Manual
Page 9
...8226; Prior to installation, do not allow screws to come in a high-temperature environment. • Turning on the power, make sure the power supply voltage has been set according to the local voltage standard. • Before using the product, please verify that all cables ... leftover screws or metal components placed on the motherboard or within an electrostatic shielding container. • Before unplugging the power supply cable from the power outlet before installing or removing the motherboard or other hardware components. • When connecting hardware components to the internal ...
...8226; Prior to installation, do not allow screws to come in a high-temperature environment. • Turning on the power, make sure the power supply voltage has been set according to the local voltage standard. • Before using the product, please verify that all cables ... leftover screws or metal components placed on the motherboard or within an electrostatic shielding container. • Before unplugging the power supply cable from the power outlet before installing or removing the motherboard or other hardware components. • When connecting hardware components to the internal ...
Manual
Page 22
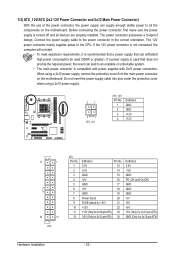
... sure the power supply is used that can withstand high power consumption be used (500W or greater). Connect the power supply cable to all devices are properly installed. The power connector possesses a foolproof design. 1/2) ATX_12V/ATX (2x2 12V Power Connector and 2x12 Main Power Connector) With the use of the power connector, the power supply can supply enough stable power to the power connector...
... sure the power supply is used that can withstand high power consumption be used (500W or greater). Connect the power supply cable to all devices are properly installed. The power connector possesses a foolproof design. 1/2) ATX_12V/ATX (2x2 12V Power Connector and 2x12 Main Power Connector) With the use of the power connector, the power supply can supply enough stable power to the power connector...
Manual
Page 29
To upgrade the BIOS, use either the GIGABYTE Q-Flash or @BIOS utility. • Q-Flash allows the user to quickly and easily ...in system's failure to boot. Its major functions include conducting the Power-On Self-Test (POST) during the POST when the power is turned on the motherboard supplies the necessary power to the CMOS to keep the configuration values in the CMOS.... may result in system malfunction. • BIOS will emit a beep code during the POST. BIOS Setup When the power is turned off, the battery on . To see more advanced BIOS Setup menu options, you need to) to activate...
To upgrade the BIOS, use either the GIGABYTE Q-Flash or @BIOS utility. • Q-Flash allows the user to quickly and easily ...in system's failure to boot. Its major functions include conducting the Power-On Self-Test (POST) during the POST when the power is turned on the motherboard supplies the necessary power to the CMOS to keep the configuration values in the CMOS.... may result in system malfunction. • BIOS will emit a beep code during the POST. BIOS Setup When the power is turned off, the battery on . To see more advanced BIOS Setup menu options, you need to) to activate...
Manual
Page 42
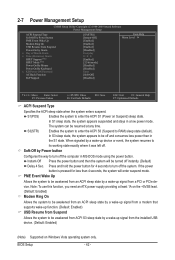
...S1 state. Soft-Off by Alarm x Day of Month Alarm x Time (hh:mm:ss) Alarm HPET Support (Note) HPET Mode (Note) Power On By Mouse Power On By Keyboard x KB Power ON Password AC Back Function EuP Support [S3(STR)] [Instant-Off] [Enabled] [Enabled] [Enabled] [Disabled] Everyday 0 : 0 : ...when the system enters suspend. Note: To use this function, you need an ATX power supply providing at any time. S1(POS) Enables the system to be turned off the system. If the power button is pressed for 4 seconds to turn off instantly. (Default) Delay 4 Sec...
...S1 state. Soft-Off by Alarm x Day of Month Alarm x Time (hh:mm:ss) Alarm HPET Support (Note) HPET Mode (Note) Power On By Mouse Power On By Keyboard x KB Power ON Password AC Back Function EuP Support [S3(STR)] [Instant-Off] [Enabled] [Enabled] [Enabled] [Disabled] Everyday 0 : 0 : ...when the system enters suspend. Note: To use this function, you need an ATX power supply providing at any time. S1(POS) Enables the system to be turned off the system. If the power button is pressed for 4 seconds to turn off instantly. (Default) Delay 4 Sec...

Manual
Page 43
select 64-bit mode when you need an ATX power supply providing at a specific time on each day or on a specific day ...password with 1~5 characters to select the HPET mode for the password, press again without entering the password to be powered on automatically. HPET Support (Note) Enables or disables High Precision Event Timer (HPET) for Windows Vista operating ... BIOS Setup Select 32-bit mode when you need an ATX power supply providing at which the system will become unavailable: PME event wake up, power on by mouse, power on by keyboard, and wake on LAN. (Note) Supported on...
select 64-bit mode when you need an ATX power supply providing at a specific time on each day or on a specific day ...password with 1~5 characters to select the HPET mode for the password, press again without entering the password to be powered on automatically. HPET Support (Note) Enables or disables High Precision Event Timer (HPET) for Windows Vista operating ... BIOS Setup Select 32-bit mode when you need an ATX power supply providing at which the system will become unavailable: PME event wake up, power on by mouse, power on by keyboard, and wake on LAN. (Note) Supported on...
Manual
Page 63
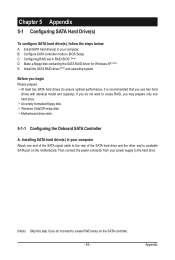
... that you do not want to create RAID array on the motherboard. B. Install the SATA RAID driver (Note) and operating system. Then connect the power connector from your power supply to available SATA port on the SATA controller. - 63 - Chapter 5 Appendix 5-1 Configuring SATA Hard Drive(s) To configure SATA hard drive(s), follow the steps...
... that you do not want to create RAID array on the motherboard. B. Install the SATA RAID driver (Note) and operating system. Then connect the power connector from your power supply to available SATA port on the SATA controller. - 63 - Chapter 5 Appendix 5-1 Configuring SATA Hard Drive(s) To configure SATA hard drive(s), follow the steps...
Manual
Page 81
...sure Service Pack 1 or Service Pack 2 has been installed (check in Chapter 1 to short the jumper to the Support&Downloads\Motherboard\FAQ page on GIGABYTE's website. When the Add New Hardware Wizard appears, click Cancel. Q: What do I still get a weak sound even though I have a CMOS_SW button...the CMOS, which will clear the CMOS values after the computer shuts down ? You can temporarily remove the battery from the battery holder to stop supplying power to show the advanced options. If yes, please disable this device. (If not, skip this jumper, refer to My Computer > Properties > ...
...sure Service Pack 1 or Service Pack 2 has been installed (check in Chapter 1 to short the jumper to the Support&Downloads\Motherboard\FAQ page on GIGABYTE's website. When the Add New Hardware Wizard appears, click Cancel. Q: What do I still get a weak sound even though I have a CMOS_SW button...the CMOS, which will clear the CMOS values after the computer shuts down ? You can temporarily remove the battery from the battery holder to stop supplying power to show the advanced options. If yes, please disable this device. (If not, skip this jumper, refer to My Computer > Properties > ...

Manual
Page 83
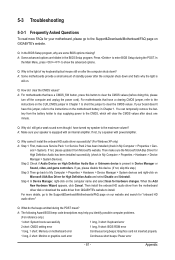
... above is unable to see if the device works successfully). Check if the keyboard is verified and solved. The problem is working properly. No The power supply, CPU or CPU socket might fail. Check if the system can boot successfully. Reinstall other devices one by one (install one device at one time...
... above is unable to see if the device works successfully). Check if the keyboard is verified and solved. The problem is working properly. No The power supply, CPU or CPU socket might fail. Check if the system can boot successfully. Reinstall other devices one by one (install one device at one time...


