Manual
Page 5
... 51 3-1 Installing Chipset Drivers 51 3-2 Application Software 52 3-3 Technical Manuals 52 3-4 Contact...53 3-5 System...53 3-6 Download Center 54 Chapter 4 Unique Features 55 4-1 Xpress Recovery2... Configuring SATA Hard Drive(s 63 5-1-1 Configuring the Onboard SATA Controller 63 5-1-2 Making a SATA RAID Driver Diskette 68 5-1-3 Installing the SATA RAID Driver and Operating System 69 5-2 Configuring Audio Input and Output 73 5-2-1 Configuring 2/4/5.1/7.1-Channel Audio 73 5-2-2 Configuring S/PDIF In/Out 76 5-2-3 Configuring Microphone Recording 78 5-2-4 Using the Sound Recorder 80...
... 51 3-1 Installing Chipset Drivers 51 3-2 Application Software 52 3-3 Technical Manuals 52 3-4 Contact...53 3-5 System...53 3-6 Download Center 54 Chapter 4 Unique Features 55 4-1 Xpress Recovery2... Configuring SATA Hard Drive(s 63 5-1-1 Configuring the Onboard SATA Controller 63 5-1-2 Making a SATA RAID Driver Diskette 68 5-1-3 Installing the SATA RAID Driver and Operating System 69 5-2 Configuring Audio Input and Output 73 5-2-1 Configuring 2/4/5.1/7.1-Channel Audio 73 5-2-2 Configuring S/PDIF In/Out 76 5-2-3 Configuring Microphone Recording 78 5-2-4 Using the Sound Recorder 80...

Manual
Page 12
... is installed, the actual memory size displayed will be less than 4 GB. (Note 2) To configure 7.1-channel audio, you have to use an HD front panel audio module and enable the multi-channel audio feature through the audio driver. (Note 3) Whether the CPU fan speed control function is supported will depend on the CPU cooler you...
... is installed, the actual memory size displayed will be less than 4 GB. (Note 2) To configure 7.1-channel audio, you have to use an HD front panel audio module and enable the multi-channel audio feature through the audio driver. (Note 3) Whether the CPU fan speed control function is supported will depend on the CPU cooler you...
Manual
Page 20
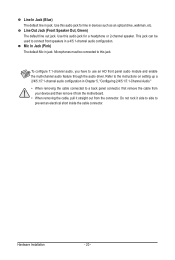
...) The default line out jack. Microphones must be used to use an HD front panel audio module and enable the multi-channel audio feature through the audio driver. To configure 7.1-channel audio, you have to connect front speakers in a 4/5.1-channel audio configuration. This jack can be connected to prevent an electrical short inside the cable connector...
...) The default line out jack. Microphones must be used to use an HD front panel audio module and enable the multi-channel audio feature through the audio driver. To configure 7.1-channel audio, you have to connect front speakers in a 4/5.1-channel audio configuration. This jack can be connected to prevent an electrical short inside the cable connector...
Manual
Page 73
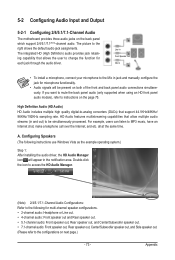
... Vista as the example operating system.) Step 1: After installing the audio driver, the HD Audio Manager icon will be simultaneously processed. HD Audio features multistreaming capabilities that support 44.1KHz/48KHz/ 96KHz/192KHz sampling rate. 5-2 Configuring Audio Input and Output 5-2-1 Configuring 2/4/5.1/7.1-Channel Audio The motherboard provides three audio jacks on next page.) - 73 - The picture to MP3...
... Vista as the example operating system.) Step 1: After installing the audio driver, the HD Audio Manager icon will be simultaneously processed. HD Audio features multistreaming capabilities that support 44.1KHz/48KHz/ 96KHz/192KHz sampling rate. 5-2 Configuring Audio Input and Output 5-2-1 Configuring 2/4/5.1/7.1-Channel Audio The motherboard provides three audio jacks on next page.) - 73 - The picture to MP3...

Manual
Page 78
... cannot be able to record the sound. If you want to change the current sound input default device to access the HD Audio Manager. Double-click the icon to microphone, right-click on the front panel. To hear the sound being recorded during the recording... is recommended that you 'll not be used at a middle level. Appendix - 78 - 5-2-3 Configuring Microphone Recording Step 1: After installing the audio driver, the HD Audio Manager icon will appear in jack (pink) on Microphone and select Set Default Device. Step 2: Connect your microphone to the Microphone screen. Step ...
... cannot be able to record the sound. If you want to change the current sound input default device to access the HD Audio Manager. Double-click the icon to microphone, right-click on the front panel. To hear the sound being recorded during the recording... is recommended that you 'll not be used at a middle level. Appendix - 78 - 5-2-3 Configuring Microphone Recording Step 1: After installing the audio driver, the HD Audio Manager icon will appear in jack (pink) on Microphone and select Set Default Device. Step 2: Connect your microphone to the Microphone screen. Step ...
Manual
Page 81
... For more FAQs for your board doesn't have a clearing CMOS jumper, refer to the instructions on our website and search for "onboard HD audio driver." Appendix A: For motherboards that have this , please turn off the computer and unplug the power cord). If your motherboard, please go to ...Some motherboards provide a small amount of my keyboard/optical mouse still on after the computer shuts down and that's why the light is still on GIGABYTE's website. If yes, please disable this device. (If not, skip this button to show the advanced options. A: The following Award BIOS beep...
... For more FAQs for your board doesn't have a clearing CMOS jumper, refer to the instructions on our website and search for "onboard HD audio driver." Appendix A: For motherboards that have this , please turn off the computer and unplug the power cord). If your motherboard, please go to ...Some motherboards provide a small amount of my keyboard/optical mouse still on after the computer shuts down and that's why the light is still on GIGABYTE's website. If yes, please disable this device. (If not, skip this button to show the advanced options. A: The following Award BIOS beep...


