Manual
Page 5
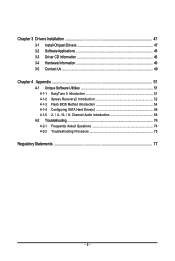
Chapter 3 Drivers Installation 47 3-1 Install Chipset Drivers 47 3-2 SoftwareApplications 48 3-3 Driver CD Information 48 3-4 Hardware Information 49 3-5 Contact Us ...49 Chapter 4 Appendix 51 4-1 Unique Software Utilities 51 4-1-1 EasyTune 5 Introduction 51 4-1-2 Xpress Recovery2 Introduction 52 4-1-3 Flash BIOS Method Introduction 54 4-1-4 Configuring SATA Hard Drive(s 58 4-1-5 2- / 4- / 6- / 8- Channel Audio Introduction 68 4-2 Troubleshooting 74 4-2-1 Frequently Asked Questions 74 4-2-2 Troubleshooting Procedure 75 Regulatory Statements 77 - 5 -
Chapter 3 Drivers Installation 47 3-1 Install Chipset Drivers 47 3-2 SoftwareApplications 48 3-3 Driver CD Information 48 3-4 Hardware Information 49 3-5 Contact Us ...49 Chapter 4 Appendix 51 4-1 Unique Software Utilities 51 4-1-1 EasyTune 5 Introduction 51 4-1-2 Xpress Recovery2 Introduction 52 4-1-3 Flash BIOS Method Introduction 54 4-1-4 Configuring SATA Hard Drive(s 58 4-1-5 2- / 4- / 6- / 8- Channel Audio Introduction 68 4-2 Troubleshooting 74 4-2-1 Frequently Asked Questions 74 4-2-2 Troubleshooting Procedure 75 Regulatory Statements 77 - 5 -

Manual
Page 6
Optional Items 2-port USB 2.0 bracket (Part No. 12CR1-1UB030-51R) 2-port SATA power cable (Part No. 12CF1-2SERPW-01R) COM port cable (Part No. 12CF1-1CM001-32R) S/PDIF In and Out Cable (Part Number: 12CR1-1SPINO-11R) 5.1/7.1 ...-01R ) - 6 - The box contents are for reference only and the actual items shall depend on product package you obtain. Box Contents GA-M61SME-S2 motherboard Motherboard driver disk User's Manual One IDE cable and one floppy disk drive cable One SATA 3Gb/s cables I/O Shield The box contents above are subject to change without notice.
Optional Items 2-port USB 2.0 bracket (Part No. 12CR1-1UB030-51R) 2-port SATA power cable (Part No. 12CF1-2SERPW-01R) COM port cable (Part No. 12CF1-1CM001-32R) S/PDIF In and Out Cable (Part Number: 12CR1-1SPINO-11R) 5.1/7.1 ...-01R ) - 6 - The box contents are for reference only and the actual items shall depend on product package you obtain. Box Contents GA-M61SME-S2 motherboard Motherboard driver disk User's Manual One IDE cable and one floppy disk drive cable One SATA 3Gb/s cables I/O Shield The box contents above are subject to change without notice.
Manual
Page 10
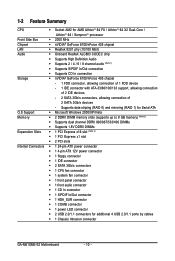
...138; 1 24-pin ATX power connector Š 1 4-pin ATX 12V power connector Š 1 floppy connector Š 1 IDE connector Š 2 SATA 3Gb/s connectors Š 1 CPU fan connector Š 1 system fan connector Š 1 front panel connector Š 1 front audio connector Š... with ATA-33/66/100/133 support, allowing connection of 2 IDE devices - 2 SATA 3Gb/s connectors, allowing connection of 2 SATA 3Gb/s devices - 1-2 Feature Summary CPU Š Socket AM2 for additional 4 USB 2.0/1.1 ports by cables Š 1 Chassis Intrusion connector GA-M61SME-S2 Motherboard - 10 -
...138; 1 24-pin ATX power connector Š 1 4-pin ATX 12V power connector Š 1 floppy connector Š 1 IDE connector Š 2 SATA 3Gb/s connectors Š 1 CPU fan connector Š 1 system fan connector Š 1 front panel connector Š 1 front audio connector Š... with ATA-33/66/100/133 support, allowing connection of 2 IDE devices - 2 SATA 3Gb/s connectors, allowing connection of 2 SATA 3Gb/s devices - 1-2 Feature Summary CPU Š Socket AM2 for additional 4 USB 2.0/1.1 ports by cables Š 1 Chassis Intrusion connector GA-M61SME-S2 Motherboard - 10 -
Manual
Page 21
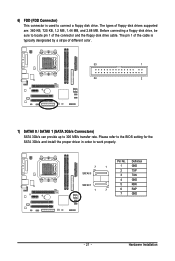
... Connector) This connector is typically designated by a stripe of different color. 33 1 34 2 7) SATAII 0 / SATAII 1 (SATA 3Gb/s Connectors) SATA 3Gb/s can provide up to connect a floppy disk drive. Please refer to the BIOS setting for the SATA 3Gb/s and install the proper driver in order to locate pin 1 of floppy disk drives supported...
... Connector) This connector is typically designated by a stripe of different color. 33 1 34 2 7) SATAII 0 / SATAII 1 (SATA 3Gb/s Connectors) SATA 3Gb/s can provide up to connect a floppy disk drive. Please refer to the BIOS setting for the SATA 3Gb/s and install the proper driver in order to locate pin 1 of floppy disk drives supported...
Manual
Page 32
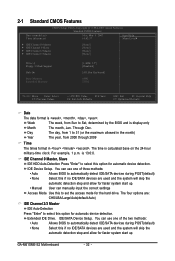
Extended IDE Drive. GA-M61SME-S2 Motherboard - 32 - IDE Channel 0 Master, Slave IDE HDD Auto-Detection Press "Enter" to automatically detect IDE/SATA devices during POST(default) • None Select this if no IDE/SATA devices are used and the system will skip the automatic detection step and allow for faster system ... Date The date format is calculated base on the 24-hour military-time clock. is display-only Month The month, Jan. IDE/SATA Device Setup. The four options are used and the system will skip the automatic detection step and allow for the hard drive. Week...
Extended IDE Drive. GA-M61SME-S2 Motherboard - 32 - IDE Channel 0 Master, Slave IDE HDD Auto-Detection Press "Enter" to automatically detect IDE/SATA devices during POST(default) • None Select this if no IDE/SATA devices are used and the system will skip the automatic detection step and allow for faster system ... Date The date format is calculated base on the 24-hour military-time clock. is display-only Month The month, Jan. IDE/SATA Device Setup. The four options are used and the system will skip the automatic detection step and allow for the hard drive. Week...

Manual
Page 36
... (C) 1984-2007 Award Software Serial-ATA RAID Config NV SATA RAID function x NV SATA 1 Primary RAID x NV SATA 1 Secondary RAID [Disabled] Enabled Enabled Item Help Menu Level` KLJI: Move Enter: Select F5: Previous Values +/-/PU/PD: Value F10: Save F6: Fail-Safe Defaults ESC: Exit F1: General Help F7: Optimized Defaults GA-M61SME-S2 Motherboard - 36 -
... (C) 1984-2007 Award Software Serial-ATA RAID Config NV SATA RAID function x NV SATA 1 Primary RAID x NV SATA 1 Secondary RAID [Disabled] Enabled Enabled Item Help Menu Level` KLJI: Move Enter: Select F5: Previous Values +/-/PU/PD: Value F10: Save F6: Fail-Safe Defaults ESC: Exit F1: General Help F7: Optimized Defaults GA-M61SME-S2 Motherboard - 36 -
Manual
Page 37
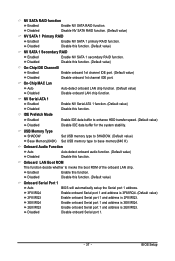
... USB memory type to invoke the boot ROM of the onboard LAN chip. Enabled Enable this function. (Default value) NV SATA 1 Secondary RAID Enabled Disabled Enable NV SATA 1 secondary RAID function. On-Chip MAC Lan Auto Auto-detect onboard LAN chip function. (Default value) Disabled Disable onboard ... 1 and address is 2F8/IRQ3. 3E8/IRQ4 2E8/IRQ3 Enable onboard Serial port 1 and address is 2E8/IRQ3. NV SATA RAID function Enabled Enable NV SATA RAID function. BIOS Setup Enable onboard Serial port 1 and address is 3E8/IRQ4. IDE Prefetch Mode Enabled Enable IDE data ...
... USB memory type to invoke the boot ROM of the onboard LAN chip. Enabled Enable this function. (Default value) NV SATA 1 Secondary RAID Enabled Disabled Enable NV SATA 1 secondary RAID function. On-Chip MAC Lan Auto Auto-detect onboard LAN chip function. (Default value) Disabled Disable onboard ... 1 and address is 2F8/IRQ3. 3E8/IRQ4 2E8/IRQ3 Enable onboard Serial port 1 and address is 2E8/IRQ3. NV SATA RAID function Enabled Enable NV SATA RAID function. BIOS Setup Enable onboard Serial port 1 and address is 3E8/IRQ4. IDE Prefetch Mode Enabled Enable IDE data ...
Manual
Page 52
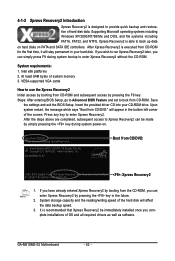
...speed. 3. Upon system restart, the message which says "Boot from the CD-ROM, you can simply press F9 during system power-on PATA and SATA IDE controllers. GA-M61SME-S2 E7 . . . . :BIOS Setup/Q-Flash :Xpress Recovery2 :Boot Menu :Qflash 01/23/2007-NV-MCP61-6A61KG05C-00 : Xpress Recovery2 1. ...Xpress Recovery2 by pressing the F9 key: Steps: After entering BIOS Setup, go to Advanced BIOS Feature and set to startup XpressRecovery2..... GA-M61SME-S2 Motherboard - 52 - VESA-supported VGA cards How to use the Xpress Recovery2 Initial access by booting from CD-ROM and subsequent ...
...speed. 3. Upon system restart, the message which says "Boot from the CD-ROM, you can simply press F9 during system power-on PATA and SATA IDE controllers. GA-M61SME-S2 E7 . . . . :BIOS Setup/Q-Flash :Xpress Recovery2 :Boot Menu :Qflash 01/23/2007-NV-MCP61-6A61KG05C-00 : Xpress Recovery2 1. ...Xpress Recovery2 by pressing the F9 key: Steps: After entering BIOS Setup, go to Advanced BIOS Feature and set to startup XpressRecovery2..... GA-M61SME-S2 Motherboard - 52 - VESA-supported VGA cards How to use the Xpress Recovery2 Initial access by booting from CD-ROM and subsequent ...

Manual
Page 53
...Recovery2 will store the backup file at the end of the data to correctly identify RAID and SATA IDE mode. USB hard disks are currently not supported. 6. Capable of Xpress Recovery2 1. SATA IDE channel 2 e. When using hard disks with more than data restoration. 3. It is .../Me. 5. PATA IDE primary channel b. Appendix Limitations: 1. Please contact your hard disk. (This button will not appear if there is recom- SATA IDE channel 4 Precautions: 1. The Main Screen of backing up and restoring only the first physical hard disk. Xpress Recovery2 is as follows: a....
...Recovery2 will store the backup file at the end of the data to correctly identify RAID and SATA IDE mode. USB hard disks are currently not supported. 6. Capable of Xpress Recovery2 1. SATA IDE channel 2 e. When using hard disks with more than data restoration. 3. It is .../Me. 5. PATA IDE primary channel b. Appendix Limitations: 1. Please contact your hard disk. (This button will not appear if there is recom- SATA IDE channel 4 Precautions: 1. The Main Screen of backing up and restoring only the first physical hard disk. Xpress Recovery2 is as follows: a....
Manual
Page 54
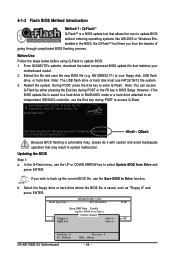
... mode or a hard drive attached to an independent IDE/SATA controller, use the End key during POST or the F8 key in system malfunction. Award Modular BIOS v6.00PG, An Energy Star Ally Copyright (C) 1984-2007, Award Software, Inc. GA-M61SME-S2 E7 . . . . :BIOS Setup/Q-Flash :Xpress ... : 0 F5 : Refresh GA-M61SME-S2 Motherboard Free size : 0 DEL : Delete - 54 - In the Q-Flash menu, use FAT32/16/12 file system. 3. Q-Flash Utility v2.02 Flash Type/Size SST 25LF040A 512K Keep DMI Data Enable Update BIOS from Drive and press ENTER. From GIGABYTE's website, download the latest...
... mode or a hard drive attached to an independent IDE/SATA controller, use the End key during POST or the F8 key in system malfunction. Award Modular BIOS v6.00PG, An Energy Star Ally Copyright (C) 1984-2007, Award Software, Inc. GA-M61SME-S2 E7 . . . . :BIOS Setup/Q-Flash :Xpress ... : 0 F5 : Refresh GA-M61SME-S2 Motherboard Free size : 0 DEL : Delete - 54 - In the Q-Flash menu, use FAT32/16/12 file system. 3. Q-Flash Utility v2.02 Flash Type/Size SST 25LF040A 512K Keep DMI Data Enable Update BIOS from Drive and press ENTER. From GIGABYTE's website, download the latest...
Manual
Page 58
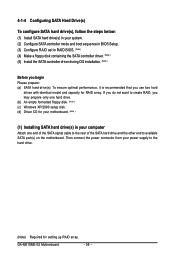
... floppy disk. (Note ) (c) Windows XP/2000 setup disk. (d) Driver CD for setting up RAID array. GA-M61SME-S2 Motherboard - 58 - 4-1-4 Configuring SATA Hard Drive(s) To configure SATA hard drive(s), follow the steps below: (1) Install SATA hard drive(s) in your system. (2) Configure SATA controller mode and boot sequence in BIOS Setup. (3) Configure RAID set in your motherboard. (Note...
... floppy disk. (Note ) (c) Windows XP/2000 setup disk. (d) Driver CD for setting up RAID array. GA-M61SME-S2 Motherboard - 58 - 4-1-4 Configuring SATA Hard Drive(s) To configure SATA hard drive(s), follow the steps below: (1) Install SATA hard drive(s) in your system. (2) Configure SATA controller mode and boot sequence in BIOS Setup. (3) Configure RAID set in your motherboard. (Note...
Manual
Page 59
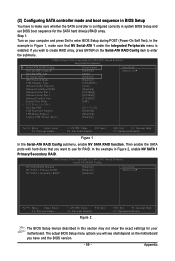
... 1 under the Integrated Peripherals menu is enabled. CMOS Setup Utility-Copyright (C) 1984-2007 Award Software Serial-ATA RAID Config NV SATA RAID function NV SATA 1 Primary RAID NV SATA 1 Secondary RAID [Enabled] [Enabled] [Enabled] Item Help Menu Level` KLJI: Move Enter: Select F5: Previous Values +/-/...Fail-Safe Defaults Figure 2 ESC: Exit F1: General Help F7: Optimized Defaults The BIOS Setup menus described in Figure 2, enable NV SATA 1 Primary/Secondary RAID. Appendix If you wish to create RAID array, press ENTER on the motherboard you want to enter BIOS Setup ...
... 1 under the Integrated Peripherals menu is enabled. CMOS Setup Utility-Copyright (C) 1984-2007 Award Software Serial-ATA RAID Config NV SATA RAID function NV SATA 1 Primary RAID NV SATA 1 Secondary RAID [Enabled] [Enabled] [Enabled] Item Help Menu Level` KLJI: Move Enter: Select F5: Previous Values +/-/...Fail-Safe Defaults Figure 2 ESC: Exit F1: General Help F7: Optimized Defaults The BIOS Setup menus described in Figure 2, enable NV SATA 1 Primary/Secondary RAID. Appendix If you wish to create RAID array, press ENTER on the motherboard you want to enter BIOS Setup ...

Manual
Page 62
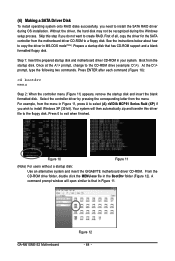
....79GB [I ] Del Capacity 111.79GB 111.79GB [ESC] Quit [F6] Back [F7] Finish [TAB] Navigate [KL] Select [ENTER] Popup Figure 7 GA-M61SME-S2 Motherboard - 62 - A message which you need to press Y to be included in the selected hard drives, press Y. (If the hard drives contain previously ...Press the TAB key to move to the Array Disks section (Figure 6). The Free Disks section displays the information about the currently installed SATA hard drives. will appear (Figure 7). Striping Block: Optimal Free Disks Port Disk Model Capacity Clear disk daAtarr?ay Disks Port Disk Model ...
....79GB [I ] Del Capacity 111.79GB 111.79GB [ESC] Quit [F6] Back [F7] Finish [TAB] Navigate [KL] Select [ENTER] Popup Figure 7 GA-M61SME-S2 Motherboard - 62 - A message which you need to press Y to be included in the selected hard drives, press Y. (If the hard drives contain previously ...Press the TAB key to move to the Array Disks section (Figure 6). The Free Disks section displays the information about the currently installed SATA hard drives. will appear (Figure 7). Striping Block: Optimal Free Disks Port Disk Model Capacity Clear disk daAtarr?ay Disks Port Disk Model ...

Manual
Page 63
...?" This indicates that , the Array List screen displaying the RAID array you should see detailed information about the RAID array, press ENTER to install the SATA controller driver and operating system. - 63 - Array Detail - Now, you can proceed to enter the Array Detail screen (Figure 9), where you created will appear (Figure...
...?" This indicates that , the Array List screen displaying the RAID array you should see detailed information about the RAID array, press ENTER to install the SATA controller driver and operating system. - 63 - Array Detail - Now, you can proceed to enter the Array Detail screen (Figure 9), where you created will appear (Figure...
Manual
Page 64
... menu Step 2: When the controller menu (Figure 11) appears, remove the startup disk and insert the blank formatted disk. (4) Making a SATA Driver Disk To install operating system onto RAID disks successfully, you do not want to create RAID. Prepare a startup disk that in the ...) For users without a startup disk: Use an alternative system and insert the GIGABYTE motherboard driver CD-ROM. Step 1: Insert the prepared startup disk and motherboard driver CD-ROM in your system. GA-M61SME-S2 Motherboard Figure 12 - 64 - Select the controller driver by pressing the corresponding letter...
... menu Step 2: When the controller menu (Figure 11) appears, remove the startup disk and insert the blank formatted disk. (4) Making a SATA Driver Disk To install operating system onto RAID disks successfully, you do not want to create RAID. Prepare a startup disk that in the ...) For users without a startup disk: Use an alternative system and insert the GIGABYTE motherboard driver CD-ROM. Step 1: Insert the prepared startup disk and motherboard driver CD-ROM in your system. GA-M61SME-S2 Motherboard Figure 12 - 64 - Select the controller driver by pressing the corresponding letter...
Manual
Page 65
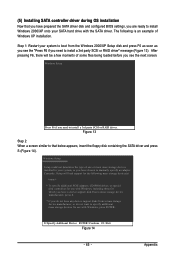
... install a 3rd party SCSI or RAID driver. Windows Setup Setup could not determine the type of one or more mass storage devices installed in your SATA hard drive with Windows, including those for which you have a device support disk from a mass storage device manufacturer, press S. * If you have any ...XP onto your system, or you do not want to specify additional mass storage devices for use with the SATA driver. Figure 13 Step 2: When a screen similar to that you have prepared the SATA driver disk and configured BIOS settings, you see the "Press F6 if you need to install a 3rd...
... install a 3rd party SCSI or RAID driver. Windows Setup Setup could not determine the type of one or more mass storage devices installed in your SATA hard drive with Windows, including those for which you have a device support disk from a mass storage device manufacturer, press S. * If you have any ...XP onto your system, or you do not want to specify additional mass storage devices for use with the SATA driver. Figure 13 Step 2: When a screen similar to that you have prepared the SATA driver disk and configured BIOS settings, you see the "Press F6 if you need to install a 3rd...
Manual
Page 66
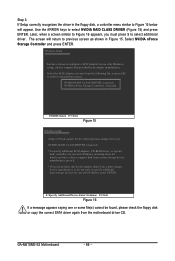
... ENTER. Step 3: If Setup correctly recognizes the driver in Figure 15. Select the SCSI Adapter you do not want from the motherboard driver CD. GA-M61SME-S2 Motherboard - 66 - Later, when a screen similar to Figure 16 appears, you have a device support disk from a mass storage device manufacturer, ...Exit Figure 16 If a message appears saying one or some file(s) cannot be found, please check the floppy disk or copy the correct SATA driver again from the following mass storage device(s): NVIDIA RAID CLASS DRIVER (required) * To specify additional SCSI adapters, CD-ROM drives, or...
... ENTER. Step 3: If Setup correctly recognizes the driver in Figure 15. Select the SCSI Adapter you do not want from the motherboard driver CD. GA-M61SME-S2 Motherboard - 66 - Later, when a screen similar to Figure 16 appears, you have a device support disk from a mass storage device manufacturer, ...Exit Figure 16 If a message appears saying one or some file(s) cannot be found, please check the floppy disk or copy the correct SATA driver again from the following mass storage device(s): NVIDIA RAID CLASS DRIVER (required) * To specify additional SCSI adapters, CD-ROM drives, or...
Manual
Page 67
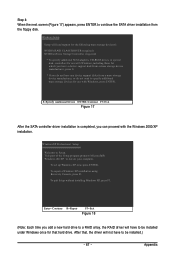
...F3. Appendix To repair a Windows XP installation using Recovery Console, press R. S=Specify Additional Device ENTER=Continue F3=Exit Figure 17 After the SATA controller driver installation is completed, you do not have to Setup. This port of the Setup program prepares Microsoft(R) Windows (R) XP to be...for that , the driver will not have any device support disks from a mass storage device manufacturer, or do not want to continue the SATA driver installation from a mass storage device manufacturer, press S. * If you can proceed with the Windows 2000/XP installation. Step 4: When ...
...F3. Appendix To repair a Windows XP installation using Recovery Console, press R. S=Specify Additional Device ENTER=Continue F3=Exit Figure 17 After the SATA controller driver installation is completed, you do not have to Setup. This port of the Setup program prepares Microsoft(R) Windows (R) XP to be...for that , the driver will not have any device support disks from a mass storage device manufacturer, or do not want to continue the SATA driver installation from a mass storage device manufacturer, press S. * If you can proceed with the Windows 2000/XP installation. Step 4: When ...

Manual
Page 76
Select "Load Fail-Safe Defaults" (or "Load Optimized Defaults"). No The IDE/SATA device, connector, or cable might fail. GA-M61SME-S2 Motherboard - 76 - Yes Check if there is unable to solve your monitor. Plugg in the keyboard and mouse and restart the computer. The problem is ...
Select "Load Fail-Safe Defaults" (or "Load Optimized Defaults"). No The IDE/SATA device, connector, or cable might fail. GA-M61SME-S2 Motherboard - 76 - Yes Check if there is unable to solve your monitor. Plugg in the keyboard and mouse and restart the computer. The problem is ...


