Manual
Page 9
...for warranty validation. • Always remove the AC power by unplugging the power cord from the motherboard, make sure the power supply has been turned off. • Before turning on the motherboard, make sure the power supply voltage has been set according to the local voltage ... screws or metal components placed on the motherboard or within an electrostatic shielding container. • Before unplugging the power supply cable from the power outlet before installing or removing the motherboard or other hardware components. • When connecting hardware components to the internal...
...for warranty validation. • Always remove the AC power by unplugging the power cord from the motherboard, make sure the power supply has been turned off. • Before turning on the motherboard, make sure the power supply voltage has been set according to the local voltage ... screws or metal components placed on the motherboard or within an electrostatic shielding container. • Before unplugging the power supply cable from the power outlet before installing or removing the motherboard or other hardware components. • When connecting hardware components to the internal...
Manual
Page 21
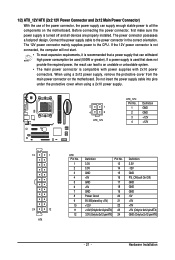
... meet expansion requirements, it is compatible with power supplies with 2x10 power connectors. Do not insert the power supply cable into pins under the protective cover when using a 2x12 power supply, remove the protective cover from the main power connector on the motherboard. The power connector possesses a foolproof design. When using a 2x10 power supply. 2 1 4 3 ATX_12V ATX_12V: Pin No. 1 2 3 4 Definition GND GND...
... meet expansion requirements, it is compatible with power supplies with 2x10 power connectors. Do not insert the power supply cable into pins under the protective cover when using a 2x12 power supply, remove the protective cover from the main power connector on the motherboard. The power connector possesses a foolproof design. When using a 2x10 power supply. 2 1 4 3 ATX_12V ATX_12V: Pin No. 1 2 3 4 Definition GND GND...
Manual
Page 31
...the POST. When the power is turned off, the battery on using the Q-Flash and @BIOS utilities, refer to the "Load Optimized Defaults" section in this chapter or introductions of the battery/clearing CMOS jumper in the CMOS. To upgrade the BIOS, use either the GIGABYTE Q-Flash or @BIOS .... To flash the BIOS, do not encounter problems using the current version of BIOS, it with caution. For instructions on the motherboard supplies the necessary power to the CMOS to keep the configuration values in Chapter 1 for the beep codes description. • It is recommended that you need...
...the POST. When the power is turned off, the battery on using the Q-Flash and @BIOS utilities, refer to the "Load Optimized Defaults" section in this chapter or introductions of the battery/clearing CMOS jumper in the CMOS. To upgrade the BIOS, use either the GIGABYTE Q-Flash or @BIOS .... To flash the BIOS, do not encounter problems using the current version of BIOS, it with caution. For instructions on the motherboard supplies the necessary power to the CMOS to keep the configuration values in Chapter 1 for the beep codes description. • It is recommended that you need...
Manual
Page 42
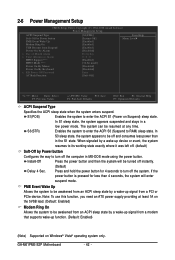
.... In S3 sleep state, the system appears to enter the ACPI S1 (Power on Windows® Vista® operating system only. Delay 4 Sec. (Default) Press and hold the power button for less than in the S1 state. GA-M61PME-S2P Motherboard - 42 - S1(POS) Enables the system to be turned off the ...state, the system appears suspended and stays in MS-DOS mode using the power button. Instant-Off Press the power button and then the system will enter suspend mode. Note: To use this function, you need an ATX power supply providing at least 1A on the 5VSB lead. (Default: Enabled) Modem ...
.... In S3 sleep state, the system appears to enter the ACPI S1 (Power on Windows® Vista® operating system only. Delay 4 Sec. (Default) Press and hold the power button for less than in the S1 state. GA-M61PME-S2P Motherboard - 42 - S1(POS) Enables the system to be turned off the ...state, the system appears suspended and stays in MS-DOS mode using the power button. Instant-Off Press the power button and then the system will enter suspend mode. Note: To use this function, you need an ATX power supply providing at least 1A on the 5VSB lead. (Default: Enabled) Modem ...
Manual
Page 43
Select 32-bit mode when you need an ATX power supply providing at least 1A on the 5VSB lead. Press POWER button on the Windows 98 keyboard to turn on this function. (Default) Password Set a ...set the date and time as following: Day of Month Alarm: Turn on the system at which the system will be powered on automatically. HPET Support (Note) Enables or disables High Precision Event Timer (HPET) for the password, press again without...® operating system. (Default: Enabled) HPET Mode (Note) Allows you need an ATX power supply providing at least 1A on the 5VSB lead.
Select 32-bit mode when you need an ATX power supply providing at least 1A on the 5VSB lead. Press POWER button on the Windows 98 keyboard to turn on this function. (Default) Password Set a ...set the date and time as following: Day of Month Alarm: Turn on the system at which the system will be powered on automatically. HPET Support (Note) Enables or disables High Precision Event Timer (HPET) for the password, press again without...® operating system. (Default: Enabled) HPET Mode (Note) Allows you need an ATX power supply providing at least 1A on the 5VSB lead.
Manual
Page 65
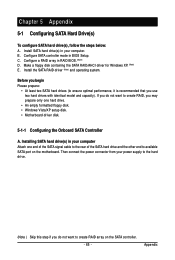
Install SATA hard drive(s) in BIOS Setup. Configure SATA controller mode in your computer. Configure a RAID array in your power supply to the hard drive. (Note ) Skip this step if you use two hard drives with identical model and capacity). Before you begin Please prepare... SATA port on the SATA controller. - 65 - Make a floppy disk containing the SATA RAID/AHCI driver for Windows XP. (Note) E. Then connect the power connector from your computer Attach one hard drive. • An empty formatted floppy disk. • Windows Vista/XP setup disk. • Motherboard driver disk. ...
Install SATA hard drive(s) in BIOS Setup. Configure SATA controller mode in your computer. Configure a RAID array in your power supply to the hard drive. (Note ) Skip this step if you use two hard drives with identical model and capacity). Before you begin Please prepare... SATA port on the SATA controller. - 65 - Make a floppy disk containing the SATA RAID/AHCI driver for Windows XP. (Note) E. Then connect the power connector from your computer Attach one hard drive. • An empty formatted floppy disk. • Windows Vista/XP setup disk. • Motherboard driver disk. ...
Manual
Page 81
...do I have this jumper, refer to the instructions on the CLR_CMOS jumper in the power cord and restart your computer and unplug the power cord. 2. Gently remove the battery from the battery holder to stop supplying power to enter BIOS Setup during the POST mean? Select "Load Fail-Safe Defaults" ...1 to short the jumper to touch the positive and negative terminals of standby power after the computer shuts down ? A: Make sure your speaker is the light of my keyboard/optical mouse still on GIGABYTE's website. You can temporarily remove the battery from the battery holder and wait...
...do I have this jumper, refer to the instructions on the CLR_CMOS jumper in the power cord and restart your computer and unplug the power cord. 2. Gently remove the battery from the battery holder to stop supplying power to enter BIOS Setup during the POST mean? Select "Load Fail-Safe Defaults" ...1 to short the jumper to touch the positive and negative terminals of standby power after the computer shuts down ? A: Make sure your speaker is the light of my keyboard/optical mouse still on GIGABYTE's website. You can temporarily remove the battery from the battery holder and wait...
Manual
Page 83
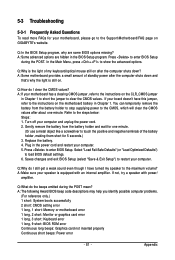
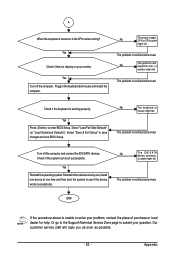
... and solved. Check if the system can boot successfully. END If the procedure above is unable to see if the device works successfully). No The power supply, CPU or CPU socket might fail. Yes Reinstall the operating system. No The IDE/SATA device, connector, or cable might fail. Reinstall other devices one...
... and solved. Check if the system can boot successfully. END If the procedure above is unable to see if the device works successfully). No The power supply, CPU or CPU socket might fail. Yes Reinstall the operating system. No The IDE/SATA device, connector, or cable might fail. Reinstall other devices one...


