
Manual
Page 37
...with caution and avoid inadequate operation that describes the appropriate keys to activate certain system features. CONTROL KEYS Move to a new BIOS, either Gigabyte's Q-Flash or @BIOS utility can enter the BIOS setup screen by pressing "Ctrl + F1". You can be used. To exit ... Load CMOS from BIOS default table Load the Optimized Defaults Dual BIOS / Q-Flash utility System Information Save all the CMOS changes, only for GA-M59SLI-S5. - 37 - English Chapter 2 BIOS Setup BIOS (Basic Input and Output System) includes a CMOS SETUP utility which allows user to...
...with caution and avoid inadequate operation that describes the appropriate keys to activate certain system features. CONTROL KEYS Move to a new BIOS, either Gigabyte's Q-Flash or @BIOS utility can enter the BIOS setup screen by pressing "Ctrl + F1". You can be used. To exit ... Load CMOS from BIOS default table Load the Optimized Defaults Dual BIOS / Q-Flash utility System Information Save all the CMOS changes, only for GA-M59SLI-S5. - 37 - English Chapter 2 BIOS Setup BIOS (Basic Input and Output System) includes a CMOS SETUP utility which allows user to...
Manual
Page 40
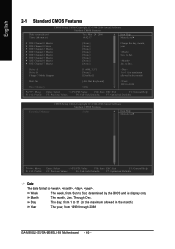
to Dec. Week The week, from 1999 through 2098 GA-M59SLI-S5/GA-M59SLI-S4 Motherboard - 40 - to Sat. Day The day, from 1 to ...Select +/-/PU/PD: Value F10: Save ESC: Exit F1: General Help F11/12: Profile F5: Previous Values F6: Fail-Safe Defaults F7: Optimized Defaults Extended Memory CMOS Setup Utility-Copyright (C) 1984-2006 Award Software Standard CMOS...Select +/-/PU/PD: Value F10: Save ESC: Exit F1: General Help F11/12: Profile F5: Previous Values F6: Fail-Safe Defaults F7: Optimized Defaults Date The date format is display only Month The month, Jan. Through ...
to Dec. Week The week, from 1999 through 2098 GA-M59SLI-S5/GA-M59SLI-S4 Motherboard - 40 - to Sat. Day The day, from 1 to ...Select +/-/PU/PD: Value F10: Save ESC: Exit F1: General Help F11/12: Profile F5: Previous Values F6: Fail-Safe Defaults F7: Optimized Defaults Extended Memory CMOS Setup Utility-Copyright (C) 1984-2006 Award Software Standard CMOS...Select +/-/PU/PD: Value F10: Save ESC: Exit F1: General Help F11/12: Profile F5: Previous Values F6: Fail-Safe Defaults F7: Optimized Defaults Date The date format is display only Month The month, Jan. Through ...
Manual
Page 43
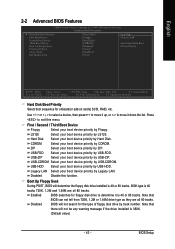
... Select Hard Disk Boot Device Priority : Move Enter: Select +/-/PU/PD: Value F10: Save ESC: Exit F1: General Help F11/12: Profile F5: Previous Values F6: Fail-Safe Defaults F7: Optimized Defaults Hard Disk Boot Priority Select boot sequence for the type of floppy disk drive by track number.
... Select Hard Disk Boot Device Priority : Move Enter: Select +/-/PU/PD: Value F10: Save ESC: Exit F1: General Help F11/12: Profile F5: Previous Values F6: Fail-Safe Defaults F7: Optimized Defaults Hard Disk Boot Priority Select boot sequence for the type of floppy disk drive by track number.
Manual
Page 45
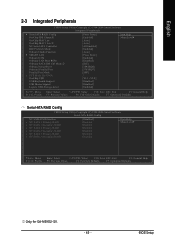
...] [Disabled] [Enabled] Item Help Menu Level : Move Enter: Select +/-/PU/PD: Value F10: Save ESC: Exit F1: General Help F11/12: Profile F5: Previous Values F6: Fail-Safe Defaults F7: Optimized Defaults Serial-ATA RAID Config CMOS Setup Utility-Copyright (C) 1984-2006 Award Software Serial-ATA RAID Config NV SATA RAID... Disabled Disabled Item Help Menu Level : Move Enter: Select +/-/PU/PD: Value F10: Save ESC: Exit F1: General Help F11/12: Profile F5: Previous Values F6: Fail-Safe Defaults F7: Optimized Defaults Only for GA-M59SLI-S5. - 45 -
...] [Disabled] [Enabled] Item Help Menu Level : Move Enter: Select +/-/PU/PD: Value F10: Save ESC: Exit F1: General Help F11/12: Profile F5: Previous Values F6: Fail-Safe Defaults F7: Optimized Defaults Serial-ATA RAID Config CMOS Setup Utility-Copyright (C) 1984-2006 Award Software Serial-ATA RAID Config NV SATA RAID... Disabled Disabled Item Help Menu Level : Move Enter: Select +/-/PU/PD: Value F10: Save ESC: Exit F1: General Help F11/12: Profile F5: Previous Values F6: Fail-Safe Defaults F7: Optimized Defaults Only for GA-M59SLI-S5. - 45 -
Manual
Page 47
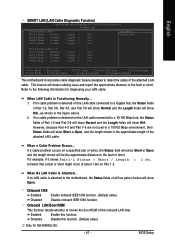
Refer to the following information for GA-M59SLI-S5. - 47 - BIOS Setup Pair1-2 Status = Normal / Length = N/A Pair3-6 Status = Normal / Length = N/A Pair4-5 Status = Normal / Length = N/A Pair7-8 Status = Normal / Length = N/A Item Help... = N/A Pair7-8 Status = Normal / Length = N/A : Move Enter: Select +/-/PU/PD: Value F10: Save ESC: Exit F1: General Help F11/12: Profile F5: Previous Values F6: Fail-Safe Defaults F7: Optimized Defaults This motherboard incorporates cable diagnostic feature designed to detect the status of the attached LAN cable. This feature will...
Refer to the following information for GA-M59SLI-S5. - 47 - BIOS Setup Pair1-2 Status = Normal / Length = N/A Pair3-6 Status = Normal / Length = N/A Pair4-5 Status = Normal / Length = N/A Pair7-8 Status = Normal / Length = N/A Item Help... = N/A Pair7-8 Status = Normal / Length = N/A : Move Enter: Select +/-/PU/PD: Value F10: Save ESC: Exit F1: General Help F11/12: Profile F5: Previous Values F6: Fail-Safe Defaults F7: Optimized Defaults This motherboard incorporates cable diagnostic feature designed to detect the status of the attached LAN cable. This feature will...
Manual
Page 49
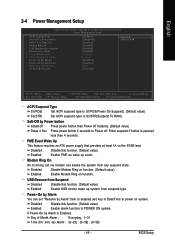
... [Soft-Off] Item Help Menu Level : Move Enter: Select +/-/PU/PD: Value F10: Save ESC: Exit F1: General Help F11/12: Profile F5: Previous Values F6: Fail-Safe Defaults F7: Optimized Defaults ACPI Suspend Type S1(POS) Set ACPI suspend type to S1/POS(Power On Suspend). (Default value) S3(STR...
... [Soft-Off] Item Help Menu Level : Move Enter: Select +/-/PU/PD: Value F10: Save ESC: Exit F1: General Help F11/12: Profile F5: Previous Values F6: Fail-Safe Defaults F7: Optimized Defaults ACPI Suspend Type S1(POS) Set ACPI suspend type to S1/POS(Power On Suspend). (Default value) S3(STR...
Manual
Page 51
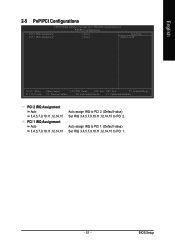
... [Auto] [Auto] Item Help Menu Level : Move Enter: Select +/-/PU/PD: Value F10: Save ESC: Exit F1: General Help F11/12: Profile F5: Previous Values F6: Fail-Safe Defaults F7: Optimized Defaults PCI 2 IRQ Assignment Auto 3,4,5,7,9,10,11,12,14,15 PCI 1 IRQ Assignment Auto 3,4,5,7,9,10,11,12,14,15 Auto...
... [Auto] [Auto] Item Help Menu Level : Move Enter: Select +/-/PU/PD: Value F10: Save ESC: Exit F1: General Help F11/12: Profile F5: Previous Values F6: Fail-Safe Defaults F7: Optimized Defaults PCI 2 IRQ Assignment Auto 3,4,5,7,9,10,11,12,14,15 PCI 1 IRQ Assignment Auto 3,4,5,7,9,10,11,12,14,15 Auto...

Manual
Page 52
.... (Default value) CPU FAN Fail Warning Disabled Enabled Disable CPU fan fail warning function. (Default value) Enable CPU fan fail warning function. GA-M59SLI-S5/GA-M59SLI-S4 Motherboard - 52 - If the case have been opened, "Case Opened" will restart. If you want to reset "Case Opened" value, set...Help Menu Level : Move Enter: Select +/-/PU/PD: Value F10: Save ESC: Exit F1: General Help F11/12: Profile F5: Previous Values F6: Fail-Safe Defaults F7: Optimized Defaults Reset Case Open Status Disabled Enabled Don't reset case open status. (Default value) Clear case open status at...
.... (Default value) CPU FAN Fail Warning Disabled Enabled Disable CPU fan fail warning function. (Default value) Enable CPU fan fail warning function. GA-M59SLI-S5/GA-M59SLI-S4 Motherboard - 52 - If the case have been opened, "Case Opened" will restart. If you want to reset "Case Opened" value, set...Help Menu Level : Move Enter: Select +/-/PU/PD: Value F10: Save ESC: Exit F1: General Help F11/12: Profile F5: Previous Values F6: Fail-Safe Defaults F7: Optimized Defaults Reset Case Open Status Disabled Enabled Don't reset case open status. (Default value) Clear case open status at...
Manual
Page 53
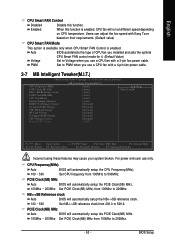
...] 1.350V Item Help Menu Level Move F11/12: Profile Enter: Select +/-/PU/PD: Value F10: Save ESC: Exit F1: General Help F5: Previous Values F6: Fail-Safe Defaults F7: Optimized Defaults Incorrect using these features may cause your system broken. CPU Frequency(MHz) Auto BIOS will run at different speed...
...] 1.350V Item Help Menu Level Move F11/12: Profile Enter: Select +/-/PU/PD: Value F10: Save ESC: Exit F1: General Help F5: Previous Values F6: Fail-Safe Defaults F7: Optimized Defaults Incorrect using these features may cause your system broken. CPU Frequency(MHz) Auto BIOS will run at different speed...
Manual
Page 80
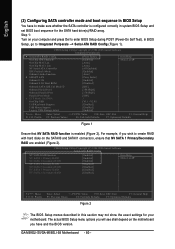
...Help Menu Level : Move Enter: Select +/-/PU/PD: Value F10: Save ESC: Exit F1: General Help F11/12: Profile F5: Previous Values F6: Fail-Safe Defaults F7: Optimized Defaults Figure 1 Ensure that NV SATA 1 Primary/Secondary RAID are enabled (Figure 2). The actual BIOS Setup menu ...Help F5: Previous Values F6: Fail-Safe Defaults F7: Optimized Defaults Figure 2 The BIOS Setup menus described in system BIOS Setup and set BIOS boot sequence for your computer and press Del to make sure whether the SATA controller is enabled (Figure 2). GA-M59SLI-S5/GA-M59SLI-S4 Motherboard - 80 -...
...Help Menu Level : Move Enter: Select +/-/PU/PD: Value F10: Save ESC: Exit F1: General Help F11/12: Profile F5: Previous Values F6: Fail-Safe Defaults F7: Optimized Defaults Figure 1 Ensure that NV SATA 1 Primary/Secondary RAID are enabled (Figure 2). The actual BIOS Setup menu ...Help F5: Previous Values F6: Fail-Safe Defaults F7: Optimized Defaults Figure 2 The BIOS Setup menus described in system BIOS Setup and set BIOS boot sequence for your computer and press Del to make sure whether the SATA controller is enabled (Figure 2). GA-M59SLI-S5/GA-M59SLI-S4 Motherboard - 80 -...
Manual
Page 81
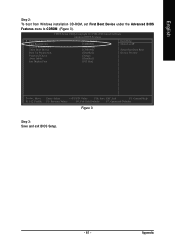
... Select Hard Disk Boot Device Priority : Move F11/12: Profile Enter: Select +/-/PU/PD: Value F10: Save ESC: Exit F1: General Help F5: Previous Values F6: Fail-Safe Defaults F7: Optimized Defaults Figure 3 Step 3: Save and exit BIOS Setup. - 81 -
... Select Hard Disk Boot Device Priority : Move F11/12: Profile Enter: Select +/-/PU/PD: Value F10: Save ESC: Exit F1: General Help F5: Previous Values F6: Fail-Safe Defaults F7: Optimized Defaults Figure 3 Step 3: Save and exit BIOS Setup. - 81 -

Manual
Page 82
... Loc Disk Model 1.0.M ST3120026AS 2.1.M ST3120026AS Capacity 111.78GB 111.78GB Array Disks Loc Disk Model [ ] Add Capacity [ ] Del [ESC] Quit [F6] Back [F7] Finish [TAB] Navigate [ ] Select [ENTER] Popup Figure 5 GA-M59SLI-S5/GA-M59SLI-S4 Motherboard - 82 - Skip this step and proceed to create RAID. In the Striping Block field, use the UP or DOWN...
... Loc Disk Model 1.0.M ST3120026AS 2.1.M ST3120026AS Capacity 111.78GB 111.78GB Array Disks Loc Disk Model [ ] Add Capacity [ ] Del [ESC] Quit [F6] Back [F7] Finish [TAB] Navigate [ ] Select [ENTER] Popup Figure 5 GA-M59SLI-S5/GA-M59SLI-S4 Motherboard - 82 - Skip this step and proceed to create RAID. In the Striping Block field, use the UP or DOWN...

Manual
Page 83
...Free Disks Loc Disk Model Capacity Array Disks Loc Disk Model [ ] Add 1.0.M ST3120026AS 2.1.M ST3120026AS Capacity 111.78GB 111.78GB [ ] Del [ESC] Quit [F6] Back [F7] Finish [TAB] Navigate [ ] Select [ENTER] Popup Figure 6 Step 6: Press F7 after selecting the target hard disks. A message which ...ay Disks Loc Disk Model [Y[C] Yle]EaArSdddisk[Nd]a12tNa..01O?..MM ST3120026AS ST3120026AS [Y] YES [N] NO [ ] Del Capacity 111.78GB 111.78GB [ESC] Quit [F6] Back [F7] Finish [TAB] Navigate [ ] Select [ENTER] Popup Figure 7 - 83 - English Step 5: Next, select the hard drives which says...
...Free Disks Loc Disk Model Capacity Array Disks Loc Disk Model [ ] Add 1.0.M ST3120026AS 2.1.M ST3120026AS Capacity 111.78GB 111.78GB [ ] Del [ESC] Quit [F6] Back [F7] Finish [TAB] Navigate [ ] Select [ENTER] Popup Figure 6 Step 6: Press F7 after selecting the target hard disks. A message which ...ay Disks Loc Disk Model [Y[C] Yle]EaArSdddisk[Nd]a12tNa..01O?..MM ST3120026AS ST3120026AS [Y] YES [N] NO [ ] Del Capacity 111.78GB 111.78GB [ESC] Quit [F6] Back [F7] Finish [TAB] Navigate [ ] Select [ENTER] Popup Figure 7 - 83 - English Step 5: Next, select the hard drives which says...
Manual
Page 86
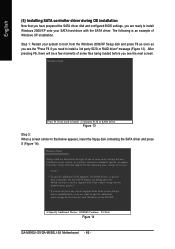
... Windows 2000/XP Setup disk and press F6 as soon as you are ready to install a 3rd party SCSI or RAID driver" message (Figure 13). Currently, Setup will be a few moments of Windows XP installation. S=Specify Additional Device ENTER=Continue F3=Exit Figure 14 GA-M59SLI-S5/GA-M59SLI-S4 Motherboard - 86 - Figure 13 Step ... storage device manufacturer, press S. * If you do not want to that you have chosen to install a 3rd party SCSI or RAID driver. After pressing F6, there will load support for the following is an example of some files being loaded before you see the "Press...
... Windows 2000/XP Setup disk and press F6 as soon as you are ready to install a 3rd party SCSI or RAID driver" message (Figure 13). Currently, Setup will be a few moments of Windows XP installation. S=Specify Additional Device ENTER=Continue F3=Exit Figure 14 GA-M59SLI-S5/GA-M59SLI-S4 Motherboard - 86 - Figure 13 Step ... storage device manufacturer, press S. * If you do not want to that you have chosen to install a 3rd party SCSI or RAID driver. After pressing F6, there will load support for the following is an example of some files being loaded before you see the "Press...
Manual
Page 89
...] [Disabled] [Enabled] Item Help Menu Level : Move F11/12: Profile Enter: Select +/-/PU/PD: Value F10: Save ESC: Exit F1: General Help F5: Previous Values F6: Fail-Safe Defaults F7: Optimized Defaults Figure 19 CMOS Setup Utility-Copyright (C) 1984-2006 Award Software Serial-ATA RAID Config NV SATA RAID function NV...] [Disabled] [Disabled] Item Help Menu Level : Move F11/12: Profile Enter: Select +/-/PU/PD: Value F10: Save ESC: Exit F1: General Help F5: Previous Values F6: Fail-Safe Defaults F7: Optimized Defaults Figure 20 - 89 -
...] [Disabled] [Enabled] Item Help Menu Level : Move F11/12: Profile Enter: Select +/-/PU/PD: Value F10: Save ESC: Exit F1: General Help F5: Previous Values F6: Fail-Safe Defaults F7: Optimized Defaults Figure 19 CMOS Setup Utility-Copyright (C) 1984-2006 Award Software Serial-ATA RAID Config NV SATA RAID function NV...] [Disabled] [Disabled] Item Help Menu Level : Move F11/12: Profile Enter: Select +/-/PU/PD: Value F10: Save ESC: Exit F1: General Help F5: Previous Values F6: Fail-Safe Defaults F7: Optimized Defaults Figure 20 - 89 -

Manual
Page 90
...: Optimal Free Disks Loc Disk Model Capacity Array Disks Loc Disk Model [ ] Add 2.0.M ST3120026AS 2.1.M ST3120026AS Capacity 111.78G 111.78G [ ] Del [ESC] Quit [F6] Back [F7] Finish [TAB] Navigate [ ] Select [ENTER] Popup Figure 21 Step 4: After all the settings, press F7 to complete the configuration. Striping Block: ... Clear disk daAtarr?ay Disks Loc Disk Model [Y[] Y]EASdd [N] 11N..01O..MM ST3120026AS ST3120026AS Capacity 111.79G 111.79G [ ] Del [ESC] Quit [F6] Back [F7] Finish [TAB] Navigate [ ] Select [ENTER] Popup Figure 22 GA-M59SLI-S5/GA-M59SLI-S4 Motherboard - 90 -
...: Optimal Free Disks Loc Disk Model Capacity Array Disks Loc Disk Model [ ] Add 2.0.M ST3120026AS 2.1.M ST3120026AS Capacity 111.78G 111.78G [ ] Del [ESC] Quit [F6] Back [F7] Finish [TAB] Navigate [ ] Select [ENTER] Popup Figure 21 Step 4: After all the settings, press F7 to complete the configuration. Striping Block: ... Clear disk daAtarr?ay Disks Loc Disk Model [Y[] Y]EASdd [N] 11N..01O..MM ST3120026AS ST3120026AS Capacity 111.79G 111.79G [ ] Del [ESC] Quit [F6] Back [F7] Finish [TAB] Navigate [ ] Select [ENTER] Popup Figure 22 GA-M59SLI-S5/GA-M59SLI-S4 Motherboard - 90 -

Manual
Page 92
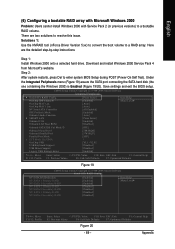
...Only for your motherboard, you have to RAID before configuring RAID. Then connect the power connector from your need (Figure 1). GA-M59SLI-S5/GA-M59SLI-S4 Motherboard - 92 - CMOS Setup Utility-Copyright (C) 1984-2006 Award Software Integrated Peripherals Serial-ATA RAID Config On-Chip IDE Channel0...Exit F1: General Help F11/12: Profile F5: Previous Values F6: Fail-Safe Defaults F7: Optimized Defaults Figure 1 The BIOS Setup menus described in BIOS Setup You have and the BIOS version. GIGABYTE SATA2 Controller (1) Installing SATA hard drive(s) in your computer Attach ...
...Only for your motherboard, you have to RAID before configuring RAID. Then connect the power connector from your need (Figure 1). GA-M59SLI-S5/GA-M59SLI-S4 Motherboard - 92 - CMOS Setup Utility-Copyright (C) 1984-2006 Award Software Integrated Peripherals Serial-ATA RAID Config On-Chip IDE Channel0...Exit F1: General Help F11/12: Profile F5: Previous Values F6: Fail-Safe Defaults F7: Optimized Defaults Figure 1 The BIOS Setup menus described in BIOS Setup You have and the BIOS version. GIGABYTE SATA2 Controller (1) Installing SATA hard drive(s) in your computer Attach ...
Manual
Page 93
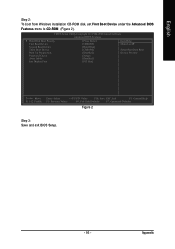
... Select Hard Disk Boot Device Priority : Move F11/12: Profile Enter: Select +/-/PU/PD: Value F10: Save ESC: Exit F1: General Help F5: Previous Values F6: Fail-Safe Defaults F7: Optimized Defaults Figure 2 Step 3: Save and exit BIOS Setup. - 93 - English Step 2: To boot from Windows installation CD-ROM disk, set...
... Select Hard Disk Boot Device Priority : Move F11/12: Profile Enter: Select +/-/PU/PD: Value F10: Save ESC: Exit F1: General Help F5: Previous Values F6: Fail-Safe Defaults F7: Optimized Defaults Figure 2 Step 3: Save and exit BIOS Setup. - 93 - English Step 2: To boot from Windows installation CD-ROM disk, set...

Manual
Page 101
...screen. Figure 18 Step 2: When a screen similar to install Windows 2000/XP onto your SATA hard drive with the SATA driver. Appendix Windows Setup Press F6 if you need to boot from a mass storage device manufacturer, or do not have a device support disk from a mass storage device manufacturer, press ...specify an adapter. Currently, Setup will be a few moments of Windows XP installation. Step 1: Restart your system, or you see the "Press F6 if you are ready to that you have chosen to install a 3rd party SCSI or RAID driver. S=Specify Additional Device ENTER=Continue F3=Exit ...
...screen. Figure 18 Step 2: When a screen similar to install Windows 2000/XP onto your SATA hard drive with the SATA driver. Appendix Windows Setup Press F6 if you need to boot from a mass storage device manufacturer, or do not have a device support disk from a mass storage device manufacturer, press ...specify an adapter. Currently, Setup will be a few moments of Windows XP installation. Step 1: Restart your system, or you see the "Press F6 if you are ready to that you have chosen to install a 3rd party SCSI or RAID driver. S=Specify Additional Device ENTER=Continue F3=Exit ...