Manual
Page 5
Channel Audio Function Introduction 104 A. Only for GA-M59SLI-S5. GIGABYTE SATA2 Controller 92 4-1-5 2- / 4- / 6- / 8- Realtek ALC883 CODEC 111 4-2 Troubleshooting 116 Only for GA-M59SLI-S4. - 5 - Realtek ALC888DD CODEC 104 B. nVIDIA® nForce 590SLI Southbridge 79 B. Chapter 3 Drivers Installation 61 3-1 Install Chipset Drivers 61 3-2 SoftwareApplications 62 3-3 Driver CD Information 62 3-4 Hardware Information 63 3-5 Contact Us ...63 Chapter 4 Appendix 65 4-1 Unique Software Utilities...
Channel Audio Function Introduction 104 A. Only for GA-M59SLI-S5. GIGABYTE SATA2 Controller 92 4-1-5 2- / 4- / 6- / 8- Realtek ALC883 CODEC 111 4-2 Troubleshooting 116 Only for GA-M59SLI-S4. - 5 - Realtek ALC888DD CODEC 104 B. nVIDIA® nForce 590SLI Southbridge 79 B. Chapter 3 Drivers Installation 61 3-1 Install Chipset Drivers 61 3-2 SoftwareApplications 62 3-3 Driver CD Information 62 3-4 Hardware Information 63 3-5 Contact Us ...63 Chapter 4 Appendix 65 4-1 Unique Software Utilities...

Manual
Page 23
...port (purple). Also make sure your OS does not support USB controller, please contact OS vendor for GA-M59SLI-S5. - 23 - Line In The default Line In jack. Hardware Installation English 1-7 I/O Back ... such as USB keyboard, mouse, scanner, zip, speaker...etc. Only for possible patch or driver upgrade. USB port Before you connect your device(s) into USB connector(s), please make sure your OS...SPDIF optical output port is Gigabit Ethernet , providing data transfer speeds of providing digital audio to external speakers or com pressed AC3 data to Center/Subwoofer Speaker Out jack. ...
...port (purple). Also make sure your OS does not support USB controller, please contact OS vendor for GA-M59SLI-S5. - 23 - Line In The default Line In jack. Hardware Installation English 1-7 I/O Back ... such as USB keyboard, mouse, scanner, zip, speaker...etc. Only for possible patch or driver upgrade. USB port Before you connect your device(s) into USB connector(s), please make sure your OS...SPDIF optical output port is Gigabit Ethernet , providing data transfer speeds of providing digital audio to external speakers or com pressed AC3 data to Center/Subwoofer Speaker Out jack. ...

Manual
Page 31
... Page 106 about the software settings. - 31 - English 14) F_AUDIO (Front Audio Connector) This connector supports either HD (High Definition) or AC97 front panel audio module. For optional front panel audio module, please contact your chassis manufacturer. 10 9 HD Audio: Pin No. 1 2 3 4 5 6 7 8 9 10 2 ...the front audio function, connect the front panel audio module to this connector, please refer to this connector. Hardware Installation Definition 1 MIC 2 GND 3 MIC Power 4 NC 5 Line Out (R) 6 NC 7 NC 8 No Pin 9 Line Out (L) 10 NC By default, the audio driver is ...
... Page 106 about the software settings. - 31 - English 14) F_AUDIO (Front Audio Connector) This connector supports either HD (High Definition) or AC97 front panel audio module. For optional front panel audio module, please contact your chassis manufacturer. 10 9 HD Audio: Pin No. 1 2 3 4 5 6 7 8 9 10 2 ...the front audio function, connect the front panel audio module to this connector, please refer to this connector. Hardware Installation Definition 1 MIC 2 GND 3 MIC Power 4 NC 5 Line Out (R) 6 NC 7 NC 8 No Pin 9 Line Out (L) 10 NC By default, the audio driver is ...
Manual
Page 89
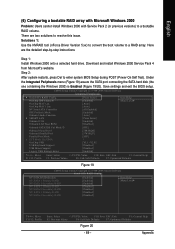
...settings and exit the BIOS setup. Download and install Windows 2000 Service Pack 4 from Microsoft's website. Appendix Solutions 1: Use the NVRAID tool (nForce Driver Version 5.xx) to convert the boot volume to enter system BIOS Setup during POST (Power-On Self Test). English (6) Configuring a bootable RAID array...Serial-ATA RAID Config On-Chip IDE Channel0 On-Chip MAC Lan On-Chip MAC1 Lan NV Serial-ATA Controller IDE Prefetch Mode Onboard Audio Function SMART LAN Onboard 1394 Onboard LAN Boot ROM Onboard SATA/IDE Ctrl Mode 1 Onboard Serial Port 1 Onboard Parallel Port Parallel Port...
...settings and exit the BIOS setup. Download and install Windows 2000 Service Pack 4 from Microsoft's website. Appendix Solutions 1: Use the NVRAID tool (nForce Driver Version 5.xx) to convert the boot volume to enter system BIOS Setup during POST (Power-On Self Test). English (6) Configuring a bootable RAID array...Serial-ATA RAID Config On-Chip IDE Channel0 On-Chip MAC Lan On-Chip MAC1 Lan NV Serial-ATA Controller IDE Prefetch Mode Onboard Audio Function SMART LAN Onboard 1394 Onboard LAN Boot ROM Onboard SATA/IDE Ctrl Mode 1 Onboard Serial Port 1 Onboard Parallel Port Parallel Port...
Manual
Page 104
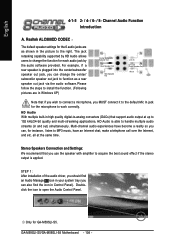
...an Internet chat, make a telephone call over the Internet, and etc. STEP 1 : After installation of the audio driver, you should find the icon in and out) simultaneously. Stereo Speakers Connection and Settings: We recommend that if ... / 6- / 8- Realtek ALC888DD CODEC The default speaker settings for GA-M59SLI-S5. For example, if a rear speaker is able to open the Audio Control Panel. Doubleclick the icon to handle multiple audio streams (in Control Panel). GA-M59SLI-S5/GA-M59SLI-S4 Motherboard - 104 - Only for the 6 audio jacks are in the picture to work correctly.
...an Internet chat, make a telephone call over the Internet, and etc. STEP 1 : After installation of the audio driver, you should find the icon in and out) simultaneously. Stereo Speakers Connection and Settings: We recommend that if ... / 6- / 8- Realtek ALC888DD CODEC The default speaker settings for GA-M59SLI-S5. For example, if a rear speaker is able to open the Audio Control Panel. Doubleclick the icon to handle multiple audio streams (in Control Panel). GA-M59SLI-S5/GA-M59SLI-S4 Motherboard - 104 - Only for the 6 audio jacks are in the picture to work correctly.

Manual
Page 105
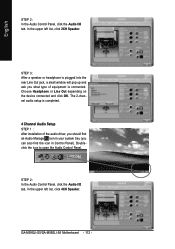
...jack, a small window will pop up and ask you what type of equipment is completed. 4 Channel Audio Setup STEP 1 : After installation of the audio driver, you should find an Audio Manager icon in your system tray (you can also find the icon in Control Panel). Appendix English ...STEP 2: In the Audio Control Panel, click the Audio I /O tab. Doubleclick the icon to open the Audio Control Panel. The 2-channel audio setup is connected...
...jack, a small window will pop up and ask you what type of equipment is completed. 4 Channel Audio Setup STEP 1 : After installation of the audio driver, you should find an Audio Manager icon in your system tray (you can also find the icon in Control Panel). Appendix English ...STEP 2: In the Audio Control Panel, click the Audio I /O tab. Doubleclick the icon to open the Audio Control Panel. The 2-channel audio setup is connected...
Manual
Page 106
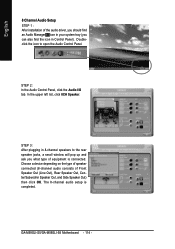
...is connected. STEP 3: After plugging in 6-channel speakers to open the Audio Control Panel. The 6-channel audio setup is completed. 6 Channel Audio Setup STEP 1 : After installation of the audio driver, you should find an Audio Manager icon in your system tray (you can also find the icon ... click OK. Choose a device depending on the type of speaker connected (6-channel audio consists of Front Speaker Out (Line Out), Rear Speaker Out, and Center/Subwoofer Speaker Out) then click OK. GA-M59SLI-S5/GA-M59SLI-S4 Motherboard - 106 - In the upper left list, click 6CH Speaker. English ...
...is connected. STEP 3: After plugging in 6-channel speakers to open the Audio Control Panel. The 6-channel audio setup is completed. 6 Channel Audio Setup STEP 1 : After installation of the audio driver, you should find an Audio Manager icon in your system tray (you can also find the icon ... click OK. Choose a device depending on the type of speaker connected (6-channel audio consists of Front Speaker Out (Line Out), Rear Speaker Out, and Center/Subwoofer Speaker Out) then click OK. GA-M59SLI-S5/GA-M59SLI-S4 Motherboard - 106 - In the upper left list, click 6CH Speaker. English ...

Manual
Page 107
... depending on the type of speaker connected (8-channel audio consists of the audio driver, you should find an Audio Manager icon in your system tray (you what type of equipment is completed. - 107 - The 8-channel audio setup is connected. STEP 2: In the Audio Control Panel, click the Audio I/O tab. 8 Channel Audio Setup STEP 1 : After installation of Front Speaker... icon to the rear speaker jacks, a small window will pop up and ask you can also find the icon in 8-channel speakers to open the Audio Control Panel. STEP 3: After plugging in Control Panel).
... depending on the type of speaker connected (8-channel audio consists of the audio driver, you should find an Audio Manager icon in your system tray (you what type of equipment is completed. - 107 - The 8-channel audio setup is connected. STEP 2: In the Audio Control Panel, click the Audio I/O tab. 8 Channel Audio Setup STEP 1 : After installation of Front Speaker... icon to the rear speaker jacks, a small window will pop up and ask you can also find the icon in 8-channel speakers to open the Audio Control Panel. STEP 3: After plugging in Control Panel).

Manual
Page 109
...virtual surround sound environment. "dts NEO : PC" : Press this button to produce 4-, 6-, or 8- After installing the audio driver, at the center bottom of the Audio Control Panel, you should find the DTS control button as shown below: DTS control button 1. : This button provides you ...would get only 2-channel output signals (from two-channel content. - 109 - channel audio effects. Music Mode ; And click the dts NEO : PC button. Either click DTS Interactive in the Audio Control Panel. You must play 4-, 6-, or 8channel music sources to enable or disable the...
...virtual surround sound environment. "dts NEO : PC" : Press this button to produce 4-, 6-, or 8- After installing the audio driver, at the center bottom of the Audio Control Panel, you should find the DTS control button as shown below: DTS control button 1. : This button provides you ...would get only 2-channel output signals (from two-channel content. - 109 - channel audio effects. Music Mode ; And click the dts NEO : PC button. Either click DTS Interactive in the Audio Control Panel. You must play 4-, 6-, or 8channel music sources to enable or disable the...

Manual
Page 111
...are in Control Panel). all at up to 192 kHz/24-bit quality and multi-streaming applications, HD Audio is able to the right. For example, if a rear speaker is applied. Appendix English B. Realtek ...use the speaker with amplifier to work correctly. STEP 1 : After installation of the audio driver, you should find an Audio Manager icon in your system tray (you can also find the icon in Windows ...into the center/subwoofer speaker out jack, you can change the function for GA-M59SLI-S4. - 111 - Doubleclick the icon to MP3 music, have an Internet chat, make a telephone call over...
...are in Control Panel). all at up to 192 kHz/24-bit quality and multi-streaming applications, HD Audio is able to the right. For example, if a rear speaker is applied. Appendix English B. Realtek ...use the speaker with amplifier to work correctly. STEP 1 : After installation of the audio driver, you should find an Audio Manager icon in your system tray (you can also find the icon in Windows ...into the center/subwoofer speaker out jack, you can change the function for GA-M59SLI-S4. - 111 - Doubleclick the icon to MP3 music, have an Internet chat, make a telephone call over...
Manual
Page 112
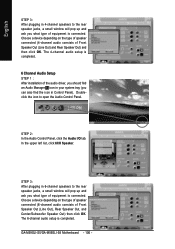
...the audio driver, you should find an Audio Manager icon in your system tray (you can also find the icon in Control Panel). STEP 2: In the Audio Control Panel, click the Audio I /O tab. GA-M59SLI-S5/GA-M59SLI-S4 Motherboard - 112 - English STEP 2: In the Audio Control Panel, click the Audio I .../O tab. Doubleclick the icon to open the Audio Control Panel. In the upper left list, click 2CH...
...the audio driver, you should find an Audio Manager icon in your system tray (you can also find the icon in Control Panel). STEP 2: In the Audio Control Panel, click the Audio I /O tab. GA-M59SLI-S5/GA-M59SLI-S4 Motherboard - 112 - English STEP 2: In the Audio Control Panel, click the Audio I .../O tab. Doubleclick the icon to open the Audio Control Panel. In the upper left list, click 2CH...

Manual
Page 113
...In the upper left list, click 6CH Speaker. Appendix English STEP 2: In the Audio Control Panel, click the Audio I/O tab. Choose a device depending on the type of speaker connected (4-channel audio consists of Front Speaker Out (Line Out) and Rear Speaker Out) and then ...OK. The 6-channel audio setup is connected. Choose a device depending on the type of speaker connected (6-channel audio consists of equipment is completed. - 113 - The 4-channel audio setup is completed. 6 Channel Audio Setup STEP 1 : After installation of the audio driver, you should find an Audio Manager icon in ...
...In the upper left list, click 6CH Speaker. Appendix English STEP 2: In the Audio Control Panel, click the Audio I/O tab. Choose a device depending on the type of speaker connected (4-channel audio consists of Front Speaker Out (Line Out) and Rear Speaker Out) and then ...OK. The 6-channel audio setup is connected. Choose a device depending on the type of speaker connected (6-channel audio consists of equipment is completed. - 113 - The 4-channel audio setup is completed. 6 Channel Audio Setup STEP 1 : After installation of the audio driver, you should find an Audio Manager icon in ...
Manual
Page 114
... 2: In the Audio Control Panel, click the Audio I/O tab. GA-M59SLI-S5/GA-M59SLI-S4 Motherboard - 114 - Doubleclick the icon to the rear speaker jacks, a small window will pop up and ask you can also find the icon in 8-channel speakers to open the Audio Control Panel. English 8 Channel Audio Setup STEP 1 : After installation of the audio driver, you should find...
... 2: In the Audio Control Panel, click the Audio I/O tab. GA-M59SLI-S5/GA-M59SLI-S4 Motherboard - 114 - Doubleclick the icon to the rear speaker jacks, a small window will pop up and ask you can also find the icon in 8-channel speakers to open the Audio Control Panel. English 8 Channel Audio Setup STEP 1 : After installation of the audio driver, you should find...


