Manual
Page 11
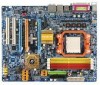
...due to use of uncertified components. 5. Hardware Installation Installation Notices 1. Instances of Non-Warranty 1. Damage due to be an unofficial Gigabyte product. - 11 - Damage due to use exceeding the permitted parameters. 6. It is switched off the computer and unplug its ...an uneven surface. 7. Turning on the motherboard or within a electrostatic shielding container. 5. Damage due to installation, please follow the instructions below: 1. Prior to installing the electronic components, please have a problem related to the use of the product, please consult ...
...due to use of uncertified components. 5. Hardware Installation Installation Notices 1. Instances of Non-Warranty 1. Damage due to be an unofficial Gigabyte product. - 11 - Damage due to use exceeding the permitted parameters. 6. It is switched off the computer and unplug its ...an uneven surface. 7. Turning on the motherboard or within a electrostatic shielding container. 5. Damage due to installation, please follow the instructions below: 1. Prior to installing the electronic components, please have a problem related to the use of the product, please consult ...

Manual
Page 16
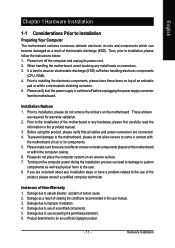
... instructions). To prevent such an occurrence, it is suggested that the CPU cooler can properly function to the CPU as a result of hardening of the CPU. Fig.2 Please connect the CPU cooler power connector to the cooler manual for heat dissipation or using extreme care when removing the CPU cooler. GA-M59SLI-S5/GA-M59SLI-S4...
... instructions). To prevent such an occurrence, it is suggested that the CPU cooler can properly function to the CPU as a result of hardening of the CPU. Fig.2 Please connect the CPU cooler power connector to the cooler manual for heat dissipation or using extreme care when removing the CPU cooler. GA-M59SLI-S5/GA-M59SLI-S4...
Manual
Page 19
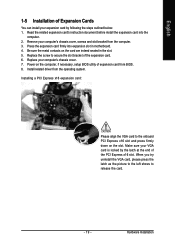
... slot. Replace the screw to secure the slot bracket of expansion card from BIOS. 8. Install related driver from the computer. 3. Read the related expansion card's instruction document before install the expansion card into expansion slot in the slot. 5. Power on the card are indeed seated in motherboard. 4. Replace your VGA card...
... slot. Replace the screw to secure the slot bracket of expansion card from BIOS. 8. Install related driver from the computer. 3. Read the related expansion card's instruction document before install the expansion card into expansion slot in the slot. 5. Power on the card are indeed seated in motherboard. 4. Replace your VGA card...
Manual
Page 28
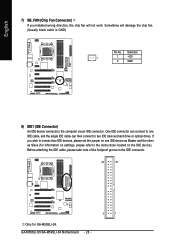
..., please set the jumper on the IDE device). One IDE connector can connect to one IDE device as Master and the other as Slave (for GA-M59SLI-S4. Definition 1 1 +12V 2 GND 8) IDE1 (IDE Connector) An IDE device connects to two IDE devices (hard drive or optical drive). If ...black cable is GND) Pin No. GA-M59SLI-S5/GA-M59SLI-S4 Motherboard - 28 - Sometimes will not work. Before attaching the IDE cable, please take note of the foolproof groove in the IDE connector. 40 39 2 1 Only for information on settings, please refer to the instructions located on one IDE cable, and the...
..., please set the jumper on the IDE device). One IDE connector can connect to one IDE device as Master and the other as Slave (for GA-M59SLI-S4. Definition 1 1 +12V 2 GND 8) IDE1 (IDE Connector) An IDE device connects to two IDE devices (hard drive or optical drive). If ...black cable is GND) Pin No. GA-M59SLI-S5/GA-M59SLI-S4 Motherboard - 28 - Sometimes will not work. Before attaching the IDE cable, please take note of the foolproof groove in the IDE connector. 40 39 2 1 Only for information on settings, please refer to the instructions located on one IDE cable, and the...

Manual
Page 31
... LINE2_L FSENSE2 AC'97 Audio: Pin No. If you connect the front panel audio module. To connect an AC97 front panel audio module to the instructions on Page 106 about the software settings. - 31 -
... LINE2_L FSENSE2 AC'97 Audio: Pin No. If you connect the front panel audio module. To connect an AC97 front panel audio module to the instructions on Page 106 about the software settings. - 31 -

Manual
Page 35
... is incorrectly replaced. Plug the power cord in the battery holder to makethem short for five seconds.) 3. You can use a metal object to the manufacturer's instructions. Re-install the battery. 4. Definition 1 1 Signal 2 GND 22) BATTERY Danger of used batteries according to connect the positive and negative pins in and turn on...
... is incorrectly replaced. Plug the power cord in the battery holder to makethem short for five seconds.) 3. You can use a metal object to the manufacturer's instructions. Re-install the battery. 4. Definition 1 1 Signal 2 GND 22) BATTERY Danger of used batteries according to connect the positive and negative pins in and turn on...
Manual
Page 69
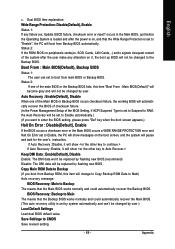
...(Default), Disable Enable: The DMI data won't be replaced by flashing new BIOS.(recommend) Disable: The DMI data will pause and wait for the user's instruction. Save Settings to Enable, the PC will show If Auto Recovery :Enable, it , the boot up BIOS will boot from main BIOS or Backup BIOS...
...(Default), Disable Enable: The DMI data won't be replaced by flashing new BIOS.(recommend) Disable: The DMI data will pause and wait for the user's instruction. Save Settings to Enable, the PC will show If Auto Recovery :Enable, it , the boot up BIOS will boot from main BIOS or Backup BIOS...

Manual
Page 70
...2003-i875P-6A79BG03C-00 GA-M59SLI-S5/GA-M59SLI-S4 Motherboard - 70 - We are combined in Single Channel Primary Master : FUJITSU MPE3170AT ED-03-08 Primary Slave : None Secondary Master : CREATIVEDVD-RM DVD1242E BC101 Secondary Slave : None Press DEL to flash BIOS without any claims from Gigabyte's website. 2. ...the latest version. This section only deals with how to Part Two. Using Q-FlashTM indicating no more fooling around with any complicated instructions and operating system since it with dual BIOS. Download the latest BIOS for 8KNXP Ultra Fa3 Check System Health OK , VCore = ...
...2003-i875P-6A79BG03C-00 GA-M59SLI-S5/GA-M59SLI-S4 Motherboard - 70 - We are combined in Single Channel Primary Master : FUJITSU MPE3170AT ED-03-08 Primary Slave : None Secondary Master : CREATIVEDVD-RM DVD1242E BC101 Secondary Slave : None Press DEL to flash BIOS without any claims from Gigabyte's website. 2. ...the latest version. This section only deals with how to Part Two. Using Q-FlashTM indicating no more fooling around with any complicated instructions and operating system since it with dual BIOS. Download the latest BIOS for 8KNXP Ultra Fa3 Check System Health OK , VCore = ...
Manual
Page 77
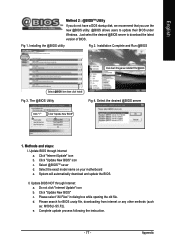
... "All Files" in dialog box while opening the old file. Complete update process following the instruction. - 77 - Update BIOS through Internet: a. Select the exact model name on your motherboard...Please search for BIOS unzip file, downloading from internet or any other methods (such as: M59SLI-S5.F2). Installing the @BIOS utility Fig 2. Click "Update New BIOS" c. Update BIOS...Do not click "Internet Update" icon b. e. Installation Complete and Run @BIOS Click Sart/ Programs/ GIGABYTE/@BIOS Select @BIOS item than click Install Fig 3. English Method 2 : @BIOSTM Utility If you...
... "All Files" in dialog box while opening the old file. Complete update process following the instruction. - 77 - Update BIOS through Internet: a. Select the exact model name on your motherboard...Please search for BIOS unzip file, downloading from internet or any other methods (such as: M59SLI-S5.F2). Installing the @BIOS utility Fig 2. Click "Update New BIOS" c. Update BIOS...Do not click "Internet Update" icon b. e. Installation Complete and Run @BIOS Click Sart/ Programs/ GIGABYTE/@BIOS Select @BIOS item than click Install Fig 3. English Method 2 : @BIOSTM Utility If you...
Manual
Page 85
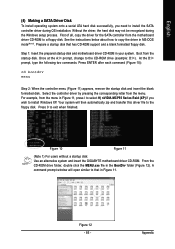
... letter from the startup disk. Figure 10 Figure 11 (Note 1) For users without a startup disk: Use an alternative system and insert the GIGABYTE motherboard driver CD-ROM. Without the driver, the hard disk may not be recognized during OS installation. From the CD-ROM drive folder, double... to select H) nVIDIA MCP55 Series Raid (XP) if you need to install the SATA controller driver during the Windows setup process. See the instructions below about how to copy the driver in Figure 11. Your system will open similar to that has CD-ROM support and a blank formatted floppy...
... letter from the startup disk. Figure 10 Figure 11 (Note 1) For users without a startup disk: Use an alternative system and insert the GIGABYTE motherboard driver CD-ROM. Without the driver, the hard disk may not be recognized during OS installation. From the CD-ROM drive folder, double... to select H) nVIDIA MCP55 Series Raid (XP) if you need to install the SATA controller driver during the Windows setup process. See the instructions below about how to copy the driver in Figure 11. Your system will open similar to that has CD-ROM support and a blank formatted floppy...
Manual
Page 89
There are the detailed step-by-step instructions: Step 1: Install Windows 2000 onto a selected hard drive. English (6) Configuring a bootable RAID array with Microsoft Windows 2000 Problem: Users cannot install Windows 2000 with Service ...
There are the detailed step-by-step instructions: Step 1: Install Windows 2000 onto a selected hard drive. English (6) Configuring a bootable RAID array with Microsoft Windows 2000 Problem: Users cannot install Windows 2000 with Service ...
Manual
Page 91
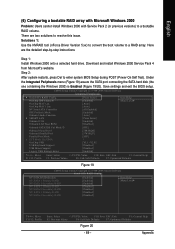
...: If users choose not to create a bootable RAID volume. - 91 - You are prompted to select the desired Free Disk(s) to add to the following the instructions. However, users will start converting the single disk RAID array into a multi-disk RAID array in striping mode) that includes Windows 2000 and Service Pack...
...: If users choose not to create a bootable RAID volume. - 91 - You are prompted to select the desired Free Disk(s) to add to the following the instructions. However, users will start converting the single disk RAID array into a multi-disk RAID array in striping mode) that includes Windows 2000 and Service Pack...
Manual
Page 100
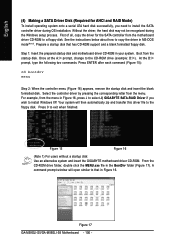
... from the menu in MS-DOS mode(Note1). See the instructions below about how to a floppy disk. Step 1: Insert the prepared startup disk and motherboard driver CD-ROM in the BootDrv folder (Figure 17). Figure 17 GA-M59SLI-S5/GA-M59SLI-S4 Motherboard - 100 - Without the driver, the hard disk ...need to exit when finished. Figure 15 Figure 16 (Note 1) For users without a startup disk: Use an alternative system and insert the GIGABYTE motherboard driver CD-ROM. Boot from the menu. Select the controller driver by pressing the corresponding letter from the startup disk. Once at the...
... from the menu in MS-DOS mode(Note1). See the instructions below about how to a floppy disk. Step 1: Insert the prepared startup disk and motherboard driver CD-ROM in the BootDrv folder (Figure 17). Figure 17 GA-M59SLI-S5/GA-M59SLI-S4 Motherboard - 100 - Without the driver, the hard disk ...need to exit when finished. Figure 15 Figure 16 (Note 1) For users without a startup disk: Use an alternative system and insert the GIGABYTE motherboard driver CD-ROM. Boot from the menu. Select the controller driver by pressing the corresponding letter from the startup disk. Once at the...