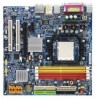
Manual
Page 3
.... No part of this product is the property of this product, Gigabyte has categorized the user manual in the following: „ For detailed product information and specifications, please carefully read or download the information you need. All rights reserved. Copyright © 2005 GIGA...-BYTE TECHNOLOGY CO., LTD. For more product details, please click onto Gigabyte's website at www.gigabyte.com.tw Notice The written content provided with this...
.... No part of this product is the property of this product, Gigabyte has categorized the user manual in the following: „ For detailed product information and specifications, please carefully read or download the information you need. All rights reserved. Copyright © 2005 GIGA...-BYTE TECHNOLOGY CO., LTD. For more product details, please click onto Gigabyte's website at www.gigabyte.com.tw Notice The written content provided with this...
Manual
Page 11
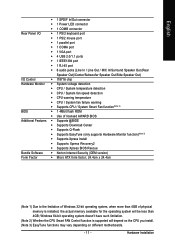
...; Supports CPU / System Smart Fan function(Note 2) BIOS Š 1 4Mbit flash ROM Š Use of licensed AWARD BIOS Additional Features Š Supports @BIOS Š Supports Download Center Š Supports Q-Flash Š Supports EasyTune (only supports Hardware Monitor function)(Note 3) Š Supports Xpress Install Š Supports Xpress Recovery2 Š Supports Xpress BIOS...
...; Supports CPU / System Smart Fan function(Note 2) BIOS Š 1 4Mbit flash ROM Š Use of licensed AWARD BIOS Additional Features Š Supports @BIOS Š Supports Download Center Š Supports Q-Flash Š Supports EasyTune (only supports Hardware Monitor function)(Note 3) Š Supports Xpress Install Š Supports Xpress Recovery2 Š Supports Xpress BIOS...
Manual
Page 29
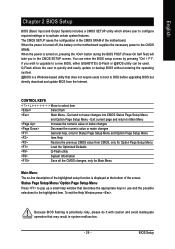
... in system malfunction. - 29 - When the power is a Windows-based utility that does not require users to boot to a new BIOS, either GIGABYTE's Q-Flash or @BIOS utility can enter the BIOS setup screen by pressing "Ctrl + F1". Q-Flash allows the user to quickly and easily update ...pressing the button during the BIOS POST (Power-On Self Test) will take you wish to upgrade to DOS before upgrading BIOS but directly download and update BIOS from CMOS, only for Option Page Setup Menu Load the Optimized Defaults Q-Flash utility System Information Save all the CMOS changes...
... in system malfunction. - 29 - When the power is a Windows-based utility that does not require users to boot to a new BIOS, either GIGABYTE's Q-Flash or @BIOS utility can enter the BIOS setup screen by pressing "Ctrl + F1". Q-Flash allows the user to quickly and easily update ...pressing the button during the BIOS POST (Power-On Self Test) will take you wish to upgrade to DOS before upgrading BIOS but directly download and update BIOS from CMOS, only for Option Page Setup Menu Load the Optimized Defaults Q-Flash utility System Information Save all the CMOS changes...
Manual
Page 56
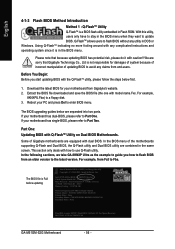
...end-users. Using Q-FlashTM indicating no more fooling around with model name.Fxx. Before You Begin: Before you how to the latest version. Download the latest BIOS for your motherboard has dual-BIOS, please refer to enter BIOS menu. If your PC and press Del to Part One... SETUP / Dual BIOS / Q-Flash / F9 For Xpress Recovery 08/07/2003-i875P-6A79BG03C-00 GA-M51GM-S2G Motherboard - 56 - Intel i875P AGPset BIOS for damages of system because of incorrect manipulation of Gigabyte motherboards are separated into two parts. We are sorry that because updating BIOS has potential risk, please...
...end-users. Using Q-FlashTM indicating no more fooling around with model name.Fxx. Before You Begin: Before you how to the latest version. Download the latest BIOS for your motherboard has dual-BIOS, please refer to enter BIOS menu. If your PC and press Del to Part One... SETUP / Dual BIOS / Q-Flash / F9 For Xpress Recovery 08/07/2003-i875P-6A79BG03C-00 GA-M51GM-S2G Motherboard - 56 - Intel i875P AGPset BIOS for damages of system because of incorrect manipulation of Gigabyte motherboards are separated into two parts. We are sorry that because updating BIOS has potential risk, please...

Manual
Page 58
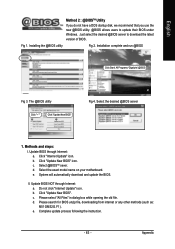
...the Q-Flash menu and press Enter button. Press arrow buttons on your system at this example, we only download one BIOS file to the floppy disk so only one BIOS file, 8KNXPU.Fba, is read, you'll..."Are you begin Step 1 with "Save Main BIOS to Floppy" item. 2. In this stage!! Please confirm again you previously downloaded to the floppy disk. English Using the Q-FlashTM utility: This section tells you want to save the current BIOS for your computer... to CMOS Q-Flash Utility Load Main BIOS from Floppy Load Backup BIOS from the floppy disk. GA-M51GM-S2G Motherboard - 58 -
...the Q-Flash menu and press Enter button. Press arrow buttons on your system at this example, we only download one BIOS file to the floppy disk so only one BIOS file, 8KNXPU.Fba, is read, you'll..."Are you begin Step 1 with "Save Main BIOS to Floppy" item. 2. In this stage!! Please confirm again you previously downloaded to the floppy disk. English Using the Q-FlashTM utility: This section tells you want to save the current BIOS for your computer... to CMOS Q-Flash Utility Load Main BIOS from Floppy Load Backup BIOS from the floppy disk. GA-M51GM-S2G Motherboard - 58 -
Manual
Page 61
... system and have the correct BIOS file for backup purpose, you want to flash and press Enter. If you can begin " section above, you previously downloaded to the floppy disk. Please confirm again you want to save the current BIOS for your computer. Q-Flash Utility V1.30 Flash Type/Size SST... dialog box asking you "Are you how to update BIOS using the Q-Flash utility. Press arrow buttons on your system at this example, we only download one BIOS file to the floppy disk so only one BIOS file, 8GE800.F4, is read, you'll see a box pop up showing the BIOS...
... system and have the correct BIOS file for backup purpose, you want to flash and press Enter. If you can begin " section above, you previously downloaded to the floppy disk. Please confirm again you want to save the current BIOS for your computer. Q-Flash Utility V1.30 Flash Type/Size SST... dialog box asking you "Are you how to update BIOS using the Q-Flash utility. Press arrow buttons on your system at this example, we only download one BIOS file to the floppy disk so only one BIOS file, 8GE800.F4, is read, you'll see a box pop up showing the BIOS...
Manual
Page 63
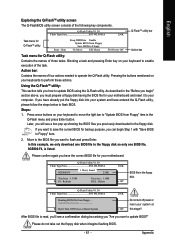
...: a. Click "Internet Update" icon. Complete update process following the instruction. - 63 - Installation complete and run @BIOS Click Start/ All Programs/ Gigabyte/ @BIOS Fig 3. Installing the @BIOS utility Fig 2. Click "Update New BIOS" icon. Please select "All Files" in dialog box while opening ...Utility If you do not have a DOS startup disk, we recommend that you use the new @BIOS utility. @BIOS allows users to download the latest version of BIOS. Select the exact model name on your motherboard. e. Appendix Select the desired @BIOS server 1. Select @BIOSTM ...
...: a. Click "Internet Update" icon. Complete update process following the instruction. - 63 - Installation complete and run @BIOS Click Start/ All Programs/ Gigabyte/ @BIOS Fig 3. Installing the @BIOS utility Fig 2. Click "Update New BIOS" icon. Please select "All Files" in dialog box while opening ...Utility If you do not have a DOS startup disk, we recommend that you use the new @BIOS utility. @BIOS allows users to download the latest version of BIOS. Select the exact model name on your motherboard. e. Appendix Select the desired @BIOS server 1. Select @BIOSTM ...

Manual
Page 64
Otherwise, your motherboard's model name again. III. It can help you need cannot be found in @BIOSTM server, please go onto Gigabyte's website for downloading and updating it shows two or more motherboard's model names to method II. Check out supported motherboard and Flash ROM: In the very beginning, there ... the system unbooted. In method II, be selected, please make sure your system won't boot. IV. Please note that motherboard's model name in dialog box. GA-M51GM-S2G Motherboard - 64 -
Otherwise, your motherboard's model name again. III. It can help you need cannot be found in @BIOSTM server, please go onto Gigabyte's website for downloading and updating it shows two or more motherboard's model names to method II. Check out supported motherboard and Flash ROM: In the very beginning, there ... the system unbooted. In method II, be selected, please make sure your system won't boot. IV. Please note that motherboard's model name in dialog box. GA-M51GM-S2G Motherboard - 64 -
Manual
Page 76
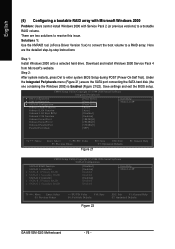
... Defaults GA-M51GM-S2G Motherboard - 76 - Solutions 1: Use the NVRAID tool (nForce Driver Version 5.xx) to convert the boot volume to a bootable RAID volume. Under the Integrated Peripherals menu (Figure 21) assure the SATA port connecting the SATA hard disk (the one containing the Windows 2000) is Enabled (Figure 21/22). Download and install...
... Defaults GA-M51GM-S2G Motherboard - 76 - Solutions 1: Use the NVRAID tool (nForce Driver Version 5.xx) to convert the boot volume to a bootable RAID volume. Under the Integrated Peripherals menu (Figure 21) assure the SATA port connecting the SATA hard disk (the one containing the Windows 2000) is Enabled (Figure 21/22). Download and install...
Manual
Page 78
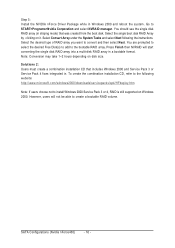
...disk RAID array in a bootable format. Select Convert Array under the System Tasks and select Next following website: http://www.microsoft.com/windows2000/downloads/servicepacks/sp4/HFdeploy.htm Note: If users choose not to install Windows 2000 Service Pack 3 or 4, RAID is still supported on it....START>Programs>Nvidia Corporation and select NVRAID manager. Solutions 2: Users must create a combination installation CD that was created from the boot disk. GA-M51GM-S2G Motherboard - 78 - Select the desired type of RAID array you want to the bootable RAID array. Select the single boot disk RAID...
...disk RAID array in a bootable format. Select Convert Array under the System Tasks and select Next following website: http://www.microsoft.com/windows2000/downloads/servicepacks/sp4/HFdeploy.htm Note: If users choose not to install Windows 2000 Service Pack 3 or 4, RAID is still supported on it....START>Programs>Nvidia Corporation and select NVRAID manager. Solutions 2: Users must create a combination installation CD that was created from the boot disk. GA-M51GM-S2G Motherboard - 78 - Select the desired type of RAID array you want to the bootable RAID array. Select the single boot disk RAID...
Manual
Page 14
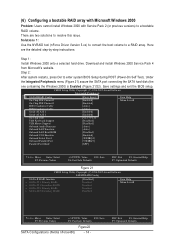
... Integrated Peripherals menu (Figure 21) assure the SATA port connecting the SATA hard disk (the one containing the Windows 2000) is Enabled (Figure 21/22). Download and install Windows 2000 Service Pack 4 from Microsoft's website. Save settings and exit the BIOS setup. Ác (6) Configuring a bootable RAID array with Microsoft Windows 2000...
... Integrated Peripherals menu (Figure 21) assure the SATA port connecting the SATA hard disk (the one containing the Windows 2000) is Enabled (Figure 21/22). Download and install Windows 2000 Service Pack 4 from Microsoft's website. Save settings and exit the BIOS setup. Ác (6) Configuring a bootable RAID array with Microsoft Windows 2000...
Manual
Page 16
... not be able to create a bootable RAID volume. Select Convert Array under the System Tasks and select Next following website: http://www.microsoft.com/windows2000/downloads/servicepacks/sp4/HFdeploy.htm Note: If users choose not to convert and then select Next. Go to the bootable RAID array. To create the combination...
... not be able to create a bootable RAID volume. Select Convert Array under the System Tasks and select Next following website: http://www.microsoft.com/windows2000/downloads/servicepacks/sp4/HFdeploy.htm Note: If users choose not to convert and then select Next. Go to the bootable RAID array. To create the combination...

