User Manual
Page 5
Channel Audio Function Introduction 72 4-2 Troubleshooting 78 - 5 - Chapter 3 Drivers Installation 47 3-1 Install Chipset Drivers 47 3-2 SoftwareApplication 48 3-3 Software Information 48 3-4 Hardware Information 49 3-5 Contact Us ...49 Chapter 4 Appendix 51 4-1 Unique Software Utilities 51 4-1-1 EasyTune 5 Introduction 51 4-1-2 Xpress Recovery Introduction 52 4-1-3 Flash BIOS Method Introduction 55 4-1-4 Serial ATA BIOS Setting Utility Introduction 66 4-1-5 2- / 4- / 6- / 8-
Channel Audio Function Introduction 72 4-2 Troubleshooting 78 - 5 - Chapter 3 Drivers Installation 47 3-1 Install Chipset Drivers 47 3-2 SoftwareApplication 48 3-3 Software Information 48 3-4 Hardware Information 49 3-5 Contact Us ...49 Chapter 4 Appendix 51 4-1 Unique Software Utilities 51 4-1-1 EasyTune 5 Introduction 51 4-1-2 Xpress Recovery Introduction 52 4-1-3 Flash BIOS Method Introduction 55 4-1-4 Serial ATA BIOS Setting Utility Introduction 66 4-1-5 2- / 4- / 6- / 8-
User Manual
Page 18
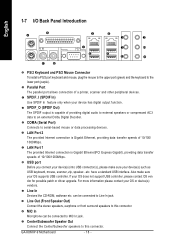
...the stereo speakers, earphone or front surround speakers to serial-based mouse or data processing devices. GA-K8NXP-9 Motherboard - 18 - COMA (Serial Port) Connects to this connector. LAN Port 1 The... provided Internet connection is Gigabit Ethernet, providing data transfer speeds of providing digital audio to external speakers or compressed AC3 data to this connector. have a standard USB interface.... OS does not support USB controller, please contact OS ven dor for possible patch or driver upgrade. SPDIF_I (SPDIF In) Use SPDIF In feature only when your OS or device(s)...
...the stereo speakers, earphone or front surround speakers to serial-based mouse or data processing devices. GA-K8NXP-9 Motherboard - 18 - COMA (Serial Port) Connects to this connector. LAN Port 1 The... provided Internet connection is Gigabit Ethernet, providing data transfer speeds of providing digital audio to external speakers or compressed AC3 data to this connector. have a standard USB interface.... OS does not support USB controller, please contact OS ven dor for possible patch or driver upgrade. SPDIF_I (SPDIF In) Use SPDIF In feature only when your OS or device(s)...
User Manual
Page 23
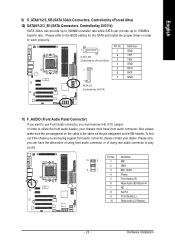
... R NC No Pin Front Audio (L) Rear Audio (L)/ Return L - 23 - Also please make sure the pin assigment on the cable is the same as the pin assigment on the MB header. Please refer to the BIOS setting for the SATA and install the proper driver in order to work properly. 7 1 ...S_ATA_SB (Controlled by nForce4 Ultra) 7 1 SATA_SII (Controlled by Sil3114) SATA 3Gb/s can provide up to 300MB/s transfer rate while SATA can have front audio connector.
... R NC No Pin Front Audio (L) Rear Audio (L)/ Return L - 23 - Also please make sure the pin assigment on the cable is the same as the pin assigment on the MB header. Please refer to the BIOS setting for the SATA and install the proper driver in order to work properly. 7 1 ...S_ATA_SB (Controlled by nForce4 Ultra) 7 1 SATA_SII (Controlled by Sil3114) SATA 3Gb/s can provide up to 300MB/s transfer rate while SATA can have front audio connector.
User Manual
Page 72
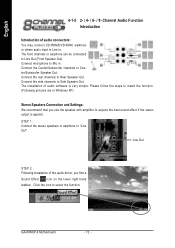
...connect CD-ROM/DVD-ROM, walkman or others audio input to Cen- Connect the Center/Subwoofer channels to Line In. Connect the rear channels to "Line Out". STEP 1: Connect the stereo speakers or earphone to Rear Speaker Out. GA-K8NXP-9 Motherboard - 72 - English 4-1-5 2- /... 4- / 6- / 8- Line In Line Out (Front Speaker Out) Center/Subwoofer Speaker Out Rear Speaker Out Connect microphone to Side Speaker Out. Connect the side channels to Mic In. Click the icon to Line Out (Front Speaker Out). The installation of the audio driver...
...connect CD-ROM/DVD-ROM, walkman or others audio input to Cen- Connect the Center/Subwoofer channels to Line In. Connect the rear channels to "Line Out". STEP 1: Connect the stereo speakers or earphone to Rear Speaker Out. GA-K8NXP-9 Motherboard - 72 - English 4-1-5 2- /... 4- / 6- / 8- Line In Line Out (Front Speaker Out) Center/Subwoofer Speaker Out Rear Speaker Out Connect microphone to Side Speaker Out. Connect the side channels to Mic In. Click the icon to Line Out (Front Speaker Out). The installation of the audio driver...
User Manual
Page 73
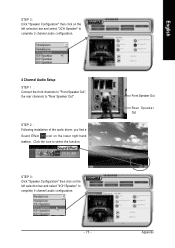
... Configuration" then click on the left selection bar and select "2CH Speaker" to complete 2 channel audio configuration. 4 Channel Audio Setup STEP 1 : Connect the front channels to "Front Speaker Out", the rear channels to "Rear Speaker Out". STEP 2 : Following installation of the audio driver, you find a Sound Effect icon on the lower right hand taskbar.
... Configuration" then click on the left selection bar and select "2CH Speaker" to complete 2 channel audio configuration. 4 Channel Audio Setup STEP 1 : Connect the front channels to "Front Speaker Out", the rear channels to "Rear Speaker Out". STEP 2 : Following installation of the audio driver, you find a Sound Effect icon on the lower right hand taskbar.
User Manual
Page 74
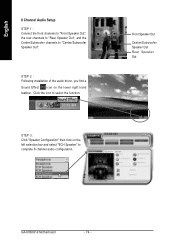
... to "Rear Speaker Out", and the Center/Subwoofer channels to complete 6 channel audio configuration. Front Speaker Out Center/Subwoofer Speaker Out Rear Speaker Out GA-K8NXP-9 Motherboard - 74 - Click the icon to select the function. STEP 2 : Following installation of the audio driver, you find a Sound Effect icon on the left selection bar and select "6CH...
... to "Rear Speaker Out", and the Center/Subwoofer channels to complete 6 channel audio configuration. Front Speaker Out Center/Subwoofer Speaker Out Rear Speaker Out GA-K8NXP-9 Motherboard - 74 - Click the icon to select the function. STEP 2 : Following installation of the audio driver, you find a Sound Effect icon on the left selection bar and select "6CH...
User Manual
Page 75
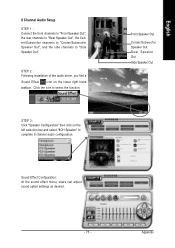
... the icon to "Side Speaker Out". Appendix STEP 2 : Following installation of the audio driver, you find a Sound Effect icon on the left selection bar and select "8CH Speaker" to complete 8 channel audio configuration. Front Speaker Out Center/Subwoofer Speaker Out Rear Speaker Out Side Speaker Out ...- 75 - English 8 Channel Audio Setup STEP 1 : Connect the front channels to "Front Speaker Out", the rear...
... the icon to "Side Speaker Out". Appendix STEP 2 : Following installation of the audio driver, you find a Sound Effect icon on the left selection bar and select "8CH Speaker" to complete 8 channel audio configuration. Front Speaker Out Center/Subwoofer Speaker Out Rear Speaker Out Side Speaker Out ...- 75 - English 8 Channel Audio Setup STEP 1 : Connect the front channels to "Front Speaker Out", the rear...


