User Manual
Page 16
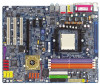
Make sure your VGA card is locked by following the steps outlined below: 1. GA-K8NXP-9 Motherboard - 16 - Replace the screw to secure the slot bracket of the PCI Express x 16 slot when you try to the onboard PCI Express x 16...expansion card. 6. Replace your computer's chassis cover, screws and slot bracket from the computer. 3. Press the expansion card firmly into the computer. 2. Install related driver from BIOS. 8. English 1-5 Installation of Expansion Cards You can install your expansion card by the small white-drawable bar. Remove your computer's chassis cover. 7. ...
Make sure your VGA card is locked by following the steps outlined below: 1. GA-K8NXP-9 Motherboard - 16 - Replace the screw to secure the slot bracket of the PCI Express x 16 slot when you try to the onboard PCI Express x 16...expansion card. 6. Replace your computer's chassis cover, screws and slot bracket from the computer. 3. Press the expansion card firmly into the computer. 2. Install related driver from BIOS. 8. English 1-5 Installation of Expansion Cards You can install your expansion card by the small white-drawable bar. Remove your computer's chassis cover. 7. ...
User Manual
Page 18
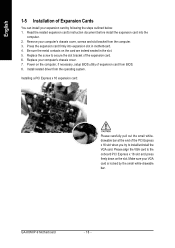
... serial-based mouse or data processing devices. Line Out (Front Speaker Out) Connect the stereo speakers, earphone or front surround speakers to MIC In jack. GA-K8NXP-9 Motherboard - 18 - LAN Port 1 The provided Internet connection is Gigabit Ethernet, providing data transfer speeds of a printer, scanner and other peripheral devices. MIC In Microphone can... AC3 data to an external Dolby Digital Decoder. If your OS does not support USB controller, please contact OS ven dor for possible patch or driver upgrade.
... serial-based mouse or data processing devices. Line Out (Front Speaker Out) Connect the stereo speakers, earphone or front surround speakers to MIC In jack. GA-K8NXP-9 Motherboard - 18 - LAN Port 1 The provided Internet connection is Gigabit Ethernet, providing data transfer speeds of a printer, scanner and other peripheral devices. MIC In Microphone can... AC3 data to an external Dolby Digital Decoder. If your OS does not support USB controller, please contact OS ven dor for possible patch or driver upgrade.
User Manual
Page 47
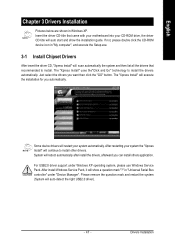
...", and execute the Setup.exe. 3-1 Install Chipset Drivers After insert the driver CD, "Xpress Install" will scan automatically the system and then list all the drivers that came with your motherboard into your CD-ROM drive, the driver CD-title will auto start and show a question ...mark "?" in Windows XP. Drivers Installation English Chapter 3 Drivers Installation Pictures below are shown in "Universal Serial Bus...
...", and execute the Setup.exe. 3-1 Install Chipset Drivers After insert the driver CD, "Xpress Install" will scan automatically the system and then list all the drivers that came with your motherboard into your CD-ROM drive, the driver CD-title will auto start and show a question ...mark "?" in Windows XP. Drivers Installation English Chapter 3 Drivers Installation Pictures below are shown in "Universal Serial Bus...
User Manual
Page 48
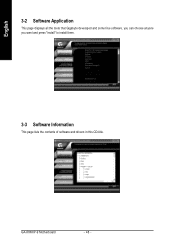
GA-K8NXP-9 Motherboard - 48 - English 3-2 Software Application This page displays all the tools that Gigabyte developed and some free software, you can choose anyone you want and press "install" to install them. 3-3 Software Information This page lists the contents of software and drivers in this CD-title.
GA-K8NXP-9 Motherboard - 48 - English 3-2 Software Application This page displays all the tools that Gigabyte developed and some free software, you can choose anyone you want and press "install" to install them. 3-3 Software Information This page lists the contents of software and drivers in this CD-title.
User Manual
Page 49
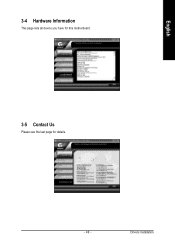
Drivers Installation English 3-4 Hardware Information This page lists all device you have for this motherboard. 3-5 Contact Us Please see the last page for details. - 49 -
Drivers Installation English 3-4 Hardware Information This page lists all device you have for this motherboard. 3-5 Contact Us Please see the last page for details. - 49 -
User Manual
Page 52
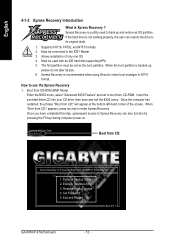
Execute Backup Utility 2. Insert the provided driver CD into your CD drive, then save and exit the BIOS menu. When "Boot from CD-ROM. Set Password 5. Allows installation of the screen. Boot ... Recovery V1.0 (C) Copy Right 2003. GIGABYTE Technology CO. , Ltd. 1. Remove Backup Image 4. The first partition must be set to boot from CD:" appears, press any key to NTFS format. Xpress Recovery is a utility used with an IDE hard disk supporting HPA 5. Exit and Restart Build 2011 GA-K8NXP-9 Motherboard - 52 - Xpress Recovery is recommended...
Execute Backup Utility 2. Insert the provided driver CD into your CD drive, then save and exit the BIOS menu. When "Boot from CD-ROM. Set Password 5. Allows installation of the screen. Boot ... Recovery V1.0 (C) Copy Right 2003. GIGABYTE Technology CO. , Ltd. 1. Remove Backup Image 4. The first partition must be set to boot from CD:" appears, press any key to NTFS format. Xpress Recovery is a utility used with an IDE hard disk supporting HPA 5. Exit and Restart Build 2011 GA-K8NXP-9 Motherboard - 52 - Xpress Recovery is recommended...
User Manual
Page 67
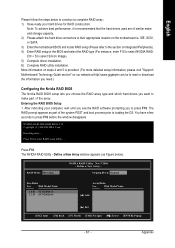
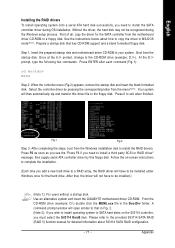
... 3) Enter the motherboard BIOS and locate RAID setup (Please refer to the section on Integrated Peripherals). 4) Enter RAID setup in the BIOS and select the RAID type (For instance, enter F10 to enter RAID setup utility ... You have a few seconds to select Silicon Image). 5) Complete driver installation. 6) Complete ... want to make and storage capacity. 2) Please attach the hard drive connectors to their appropriate location on our website at http:\\www.gigabyte.com.tw to read or download the information you need.) Configuring the Nvidia RAID BIOS The Nvidia RAID BIOS setup lets you choose ...
... 3) Enter the motherboard BIOS and locate RAID setup (Please refer to the section on Integrated Peripherals). 4) Enter RAID setup in the BIOS and select the RAID type (For instance, enter F10 to enter RAID setup utility ... You have a few seconds to select Silicon Image). 5) Complete driver installation. 6) Complete ... want to make and storage capacity. 2) Please attach the hard drive connectors to their appropriate location on our website at http:\\www.gigabyte.com.tw to read or download the information you need.) Configuring the Nvidia RAID BIOS The Nvidia RAID BIOS setup lets you choose ...
User Manual
Page 70
... want to configure and load drivers under Windows. Striping Block: 64K Adapt 2 2 Channel M/S 0 Master 1 Master Index 0 1 Disk Model Name ST3120026AS ST3120026AS Capacity 111.79GB 111.79GB [R] Rebuild [D] Delete [C] Clear Disk [ENTER] Return If you selected, such as empty and wipe out all the data, otherwise press N. GA-K8NXP-9 Motherboard - 70 - Array Detail - At the...
... want to configure and load drivers under Windows. Striping Block: 64K Adapt 2 2 Channel M/S 0 Master 1 Master Index 0 1 Disk Model Name ST3120026AS ST3120026AS Capacity 111.79GB 111.79GB [R] Rebuild [D] Delete [C] Clear Disk [ENTER] Return If you selected, such as empty and wipe out all the data, otherwise press N. GA-K8NXP-9 Motherboard - 70 - Array Detail - At the...
User Manual
Page 71
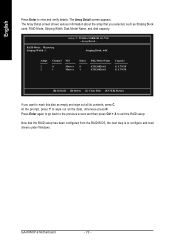
... 2: When the controller menu (Fig.2) appears, remove the startup disk and insert the blank formatted disk. Use an alternative system and insert the GIGABYTE motherboard driver CD-ROM. Appendix Step 1: Insert the prepared startup disk and motherboard driver CD-ROM in the BootDrv folder. At the D:\> prompt, type the following two commands. After that, the...
... 2: When the controller menu (Fig.2) appears, remove the startup disk and insert the blank formatted disk. Use an alternative system and insert the GIGABYTE motherboard driver CD-ROM. Appendix Step 1: Insert the prepared startup disk and motherboard driver CD-ROM in the BootDrv folder. At the D:\> prompt, type the following two commands. After that, the...
User Manual
Page 72
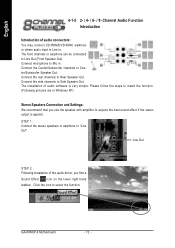
... Out (Front Speaker Out). English 4-1-5 2- / 4- / 6- / 8- The front channels or earphone can be connected to select the function. GA-K8NXP-9 Motherboard - 72 - Connect the Center/Subwoofer channels to Rear Speaker Out. The installation of the audio driver, you use the speaker with amplifier to install the function. (Following pictures are in Windows XP) Stereo Speakers...
... Out (Front Speaker Out). English 4-1-5 2- / 4- / 6- / 8- The front channels or earphone can be connected to select the function. GA-K8NXP-9 Motherboard - 72 - Connect the Center/Subwoofer channels to Rear Speaker Out. The installation of the audio driver, you use the speaker with amplifier to install the function. (Following pictures are in Windows XP) Stereo Speakers...
User Manual
Page 74
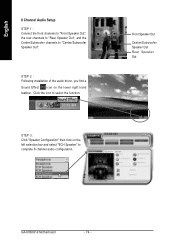
Click the icon to complete 6 channel audio configuration. Front Speaker Out Center/Subwoofer Speaker Out Rear Speaker Out GA-K8NXP-9 Motherboard - 74 - STEP 3: Click "Speaker Configuration" then click on the lower right hand taskbar. English 6 Channel Audio Setup STEP 1 : Connect the front channels to "Front ... Out", the rear channels to "Rear Speaker Out", and the Center/Subwoofer channels to "Center/Subwoofer Speaker Out". STEP 2 : Following installation of the audio driver, you find a Sound Effect icon on the left selection bar and select "6CH Speaker" to select the function.
Click the icon to complete 6 channel audio configuration. Front Speaker Out Center/Subwoofer Speaker Out Rear Speaker Out GA-K8NXP-9 Motherboard - 74 - STEP 3: Click "Speaker Configuration" then click on the lower right hand taskbar. English 6 Channel Audio Setup STEP 1 : Connect the front channels to "Front ... Out", the rear channels to "Rear Speaker Out", and the Center/Subwoofer channels to "Center/Subwoofer Speaker Out". STEP 2 : Following installation of the audio driver, you find a Sound Effect icon on the left selection bar and select "6CH Speaker" to select the function.


