User Manual
Page 29
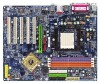
...the possible selections for Main Menu Main Menu The on the motherboard supplies the necessary power to the CMOS SRAM. When the power is a Windows-based utility that you to quickly and easily update or backup BIOS without entering the operating system. @BIOS is turned on, pushing the ... Option Page Setup Menu Item Help Restore the previous CMOS value from the Internet. Quit and not save the current BIOS to a new BIOS, either GIGABYTE's Q-Flash or @BIOS utility can enter the BIOS setup screen by pressing "Ctrl + F1". English Chapter 2 BIOS Setup BIOS (Basic Input and Output...
...the possible selections for Main Menu Main Menu The on the motherboard supplies the necessary power to the CMOS SRAM. When the power is a Windows-based utility that you to quickly and easily update or backup BIOS without entering the operating system. @BIOS is turned on, pushing the ... Option Page Setup Menu Item Help Restore the previous CMOS value from the Internet. Quit and not save the current BIOS to a new BIOS, either GIGABYTE's Q-Flash or @BIOS utility can enter the BIOS setup screen by pressing "Ctrl + F1". English Chapter 2 BIOS Setup BIOS (Basic Input and Output...
User Manual
Page 44
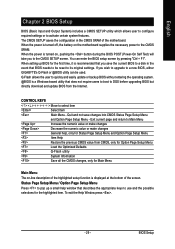
...OS) will increase hardware working speed. "Top Performance" will effect the result. For example, the same hardware configuration might not run properly with Windows XP, but works smoothly with Windows NT. English 2-8 Top Performance CMOS Setup Utility-Copyright (C) 1984-2004 Award Software ` Standard CMOS Features Top Performance ` Advanced BIOS Features Load ...(M.I.T.) ESC: Quit F8: Q-Flash KLJI: Select Item F10: Save & Exit Setup Load Optimized Defaults Selecting this function. (Default Value) Enabled Enable Top Performance function. GA-K8NSC-939 Motherboard - 44 -
...OS) will increase hardware working speed. "Top Performance" will effect the result. For example, the same hardware configuration might not run properly with Windows XP, but works smoothly with Windows NT. English 2-8 Top Performance CMOS Setup Utility-Copyright (C) 1984-2004 Award Software ` Standard CMOS Features Top Performance ` Advanced BIOS Features Load ...(M.I.T.) ESC: Quit F8: Q-Flash KLJI: Select Item F10: Save & Exit Setup Load Optimized Defaults Selecting this function. (Default Value) Enabled Enable Top Performance function. GA-K8NSC-939 Motherboard - 44 -

User Manual
Page 47
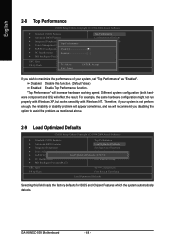
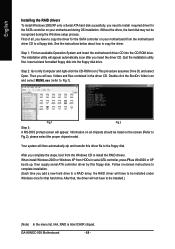
... will restart your system the "Xpress Install" will continue to install other drivers. After install Windows Service Pack, it will show the installation guide. in "Universal Serial Bus controller" under Windows XP operating system, please use Windows Service Pack. Drivers Installation Just select the drivers you can install others application. After restarting your....0 driver). - 47 - Insert the driver CD-title that recommended to install the drivers automatically. If not, please double click the CD-ROM device icon in Windows XP.
... will restart your system the "Xpress Install" will continue to install other drivers. After install Windows Service Pack, it will show the installation guide. in "Universal Serial Bus controller" under Windows XP operating system, please use Windows Service Pack. Drivers Installation Just select the drivers you can install others application. After restarting your....0 driver). - 47 - Insert the driver CD-title that recommended to install the drivers automatically. If not, please double click the CD-ROM device icon in Windows XP.
User Manual
Page 54
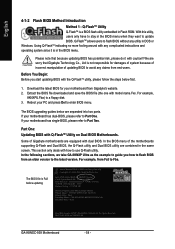
...Energy Star Ally Copyright (C) 1984-2003, Award Software, Inc. Please note that Gigabyte Technology Co., Ltd is in the same screen. In the BIOS menu of Gigabyte motherboards are combined in the BIOS menu. For example, from Gigabyte's website. 2. Using Q-FlashTM indicating no more fooling around with model name....If your PC and press Del to enter SETUP / Dual BIOS / Q-Flash / F9 For Xpress Recovery 08/07/2003-i875P-6A79BG03C-00 GA-K8NSC-939 Motherboard - 54 - This section only deals with how to update BIOS. With this utility, users only have to stay in DOS or Windows.
...Energy Star Ally Copyright (C) 1984-2003, Award Software, Inc. Please note that Gigabyte Technology Co., Ltd is in the same screen. In the BIOS menu of Gigabyte motherboards are combined in the BIOS menu. For example, from Gigabyte's website. 2. Using Q-FlashTM indicating no more fooling around with model name....If your PC and press Del to enter SETUP / Dual BIOS / Q-Flash / F9 For Xpress Recovery 08/07/2003-i875P-6A79BG03C-00 GA-K8NSC-939 Motherboard - 54 - This section only deals with how to update BIOS. With this utility, users only have to stay in DOS or Windows.
User Manual
Page 61
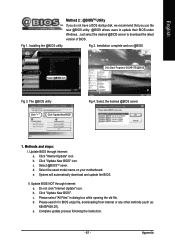
Just select the desired @BIOS server to update their BIOS under Windows. Installation complete and run @BIOS Select @BIOS item. Update BIOS through Internet: a. Click "Update New BIOS" icon. d. e. II. Complete update process following the instruction. - 61 - Click Start/ Programs/ GIGABYTE/@BIOS Fig 3. Methods and steps: I. b. Click "Update New BIOS". Please search for...
Just select the desired @BIOS server to update their BIOS under Windows. Installation complete and run @BIOS Select @BIOS item. Update BIOS through Internet: a. Click "Update New BIOS" icon. d. e. II. Complete update process following the instruction. - 61 - Click Start/ Programs/ GIGABYTE/@BIOS Fig 3. Methods and steps: I. b. Click "Update New BIOS". Please search for...
User Manual
Page 64
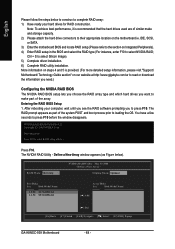
...or SATA. 3) Enter the motherboard BIOS and locate RAID setup (Please refer to the section on our website at http:\\www.gigabyte.com.tw to read or download the information you need.) Configuring the NVIDIA RAID BIOS The NVIDIA RAID BIOS setup lets you ...a New Array window appears (as part of similar make part of the array. The NVIDIA RAID Utility - Striping Block: Optimal Free Disks Loc Disk Model Name 1.0.M ST3120026AS 1.1.M ST3120026AS Array Disks Loc Disk Model Name [ ] Add [ ] Del [F6] Back [F7] Finish [TAB] Navigate [ ] Select [ENTER] Popup GA-K8NSC-939 Motherboard - 64 ...
...or SATA. 3) Enter the motherboard BIOS and locate RAID setup (Please refer to the section on our website at http:\\www.gigabyte.com.tw to read or download the information you need.) Configuring the NVIDIA RAID BIOS The NVIDIA RAID BIOS setup lets you ...a New Array window appears (as part of similar make part of the array. The NVIDIA RAID Utility - Striping Block: Optimal Free Disks Loc Disk Model Name 1.0.M ST3120026AS 1.1.M ST3120026AS Array Disks Loc Disk Model Name [ ] Add [ ] Del [F6] Back [F7] Finish [TAB] Navigate [ ] Select [ENTER] Popup GA-K8NSC-939 Motherboard - 64 ...
User Manual
Page 65
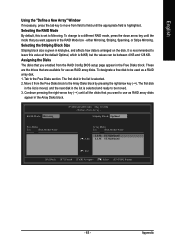
... BIOS setup page appear in the RAID Mode box - RAID Mode: Mirroring NVIDIA RAID Utility May 10 2004 - Appendix English Using the "Define a New Array" Window If necessary, press the tab key to move from field to the Free Disks section. To designate a free disk to leave this is highlighted. Define...
... BIOS setup page appear in the RAID Mode box - RAID Mode: Mirroring NVIDIA RAID Utility May 10 2004 - Appendix English Using the "Define a New Array" Window If necessary, press the tab key to move from field to the Free Disks section. To designate a free disk to leave this is highlighted. Define...
User Manual
Page 66
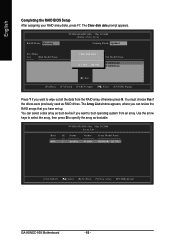
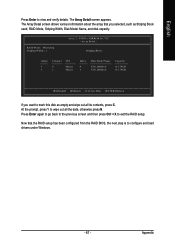
... boot operating system from the RAID array, otherwise press N. You must choose Yes if the drives were previously used as bootable. The Array List window appears, where you can select a disk array as boot device if you have set up. Boot BBS NVIDIA RAID Utility May 10 2004 -...2004 - Array List - Id Status Vendor Array Model Name 2 Healthy NVIDIA MIRROR 111.79G [Ctrl-X] Exit [ ] Select [B] Set Boot [N] New Array [ENTER] Detail GA-K8NSC-939 Motherboard - 66 - The Clear disk data prompt appears. English Completing the RAID BIOS Setup After assigning your RAID array disks, press F7.
... boot operating system from the RAID array, otherwise press N. You must choose Yes if the drives were previously used as bootable. The Array List window appears, where you can select a disk array as boot device if you have set up. Boot BBS NVIDIA RAID Utility May 10 2004 -...2004 - Array List - Id Status Vendor Array Model Name 2 Healthy NVIDIA MIRROR 111.79G [Ctrl-X] Exit [ ] Select [B] Set Boot [N] New Array [ENTER] Detail GA-K8NSC-939 Motherboard - 66 - The Clear disk data prompt appears. English Completing the RAID BIOS Setup After assigning your RAID array disks, press F7.
User Manual
Page 67
... out all its contents, press C. RAID Mode: Mirroring Striping Width : 1 Array 2 : NVIDIA MIRROR 111.79G - At the prompt, press Y to configure and load drivers under Windows. - 67 -
... out all its contents, press C. RAID Mode: Mirroring Striping Width : 1 Array 2 : NVIDIA MIRROR 111.79G - At the prompt, press Y to configure and load drivers under Windows. - 67 -
User Manual
Page 68
... need to install required driver for the SATA controller on -screen instructions to complete installation. (Each time you have to be installed under Windows once for that , the driver will appear. Quit the installation utility first. Double-click the BootDrv folder icon and select MENU.exe (...the motherboard driver CD into the floppy disk drive. After that hard drive. When install Windows 2000 or Windows XP from the motherboard driver CD to a floppy disk. Step 2: Go to copy the driver. GA-K8NSC-939 Motherboard - 68 - Your system will have to copy the driver for the SATA ...
... need to install required driver for the SATA controller on -screen instructions to complete installation. (Each time you have to be installed under Windows once for that , the driver will appear. Quit the installation utility first. Double-click the BootDrv folder icon and select MENU.exe (...the motherboard driver CD into the floppy disk drive. After that hard drive. When install Windows 2000 or Windows XP from the motherboard driver CD to a floppy disk. Step 2: Go to copy the driver. GA-K8NSC-939 Motherboard - 68 - Your system will have to copy the driver for the SATA ...
User Manual
Page 69
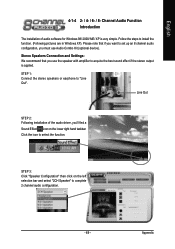
...). Stereo Speakers Connection and Settings: We recommend that if you want to "Line Out". Line Out STEP 2: Following installation of audio software for Windows 98/ 2000/ ME/ XP is applied. Channel Audio Function Introduction The installation of the audio driver, you use Audio Combo Kit (optional device). Follow the ...
...). Stereo Speakers Connection and Settings: We recommend that if you want to "Line Out". Line Out STEP 2: Following installation of audio software for Windows 98/ 2000/ ME/ XP is applied. Channel Audio Function Introduction The installation of the audio driver, you use Audio Combo Kit (optional device). Follow the ...
User Manual
Page 75
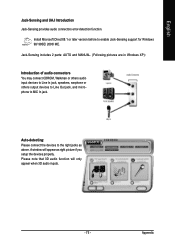
... right jacks as right picture if you setup the devices properly. Jack-Sensing includes 2 parts: AUTO and MANUAL. (Following pictures are in Windows XP): Introduction of audio connectors You may connect CDROM, Walkman or others audio input devices to Line In jack, speakers, earphone or others ...output devices to Line Out jack, and microphone to enable Jack-Sensing support for Windows 98/ 98SE/ 2000/ ME. English Jack-Sensing and UAJ Introduction Jack-Sensing provides audio connectors error-detection function. Please note that 3D ...
... right jacks as right picture if you setup the devices properly. Jack-Sensing includes 2 parts: AUTO and MANUAL. (Following pictures are in Windows XP): Introduction of audio connectors You may connect CDROM, Walkman or others audio input devices to Line In jack, speakers, earphone or others ...output devices to Line Out jack, and microphone to enable Jack-Sensing support for Windows 98/ 98SE/ 2000/ ME. English Jack-Sensing and UAJ Introduction Jack-Sensing provides audio connectors error-detection function. Please note that 3D ...


