User Manual
Page 29
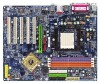
...button during the BIOS POST (Power-On Self Test) will take you to the CMOS SETUP screen. You can be reset to a new BIOS, either GIGABYTE's Q-Flash or @BIOS utility can enter the BIOS setup screen by pressing "Ctrl + F1". English Chapter 2 BIOS Setup BIOS (Basic Input and Output ...Exit current page and return to Main Menu Increase the numeric value or make changes Decrease the numeric value or make changes General help window that describes the appropriate keys to DOS before upgrading BIOS but directly download and update BIOS from CMOS, only for Option Page Setup Menu...
...button during the BIOS POST (Power-On Self Test) will take you to the CMOS SETUP screen. You can be reset to a new BIOS, either GIGABYTE's Q-Flash or @BIOS utility can enter the BIOS setup screen by pressing "Ctrl + F1". English Chapter 2 BIOS Setup BIOS (Basic Input and Output ...Exit current page and return to Main Menu Increase the numeric value or make changes Decrease the numeric value or make changes General help window that describes the appropriate keys to DOS before upgrading BIOS but directly download and update BIOS from CMOS, only for Option Page Setup Menu...
User Manual
Page 44
GA-K8NSC-939 Motherboard - 44 - For example, the same hardware configuration might not run properly with Windows XP, but works smoothly with Windows NT. Therefore, if your system is not perform enough, the reliability or stability problem will appear sometimes, and we will recommend you disabling the option ...
GA-K8NSC-939 Motherboard - 44 - For example, the same hardware configuration might not run properly with Windows XP, but works smoothly with Windows NT. Therefore, if your system is not perform enough, the reliability or stability problem will appear sometimes, and we will recommend you disabling the option ...

User Manual
Page 47
After install Windows Service Pack, it will auto start and show a question mark "?" After restarting your system automatically. Drivers Installation The "Xpress Install" uses the"Click and Go" ..., afterward you want then click the "GO" button. English Chapter 3 Drivers Installation Pictures below are shown in "Universal Serial Bus controller" under Windows XP operating system, please use Windows Service Pack. Insert the driver CD-title that recommended to install the drivers automatically. The "Xpress Install" will auto-detect the right USB2...
After install Windows Service Pack, it will auto start and show a question mark "?" After restarting your system automatically. Drivers Installation The "Xpress Install" uses the"Click and Go" ..., afterward you want then click the "GO" button. English Chapter 3 Drivers Installation Pictures below are shown in "Universal Serial Bus controller" under Windows XP operating system, please use Windows Service Pack. Insert the driver CD-title that recommended to install the drivers automatically. The "Xpress Install" will auto-detect the right USB2...
User Manual
Page 54
... The BIOS upgrading guides below first. 1. If your motherboard has single-BIOS, please refer to a floppy disk. 3. Some of Gigabyte motherboards are sorry that because updating BIOS has potential risk, please do it is not responsible for damages of system because of incorrect ... / Dual BIOS / Q-Flash / F9 For Xpress Recovery 08/07/2003-i875P-6A79BG03C-00 GA-K8NSC-939 Motherboard - 54 - Please note that Gigabyte Technology Co., Ltd is in DOS or Windows. For example, from Gigabyte's website. 2. Q-FlashTM allows users to flash BIOS without any claims from an older version ...
... The BIOS upgrading guides below first. 1. If your motherboard has single-BIOS, please refer to a floppy disk. 3. Some of Gigabyte motherboards are sorry that because updating BIOS has potential risk, please do it is not responsible for damages of system because of incorrect ... / Dual BIOS / Q-Flash / F9 For Xpress Recovery 08/07/2003-i875P-6A79BG03C-00 GA-K8NSC-939 Motherboard - 54 - Please note that Gigabyte Technology Co., Ltd is in DOS or Windows. For example, from Gigabyte's website. 2. Q-FlashTM allows users to flash BIOS without any claims from an older version ...
User Manual
Page 61
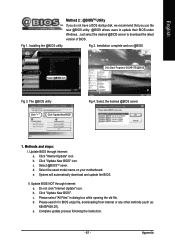
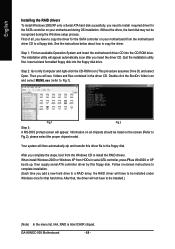
Installing the @BIOS utility Fig 2. Click Start/ Programs/ GIGABYTE/@BIOS Fig 3. Select the desired @BIOS server 1. c. d. e. II. Click "Update New BIOS". Please search for BIOS unzip file, downloading from internet or any ...: K8NSP939.D1). b. Please select "All Files" in dialog box while opening the old file. Just select the desired @BIOS server to update their BIOS under Windows. Click "Internet Update" icon. Select the exact model name on your motherboard. Update BIOS NOT through Internet: a. c. Complete update process following the instruction. - 61...
Installing the @BIOS utility Fig 2. Click Start/ Programs/ GIGABYTE/@BIOS Fig 3. Select the desired @BIOS server 1. c. d. e. II. Click "Update New BIOS". Please search for BIOS unzip file, downloading from internet or any ...: K8NSP939.D1). b. Please select "All Files" in dialog box while opening the old file. Just select the desired @BIOS server to update their BIOS under Windows. Click "Internet Update" icon. Select the exact model name on your motherboard. Update BIOS NOT through Internet: a. c. Complete update process following the instruction. - 61...
User Manual
Page 64
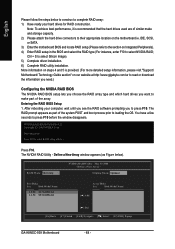
... [ENTER] Popup GA-K8NSC-939 Motherboard - 64 - Press F10 to press F10 before the window disappears. Define a New Array window appears (as part of the array. Note: To achieve best performance, it is provided. (For more detailed setup information, please visit "Support\ Motherboard\ Technology Guide section" on our website at http:\\www.gigabyte.com.tw to...
... [ENTER] Popup GA-K8NSC-939 Motherboard - 64 - Press F10 to press F10 before the window disappears. Define a New Array window appears (as part of the array. Note: To achieve best performance, it is provided. (For more detailed setup information, please visit "Support\ Motherboard\ Technology Guide section" on our website at http:\\www.gigabyte.com.tw to...
User Manual
Page 65
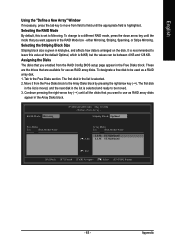
... Disks Loc Disk Model Name [ ] Add 1.0.M ST3120026AS 1.1.M ST3120026AS [ ] Del [F6] Back [F7] Finish [TAB] Navigate [ ] Select [ENTER] Popup - 65 - English Using the "Define a New Array" Window If necessary, press the tab key to move from field to field until the appropriate field is selected. 2. These are the drives that you enabled...
... Disks Loc Disk Model Name [ ] Add 1.0.M ST3120026AS 1.1.M ST3120026AS [ ] Del [F6] Back [F7] Finish [TAB] Navigate [ ] Select [ENTER] Popup - 65 - English Using the "Define a New Array" Window If necessary, press the tab key to move from field to field until the appropriate field is selected. 2. These are the drives that you enabled...
User Manual
Page 66
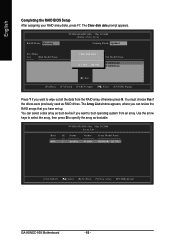
... press N. The Array List window appears, where you can select a disk array as boot device if you have set up. Boot BBS NVIDIA RAID Utility May 10 2004 - Id Status Vendor Array Model Name 2 Healthy NVIDIA MIRROR 111.79G [Ctrl-X] Exit [ ] Select [B] Set Boot [N] New Array [ENTER] Detail GA-K8NSC-939 Motherboard - 66 - Array...
... press N. The Array List window appears, where you can select a disk array as boot device if you have set up. Boot BBS NVIDIA RAID Utility May 10 2004 - Id Status Vendor Array Model Name 2 Healthy NVIDIA MIRROR 111.79G [Ctrl-X] Exit [ ] Select [B] Set Boot [N] New Array [ENTER] Detail GA-K8NSC-939 Motherboard - 66 - Array...
User Manual
Page 67
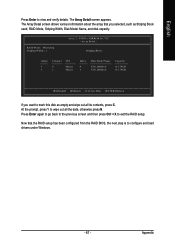
... information about the array that the RAID setup has been configured from the RAID BIOS, the next step is to configure and load drivers under Windows. - 67 - RAID Mode: Mirroring Striping Width : 1 Array 2 : NVIDIA MIRROR 111.79G - Press Enter again to go back to the previous screen and then press Ctrl...
... information about the array that the RAID setup has been configured from the RAID BIOS, the next step is to configure and load drivers under Windows. - 67 - RAID Mode: Mirroring Striping Width : 1 Array 2 : NVIDIA MIRROR 111.79G - Press Enter again to go back to the previous screen and then press Ctrl...
User Manual
Page 68
... Step 3: A MS-DOS prompt screen will appear. After that hard drive. GA-K8NSC-939 Motherboard - 68 - The installation utility will have to copy the driver for the SATA controller on your motherboard during the Windows setup process. Double-click the BootDrv folder icon and select MENU.exe (refer ... driver, the hard disk may not be installed.) (Note) In the menu list, IAA_RAID is Intel ICH5R chipset. When install Windows 2000 or Windows XP from the motherboard driver CD to be recognized during OS installation. Insert a blank formatted floppy disk into the CD-ROM drive...
... Step 3: A MS-DOS prompt screen will appear. After that hard drive. GA-K8NSC-939 Motherboard - 68 - The installation utility will have to copy the driver for the SATA controller on your motherboard during the Windows setup process. Double-click the BootDrv folder icon and select MENU.exe (refer ... driver, the hard disk may not be installed.) (Note) In the menu list, IAA_RAID is Intel ICH5R chipset. When install Windows 2000 or Windows XP from the motherboard driver CD to be recognized during OS installation. Insert a blank formatted floppy disk into the CD-ROM drive...
User Manual
Page 69
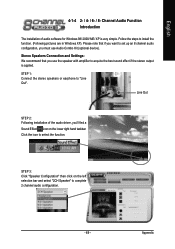
... STEP 3: Click "Speaker Configuration" then click on the lower right hand taskbar. Line Out STEP 2: Following installation of audio software for Windows 98/ 2000/ ME/ XP is applied. Channel Audio Function Introduction The installation of the audio driver, you use Audio Combo Kit (optional ...device). Click the icon to install the function. (Following pictures are in Windows XP). Follow the steps to select the function. Appendix English 4-1-4 2- / 4- / 6- / 8- STEP 1: Connect the stereo speakers or earphone to...
... STEP 3: Click "Speaker Configuration" then click on the lower right hand taskbar. Line Out STEP 2: Following installation of audio software for Windows 98/ 2000/ ME/ XP is applied. Channel Audio Function Introduction The installation of the audio driver, you use Audio Combo Kit (optional ...device). Click the icon to install the function. (Following pictures are in Windows XP). Follow the steps to select the function. Appendix English 4-1-4 2- / 4- / 6- / 8- STEP 1: Connect the stereo speakers or earphone to...
User Manual
Page 75
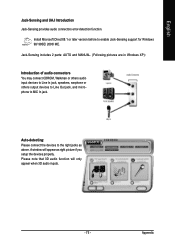
... before to the right jacks as right picture if you setup the devices properly. Jack-Sensing includes 2 parts: AUTO and MANUAL. (Following pictures are in Windows XP): Introduction of audio connectors You may connect CDROM, Walkman or others audio input devices to Line In jack, speakers, earphone or others output devices... jack. Please note that 3D audio function will appear as above. English Jack-Sensing and UAJ Introduction Jack-Sensing provides audio connectors error-detection function. A window will only appear when 3D audio inputs. - 75 - Appendix
... before to the right jacks as right picture if you setup the devices properly. Jack-Sensing includes 2 parts: AUTO and MANUAL. (Following pictures are in Windows XP): Introduction of audio connectors You may connect CDROM, Walkman or others audio input devices to Line In jack, speakers, earphone or others output devices... jack. Please note that 3D audio function will appear as above. English Jack-Sensing and UAJ Introduction Jack-Sensing provides audio connectors error-detection function. A window will only appear when 3D audio inputs. - 75 - Appendix


