User Manual
Page 15
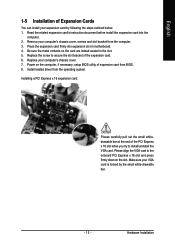
... card. 6. Please align the VGA card to the onboard PCI Express x 16 slot and press firmly down on the card are indeed seated in motherboard. 4. Install related driver from BIOS. 8. Make sure your computer's chassis cover. 7. Be sure the metal contacts on the slot. Remove your expansion card by the small white...
... card. 6. Please align the VGA card to the onboard PCI Express x 16 slot and press firmly down on the card are indeed seated in motherboard. 4. Install related driver from BIOS. 8. Make sure your computer's chassis cover. 7. Be sure the metal contacts on the slot. Remove your expansion card by the small white...

User Manual
Page 16
... you connect your device(s) into USB connector(s), please make the device unable to serial-based mouse or data processing devices. GA-K8N51GMF(-RH) Motherboard - 16 - Line Out (Front Speaker Out) Connect the stereo speakers, earphone or front surround speakers to the lower ...port (purple). Parallel Port The parallel port allows connection of 10/100Mbps. If your OS does not support USB controller, please contact OS vendor for possible patch or driver...
... you connect your device(s) into USB connector(s), please make the device unable to serial-based mouse or data processing devices. GA-K8N51GMF(-RH) Motherboard - 16 - Line Out (Front Speaker Out) Connect the stereo speakers, earphone or front surround speakers to the lower ...port (purple). Parallel Port The parallel port allows connection of 10/100Mbps. If your OS does not support USB controller, please contact OS vendor for possible patch or driver...
User Manual
Page 20
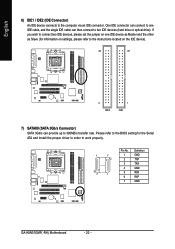
... optical drive). English 6) IDE1 / IDE2 (IDE Connector) An IDE device connects to work properly. 1 7 7 1 Pin No. 1 2 3 4 5 6 7 Definition GND TXP TXN GND RXN RXP GND GA-K8N51GMF(-RH) Motherboard - 20 - Please refer to the BIOS setting for information on settings, please refer to the instructions located on the IDE device). 40 39 2 IDE2 1 IDE1... 3Gb/s Connector) SATA 3Gb/s can connect to one IDE device as Master and the other as Slave (for the Serial ATA and install the proper driver in order to the computer via an IDE connector.
... optical drive). English 6) IDE1 / IDE2 (IDE Connector) An IDE device connects to work properly. 1 7 7 1 Pin No. 1 2 3 4 5 6 7 Definition GND TXP TXN GND RXN RXP GND GA-K8N51GMF(-RH) Motherboard - 20 - Please refer to the BIOS setting for information on settings, please refer to the instructions located on the IDE device). 40 39 2 IDE2 1 IDE1... 3Gb/s Connector) SATA 3Gb/s can connect to one IDE device as Master and the other as Slave (for the Serial ATA and install the proper driver in order to the computer via an IDE connector.

User Manual
Page 47
... "My computer", and execute the Setup.exe. 3-1 Install Chipset Drivers After insert the driver CD, "Xpress Install" will scan automatically the system and then list all the drivers that came with your motherboard into your system the "Xpress Install" will continue to install other drivers. System will show the installation guide. Please remove the question...
... "My computer", and execute the Setup.exe. 3-1 Install Chipset Drivers After insert the driver CD, "Xpress Install" will scan automatically the system and then list all the drivers that came with your motherboard into your system the "Xpress Install" will continue to install other drivers. System will show the installation guide. Please remove the question...

User Manual
Page 48
English 3-2 Software Application This page displays all the tools that Gigabyte developed and some free software, you can choose anyone you want and press "install" to install them. 3-3 Software Information This page lists the contents of software and drivers in this CD-title. GA-K8N51GMF(-RH) Motherboard - 48 -
English 3-2 Software Application This page displays all the tools that Gigabyte developed and some free software, you can choose anyone you want and press "install" to install them. 3-3 Software Information This page lists the contents of software and drivers in this CD-title. GA-K8N51GMF(-RH) Motherboard - 48 -
User Manual
Page 49
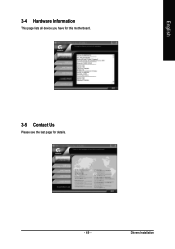
English 3-4 Hardware Information This page lists all device you have for this motherboard. 3-5 Contact Us Please see the last page for details. - 49 - Drivers Installation
English 3-4 Hardware Information This page lists all device you have for this motherboard. 3-5 Contact Us Please see the last page for details. - 49 - Drivers Installation

User Manual
Page 51
... up errors resulting from a recommended memory module list. and @BIOS at the same time.) - 51 - Through GIGABYTE M.I .B. 2) is a unique feature that allows system hardware information such as the CPU system bus, memory timings or to enabled...friendly and reliable platform for a faster and smoother execution of all new drivers with the latest LGA775 Intel® Pentium® 4 Processor as well as future Intel® processors. for solid system stability. M.I.T. (Motherboard Intelligent Tweaker) Motherboard Intelligent Tweaker (M.I .B. 2 features. feature the user is designed to...
... up errors resulting from a recommended memory module list. and @BIOS at the same time.) - 51 - Through GIGABYTE M.I .B. 2) is a unique feature that allows system hardware information such as the CPU system bus, memory timings or to enabled...friendly and reliable platform for a faster and smoother execution of all new drivers with the latest LGA775 Intel® Pentium® 4 Processor as well as future Intel® processors. for solid system stability. M.I.T. (Motherboard Intelligent Tweaker) Motherboard Intelligent Tweaker (M.I .B. 2 features. feature the user is designed to...
User Manual
Page 54
...a primary partition must be backed up data from the driver CD before data backup. 2. GA-8N-SLI Royal GA-8N-SLI Pro GA-8N-SLI Capable of the hard disk, so free space available on the following motherboards (As this is normal that data backup takes longer time...the backup file must be solved by BIOS update) GA-K8U GA-K8NXP-9 GA-K8U-9 GA-K8N Ultra-9 GA-K8NXP-SLI GA-K8NF-9 (PCB Ver. 1.0) GA-K8N Ultra-SLI GA-K8NE (PCB Ver. 1.0) GA-K8N Pro-SLI GA-K8NMF-9 GA-K8N51GMF(-RH) Motherboard - 54 - On a few motherboards based on the size of Xpress Recovery2 1. mended...
...a primary partition must be backed up data from the driver CD before data backup. 2. GA-8N-SLI Royal GA-8N-SLI Pro GA-8N-SLI Capable of the hard disk, so free space available on the following motherboards (As this is normal that data backup takes longer time...the backup file must be solved by BIOS update) GA-K8U GA-K8NXP-9 GA-K8U-9 GA-K8N Ultra-9 GA-K8NXP-SLI GA-K8NF-9 (PCB Ver. 1.0) GA-K8N Ultra-SLI GA-K8NE (PCB Ver. 1.0) GA-K8N Pro-SLI GA-K8NMF-9 GA-K8N51GMF(-RH) Motherboard - 54 - On a few motherboards based on the size of Xpress Recovery2 1. mended...
User Manual
Page 64
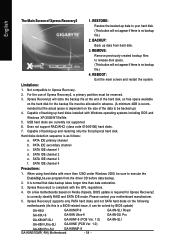
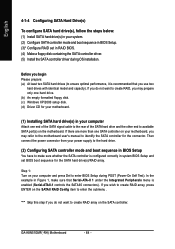
...(b) An empty formatted floppy disk. (c) Windows XP/2000 setup disk. (d) Driver CD for your motherboard. (1) Installing SATA hard drive(s) in your computer Attach one SATA controller on your motherboard, you do not want to create RAID array on the SATAII RAID Config ...the motherboard. English 4-1-4 Configuring SATA Hard Drive(s) To configure SATA hard drive(s), follow the steps below: (1) Install SATA hard drive(s) in your system. (2) Configure SATA controller mode and boot sequence in BIOS Setup. (3)* Configure RAID set BIOS boot sequence for the connector. GA-K8N51GMF(-RH) Motherboard ...
...(b) An empty formatted floppy disk. (c) Windows XP/2000 setup disk. (d) Driver CD for your motherboard. (1) Installing SATA hard drive(s) in your computer Attach one SATA controller on your motherboard, you do not want to create RAID array on the SATAII RAID Config ...the motherboard. English 4-1-4 Configuring SATA Hard Drive(s) To configure SATA hard drive(s), follow the steps below: (1) Install SATA hard drive(s) in your system. (2) Configure SATA controller mode and boot sequence in BIOS Setup. (3)* Configure RAID set BIOS boot sequence for the connector. GA-K8N51GMF(-RH) Motherboard ...

User Manual
Page 72
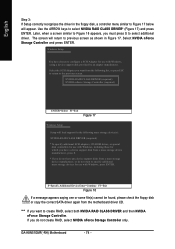
...from the startup disk. Press 0 to copy the driver in MS-DOS mode(Note1). A command prompt window will then automatically zip and transfer this driver file to a floppy disk. GA-K8N51GMF(-RH) Motherboard Figure 14 - 72 - English (4) Making a SATA Driver Disk To install operating system onto a serial ATA hard... 12 Figure 13 (Note 1) For users without a startup disk: Use an alternative system and insert the GIGABYTE motherboard driver CD-ROM. First of all, copy the driver for the SATA controller from the menu in Figure 13. Your system will open similar to that has CD...
...from the startup disk. Press 0 to copy the driver in MS-DOS mode(Note1). A command prompt window will then automatically zip and transfer this driver file to a floppy disk. GA-K8N51GMF(-RH) Motherboard Figure 14 - 72 - English (4) Making a SATA Driver Disk To install operating system onto a serial ATA hard... 12 Figure 13 (Note 1) For users without a startup disk: Use an alternative system and insert the GIGABYTE motherboard driver CD-ROM. First of all, copy the driver for the SATA controller from the menu in Figure 13. Your system will open similar to that has CD...
User Manual
Page 74
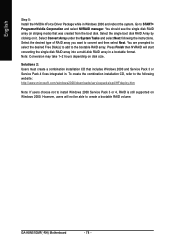
...press ENTER. If you do not create RAID, select NVIDIA nForce Storage Controller only. English Step 3: If Setup correctly recognizes the driver in the floppy disk, a controller menu similar to Figure 17 below will return to previous screen as shown in Figure 17. S=... screen will appear. Select the SCSI Adapter you want from the motherboard driver CD. Later, when a screen similar to Figure 18 appears, you must press S to select NVIDIA RAID CLASS DRIVER* (Figure 17) and press ENTER. Use the ARROW keys to select additional driver. GA-K8N51GMF(-RH) Motherboard - 74 -
...press ENTER. If you do not create RAID, select NVIDIA nForce Storage Controller only. English Step 3: If Setup correctly recognizes the driver in the floppy disk, a controller menu similar to Figure 17 below will return to previous screen as shown in Figure 17. S=... screen will appear. Select the SCSI Adapter you want from the motherboard driver CD. Later, when a screen similar to Figure 18 appears, you must press S to select NVIDIA RAID CLASS DRIVER* (Figure 17) and press ENTER. Use the ARROW keys to select additional driver. GA-K8N51GMF(-RH) Motherboard - 74 -

User Manual
Page 76
...the detailed step-by-step instructions: Step 1: Install Windows 2000 onto a selected hard drive. Solutions 1: Use the NVRAID tool (nForce Driver Version 5.xx) to convert the boot volume to resolve this issue. Download and install Windows 2000 Service Pack 4 from Microsoft's website...] Disabled Disabled Item Help Menu Level : Move Enter: Select F5: Previous Values +/-/PU/PD: Value F10: Save F6: Fail-Safe Defaults GA-K8N51GMF(-RH) Motherboard Figure 22 - 76 - ESC: Exit F1: General Help F7: Optimized Defaults Here are two solutions to a RAID array. Save settings and...
...the detailed step-by-step instructions: Step 1: Install Windows 2000 onto a selected hard drive. Solutions 1: Use the NVRAID tool (nForce Driver Version 5.xx) to convert the boot volume to resolve this issue. Download and install Windows 2000 Service Pack 4 from Microsoft's website...] Disabled Disabled Item Help Menu Level : Move Enter: Select F5: Previous Values +/-/PU/PD: Value F10: Save F6: Fail-Safe Defaults GA-K8N51GMF(-RH) Motherboard Figure 22 - 76 - ESC: Exit F1: General Help F7: Optimized Defaults Here are two solutions to a RAID array. Save settings and...
User Manual
Page 78
... the system. Select the desired type of RAID array you want to install Windows 2000 Service Pack 3 or 4, RAID is still supported on Windows 2000. GA-K8N51GMF(-RH) Motherboard - 78 - English Step 5: Install the NVIDIA nForce Driver Package while in .
... the system. Select the desired type of RAID array you want to install Windows 2000 Service Pack 3 or 4, RAID is still supported on Windows 2000. GA-K8N51GMF(-RH) Motherboard - 78 - English Step 5: Install the NVIDIA nForce Driver Package while in .
User Manual
Page 79
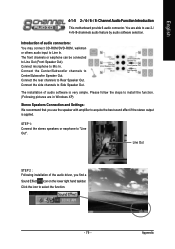
Introduction of the audio driver, you use 2-/ 4-/6-/8-channnels audio feature by audio software selection. Connect the side channels to Mic In. Line Out STEP 2 : Following installation of audio connectors: You ... to install the function. (Following pictures are able to use the speaker with amplifier to Center/Subwoofer Speaker Out. Appendix Channel Audio Function Introduction This motherboard provide 6 audio connector. STEP 1: Connect the stereo speakers or earphone to select the function. - 79 - Click the icon to "Line Out". Connect the Center/Subwoofer...
Introduction of the audio driver, you use 2-/ 4-/6-/8-channnels audio feature by audio software selection. Connect the side channels to Mic In. Line Out STEP 2 : Following installation of audio connectors: You ... to install the function. (Following pictures are able to use the speaker with amplifier to Center/Subwoofer Speaker Out. Appendix Channel Audio Function Introduction This motherboard provide 6 audio connector. STEP 1: Connect the stereo speakers or earphone to select the function. - 79 - Click the icon to "Line Out". Connect the Center/Subwoofer...
User Manual
Page 80
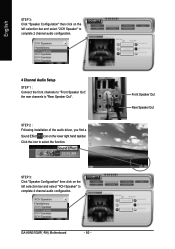
... to select the function. English STEP 3: Click "Speaker Configuration" then click on the left selection bar and select "4CH Speaker" to complete 4 channel audio configuration. GA-K8N51GMF(-RH) Motherboard - 80 - STEP 2 : Following installation of the audio driver, you find a Sound Effect icon on the lower right hand taskbar.
... to select the function. English STEP 3: Click "Speaker Configuration" then click on the left selection bar and select "4CH Speaker" to complete 4 channel audio configuration. GA-K8N51GMF(-RH) Motherboard - 80 - STEP 2 : Following installation of the audio driver, you find a Sound Effect icon on the lower right hand taskbar.
User Manual
Page 82
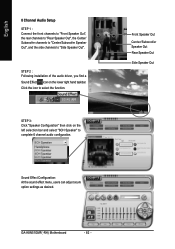
... function. Click the icon to "Side Speaker Out". Front Speaker Out Center/Subwoofer Speaker Out Rear Speaker Out Side Speaker Out GA-K8N51GMF(-RH) Motherboard - 82 - STEP 2 : Following installation of the audio driver, you find a Sound Effect icon on the left selection bar and select "6CH Speaker" to complete 6 channel audio configuration. STEP 3: Click...
... function. Click the icon to "Side Speaker Out". Front Speaker Out Center/Subwoofer Speaker Out Rear Speaker Out Side Speaker Out GA-K8N51GMF(-RH) Motherboard - 82 - STEP 2 : Following installation of the audio driver, you find a Sound Effect icon on the left selection bar and select "6CH Speaker" to complete 6 channel audio configuration. STEP 3: Click...


