
User Manual
Page 20
... gold edge connectors are fully inserted. Step 1: Gently spread the retaining clips of the same model to enable SLI Mode. Align the small notch at a 25o angle. Supported Operating Systems: Only Windows XP operating system is to take out the module from the socket and insert it away from the socket.... Step 2: Position the SLI Mode side of the module above the socket at the top edge of the module ...
... gold edge connectors are fully inserted. Step 1: Gently spread the retaining clips of the same model to enable SLI Mode. Align the small notch at a 25o angle. Supported Operating Systems: Only Windows XP operating system is to take out the module from the socket and insert it away from the socket.... Step 2: Position the SLI Mode side of the module above the socket at the top edge of the module ...
User Manual
Page 33
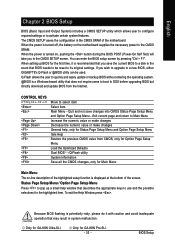
... and return to a new BIOS, either GIGABYTE's Q-Flash or @BIOS utility can enter the BIOS setup screen by pressing "Ctrl + F1". Status Page Setup Menu / Option Page Setup Menu Press to pop up BIOS for the highlighted item. Only for GA-K8N Ultra-SLI. When the power is turned on, pushing... Option Page Setup Menu - Q-Flash allows the user to quickly and easily update or backup BIOS without entering the operating system. @BIOS is a Windows-based utility that BIOS needs to be used. English Chapter 2 BIOS Setup BIOS (Basic Input and Output System) includes a CMOS SETUP utility which...
... and return to a new BIOS, either GIGABYTE's Q-Flash or @BIOS utility can enter the BIOS setup screen by pressing "Ctrl + F1". Status Page Setup Menu / Option Page Setup Menu Press to pop up BIOS for the highlighted item. Only for GA-K8N Ultra-SLI. When the power is turned on, pushing... Option Page Setup Menu - Q-Flash allows the user to quickly and easily update or backup BIOS without entering the operating system. @BIOS is a Windows-based utility that BIOS needs to be used. English Chapter 2 BIOS Setup BIOS (Basic Input and Output System) includes a CMOS SETUP utility which...
User Manual
Page 52
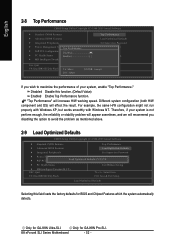
... Disable this field loads the factory defaults for BIOS and Chipset Features which the system automatically detects. Only for GA-K8N Ultra-SLI. Therefore, if your system is not perform enough, the reliability or stability problem will appear sometimes, and we ...maximize the performance of your system, enable "Top Performance." For example, the same H/W configuration might not run properly with Windows XP, but works smoothly with Windows NT. English 2-8 Top Performance CMOS Setup Utility-Copyright (C) 1984-2005 Award Software Standard CMOS Features Advanced BIOS Features Integrated...
... Disable this field loads the factory defaults for BIOS and Chipset Features which the system automatically detects. Only for GA-K8N Ultra-SLI. Therefore, if your system is not perform enough, the reliability or stability problem will appear sometimes, and we ...maximize the performance of your system, enable "Top Performance." For example, the same H/W configuration might not run properly with Windows XP, but works smoothly with Windows NT. English 2-8 Top Performance CMOS Setup Utility-Copyright (C) 1984-2005 Award Software Standard CMOS Features Advanced BIOS Features Integrated...
User Manual
Page 55
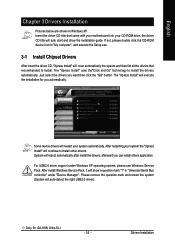
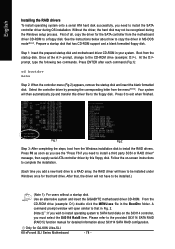
... execute the installation for GA-K8N Ultra-SLI. - 55 - Please remove the question mark and restart the system (System will restart your system automatically. English Chapter 3 Drivers Installation Pictures below are shown in "Universal Serial Bus controller" under Windows XP operating system, please use Windows Service Pack. Just select... came with your motherboard into your system the "Xpress Install" will show the installation guide. in Windows XP. After restarting your CD-ROM drive, the driver CD-title will auto start and show a question mark "?" After install...
... execute the installation for GA-K8N Ultra-SLI. - 55 - Please remove the question mark and restart the system (System will restart your system automatically. English Chapter 3 Drivers Installation Pictures below are shown in "Universal Serial Bus controller" under Windows XP operating system, please use Windows Service Pack. Just select... came with your motherboard into your system the "Xpress Install" will show the installation guide. in Windows XP. After restarting your CD-ROM drive, the driver CD-title will auto start and show a question mark "?" After install...
User Manual
Page 59
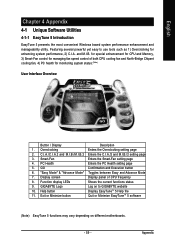
... the PC Health setting page 5. English Chapter 4 Appendix 4-1 Unique Software Utilities 4-1-1 EasyTune 5 Introduction EasyTune 5 presents the most convenient Windows based system performance enhancement and manageability utility. for special enhancement for CPU and Memory, 3) Smart-Fan control for managing fan speed control ... C.I.A./C.I.A.2 and M.I.B./M.I.B.2 Enters the C.I.A./2 and M.I .B. and M.I .B./2 setting page 3. "Easy Mode" & "Advance Mode" Toggles between Easy and Advance Mode 7. GIGABYTE Logo Log on different motherboards. - 59 - Featuring several powerful yet easy to...
... the PC Health setting page 5. English Chapter 4 Appendix 4-1 Unique Software Utilities 4-1-1 EasyTune 5 Introduction EasyTune 5 presents the most convenient Windows based system performance enhancement and manageability utility. for special enhancement for CPU and Memory, 3) Smart-Fan control for managing fan speed control ... C.I.A./C.I.A.2 and M.I.B./M.I.B.2 Enters the C.I.A./2 and M.I .B. and M.I .B./2 setting page 3. "Easy Mode" & "Advance Mode" Toggles between Easy and Advance Mode 7. GIGABYTE Logo Log on different motherboards. - 59 - Featuring several powerful yet easy to...
User Manual
Page 60
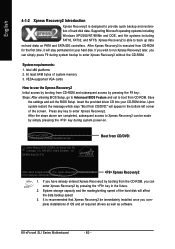
... completed, subsequent access to Xpress Recovery2 can be immediately installed once you can simply press F9 during system power-on PATA and SATA IDE controllers. GA-K8N Ultra-SLI F7b . . . . :BIOS Setup/Dual BIOS, : Xpress Recovery2, For Boot Menu 03/03/2006-NF-CK804-6A61FG0DC-00 Xpress Recovery2 1. ... to back up data on hard disks on . . . Save the settings and exit the BIOS Setup. Supporting Microsoft operating systems including Windows XP/2000/NT/98/Me and DOS, and file systems including FAT16, FAT32, and NTFS, Xpress Recovery2 is recommended that Xpress Recovery2 be...
... completed, subsequent access to Xpress Recovery2 can be immediately installed once you can simply press F9 during system power-on PATA and SATA IDE controllers. GA-K8N Ultra-SLI F7b . . . . :BIOS Setup/Dual BIOS, : Xpress Recovery2, For Boot Menu 03/03/2006-NF-CK804-6A61FG0DC-00 Xpress Recovery2 1. ... to back up data on hard disks on . . . Save the settings and exit the BIOS Setup. Supporting Microsoft operating systems including Windows XP/2000/NT/98/Me and DOS, and file systems including FAT16, FAT32, and NTFS, Xpress Recovery2 is recommended that Xpress Recovery2 be...

User Manual
Page 61
...update) GA-K8U GA-K8U-9 GA-K8NXP-SLI GA-K8N Ultra-SLI GA-K8N Pro-SLI GA-K8NXP-9 GA-K8N Ultra-9 GA-K8NF-9 (PCB Ver. 1.0) GA-K8NE (PCB Ver. 1.0) GA-K8NMF-9 - 61 - Not compatible to your motherboard manufacturer. 5. Capable of Xpress Recovery2 1. It is no backup file.) 2. GA-8N-SLI Royal GA-8N-SLI Pro GA-8N-SLI Appendix ...Limitations: 1. SATA IDE channel 2 e. PATA IDE primary channel b. Please contact your hard disk. (This button will not appear if there is normal that data backup takes longer time than 128G under Windows...
...update) GA-K8U GA-K8U-9 GA-K8NXP-SLI GA-K8N Ultra-SLI GA-K8N Pro-SLI GA-K8NXP-9 GA-K8N Ultra-9 GA-K8NF-9 (PCB Ver. 1.0) GA-K8NE (PCB Ver. 1.0) GA-K8NMF-9 - 61 - Not compatible to your motherboard manufacturer. 5. Capable of Xpress Recovery2 1. It is no backup file.) 2. GA-8N-SLI Royal GA-8N-SLI Pro GA-8N-SLI Appendix ...Limitations: 1. SATA IDE channel 2 e. PATA IDE primary channel b. Please contact your hard disk. (This button will not appear if there is normal that data backup takes longer time than 128G under Windows...
User Manual
Page 64
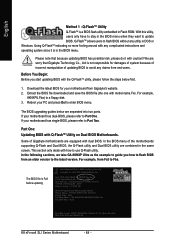
...to a floppy disk. 3. In the following sections, we take GA-8KNXP Ultra as the example to guide you start updating BIOS with dual ...example, from an older version to Part One. Please note that Gigabyte Technology Co., Ltd is not responsible for damages of system because of... Q-Flash / F9 For Xpress Recovery 08/07/2003-i875P-6A79BG03C-00 K8 nForce4 SLI Series Motherboard - 64 - For example, 8KNXPU.Fba) to update BIOS. The BIOS...Fxx. With this utility, users only have to stay in DOS or Windows. Using Q-FlashTM indicating no more fooling around with caution!! We are separated...
...to a floppy disk. 3. In the following sections, we take GA-8KNXP Ultra as the example to guide you start updating BIOS with dual ...example, from an older version to Part One. Please note that Gigabyte Technology Co., Ltd is not responsible for damages of system because of... Q-Flash / F9 For Xpress Recovery 08/07/2003-i875P-6A79BG03C-00 K8 nForce4 SLI Series Motherboard - 64 - For example, 8KNXPU.Fba) to update BIOS. The BIOS...Fxx. With this utility, users only have to stay in DOS or Windows. Using Q-FlashTM indicating no more fooling around with caution!! We are separated...
User Manual
Page 71
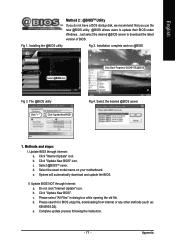
... any other methods (such as: K8NS939.D2). Methods and steps: I. Please select "All Files" in dialog box while opening the old file. Click Start/ Programs/ GIGABYTE/@BIOS Fig 3. English Method 2 : @BIOSTM Utility If you do not have a DOS startup disk, we recommend that you use the new @BIOS utility. @BIOS allows...
... any other methods (such as: K8NS939.D2). Methods and steps: I. Please select "All Files" in dialog box while opening the old file. Click Start/ Programs/ GIGABYTE/@BIOS Fig 3. English Method 2 : @BIOSTM Utility If you do not have a DOS startup disk, we recommend that you use the new @BIOS utility. @BIOS allows...
User Manual
Page 74
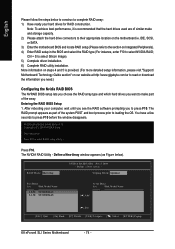
...(Please refer to select NVIDIA RAID; Press F10. Define a New Array - Define a New Array window appears (as part of the array. Striping Block: Optimal Free Disks Loc Disk Model Name 2.0.M ST3120026AS ...Del [ESC] Quit [F6] Back [F7] Finish [TAB] Navigate [ ] Select [ENTER] Popup K8 nForce4 SLI Series Motherboard - 74 - NVIDIA RAID IDE ROM BIOS 4.76 Copyright (C) 2004 NVIDIA Corp. Entering the RAID BIOS...visit "Support\ Motherboard\ Technology Guide section" on our website at http:\\www.gigabyte.com.tw to read or download the information you need.) Configuring the Nvidia RAID...
...(Please refer to select NVIDIA RAID; Press F10. Define a New Array - Define a New Array window appears (as part of the array. Striping Block: Optimal Free Disks Loc Disk Model Name 2.0.M ST3120026AS ...Del [ESC] Quit [F6] Back [F7] Finish [TAB] Navigate [ ] Select [ENTER] Popup K8 nForce4 SLI Series Motherboard - 74 - NVIDIA RAID IDE ROM BIOS 4.76 Copyright (C) 2004 NVIDIA Corp. Entering the RAID BIOS...visit "Support\ Motherboard\ Technology Guide section" on our website at http:\\www.gigabyte.com.tw to read or download the information you need.) Configuring the Nvidia RAID...
User Manual
Page 75
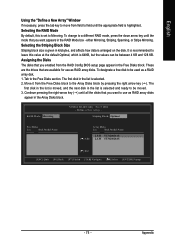
... in the list is set to Mirroring. Move it from the Free Disks block to the Free Disks section. English Using the "Define a New Array" Window If necessary, press the tab key to move from field to field until all the disks that you want appears in the RAID Mode box -
... in the list is set to Mirroring. Move it from the Free Disks block to the Free Disks section. English Using the "Define a New Array" Window If necessary, press the tab key to move from field to field until all the disks that you want appears in the RAID Mode box -
User Manual
Page 76
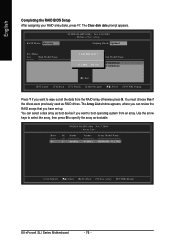
RAID Mode: Mirroring NVIDIA RAID Utility Nov 5 10 2004 - The Array List window appears, where you can select a disk array as boot device if you have set up. Striping Block: Optimal Free Disks Loc Disk Model Name Clear ... from an array. Id Status Vendor Array Model Name 2 Healthy NVIDIA MIRROR 111.79G [Ctrl-X] Exit [ ] Select [B] Set Boot [N] New Array [ENTER] Detail K8 nForce4 SLI Series Motherboard - 76 - Define a New Array - Boot No NVIDIA RAID Utility Nov 5 2004 - Array List - English Completing the RAID BIOS Setup After assigning your RAID...
RAID Mode: Mirroring NVIDIA RAID Utility Nov 5 10 2004 - The Array List window appears, where you can select a disk array as boot device if you have set up. Striping Block: Optimal Free Disks Loc Disk Model Name Clear ... from an array. Id Status Vendor Array Model Name 2 Healthy NVIDIA MIRROR 111.79G [Ctrl-X] Exit [ ] Select [B] Set Boot [N] New Array [ENTER] Detail K8 nForce4 SLI Series Motherboard - 76 - Define a New Array - Boot No NVIDIA RAID Utility Nov 5 2004 - Array List - English Completing the RAID BIOS Setup After assigning your RAID...
User Manual
Page 77
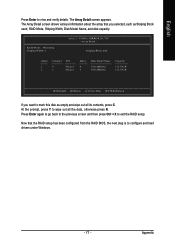
English Press Enter to configure and load drivers under Windows. - 77 - The Array Detail screen appears. Appendix The Array Detail screen shows various information about the array that the RAID setup has been configured from ...
English Press Enter to configure and load drivers under Windows. - 77 - The Array Detail screen appears. Appendix The Array Detail screen shows various information about the array that the RAID setup has been configured from ...
User Manual
Page 78
...RAID (RAID 5) function manual for that , the driver will not have to be installed under Windows once for detailed information about how to complete the installation. (Each time you must select the ...-ROM to install the RAID drivers. Use an alternative system and insert the GIGABYTE motherboard driver CD-ROM. K8 nForce4 SLI Series Motherboard - 78 - Prepare a startup disk that in your system. ...driver in the BootDrv folder. First of all, copy the driver for GA-K8N Ultra-SLI. Without the driver, the hard disk may not be installed.) (Note 1): For users without a startup...
...RAID (RAID 5) function manual for that , the driver will not have to be installed under Windows once for detailed information about how to complete the installation. (Each time you must select the ...-ROM to install the RAID drivers. Use an alternative system and insert the GIGABYTE motherboard driver CD-ROM. K8 nForce4 SLI Series Motherboard - 78 - Prepare a startup disk that in your system. ...driver in the BootDrv folder. First of all, copy the driver for GA-K8N Ultra-SLI. Without the driver, the hard disk may not be installed.) (Note 1): For users without a startup...
User Manual
Page 79
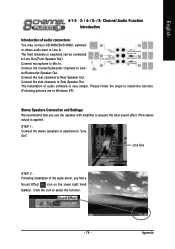
... to Side Speaker Out. Connect the side channels to select the function. - 79 - Please follow the steps to install the function. (Following pictures are in Windows XP) Stereo Speakers Connection and Settings: We recommend that you find a Sound Effect icon on the lower right hand taskbar. Appendix Channel Audio Function Introduction...
... to Side Speaker Out. Connect the side channels to select the function. - 79 - Please follow the steps to install the function. (Following pictures are in Windows XP) Stereo Speakers Connection and Settings: We recommend that you find a Sound Effect icon on the lower right hand taskbar. Appendix Channel Audio Function Introduction...
User Manual
Page 83
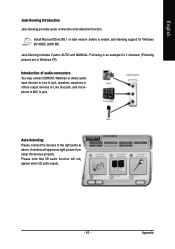
... appear when 3D audio inputs. - 83 - Appendix Following is an example for Windows 98/ 98SE/ 2000/ ME. Jack-Sensing includes 2 parts: AUTO and MANUAL. Please note that 3D audio function will appear as above. Auto-detecting: Please ...Sensing provides audio connectors error-detection function. Install Microsoft DirectX8.1 or later version before to enable Jack-Sensing support for 2 channels (Following pictures are in Windows XP): Introduction of audio connectors You may connect CDROM, Walkman or others audio input devices to Line In jack, speakers, earphone or others output devices...
... appear when 3D audio inputs. - 83 - Appendix Following is an example for Windows 98/ 98SE/ 2000/ ME. Jack-Sensing includes 2 parts: AUTO and MANUAL. Please note that 3D audio function will appear as above. Auto-detecting: Please ...Sensing provides audio connectors error-detection function. Install Microsoft DirectX8.1 or later version before to enable Jack-Sensing support for 2 channels (Following pictures are in Windows XP): Introduction of audio connectors You may connect CDROM, Walkman or others audio input devices to Line In jack, speakers, earphone or others output devices...


