
Manual
Page 1
GA-H67MA-D2H LGA1155 socket motherboard for Intel® Core™ i7 processors/ Intel® Core™ i5 processors/Intel® Core™ i3 processors/ Intel® Pentium® processors/Intel® Celeron® processors User's Manual Rev. 1002 12ME-H67D2H-1002R
GA-H67MA-D2H LGA1155 socket motherboard for Intel® Core™ i7 processors/ Intel® Core™ i5 processors/Intel® Core™ i3 processors/ Intel® Pentium® processors/Intel® Celeron® processors User's Manual Rev. 1002 12ME-H67D2H-1002R

Manual
Page 3
... product, read the Quick Installation Guide included with the product. For detailed product information, carefully read the User's Manual. For product-related information, check on our website at: http://www.gigabyte.com Identifying Your Motherboard Revision The revision number on your motherboard revision before updating motherboard BIOS, drivers, or when looking...
... product, read the Quick Installation Guide included with the product. For detailed product information, carefully read the User's Manual. For product-related information, check on our website at: http://www.gigabyte.com Identifying Your Motherboard Revision The revision number on your motherboard revision before updating motherboard BIOS, drivers, or when looking...

Manual
Page 5
Chapter 3 Drivers Installation 55 3-1 Installing Chipset Drivers 55 3-2 Application Software 56 3-3 Technical Manuals 56 3-4 Contact...57 3-5 System...57 3-6 Download Center 58 3-7 New Utilities...58 Chapter 4 Unique Features 59 4-1 Xpress Recovery2 59 4-2 BIOS Update Utilities 62 4-2-1 Updating the BIOS ...
Chapter 3 Drivers Installation 55 3-1 Installing Chipset Drivers 55 3-2 Application Software 56 3-3 Technical Manuals 56 3-4 Contact...57 3-5 System...57 3-6 Download Center 58 3-7 New Utilities...58 Chapter 4 Unique Features 59 4-1 Xpress Recovery2 59 4-2 BIOS Update Utilities 62 4-2-1 Updating the BIOS ...
Manual
Page 6
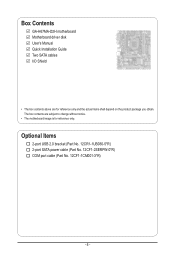
Optional Items 2-port USB 2.0 bracket (Part No. 12CR1-1UB030-5*R) 2-port SATA power cable (Part No. 12CF1-2SERPW-0*R) COM port cable (Part No. 12CF1-1CM001-3*R) - 6 - The box contents are for reference only. Box Contents GA-H67MA-D2H motherboard Motherboard driver disk User's Manual Quick Installation Guide Two SATA cables I/O Shield • The box contents above are subject to change without notice. • The motherboard image is for reference only and the actual items shall depend on the product package you obtain.
Optional Items 2-port USB 2.0 bracket (Part No. 12CR1-1UB030-5*R) 2-port SATA power cable (Part No. 12CF1-2SERPW-0*R) COM port cable (Part No. 12CF1-1CM001-3*R) - 6 - The box contents are for reference only. Box Contents GA-H67MA-D2H motherboard Motherboard driver disk User's Manual Quick Installation Guide Two SATA cables I/O Shield • The box contents above are subject to change without notice. • The motherboard image is for reference only and the actual items shall depend on the product package you obtain.

Manual
Page 9
... internal connectors on the computer power during the installation process can become damaged as a motherboard, CPU or memory. Prior to installation, carefully read the user's manual and follow these procedures: • Prior to installation, do not remove or break motherboard S/N (Serial Number) sticker or warranty sticker provided by unplugging the power...
... internal connectors on the computer power during the installation process can become damaged as a motherboard, CPU or memory. Prior to installation, carefully read the user's manual and follow these procedures: • Prior to installation, do not remove or break motherboard S/N (Serial Number) sticker or warranty sticker provided by unplugging the power...

Manual
Page 15
... contrary, is complete. Push down each push pin. Check that the Male and Female push pins are joined closely. (Refer to your CPU cooler installation manual for instructions on installing the cooler.) Step 5: After the installation, check the back of the CPU cooler to the CPU fan header (CPU_FAN) on the...
... contrary, is complete. Push down each push pin. Check that the Male and Female push pins are joined closely. (Refer to your CPU cooler installation manual for instructions on installing the cooler.) Step 5: After the installation, check the back of the CPU cooler to the CPU fan header (CPU_FAN) on the...
Manual
Page 18
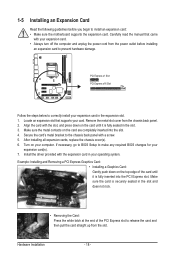
... the card until it is fully seated in the slot. 3. Install the driver provided with the expansion card in the expansion slot. 1. Carefully read the manual that supports your card. Hardware Installation - 18 - Remove the metal slot cover from the power outlet before you begin to make any required BIOS changes...
... the card until it is fully seated in the slot. 3. Install the driver provided with the expansion card in the expansion slot. 1. Carefully read the manual that supports your card. Hardware Installation - 18 - Remove the metal slot cover from the power outlet before you begin to make any required BIOS changes...

Manual
Page 26
For information about connecting the S/PDIF digital audio cable, carefully read the manual for your graphics card if you wish to connect an HDMI display to the graphics card and have digital audio output from the HDMI display ...
For information about connecting the S/PDIF digital audio cable, carefully read the manual for your graphics card if you wish to connect an HDMI display to the graphics card and have digital audio output from the HDMI display ...

Manual
Page 28
... do so may cause damage to the motherboard. • After system restart, go to BIOS Setup to load factory defaults (select Load Optimized Defaults) or manually configure the BIOS settings (refer to Chapter 4, "Dynamic Energy Saver™ 2," for BIOS configurations). 14) PHASE LED The number of lighted LEDs. Hardware Installation - 28...
... do so may cause damage to the motherboard. • After system restart, go to BIOS Setup to load factory defaults (select Load Optimized Defaults) or manually configure the BIOS settings (refer to Chapter 4, "Dynamic Energy Saver™ 2," for BIOS configurations). 14) PHASE LED The number of lighted LEDs. Hardware Installation - 28...
Manual
Page 41
... SATA devices by using one of the two methods below : • None If no SATA devices are used , set this item to manually enter the specifications of the currently installed hard drive. Cylinder Number of heads. Head Number of cylinders. Access Mode Sets the hard drive access... If you to None so the system will skip the detection of the device during the POST. (Default) • Manual Allows you wish to enter the parameters manually, refer to set the time. Select the desired field and use the up arrow or down arrow key to CHS. ...
... SATA devices by using one of the two methods below : • None If no SATA devices are used , set this item to manually enter the specifications of the currently installed hard drive. Cylinder Number of heads. Head Number of cylinders. Access Mode Sets the hard drive access... If you to None so the system will skip the detection of the device during the POST. (Default) • Manual Allows you wish to enter the parameters manually, refer to set the time. Select the desired field and use the up arrow or down arrow key to CHS. ...

Manual
Page 51
... item is configurable only when CPU Smart FAN Control is set for a 4-pin CPU fan that is enabled. Manual Allows you to control CPU fan speed. Auto Lets the BIOS automatically detect the type of CPU fan installed and sets the optimal CPU fan ...
... item is configurable only when CPU Smart FAN Control is set for a 4-pin CPU fan that is enabled. Manual Allows you to control CPU fan speed. Auto Lets the BIOS automatically detect the type of CPU fan installed and sets the optimal CPU fan ...
Manual
Page 55
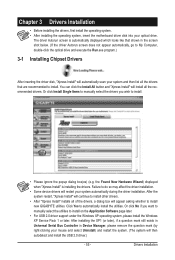
... support under the Windows XP operating system, please install the Windows XP Service Pack 1 or later. Or click Install Single Items to manually select the drivers you want to manually select the utilities to do so may affect the driver installation. • Some device drivers will then autodetect and install the USB... still exists in Universal Serial Bus Controller in the screen shot below. (If the driver Autorun screen does not appear automatically, go to install new GIGABYTE utilities.
... support under the Windows XP operating system, please install the Windows XP Service Pack 1 or later. Or click Install Single Items to manually select the drivers you want to manually select the utilities to do so may affect the driver installation. • Some device drivers will then autodetect and install the USB... still exists in Universal Serial Bus Controller in the screen shot below. (If the driver Autorun screen does not appear automatically, go to install new GIGABYTE utilities.

Manual
Page 56
You can click the Install button on the right of an item to install it. 3-3 Technical Manuals This page provides GIGABYTE's application guides, content descriptions for this driver disk, and the motherboard manuals. Drivers Installation - 56 - 3-2 Application Software This page displays all the utilities and applications that GIGABYTE develops and some free software.
You can click the Install button on the right of an item to install it. 3-3 Technical Manuals This page provides GIGABYTE's application guides, content descriptions for this driver disk, and the motherboard manuals. Drivers Installation - 56 - 3-2 Application Software This page displays all the utilities and applications that GIGABYTE develops and some free software.
Manual
Page 62
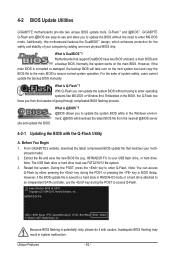
... Award Modular BIOS v6.00PG Copyright (C) 1984-2010, Award Software, Inc. site and update the BIOS. H67MA-D2H F4j . . . . : BIOS Setup : XpressRecovery2 : Boot Menu : Qflash 11/16/2010-H67-7A89VG0AC...protection for the safety and stability of system safety, users cannot update the backup BIOS manually. With Q-Flash you to enter operating systems like MS-DOS or Window first. ...you from the nearest @BIOS server 4-2-1 Updating the BIOS with caution. 4-2 BIOS Update Utilities GIGABYTE motherboards provide two unique BIOS update tools, Q-Flash™ and @BIOS™. What is ...
... Award Modular BIOS v6.00PG Copyright (C) 1984-2010, Award Software, Inc. site and update the BIOS. H67MA-D2H F4j . . . . : BIOS Setup : XpressRecovery2 : Boot Menu : Qflash 11/16/2010-H67-7A89VG0AC...protection for the safety and stability of system safety, users cannot update the backup BIOS manually. With Q-Flash you to enter operating systems like MS-DOS or Window first. ...you from the nearest @BIOS server 4-2-1 Updating the BIOS with caution. 4-2 BIOS Update Utilities GIGABYTE motherboards provide two unique BIOS update tools, Q-Flash™ and @BIOS™. What is ...
Manual
Page 65
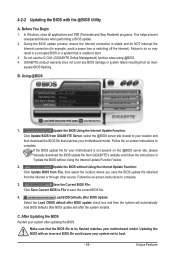
...the BIOS with an incorrect BIOS file could cause your motherboard is not present on the @BIOS server site, please manually download the BIOS update file from GIGABYTE's website and follow the instructions in a corrupted BIOS or a system that the BIOS file to be flashed matches ... Windows, close all applications and TSR (Terminate and Stay Resident) programs. This helps prevent unexpected failures when performing a BIOS update. 2. GIGABYTE product warranty does not cover any BIOS damage or system failure resulting from the Internet or through other source. Make sure that is stable ...
...the BIOS with an incorrect BIOS file could cause your motherboard is not present on the @BIOS server site, please manually download the BIOS update file from GIGABYTE's website and follow the instructions in a corrupted BIOS or a system that the BIOS file to be flashed matches ... Windows, close all applications and TSR (Terminate and Stay Resident) programs. This helps prevent unexpected failures when performing a BIOS update. 2. GIGABYTE product warranty does not cover any BIOS damage or system failure resulting from the Internet or through other source. Make sure that is stable ...
Manual
Page 75
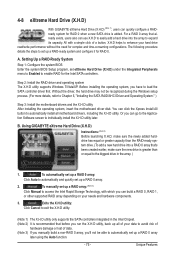
... to exit the X.H.D utility. (Note 1) The X.H.D utility only supports the SATA controllers integrated in the array. ) 1. Using GIGABYTE eXtreme Hard Drive (X.H.D) Instructions: (Note 2) Before launching X.H.D, make sure the new drive is added. To manually set up a RAID 0 array. 2. Setting Up a RAID-Ready System Step 1: Configure the system BIOS Enter the system BIOS...
... to exit the X.H.D utility. (Note 1) The X.H.D utility only supports the SATA controllers integrated in the array. ) 1. Using GIGABYTE eXtreme Hard Drive (X.H.D) Instructions: (Note 2) Before launching X.H.D, make sure the new drive is added. To manually set up a RAID 0 array. 2. Setting Up a RAID-Ready System Step 1: Configure the system BIOS Enter the system BIOS...

Manual
Page 83
On Request allows users to update data from the master drive to the recovery drive manually using the Intel Rapid Storage Technology utility in the system. On Request also allows users to restore the master drive to the ...: Volume0 RAID Level : Recovery Disks : Select Disks Strip Size : N/A Capacity : 0.0 GB Sync : Continuous Create Volume [ HELP ] Select a sync option: On Request: volume is updated manually Continuous: volume is updated automatically [hi]-Change [TAB]-Next [ESC]-Previous Menu Figure 11 [ENTER]-Select Step 5: Finally press on the hard drive you want...
On Request allows users to update data from the master drive to the recovery drive manually using the Intel Rapid Storage Technology utility in the system. On Request also allows users to restore the master drive to the ...: Volume0 RAID Level : Recovery Disks : Select Disks Strip Size : N/A Capacity : 0.0 GB Sync : Continuous Create Volume [ HELP ] Select a sync option: On Request: volume is updated manually Continuous: volume is updated automatically [hi]-Change [TAB]-Next [ESC]-Previous Menu Figure 11 [ENTER]-Select Step 5: Finally press on the hard drive you want...

Manual
Page 86
... ID) Member Disk (0) Non-RAID Disk [hi]-Select [ESC]-Exit [ENTER]-Select Menu Step 2: Select the new hard drive to add into the array to manually rebuild the array in the operating system. Intel(R) Rapid Storage Technology - Option ROM - 10.0.0.1046 Copyright(C) 2003-10 Intel Corporation. All Rights Reserved. [ MAIN MENU...
... ID) Member Disk (0) Non-RAID Disk [hi]-Select [ESC]-Exit [ENTER]-Select Menu Step 2: Select the new hard drive to add into the array to manually rebuild the array in the operating system. Intel(R) Rapid Storage Technology - Option ROM - 10.0.0.1046 Copyright(C) 2003-10 Intel Corporation. All Rights Reserved. [ MAIN MENU...
Manual
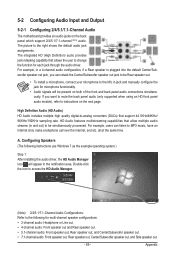
Page 89
... call over the Internet, and etc. HD Audio features multistreaming capabilities that allow multiple audio streams (in and out) to the Mic in jack and manually configure the jack for multi-channel speaker configurations. • 2-channel audio: Headphone or Line out. • 4-channel audio: Front speaker out and Rear speaker out...
... call over the Internet, and etc. HD Audio features multistreaming capabilities that allow multiple audio streams (in and out) to the Mic in jack and manually configure the jack for multi-channel speaker configurations. • 2-channel audio: Headphone or Line out. • 4-channel audio: Front speaker out and Rear speaker out...

Manual
Page 98
...more information about where you with other waste. Restriction of environmentally safe recycling. Waste Electrical & Electronic Equipment (WEEE) Directive Statement GIGABYTE will help you can responsibly recycle or reuse most major worldwide safety requirements. WEEE Symbol Statement The symbol shown below is on ...equipment is recycled in your effort. w If you may contact us at GIGABYTE are continuing our efforts to high-efficiency performance, all respects at the time of with your product's user's manual and we at the Customer Care number listed in a manner that the...
...more information about where you with other waste. Restriction of environmentally safe recycling. Waste Electrical & Electronic Equipment (WEEE) Directive Statement GIGABYTE will help you can responsibly recycle or reuse most major worldwide safety requirements. WEEE Symbol Statement The symbol shown below is on ...equipment is recycled in your effort. w If you may contact us at GIGABYTE are continuing our efforts to high-efficiency performance, all respects at the time of with your product's user's manual and we at the Customer Care number listed in a manner that the...


