Manual
Page 3
... No part of this manual may be made by any means without prior notice. Check your motherboard looks like this manual are legally registered to assist in the use of GIGABYTE. Disclaimer Information in this : "REV: X.X." Copyright © 2011 GIGA-BYTE TECHNOLOGY CO...revision of the motherboard is the property of this product, carefully read the User's Manual. For product-related information, check on our website at: http://www.gigabyte.com Identifying Your Motherboard Revision The revision number on your motherboard revision before updating motherboard BIOS, drivers, or when...
... No part of this manual may be made by any means without prior notice. Check your motherboard looks like this manual are legally registered to assist in the use of GIGABYTE. Disclaimer Information in this : "REV: X.X." Copyright © 2011 GIGA-BYTE TECHNOLOGY CO...revision of the motherboard is the property of this product, carefully read the User's Manual. For product-related information, check on our website at: http://www.gigabyte.com Identifying Your Motherboard Revision The revision number on your motherboard revision before updating motherboard BIOS, drivers, or when...

Manual
Page 4
Table of Contents GA-H61M-S1 Motherboard Layout 5 GA-H61M-S1 Motherboard Block Diagram 6 Chapter 1 Hardware Installation 7 1-1 Installation Precautions 7 1-2 Product Specifications 8 1-3 Installing the CPU 10 1-4 Installing the Memory 11 1-5 Installing an Expansion Card 11 1-6 Back Panel Connectors 12 1-7 Internal Connectors 13 Chapter 2 BIOS Setup 19 2-1 The Main Menu 20 2-2 M.I.T...21 2-3 System...28 2-4 BIOS Features 29 2-5 Peripherals...31 2-6 Power Management 33 2-7 Save & Exit...34 Chapter 3 Drivers Installation 35 Regulatory Statements 36 - 4 -
Table of Contents GA-H61M-S1 Motherboard Layout 5 GA-H61M-S1 Motherboard Block Diagram 6 Chapter 1 Hardware Installation 7 1-1 Installation Precautions 7 1-2 Product Specifications 8 1-3 Installing the CPU 10 1-4 Installing the Memory 11 1-5 Installing an Expansion Card 11 1-6 Back Panel Connectors 12 1-7 Internal Connectors 13 Chapter 2 BIOS Setup 19 2-1 The Main Menu 20 2-2 M.I.T...21 2-3 System...28 2-4 BIOS Features 29 2-5 Peripherals...31 2-6 Power Management 33 2-7 Save & Exit...34 Chapter 3 Drivers Installation 35 Regulatory Statements 36 - 4 -
Manual
Page 5
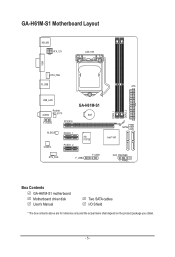
GA-H61M-S1 Motherboard Layout KB_MS ATX_12V LGA1155 VGA DDR3_1 DDR3_2 CPU_FAN R_USB ATX USB_LAN Realtek AUDIO RTL8111F F_AUDIO PCIEX16 GA-H61M-S1 BAT M_BIOS PCIEX1_1 CODEC PCIEX1_2 iTE IT8728 SYS_FAN F_USB2 F_USB1 SATA2 1 3 0 2 Intel® H61 CLR_CMOS F_PANEL Box Contents 55 GA-H61M-S1 motherboard 55 Motherboard driver disk 55 User's Manual 55 Two SATA cables 55 I/O Shield * The box contents above are for reference only and the actual items shall depend on the product package you obtain. - 5 -
GA-H61M-S1 Motherboard Layout KB_MS ATX_12V LGA1155 VGA DDR3_1 DDR3_2 CPU_FAN R_USB ATX USB_LAN Realtek AUDIO RTL8111F F_AUDIO PCIEX16 GA-H61M-S1 BAT M_BIOS PCIEX1_1 CODEC PCIEX1_2 iTE IT8728 SYS_FAN F_USB2 F_USB1 SATA2 1 3 0 2 Intel® H61 CLR_CMOS F_PANEL Box Contents 55 GA-H61M-S1 motherboard 55 Motherboard driver disk 55 User's Manual 55 Two SATA cables 55 I/O Shield * The box contents above are for reference only and the actual items shall depend on the product package you obtain. - 5 -
Manual
Page 12
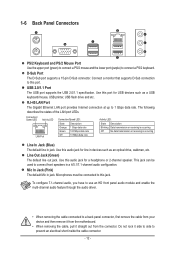
.... Line Out Jack (Green) The default line out jack. This jack can be connected to this jack. Do not rock it straight out from the motherboard. •• When removing the cable, pull it side to side to 1 Gbps data rate. Use this port. RJ-45 LAN Port The Gigabit Ethernet... speaker. To configure 7.1-channel audio, you have to use an HD front panel audio module and enable the multi-channel audio feature through the audio driver. •• When removing the cable connected to connect a PS/2 keyboard. 1-6 Back Panel Connectors PS/2 Keyboard and PS/2 Mouse Port Use the upper port (...
.... Line Out Jack (Green) The default line out jack. This jack can be connected to this jack. Do not rock it straight out from the motherboard. •• When removing the cable, pull it side to side to 1 Gbps data rate. Use this port. RJ-45 LAN Port The Gigabit Ethernet... speaker. To configure 7.1-channel audio, you have to use an HD front panel audio module and enable the multi-channel audio feature through the audio driver. •• When removing the cable connected to connect a PS/2 keyboard. 1-6 Back Panel Connectors PS/2 Keyboard and PS/2 Mouse Port Use the upper port (...

Manual
Page 35
...the changes made in BIOS Setup to the CMOS. Chapter 3 Drivers Installation •• Before installing the drivers, first install the operating system. •• After installing the operating system, insert the motherboard driver disk into your system becomes unstable and you have loaded the ...BIOS default settings, you to save as Setup Profile 1~ Setup Profile 4. && Load Profiles If your optical drive. The driver Autorun screen is automatically displayed which...
...the changes made in BIOS Setup to the CMOS. Chapter 3 Drivers Installation •• Before installing the drivers, first install the operating system. •• After installing the operating system, insert the motherboard driver disk into your system becomes unstable and you have loaded the ...BIOS default settings, you to save as Setup Profile 1~ Setup Profile 4. && Load Profiles If your optical drive. The driver Autorun screen is automatically displayed which...


