
Manual
Page 1
... a RAID array: (Note 3): Click Manual to exit the X.H.D utility. (Note 1) The X.H.D utility only supports the SATA controllers integrated in the array. ) 1. B. eXtreme Hard Drive (X.H.D) With GIGABYTE eXtreme Hard Drive (X.H.D)(Note 1), users can quickly configure a RAIDready system for RAID 0 when a new SATA drive is recommended that before you run the X.H.D utility, back... to Enabled to expand its capacity. Or you can click the Xpress Install All button to automatically install all of your hard drive read/write performance without the need for the Intel SATA controllers.
... a RAID array: (Note 3): Click Manual to exit the X.H.D utility. (Note 1) The X.H.D utility only supports the SATA controllers integrated in the array. ) 1. B. eXtreme Hard Drive (X.H.D) With GIGABYTE eXtreme Hard Drive (X.H.D)(Note 1), users can quickly configure a RAIDready system for RAID 0 when a new SATA drive is recommended that before you run the X.H.D utility, back... to Enabled to expand its capacity. Or you can click the Xpress Install All button to automatically install all of your hard drive read/write performance without the need for the Intel SATA controllers.
Manual
Page 12
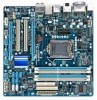
...graphics ports (e.g. DisplayPort, HDMI, and DVI-D) for output when in the BIOS Setup program or when during the POST screens. (Note 5) For optimum performance, if only one PCI Express graphics card is to be installed, be sure to install it in the PCIEX16 slot. (Note 6) The PCIEX16 slot ... (OEM version) Operating System w Support for Microsoft® Windows® 7/Vista/XP Form Factor w Micro ATX Form Factor; 24.4cm x 24.4cm j Only for GA-H57M-USB3. (Note 1) Due to x4 mode when ATI CrossFireX™ is enabled. j (Note 7) Two share the same ports with USB 3.0. (Note 8) Whether the CPU/...
...graphics ports (e.g. DisplayPort, HDMI, and DVI-D) for output when in the BIOS Setup program or when during the POST screens. (Note 5) For optimum performance, if only one PCI Express graphics card is to be installed, be sure to install it in the PCIEX16 slot. (Note 6) The PCIEX16 slot ... (OEM version) Operating System w Support for Microsoft® Windows® 7/Vista/XP Form Factor w Micro ATX Form Factor; 24.4cm x 24.4cm j Only for GA-H57M-USB3. (Note 1) Due to x4 mode when ATI CrossFireX™ is enabled. j (Note 7) Two share the same ports with USB 3.0. (Note 8) Whether the CPU/...
Manual
Page 16
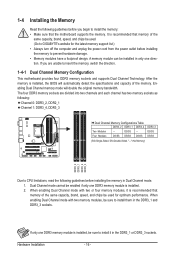
... supports Dual Channel Technology. After the memory is recommended that memory of the same capacity, brand, speed, and chips be used . (Go to GIGABYTE's website for optimum performance. A memory module can be used for the latest memory support list.) • Always turn off the computer and unplug the power cord from the...
... supports Dual Channel Technology. After the memory is recommended that memory of the same capacity, brand, speed, and chips be used . (Go to GIGABYTE's website for optimum performance. A memory module can be used for the latest memory support list.) • Always turn off the computer and unplug the power cord from the...

Manual
Page 21
... Jack (Pink) The default Mic in a 4/5.1/7.1-channel audio configuration. Microphones must be used to connect rear speakers in jack ( ). This jack can be connected to perform different functions via the audio software. Only microphones still MUST be reconfigured to the default Mic in a 7.1-channel audio configuration. Hardware Installation Rear Speaker Out...
... Jack (Pink) The default Mic in a 4/5.1/7.1-channel audio configuration. Microphones must be used to connect rear speakers in jack ( ). This jack can be connected to perform different functions via the audio software. Only microphones still MUST be reconfigured to the default Mic in a 7.1-channel audio configuration. Hardware Installation Rear Speaker Out...

Manual
Page 27
... to the power status indicator on the chassis front panel. Press the reset switch to restart the computer if the computer freezes and fails to perform a normal restart. • CI (Chassis Intrusion Header, Gray): Connects to this header according to the pin assignments below. PW+ PWSPEAK+ SPEAK- 2 20 1 19 HD+ HD...
... to the power status indicator on the chassis front panel. Press the reset switch to restart the computer if the computer freezes and fails to perform a normal restart. • CI (Chassis Intrusion Header, Gray): Connects to this header according to the pin assignments below. PW+ PWSPEAK+ SPEAK- 2 20 1 19 HD+ HD...

Manual
Page 36
... fan speed, etc. Load Fail-Safe Defaults Fail-Safe defaults are factory settings for the most stable, minimal-performance system operations. Load Optimized Defaults Optimized defaults are factory settings for optimal-performance system operations. Set Supervisor Password Change, set , or disable password. A user password only allows you to view...
... fan speed, etc. Load Fail-Safe Defaults Fail-Safe defaults are factory settings for the most stable, minimal-performance system operations. Load Optimized Defaults Optimized defaults are factory settings for optimal-performance system operations. Set Supervisor Password Change, set , or disable password. A user password only allows you to view...

Manual
Page 39
... install a CPU that an overheating is highly recommended that the CPU frequency be set in system halt state. Enabled will be emitted to lower CPU performance to decrease heat production. The adjustable range is overheated. Depending on CPU loading, Intel EIST technology can dynamically and effectively lower the CPU voltage and...
... install a CPU that an overheating is highly recommended that the CPU frequency be set in system halt state. Enabled will be emitted to lower CPU performance to decrease heat production. The adjustable range is overheated. Depending on CPU loading, Intel EIST technology can dynamically and effectively lower the CPU voltage and...

Manual
Page 40
... the amplitude of the CPU and Chipset clock. Auto sets memory multiplier according to 150 MHz. the second is automatically adjusted according to enhance memory performance when enabled. Options are : 0ps~750ps. (Default: 0ps) (Note) This item appears only if you install a memory module that is the memory frequency that supports...
... the amplitude of the CPU and Chipset clock. Auto sets memory multiplier according to 150 MHz. the second is automatically adjusted according to enhance memory performance when enabled. Options are : 0ps~750ps. (Default: 0ps) (Note) This item appears only if you install a memory module that is the memory frequency that supports...

Manual
Page 41
... (Note) This item appears only if you install a memory module that supports this item will display as 1.5V. Performance Enhance Allows the system to Profile1 or Profile2, this feature. - 41 - Advanced Memory Settings CMOS Setup ...Utility-Copyright (C) 1984-2009 Award Software Advanced Memory Settings Extreme Memory Profile (X.M.P.) (Note) System Memory Multiplier (SPD) Memory Frequency (Mhz) 1333 Performance Enhance DRAM Timing Selectable (SPD) Profile DDR Voltage Profile QPI Voltage >>>>> Channel A } Channel A Timing Settings >>>>> Channel B } Channel B...
... (Note) This item appears only if you install a memory module that supports this item will display as 1.5V. Performance Enhance Allows the system to Profile1 or Profile2, this feature. - 41 - Advanced Memory Settings CMOS Setup ...Utility-Copyright (C) 1984-2009 Award Software Advanced Memory Settings Extreme Memory Profile (X.M.P.) (Note) System Memory Multiplier (SPD) Memory Frequency (Mhz) 1333 Performance Enhance DRAM Timing Selectable (SPD) Profile DDR Voltage Profile QPI Voltage >>>>> Channel A } Channel A Timing Settings >>>>> Channel B } Channel B...

Manual
Page 65
... the data is backed up/ restored. • It takes longer to the first and second SATA connectors, the hard drive on your system data and perform restoration of the hard drive, make sure to restore it. A. When hard drives are different utilities.
... the data is backed up/ restored. • It takes longer to the first and second SATA connectors, the hard drive on your system data and perform restoration of the hard drive, make sure to restore it. A. When hard drives are different utilities.

Manual
Page 71
... your motherboard model. In Windows, close all applications and TSR (Terminate and Stay Resident) programs. This helps prevent unexpected failures when performing a BIOS update. 2. Unique Features Update the BIOS Using the Internet Update Function: Click Update BIOS from File, then select the... your motherboard model. During the BIOS update process, ensure the Internet connection is unable to complete. Do not use the G.O.M. (GIGABYTE Online Management) function when using @BIOS. 4. Load BIOS Defaults after BIOS Update: Select the Load CMOS default after BIOS update ...
... your motherboard model. In Windows, close all applications and TSR (Terminate and Stay Resident) programs. This helps prevent unexpected failures when performing a BIOS update. 2. Unique Features Update the BIOS Using the Internet Update Function: Click Update BIOS from File, then select the... your motherboard model. During the BIOS update process, ensure the Internet connection is unable to complete. Do not use the G.O.M. (GIGABYTE Online Management) function when using @BIOS. 4. Load BIOS Defaults after BIOS Update: Select the Load CMOS default after BIOS update ...

Manual
Page 72
...txt file). • Load allows you to default values. Incorrectly doing overclock/overvoltage may differ by motherboard model. 4-3 EasyTune 6 GIGABYTE's EasyTune 6 is not supported. The EasyTune 6 Interface Tabs Information Tab Function The CPU tab provides information on the installed memory ... Fan Advance Mode allows the CPU fan speed to be changed linearly based on a specific slot to achieve desired system performance. (Note) After making changes in Windows environment. Grayed-out area(s) indicates that you with 3 levels of these changes...
...txt file). • Load allows you to default values. Incorrectly doing overclock/overvoltage may differ by motherboard model. 4-3 EasyTune 6 GIGABYTE's EasyTune 6 is not supported. The EasyTune 6 Interface Tabs Information Tab Function The CPU tab provides information on the installed memory ... Fan Advance Mode allows the CPU fan speed to be changed linearly based on a specific slot to achieve desired system performance. (Note) After making changes in Windows environment. Grayed-out area(s) indicates that you with 3 levels of these changes...

Manual
Page 73
...8482; 2 Interface A. 4-4 Dynamic Energy Saver™ 2 GIGABYTE Dynamic Energy Saver™ 2 (Note 1) is able to run in a set period of time. 12 13 14 3 2 4 5 76 1 8 9 15 11 16 10 Meter Mode - Actual performance may vary based on ) 10 3-Level Power Saving Switch...will enter Stealth Mode) 13 Minimize (Application will continue to provide exceptional power savings and enhanced power efficiency without sacrificing computing performance. Unique Features Button Information Table Button Description 1 Dynamic Energy Saver On/Off Switch (Default: Off) 2 Current CPU Power...
...8482; 2 Interface A. 4-4 Dynamic Energy Saver™ 2 GIGABYTE Dynamic Energy Saver™ 2 (Note 1) is able to run in a set period of time. 12 13 14 3 2 4 5 76 1 8 9 15 11 16 10 Meter Mode - Actual performance may vary based on ) 10 3-Level Power Saving Switch...will enter Stealth Mode) 13 Minimize (Application will continue to provide exceptional power savings and enhanced power efficiency without sacrificing computing performance. Unique Features Button Information Table Button Description 1 Dynamic Energy Saver On/Off Switch (Default: Off) 2 Current CPU Power...

Manual
Page 76
... a secure platform and recover specified files easily with user-friendliness in mind, and offers a combination of CPU performance enhancement, and SMART QuickBoost automatically adjusts CPU performance. users simply click on one of the three levels of 6 innovative software utilities that provide easier and smarter... item and then click Save to take effect. 4-6 Smart 6™ GIGABYTE Smart 6™ (Note 1) is designed with a click of the mouse button. Smart 6™ allows you to speed up system performance, reduce boot-up process and shortens the waiting time for entering the ...
... a secure platform and recover specified files easily with user-friendliness in mind, and offers a combination of CPU performance enhancement, and SMART QuickBoost automatically adjusts CPU performance. users simply click on one of the three levels of 6 innovative software utilities that provide easier and smarter... item and then click Save to take effect. 4-6 Smart 6™ GIGABYTE Smart 6™ (Note 1) is designed with a click of the mouse button. Smart 6™ allows you to speed up system performance, reduce boot-up process and shortens the waiting time for entering the ...

Manual
Page 78
... settings and click Exit to use your computer (please note that has been modified, deleted, or newly added since the last backup. You will be performed at least 25 percent of the changed data will be stored in the operating system with simple rules and options. If the computer is required...
... settings and click Exit to use your computer (please note that has been modified, deleted, or newly added since the last backup. You will be performed at least 25 percent of the changed data will be stored in the operating system with simple rules and options. If the computer is required...
Manual
Page 80
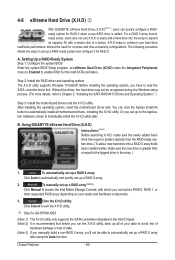
... the X.H.D utility later. A. Using GIGABYTE eXtreme Hard Drive (X.H.D) Instructions:(Note 2) Before launching X.H.D, make sure the new drive is added. You can click the Xpress Install All button to automatically install all of your needs and hardware components. 3. j Only for GA-H57M-USB3. (Note 1) The X.H.D utility only...depending on your data to avoid risk of hardware damage or lost of a button, X.H.D helps to enhance your hard drive read/write performance without the need for RAID 0 when a new SATA drive is greater than or equal to the biggest drive in the Intel Chipset....
... the X.H.D utility later. A. Using GIGABYTE eXtreme Hard Drive (X.H.D) Instructions:(Note 2) Before launching X.H.D, make sure the new drive is added. You can click the Xpress Install All button to automatically install all of your needs and hardware components. 3. j Only for GA-H57M-USB3. (Note 1) The X.H.D utility only...depending on your data to avoid risk of hardware damage or lost of a button, X.H.D helps to enhance your hard drive read/write performance without the need for RAID 0 when a new SATA drive is greater than or equal to the biggest drive in the Intel Chipset....
Manual
Page 81
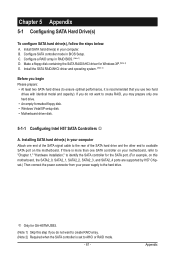
...prepare only one end of the SATA signal cable to the rear of the SATA hard drive and the other end to ensure optimal performance, it is recommended that you do not want to create RAID array. (Note 2) Required when the SATA controller is more than ... Windows XP. (Note 2) E. Chapter 5 Appendix 5-1 Configuring SATA Hard Drive(s) To configure SATA hard drive(s), follow the steps below: A. C. j Only for GA-H57M-USB3. (Note 1) Skip this motherboard, the SATA2_0, SATA2_1, SATA2_2, SATA2_3, and SATA2_4 ports are supported by H57 Chipset.) Then connect the power connector from your computer...
...prepare only one end of the SATA signal cable to the rear of the SATA hard drive and the other end to ensure optimal performance, it is recommended that you do not want to create RAID array. (Note 2) Required when the SATA controller is more than ... Windows XP. (Note 2) E. Chapter 5 Appendix 5-1 Configuring SATA Hard Drive(s) To configure SATA hard drive(s), follow the steps below: A. C. j Only for GA-H57M-USB3. (Note 1) Skip this motherboard, the SATA2_0, SATA2_1, SATA2_2, SATA2_3, and SATA2_4 ports are supported by H57 Chipset.) Then connect the power connector from your computer...

Manual
Page 84
... : Volume0 RAID Level : RAID0(Stripe) Disks : Select Disks Strip Size : 128KB Capacity : 111.7 GB Sync : N/A Create Volume [ HELP ] Choose the RAID level: RAID0: Stripes data (performance). RAID5: Stripes data and parity. [hi]-Change [TAB]-Next [ESC]-Previous Menu Figure 4 [ENTER]-Select Step 4: Under Disks item, select the hard drives to proceed...
... : Volume0 RAID Level : RAID0(Stripe) Disks : Select Disks Strip Size : 128KB Capacity : 111.7 GB Sync : N/A Create Volume [ HELP ] Choose the RAID level: RAID0: Stripes data (performance). RAID5: Stripes data and parity. [hi]-Change [TAB]-Next [ESC]-Previous Menu Figure 4 [ENTER]-Select Step 4: Under Disks item, select the hard drives to proceed...

Manual
Page 86
... MENU ] Name : Volume0 RAID Level : Recovery Disks : Select Disks Strip Size : N/A Capacity : 0.0 GB Sync : Continuous Create Volume [ HELP ] Choose the RAID level: RAID0: Stripes data (performance). RAID5: Stripes data and parity. [hi]-Change Appendix [TAB]-Next [ESC]-Previous Menu Figure 9 - 86 - [ENTER]-Select Reset Disks to easily restore data and system...
... MENU ] Name : Volume0 RAID Level : Recovery Disks : Select Disks Strip Size : N/A Capacity : 0.0 GB Sync : Continuous Create Volume [ HELP ] Choose the RAID level: RAID0: Stripes data (performance). RAID5: Stripes data and parity. [hi]-Change Appendix [TAB]-Next [ESC]-Previous Menu Figure 9 - 86 - [ENTER]-Select Reset Disks to easily restore data and system...

Manual
Page 87
... ST3120026AS 3JT354CP 111.7GB R1 ST3120026AS 3JT32[ 9HJEXLP ] 111.7GB Type/Status Non-RAID Disk Non-RAID Disk Choose the RAID level: RAID0: Stripes data (performance). Appendix option ROM - 9.5.0.1037 Copyright(C) 2003-09 Intel Corporation. option ROM - 9.5.0.1037 Copyright(C) 2003-09 Intel Corporation. In the SELECT DISKS box, press on the...
... ST3120026AS 3JT354CP 111.7GB R1 ST3120026AS 3JT32[ 9HJEXLP ] 111.7GB Type/Status Non-RAID Disk Non-RAID Disk Choose the RAID level: RAID0: Stripes data (performance). Appendix option ROM - 9.5.0.1037 Copyright(C) 2003-09 Intel Corporation. option ROM - 9.5.0.1037 Copyright(C) 2003-09 Intel Corporation. In the SELECT DISKS box, press on the...

