Manual
Page 5
... 4-1 Xpress Recovery2 61 4-2 BIOS Update Utilities 66 4-2-1 Updating the BIOS with the Q-Flash Utility 66 4-2-2 Updating the BIOS with the @BIOS Utility 69 4-3 EasyTune 5 ...71 4-4 Windows Vista ReadyBoost 72 Chapter 5 Appendix ...73 5-1 Configuring Audio Input and Output 73 5-1-1 Configuring 2/4/5.1/7.1-Channel Audio 73 5-1-2 Installing the S/PDIF In Cable (Optional 76 5-1-3 Enabling the...
... 4-1 Xpress Recovery2 61 4-2 BIOS Update Utilities 66 4-2-1 Updating the BIOS with the Q-Flash Utility 66 4-2-2 Updating the BIOS with the @BIOS Utility 69 4-3 EasyTune 5 ...71 4-4 Windows Vista ReadyBoost 72 Chapter 5 Appendix ...73 5-1 Configuring Audio Input and Output 73 5-1-1 Configuring 2/4/5.1/7.1-Channel Audio 73 5-1-2 Installing the S/PDIF In Cable (Optional 76 5-1-3 Enabling the...
Manual
Page 12
...Intel will be less than 4 GB of physical memory is installed, the actual memory size displayed will be updated on the GIGABYTE website. (Note 6) Available functions in Windows Vista only) and configure the SATA connectors for AHCI mode. (Refer to Chapter 2, "BIOS Setup," "Integrated Peripherals," for... 24.4cm x 24.4cm (Note 1) Due to Windows XP 32-bit operating system limitation, when more than 4 GB. (Note 2) The GA-G33M-S2H supports up to PCI Express x4 mode. (Please refer to an Intel G33 graphics driver limitation, the GA-G33M-S2H does not currently support Blu-ray/ HD DVD format ...
...Intel will be less than 4 GB of physical memory is installed, the actual memory size displayed will be updated on the GIGABYTE website. (Note 6) Available functions in Windows Vista only) and configure the SATA connectors for AHCI mode. (Refer to Chapter 2, "BIOS Setup," "Integrated Peripherals," for... 24.4cm x 24.4cm (Note 1) Due to Windows XP 32-bit operating system limitation, when more than 4 GB. (Note 2) The GA-G33M-S2H supports up to PCI Express x4 mode. (Please refer to an Intel G33 graphics driver limitation, the GA-G33M-S2H does not currently support Blu-ray/ HD DVD format ...
Manual
Page 19
English PCI Express x16 Graphics Card Support List The items below are supported under Windows XP operating system only. When using an add-on graphics card, please first ... X1950 Pro ATI Radeon X1950 XTX ATI Radeon X600 XT ATI Radeon X700 Pro ATI Radeon X800 XT Maker GIGABYTE GIGABYTE GIGABYTE GIGABYTE GIGABYTE GIGABYTE GIGABYTE GIGABYTE GIGABYTE GIGABYTE GIGABYTE GIGABYTE GIGABYTE GIGABYTE GIGABYTE GIGABYTE GIGABYTE GIGABYTE GIGABYTE GIGABYTE GIGABYTE GIGABYTE GIGABYTE MSI ASUS ASUS Model Name GV-RX30128D GV-RX30S128D GV-RX30HM128D GV-RX55128D GV-RX60P128DE GV-RX60X128V GV-RX70128D ...
English PCI Express x16 Graphics Card Support List The items below are supported under Windows XP operating system only. When using an add-on graphics card, please first ... X1950 Pro ATI Radeon X1950 XTX ATI Radeon X600 XT ATI Radeon X700 Pro ATI Radeon X800 XT Maker GIGABYTE GIGABYTE GIGABYTE GIGABYTE GIGABYTE GIGABYTE GIGABYTE GIGABYTE GIGABYTE GIGABYTE GIGABYTE GIGABYTE GIGABYTE GIGABYTE GIGABYTE GIGABYTE GIGABYTE GIGABYTE GIGABYTE GIGABYTE GIGABYTE GIGABYTE GIGABYTE MSI ASUS ASUS Model Name GV-RX30128D GV-RX30S128D GV-RX30HM128D GV-RX55128D GV-RX60P128DE GV-RX60X128V GV-RX70128D ...
Manual
Page 21
... GA-G33M-S2H does not currently support Blu-ray/ HD DVD format playback. Refer the figures below for details.) • Please note the HDMI audio output only supports AC3, DTS and 2-channel-LPCM formats. (AC3 and DTS require the use of 1920x1080p but the actual resolutions supported depend on the GIGABYTE website..., select Start>Control Panel>Sounds and Audio Devices>Audio, set the Default device for sound playback is HDCP compliant. In Windows Vista, select Start>Control Panel> Sound, select Realtek HDMI Output and then click Set Default. (Note) Due to this port. Once released, ...
... GA-G33M-S2H does not currently support Blu-ray/ HD DVD format playback. Refer the figures below for details.) • Please note the HDMI audio output only supports AC3, DTS and 2-channel-LPCM formats. (AC3 and DTS require the use of 1920x1080p but the actual resolutions supported depend on the GIGABYTE website..., select Start>Control Panel>Sounds and Audio Devices>Audio, set the Default device for sound playback is HDCP compliant. In Windows Vista, select Start>Control Panel> Sound, select Realtek HDMI Output and then click Set Default. (Note) Due to this port. Once released, ...

Manual
Page 35
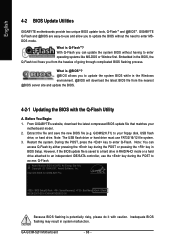
...; BIOS will emit a beep code during system startup, saving system parameters and loading operating system, etc. To upgrade the BIOS, use either the GIGABYTE Q-Flash or @BIOS utility. • Q-Flash allows the user to quickly and easily upgrade or back up BIOS without entering the operating system. ...• @BIOS is a Windows-based utility that allows the user to modify basic system configuration settings or to the "Load Optimized Defaults" section in this chapter or introductions ...
...; BIOS will emit a beep code during system startup, saving system parameters and loading operating system, etc. To upgrade the BIOS, use either the GIGABYTE Q-Flash or @BIOS utility. • Q-Flash allows the user to quickly and easily upgrade or back up BIOS without entering the operating system. ...• @BIOS is a Windows-based utility that allows the user to modify basic system configuration settings or to the "Load Optimized Defaults" section in this chapter or introductions ...

Manual
Page 42
set this item to Always Enable. Depending on CPU loading, Intel® EIST technology can function as Windows NT4.0. (Default: Disabled) No-Execute Memory Protect (Note) Enables or disables Intel® Execute Disable Bit function. PEG2 Sets the... or disables Enhanced Intel SpeedStep Technology (EIST). to 3 (Note) Allows you install a CPU that supports this feature. Set this memory for Windows XP operating system; GA-G33M-S2H Motherboard - 42 - PCI Sets the PCI graphics card as the first display. (Default) Onboard Sets the onboard VGA as the first display....
set this item to Always Enable. Depending on CPU loading, Intel® EIST technology can function as Windows NT4.0. (Default: Disabled) No-Execute Memory Protect (Note) Enables or disables Intel® Execute Disable Bit function. PEG2 Sets the... or disables Enhanced Intel SpeedStep Technology (EIST). to 3 (Note) Allows you install a CPU that supports this feature. Set this memory for Windows XP operating system; GA-G33M-S2H Motherboard - 42 - PCI Sets the PCI graphics card as the first display. (Default) Onboard Sets the onboard VGA as the first display....
Manual
Page 43
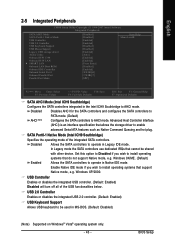
Disabled Allows the SATA controllers to operate in Legacy IDE mode. Windows 9X/ME. (Default) Allows the SATA controllers to operate in Native IDE mode. Enable Native IDE mode if you wish to install operating ...shared with other device. USB 2.0 Controller Enables or disables the integrated USB 2.0 controller. (Default: Enabled) USB Keyboard Support Allows USB keyboard to AHCI mode. Windows XP/2000. USB Controller Enables or disables the integrated USB controller. (Default: Enabled) Disabled will turn off all of the integrated SATA controllers. English 2-5 ...
Disabled Allows the SATA controllers to operate in Legacy IDE mode. Windows 9X/ME. (Default) Allows the SATA controllers to operate in Native IDE mode. Enable Native IDE mode if you wish to install operating ...shared with other device. USB 2.0 Controller Enables or disables the integrated USB 2.0 controller. (Default: Enabled) USB Keyboard Support Allows USB keyboard to AHCI mode. Windows XP/2000. USB Controller Enables or disables the integrated USB controller. (Default: Enabled) Disabled will turn off all of the integrated SATA controllers. English 2-5 ...
Manual
Page 45
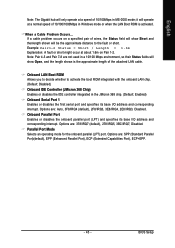
...) port. Options are not used in a 10/100 Mbps environment, so their Status fields will only operate at a normal speed of 10/100/1000Mbps in Windows mode or when the LAN Boot ROM is the approximate length of 10/100Mbps in the JMicron 368 chip. (Default: Enabled) Onboard Serial Port 1 Enables...
...) port. Options are not used in a 10/100 Mbps environment, so their Status fields will only operate at a normal speed of 10/100/1000Mbps in Windows mode or when the LAN Boot ROM is the approximate length of 10/100Mbps in the JMicron 368 chip. (Default: Enabled) Onboard Serial Port 1 Enables...
Manual
Page 46
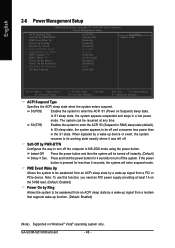
When signaled by PWR-BTTN Configures the way to be resumed at least 1A on Suspend) sleep state. GA-G33M-S2H Motherboard - 46 - In S3 sleep state, the system appears to turn off the system. Soft-Off by a wake-up device or event, the system resumes .... If the power button is pressed for 4 seconds to be awakened from an ACPI sleep state by a wake-up function. (Default: Enabled) (Note) Supported on Windows® Vista® operating system only. Enables the system to enter the ACPI S3 (Suspend to be turned off and consumes less power than 4 seconds...
When signaled by PWR-BTTN Configures the way to be resumed at least 1A on Suspend) sleep state. GA-G33M-S2H Motherboard - 46 - In S3 sleep state, the system appears to turn off the system. Soft-Off by a wake-up device or event, the system resumes .... If the power button is pressed for 4 seconds to be awakened from an ACPI sleep state by a wake-up function. (Default: Enabled) (Note) Supported on Windows® Vista® operating system only. Enables the system to enter the ACPI S3 (Suspend to be turned off and consumes less power than 4 seconds...
Manual
Page 47
...the system to turn on this function. (Default) Password Set a password with up to 5 characters and then press to turn on the Windows 98 keyboard to accept. Disabled Disables this item and set to clear the password settings. Keyboard 98 Press POWER button on the system. Note... for the password, press again without entering the password to Password. HPET Support (Note) Enables or disables High Precision Event Timer (HPET) for Windows® Vista® operating system. (Default: Enabled) HPET Mode (Note) Allows you need an ATX power supply providing at least 1A on...
...the system to turn on this function. (Default) Password Set a password with up to 5 characters and then press to turn on the Windows 98 keyboard to accept. Disabled Disables this item and set to clear the password settings. Keyboard 98 Press POWER button on the system. Note... for the password, press again without entering the password to Password. HPET Support (Note) Enables or disables High Precision Event Timer (HPET) for Windows® Vista® operating system. (Default: Enabled) HPET Mode (Note) Allows you need an ATX power supply providing at least 1A on...
Manual
Page 57
... and install the USB 2.0 driver.) - 57 - You can press Xpress Install to install and press the Install button following instructions use Windows XP as the example operating system.) • After installing the operating system, insert the motherboard driver disk into your mouse and select Uninstall... still exists in Universal Serial Bus Controller in the motherboard driver disk. • For USB 2.0 driver support under the Windows XP operating system, please install the Windows XP Service Pack 1 or later. Or you wish to install all the driver items. • Please ignore the popup...
... and install the USB 2.0 driver.) - 57 - You can press Xpress Install to install and press the Install button following instructions use Windows XP as the example operating system.) • After installing the operating system, insert the motherboard driver disk into your mouse and select Uninstall... still exists in Universal Serial Bus Controller in the motherboard driver disk. • For USB 2.0 driver support under the Windows XP operating system, please install the Windows XP Service Pack 1 or later. Or you wish to install all the driver items. • Please ignore the popup...

Manual
Page 61
...(10 GB or more is the first physical drive. - 61 - Unique Features actual size requirements vary, depending on the first SATA connector is recommended; Windows® XP with SP3 or later; System Requirements: • Intel® x86 platform • At least 64 MB of system memory • VESA... compatible graphics card • Windows® 2000 with SP1 or later • Xpress Recovery and Xpress Recovery2 are installed. • The amount of data and hard drive access speed ...
...(10 GB or more is the first physical drive. - 61 - Unique Features actual size requirements vary, depending on the first SATA connector is recommended; Windows® XP with SP3 or later; System Requirements: • Intel® x86 platform • At least 64 MB of system memory • VESA... compatible graphics card • Windows® 2000 with SP1 or later • Xpress Recovery and Xpress Recovery2 are installed. • The amount of data and hard drive access speed ...
Manual
Page 62
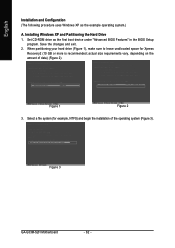
... 1 Figure 2 3. English Installation and Configuration (The following procedure uses Windows XP as the first boot device under "Advanced BIOS Features" in the BIOS Setup program. actual size requirements vary, depending on the amount of the operating system (Figure 3). Figure 3 GA-G33M-S2H Motherboard - 62 - Installing Windows XP and Partitioning the Hard Drive 1. Select a file system...
... 1 Figure 2 3. English Installation and Configuration (The following procedure uses Windows XP as the first boot device under "Advanced BIOS Features" in the BIOS Setup program. actual size requirements vary, depending on the amount of the operating system (Figure 3). Figure 3 GA-G33M-S2H Motherboard - 62 - Installing Windows XP and Partitioning the Hard Drive 1. Select a file system...
Manual
Page 64
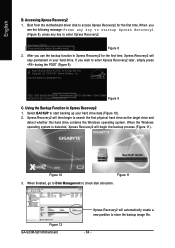
...image file. - 64 - Award Modular BIOS v6.00PG, An Energy Star Ally Copyright (C) 1984-2007, Award Software, Inc. Figure 12 GA-G33M-S2H Motherboard Xpress Recovery2 will then begin the backup process (Figure 11). English B. Xpress Recovery2 will automatically create a new partition to enter Xpress ... go to Disk Management to search the first physical hard drive as the target drive and detect whether this hard drive contains the Windows operating system. Select BACKUP to enter Xpress Recovery2. . . Intel G33 BIOS for the first time. Boot from the motherboard driver ...
...image file. - 64 - Award Modular BIOS v6.00PG, An Energy Star Ally Copyright (C) 1984-2007, Award Software, Inc. Figure 12 GA-G33M-S2H Motherboard Xpress Recovery2 will then begin the backup process (Figure 11). English B. Xpress Recovery2 will automatically create a new partition to enter Xpress ... go to Disk Management to search the first physical hard drive as the target drive and detect whether this hard drive contains the Windows operating system. Select BACKUP to enter Xpress Recovery2. . . Intel G33 BIOS for the first time. Boot from the motherboard driver ...
Manual
Page 66
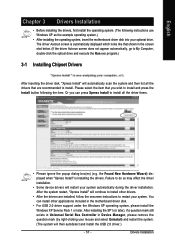
From GIGABYTE's website, download the latest compressed BIOS update file that matches your floppy disk, USB flash drive, or hard drive. GA-G33M-S2H Motherboard - 66 - With Q-Flash you from the nearest @BIOS server site and update the BIOS. 4-2-1 Updating the BIOS with caution. ...Begin: 1. G33MS2H.F1) to enter operating systems like MS-DOS or Window first. During the POST, press the key to update the system BIOS while in BIOS Setup. What is saved to a hard drive in system malfunction. Intel G33 BIOS for G33M-S2H F1a . . . . : BIOS Setup/Q-Flash : XpressRecovery2 : ...
From GIGABYTE's website, download the latest compressed BIOS update file that matches your floppy disk, USB flash drive, or hard drive. GA-G33M-S2H Motherboard - 66 - With Q-Flash you from the nearest @BIOS server site and update the BIOS. 4-2-1 Updating the BIOS with caution. ...Begin: 1. G33MS2H.F1) to enter operating systems like MS-DOS or Window first. During the POST, press the key to update the system BIOS while in BIOS Setup. What is saved to a hard drive in system malfunction. Intel G33 BIOS for G33M-S2H F1a . . . . : BIOS Setup/Q-Flash : XpressRecovery2 : ...
Manual
Page 69
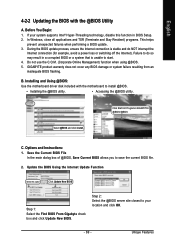
...your system supports Intel® Hyper-Threading technology, disable this option Click Update New BIOS Step 1: Select the Find BIOS From Gigabyte check box and click Update New BIOS. During the BIOS update process, ensure the Internet connection is unable to save the current... BIOS file. 2. Click Start>All Programs>GIGABYTE> @BIOS>@BIOS C. In Windows, close all applications and TSR (Terminate and Stay Resident) programs. This helps prevent unexpected failures when performing a BIOS update. 3....
...your system supports Intel® Hyper-Threading technology, disable this option Click Update New BIOS Step 1: Select the Find BIOS From Gigabyte check box and click Update New BIOS. During the BIOS update process, ensure the Internet connection is unable to save the current... BIOS file. 2. Click Start>All Programs>GIGABYTE> @BIOS>@BIOS C. In Windows, close all applications and TSR (Terminate and Stay Resident) programs. This helps prevent unexpected failures when performing a BIOS update. 3....
Manual
Page 71
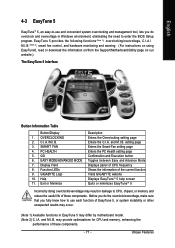
... convenient system overclocking and management tool, lets you do the overclock/overvoltage, make sure that you do overclock and overvoltage in Windows environment, eliminating the need to CPU, chipset, or memory and reduce the useful life of EasyTune 5, or system instability or... and Execution button Toggles between Easy and Advance Mode Displays panel of CPU frequency Shows the information of the current function Visits GIGABYTE website Displays EasyTuneTM 5 help screen Quits or minimizes EasyTuneTM 5 Incorrectly doing overclock/overvoltage may result in EasyTune 5 may provide ...
... convenient system overclocking and management tool, lets you do the overclock/overvoltage, make sure that you do overclock and overvoltage in Windows environment, eliminating the need to CPU, chipset, or memory and reduce the useful life of EasyTune 5, or system instability or... and Execution button Toggles between Easy and Advance Mode Displays panel of CPU frequency Shows the information of the current function Visits GIGABYTE website Displays EasyTuneTM 5 help screen Quits or minimizes EasyTuneTM 5 Incorrectly doing overclock/overvoltage may result in EasyTune 5 may provide ...

Manual
Page 72
... steps below to enable the ReadyBoost function: Step 1: Go to use for ReadyBoost using the slider or spin box. Right-click on a Windows Vista certified USB flash drive to boost your computer's performance. Step 2: In the ReadyBoost tab, select Use this device. Under Space to ... acceleration is one to three times the amount of RAM installed in your computer. English 4-4 Windows Vista ReadyBoost Windows ReadyBoost allows you to use flash memory on the USB flash drive icon and choose Properties. GA-G33M-S2H Motherboard - 72 - Click Apply and then OK to turn on ReadyBoost. • The...
... steps below to enable the ReadyBoost function: Step 1: Go to use for ReadyBoost using the slider or spin box. Right-click on a Windows Vista certified USB flash drive to boost your computer's performance. Step 2: In the ReadyBoost tab, select Use this device. Under Space to ... acceleration is one to three times the amount of RAM installed in your computer. English 4-4 Windows Vista ReadyBoost Windows ReadyBoost allows you to use flash memory on the USB flash drive icon and choose Properties. GA-G33M-S2H Motherboard - 72 - Click Apply and then OK to turn on ReadyBoost. • The...

Manual
Page 74
...or 8CH Speaker according to the type of device you connect an audio device to set up. Configuring Speakers: (The following instructions use Windows XP as the example operating system.) Step 1: After installing the audio driver, the Audio Manager icon will appear in your operating system...sure the "Microsoft UAA Bus driver for Windows. Step 2: Click the Audio I/O tab. Then click OK to the type of speaker configuration you wish to an audio jack, the Connected device box appears. Double-click the icon to access the Audio Control Panel. GA-G33M-S2H Motherboard - 74 - English A.
...or 8CH Speaker according to the type of device you connect an audio device to set up. Configuring Speakers: (The following instructions use Windows XP as the example operating system.) Step 1: After installing the audio driver, the Audio Manager icon will appear in your operating system...sure the "Microsoft UAA Bus driver for Windows. Step 2: Click the Audio I/O tab. Then click OK to the type of speaker configuration you wish to an audio jack, the Connected device box appears. Double-click the icon to access the Audio Control Panel. GA-G33M-S2H Motherboard - 74 - English A.


