
Manual
Page 2
Configuring the Smart TPM Utility 18 4.1. Creating a Bluetooth Cell Phone Key 19 4.3. Other Bluetooth Settings 21 4.4. Installing the Smart TPM Utility 4 3. Creating a USB Key 18 4.2. Initializing the TPM chip 5 3.1. Initializing the TPM Chip with the Smart TPM Utility 5 3.2. Other Features...21 - 2 - Table of Contents TPM Configuration Procedure 3 1. Installing the Infineon TPM Driver and the Smart TPM Utility 4 2.1. Installing the Infineon TPM Driver 4 2.2. Configuring the System BIOS 3 2. Advanced Mode...8 4.
Configuring the Smart TPM Utility 18 4.1. Creating a Bluetooth Cell Phone Key 19 4.3. Other Bluetooth Settings 21 4.4. Installing the Smart TPM Utility 4 3. Creating a USB Key 18 4.2. Initializing the TPM chip 5 3.1. Initializing the TPM Chip with the Smart TPM Utility 5 3.2. Other Features...21 - 2 - Table of Contents TPM Configuration Procedure 3 1. Installing the Infineon TPM Driver and the Smart TPM Utility 4 2.1. Installing the Infineon TPM Driver 4 2.2. Configuring the System BIOS 3 2. Advanced Mode...8 4.
Manual
Page 3
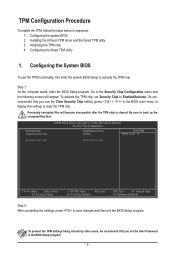
... Security Chip to activate the TPM chip. Configuring the System BIOS To use the Clear Security Chip setting (press + in sequence: 1. Installing the Infineon TPM driver and the Smart TPM utility 3. Step 1: As the computer starts, enter the BIOS Setup program. Initializing the TPM chip 4. TPM Configuration Procedure To enable the...
... Security Chip to activate the TPM chip. Configuring the System BIOS To use the Clear Security Chip setting (press + in sequence: 1. Installing the Infineon TPM driver and the Smart TPM utility 3. Step 1: As the computer starts, enter the BIOS Setup program. Initializing the TPM chip 4. TPM Configuration Procedure To enable the...
Manual
Page 4
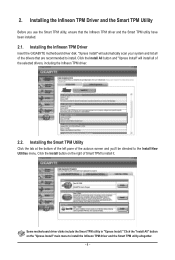
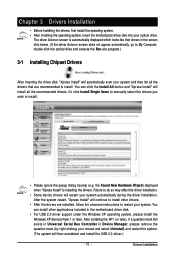
... automatically scan your system and list all of the drivers that the Infineon TPM driver and the Smart TPM utility have been installed. 2.1. "Xpress Install" will install all of the selected drivers, including the Infineon TPM driver. 2.2. Click the Install button on the "Xpress Install... bottom of the left pane of Smart TPM to install the Infineon TPM driver and the Smart TPM utility altogether. - 4 - Installing the Infineon TPM Driver Insert the GIGABYTE motherboard driver disk. Some motherboard driver disks include the Smart TPM utility in "Xpress Install." 2. Installing the...
... automatically scan your system and list all of the drivers that the Infineon TPM driver and the Smart TPM utility have been installed. 2.1. "Xpress Install" will install all of the selected drivers, including the Infineon TPM driver. 2.2. Click the Install button on the "Xpress Install... bottom of the left pane of Smart TPM to install the Infineon TPM driver and the Smart TPM utility altogether. - 4 - Installing the Infineon TPM Driver Insert the GIGABYTE motherboard driver disk. Some motherboard driver disks include the Smart TPM utility in "Xpress Install." 2. Installing the...
Manual
Page 5
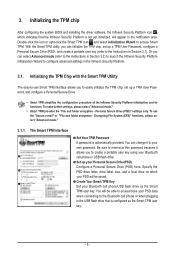
... Key Set your Personal Secure Drive(PSD) Configure a Personal Secure Drive (PSD) here. 3. Initializing the TPM chip After configuring the system BIOS and installing the driver software, the Infineon Security Platform icon , which your PSD data when connecting to the Bluetooth cell phone or when plugging in the USB flash drive...
... Key Set your Personal Secure Drive(PSD) Configure a Personal Secure Drive (PSD) here. 3. Initializing the TPM chip After configuring the system BIOS and installing the driver software, the Infineon Security Platform icon , which your PSD data when connecting to the Bluetooth cell phone or when plugging in the USB flash drive...
Manual
Page 3
...from the Support\Motherboard\Technology Guide page on our website. For product-related information, check on our website at: http://www.gigabyte.com.tw Identifying Your Motherboard Revision The revision number on how to their respective owners. For example, "REV: 1.0" means the...'s Manual. For instructions on your motherboard revision before updating motherboard BIOS, drivers, or when looking for technical information. Changes to the specifications and features in this product, GIGABYTE provides the following types of documentations: For quick set-up of the ...
...from the Support\Motherboard\Technology Guide page on our website. For product-related information, check on our website at: http://www.gigabyte.com.tw Identifying Your Motherboard Revision The revision number on how to their respective owners. For example, "REV: 1.0" means the...'s Manual. For instructions on your motherboard revision before updating motherboard BIOS, drivers, or when looking for technical information. Changes to the specifications and features in this product, GIGABYTE provides the following types of documentations: For quick set-up of the ...
Manual
Page 5
... 71 3-1 Installing Chipset Drivers 71 3-2 Application Software 72 3-3 Technical Manuals 72 3-4 Contact ...73 3-5 System ...73 3-6 Download Center 74 Chapter 4 Unique Features 75 4-1 Xpress Recovery2...5 Appendix ...89 5-1 Configuring SATA Hard Drive(s 89 5-1-1 Configuring Intel ICH10R SATA Controllers 89 5-1-2 Configuring GIGABYTE SATA2 SATA Controller 95 5-1-3 Making a SATA RAID/AHCI Driver Diskette 101 5-1-4 Installing the SATA RAID/AHCI Driver and Operating System 102 5-2 ConfiguringAudio Input and Output 112 5-2-1 Configuring 2/4/5.1/7.1-Channel Audio 112 5-2-2 Configuring S/PDIF...
... 71 3-1 Installing Chipset Drivers 71 3-2 Application Software 72 3-3 Technical Manuals 72 3-4 Contact ...73 3-5 System ...73 3-6 Download Center 74 Chapter 4 Unique Features 75 4-1 Xpress Recovery2...5 Appendix ...89 5-1 Configuring SATA Hard Drive(s 89 5-1-1 Configuring Intel ICH10R SATA Controllers 89 5-1-2 Configuring GIGABYTE SATA2 SATA Controller 95 5-1-3 Making a SATA RAID/AHCI Driver Diskette 101 5-1-4 Installing the SATA RAID/AHCI Driver and Operating System 102 5-2 ConfiguringAudio Input and Output 112 5-2-1 Configuring 2/4/5.1/7.1-Channel Audio 112 5-2-2 Configuring S/PDIF...
Manual
Page 6
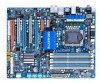
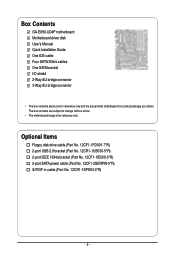
... IEEE 1394a bracket (Part No. 12CF1-1IE008-0*R) 2-port SATA power cable (Part No. 12CF1-2SERPW-0*R) S/PDIF in cable (Part No. 12CR1-1SPDIN-0*R) - 6 - Box Contents GA-EX58-UD4P motherboard Motherboard driver disk User's Manual Quick Installation Guide One IDE cable Four SATA 3Gb/s cables One SATA bracket I/O shield 2-Way SLI bridge connector 3-Way SLI bridge...
... IEEE 1394a bracket (Part No. 12CF1-1IE008-0*R) 2-port SATA power cable (Part No. 12CF1-2SERPW-0*R) S/PDIF in cable (Part No. 12CR1-1SPDIN-0*R) - 6 - Box Contents GA-EX58-UD4P motherboard Motherboard driver disk User's Manual Quick Installation Guide One IDE cable Four SATA 3Gb/s cables One SATA bracket I/O shield 2-Way SLI bridge connector 3-Way SLI bridge...

Manual
Page 18
1-5 Installing an Expansion Card Read the following guidelines before installing an expansion card to prevent hardware damage. Install the driver provided with the slot, and press down on the card until it is fully inserted into the slot. 4. Example: Installing and Removing a PCI Express x16 ... white latch at the end of the card until it is fully seated in the slot. 3. Make sure the metal contacts on your expansion card(s). 7. GA-EX58-UD4P Motherboard - 18 -
1-5 Installing an Expansion Card Read the following guidelines before installing an expansion card to prevent hardware damage. Install the driver provided with the slot, and press down on the card until it is fully inserted into the slot. 4. Example: Installing and Removing a PCI Express x16 ... white latch at the end of the card until it is fully seated in the slot. 3. Make sure the metal contacts on your expansion card(s). 7. GA-EX58-UD4P Motherboard - 18 -
Manual
Page 21
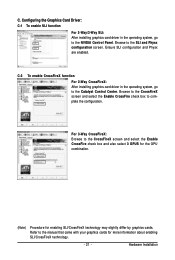
...configuration screen. For 3-Way CrossFireX: Browse to the Catalyst Control Center. Configuring the Graphics Card Driver: C-1 To enable SLI function For 2-Way/3-Way SLI: After installing graphics card driver in the operating system, go to the manual that came with your graphics cards for enabling... SLI/CrossFireX technology may slightly differ by graphics cards. C-2 To enable CrossFireX function For 2-Way CrossFireX: After installing graphics card driver in the operating system, go to the CrossFireX screen and select the Enable CrossFire check box and also select 3 GPUS for the ...
...configuration screen. For 3-Way CrossFireX: Browse to the Catalyst Control Center. Configuring the Graphics Card Driver: C-1 To enable SLI function For 2-Way/3-Way SLI: After installing graphics card driver in the operating system, go to the manual that came with your graphics cards for enabling... SLI/CrossFireX technology may slightly differ by graphics cards. C-2 To enable CrossFireX function For 2-Way CrossFireX: After installing graphics card driver in the operating system, go to the CrossFireX screen and select the Enable CrossFire check box and also select 3 GPUS for the ...
Manual
Page 42
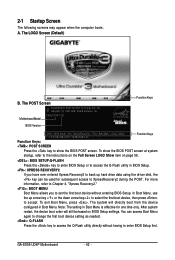
...drive data using the driver disk, the key can access Boot Menu again to change the first boot device setting as needed. : Q-FLASH Press the key to access the Q-Flash utility directly without entering BIOS Setup. The LOGO Screen (Default) B. Motherboard Model BIOS Version EX58-UD4P F1B . . ...Keys Function Keys: : POST SCREEN Press the key to show the BIOS POST screen at system startup, refer to enter BIOS Setup first. GA-EX58-UD4P Motherboard - 42 - For more information, refer to Chapter 4, "Xpress Recovery2." : BOOT MENU Boot Menu allows you have ever entered ...
...drive data using the driver disk, the key can access Boot Menu again to change the first boot device setting as needed. : Q-FLASH Press the key to access the Q-Flash utility directly without entering BIOS Setup. The LOGO Screen (Default) B. Motherboard Model BIOS Version EX58-UD4P F1B . . ...Keys Function Keys: : POST SCREEN Press the key to show the BIOS POST screen at system startup, refer to enter BIOS Setup first. GA-EX58-UD4P Motherboard - 42 - For more information, refer to Chapter 4, "Xpress Recovery2." : BOOT MENU Boot Menu allows you have ever entered ...
Manual
Page 59
... (AHCI) is an interface specification that cannot be shared with other device. In Legacy mode the SATA controllers use dedicated IRQs that allows the storage driver to enable advanced Serial ATA features such as Native Command Queuing and hot plug. SATA Port0-3 Native Mode (ICH10R South Bridge) Specifies the operating mode...
... (AHCI) is an interface specification that cannot be shared with other device. In Legacy mode the SATA controllers use dedicated IRQs that allows the storage driver to enable advanced Serial ATA features such as Native Command Queuing and hot plug. SATA Port0-3 Native Mode (ICH10R South Bridge) Specifies the operating mode...

Manual
Page 61
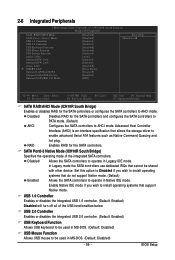
... with the onboard LAN chip. (Default: Disabled) Onboard SATA/IDE Device (GIGABYTE SATA2 Chip) Enables or disables the IDE and SATA controllers integrated in the GIGABYTE SATA2 chip. (Default: Enabled) Onboard SATA/IDE Ctrl Mode (GIGABYTE SATA2 Chip) Enables or disables RAID for the SATA controller and configures the... occur at a normal speed of 10/100 Mbps in Windows mode or when the LAN Boot ROM is an interface specification that allows the storage driver to the fault or short. IDE Disables RAID for the SATA controller integrated in PATA mode) - 61 - Note: Part 4-5 and Part 7-8 ...
... with the onboard LAN chip. (Default: Disabled) Onboard SATA/IDE Device (GIGABYTE SATA2 Chip) Enables or disables the IDE and SATA controllers integrated in the GIGABYTE SATA2 chip. (Default: Enabled) Onboard SATA/IDE Ctrl Mode (GIGABYTE SATA2 Chip) Enables or disables RAID for the SATA controller and configures the... occur at a normal speed of 10/100 Mbps in Windows mode or when the LAN Boot ROM is an interface specification that allows the storage driver to the fault or short. IDE Disables RAID for the SATA controller integrated in PATA mode) - 61 - Note: Part 4-5 and Part 7-8 ...
Manual
Page 71
...the Windows XP operating system, please install the Windows XP Service Pack 1 or later. Or click Install Single Items to manually select the drivers you wish to install. the Found New Hardware Wizard) displayed when "Xpress Install" is automatically displayed which looks like that are installed,... to restart your mouse and select Uninstall) and restart the system. (The system will then autodetect and install the USB 2.0 driver.) - 71 - You can click the Install All button and "Xpress Install" will automatically scan your system and then list all the recommended...
...the Windows XP operating system, please install the Windows XP Service Pack 1 or later. Or click Install Single Items to manually select the drivers you wish to install. the Found New Hardware Wizard) displayed when "Xpress Install" is automatically displayed which looks like that are installed,... to restart your mouse and select Uninstall) and restart the system. (The system will then autodetect and install the USB 2.0 driver.) - 71 - You can click the Install All button and "Xpress Install" will automatically scan your system and then list all the recommended...

Manual
Page 72
GA-EX58-UD4P Motherboard - 72 - You can click the Install button on the right of an item to install it. 3-3 Technical Manuals This page provides GIGABYTE's application guides, content descriptions for this driver disk, and the motherboard manuals. 3-2 Application Software This page displays all the utilities and applications that GIGABYTE develops and some free software.
GA-EX58-UD4P Motherboard - 72 - You can click the Install button on the right of an item to install it. 3-3 Technical Manuals This page provides GIGABYTE's application guides, content descriptions for this driver disk, and the motherboard manuals. 3-2 Application Software This page displays all the utilities and applications that GIGABYTE develops and some free software.
Manual
Page 73
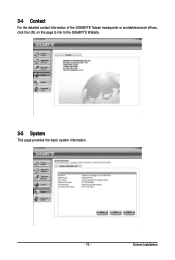
3-4 Contact For the detailed contact information of the GIGABYTE Taiwan headquarter or worldwide branch offices, click the URL on this page to link to the GIGABYTE Website. 3-5 System This page provides the basic system information. - 73 - Drivers Installation
3-4 Contact For the detailed contact information of the GIGABYTE Taiwan headquarter or worldwide branch offices, click the URL on this page to link to the GIGABYTE Website. 3-5 System This page provides the basic system information. - 73 - Drivers Installation

Manual
Page 74
GA-EX58-UD4P Motherboard - 74 - The latest version of the BIOS, drivers, or applications will be displayed. 3-6 Download Center To update the BIOS, drivers, or applications, click the Download Center button to link to the GIGABYTE Web site.
GA-EX58-UD4P Motherboard - 74 - The latest version of the BIOS, drivers, or applications will be displayed. 3-6 Download Center To update the BIOS, drivers, or applications, click the Download Center button to link to the GIGABYTE Web site.
Manual
Page 75
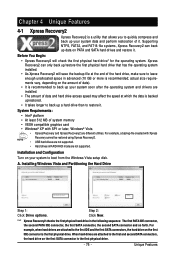
... Requirements: • Intel® platform • At least 512 MB of it. Installation and Configuration Turn on your system soon after the operating system and drivers are attached to the first IDE and the first SATA connectors, the hard drive on PATA and SATA hard drives and restore it. Chapter 4 Unique...
... Requirements: • Intel® platform • At least 512 MB of it. Installation and Configuration Turn on your system soon after the operating system and drivers are attached to the first IDE and the first SATA connectors, the hard drive on PATA and SATA hard drives and restore it. Chapter 4 Unique...
Manual
Page 76
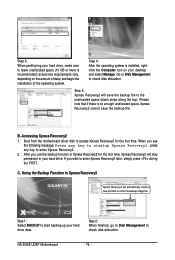
... that if there is recommended; After you use the backup function in your hard drive data. Boot from the motherboard driver disk to access Xpress Recovery2 for the first time, Xpress Recovery2 will automatically create a new partition to enter Xpress Recovery2. 2. GA-EX58-UD4P Motherboard - 76 - C. Go to Disk Management to check disk allocation.
... that if there is recommended; After you use the backup function in your hard drive data. Boot from the motherboard driver disk to access Xpress Recovery2 for the first time, Xpress Recovery2 will automatically create a new partition to enter Xpress Recovery2. 2. GA-EX58-UD4P Motherboard - 76 - C. Go to Disk Management to check disk allocation.
Manual
Page 85
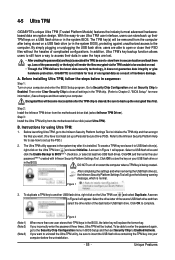
... drive and then select the drive letter of the password(s) or the key(s) will replace the former key. 4-5 Ultra TPM GIGABYTE's unique Ultra TPM (Trusted Platform Module) features the industry's most advanced hardwarebased data encryption design. With the easy-to access ...TPM: 1. Loss of the destination USB flash drive. GIGABYTE is being stored on your computer. A. Encrypted files will give hardware protection. Step 3: Install the Ultra TPM utility from the motherboard driver disk (select Infineon TPM Driver). B. Refer to the Infineon Security Platform Help file to...
... drive and then select the drive letter of the password(s) or the key(s) will replace the former key. 4-5 Ultra TPM GIGABYTE's unique Ultra TPM (Trusted Platform Module) features the industry's most advanced hardwarebased data encryption design. With the easy-to access ...TPM: 1. Loss of the destination USB flash drive. GIGABYTE is being stored on your computer. A. Encrypted files will give hardware protection. Step 3: Install the Ultra TPM utility from the motherboard driver disk (select Infineon TPM Driver). B. Refer to the Infineon Security Platform Help file to...
Manual
Page 86
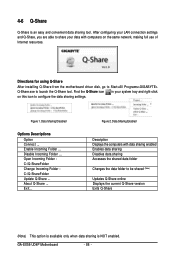
... making full use of Internet resources. Figure 1. Open Incoming Folder : C:\Q-ShareFolder Change Incoming Folder : C:\Q-ShareFolder Update Q-Share ... GA-EX58-UD4P Motherboard - 86 - Figure 2. Data Sharing Enabled Description Displays the computers with computers on this icon to be shared (Note) ...enabled. Enable Incoming Folder ... About Q-Share ... Directions for using Q-Share After installing Q-Share from the motherboard driver disk, go to Start>All Programs>GIGABYTE> Q-Share.exe to share your LAN connection settings and Q-Share, you are able to launch the Q-Share...
... making full use of Internet resources. Figure 1. Open Incoming Folder : C:\Q-ShareFolder Change Incoming Folder : C:\Q-ShareFolder Update Q-Share ... GA-EX58-UD4P Motherboard - 86 - Figure 2. Data Sharing Enabled Description Displays the computers with computers on this icon to be shared (Note) ...enabled. Enable Incoming Folder ... About Q-Share ... Directions for using Q-Share After installing Q-Share from the motherboard driver disk, go to Start>All Programs>GIGABYTE> Q-Share.exe to share your LAN connection settings and Q-Share, you are able to launch the Q-Share...


