Manual
Page 3
... by any form or by copyright laws and is 1.0. For product-related information, check on our website at: http://www.gigabyte.com.tw Identifying Your Motherboard Revision The revision number on our website. For detailed product information, carefully read or download the ...information on/from the Support&Downloads\Motherboard\Technology Guide page on your motherboard revision before updating motherboard BIOS, drivers, or when looking for technical information. Changes to their respective owners. The trademarks mentioned in this manual are legally registered ...
... by any form or by copyright laws and is 1.0. For product-related information, check on our website at: http://www.gigabyte.com.tw Identifying Your Motherboard Revision The revision number on our website. For detailed product information, carefully read or download the ...information on/from the Support&Downloads\Motherboard\Technology Guide page on your motherboard revision before updating motherboard BIOS, drivers, or when looking for technical information. Changes to their respective owners. The trademarks mentioned in this manual are legally registered ...
Manual
Page 5
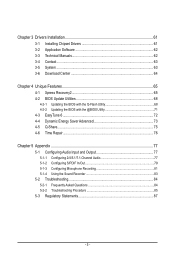
... 61 3-1 Installing Chipset Drivers 61 3-2 Application Software 62 3-3 Technical Manuals 62 3-4 Contact...63 3-5 System...63 3-6 Download Center 64 Chapter 4 Unique Features 65 4-1 Xpress Recovery2 65 4-2 BIOS Update Utilities 68 4-2-1 ...
... 61 3-1 Installing Chipset Drivers 61 3-2 Application Software 62 3-3 Technical Manuals 62 3-4 Contact...63 3-5 System...63 3-6 Download Center 64 Chapter 4 Unique Features 65 4-1 Xpress Recovery2 65 4-2 BIOS Update Utilities 68 4-2-1 ...
Manual
Page 6
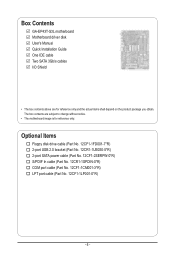
...-2SERPW-0*R) S/PDIF In cable (Part No. 12CR1-1SPDIN-0*R) COM port cable (Part No. 12CF1-1CM001-3*R) LPT port cable (Part No. 12CF1-1LP001-0*R) - 6 - Box Contents GA-EP43T-S3L motherboard Motherboard driver disk User's Manual Quick Installation Guide One IDE cable Two SATA 3Gb/s cables I/O Shield • The box contents above are subject to change without...
...-2SERPW-0*R) S/PDIF In cable (Part No. 12CR1-1SPDIN-0*R) COM port cable (Part No. 12CF1-1CM001-3*R) LPT port cable (Part No. 12CF1-1LP001-0*R) - 6 - Box Contents GA-EP43T-S3L motherboard Motherboard driver disk User's Manual Quick Installation Guide One IDE cable Two SATA 3Gb/s cables I/O Shield • The box contents above are subject to change without...
Manual
Page 18
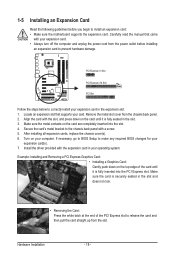
... to the chassis back panel with the expansion card in the expansion slot. 1. Make sure the card is fully inserted into the slot. 4. Install the driver provided with a screw. 5. Locate an expansion slot that came with the slot, and press down on the card until it is fully seated in the...
... to the chassis back panel with the expansion card in the expansion slot. 1. Make sure the card is fully inserted into the slot. 4. Install the driver provided with a screw. 5. Locate an expansion slot that came with the slot, and press down on the card until it is fully seated in the...
Manual
Page 34
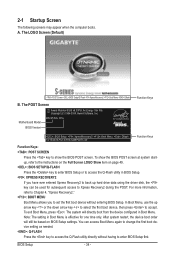
...(Default) :POST Screen :BIOS Setup/Q-Flash :XpressRecovery2 :Boot Menu :Qflash B. In Boot Menu, use the up hard drive data using the driver disk, the key can access Boot Menu again to change the first boot device setting as needed. : Q-FLASH Press the key to access the... select the first boot device, then press to the instructions on the Full Screen LOGO Show item on BIOS Setup settings. Motherboard Model BIOS Version EP43T-S3L E1a . . . . : BIOS Setup : XpressRecovery2 : Boot Menu : Qflash 10/15/2009-P43-ICH10-7A69PG0TC-00 Function Keys Function Keys Function Keys: :...
...(Default) :POST Screen :BIOS Setup/Q-Flash :XpressRecovery2 :Boot Menu :Qflash B. In Boot Menu, use the up hard drive data using the driver disk, the key can access Boot Menu again to change the first boot device setting as needed. : Q-FLASH Press the key to access the... select the first boot device, then press to the instructions on the Full Screen LOGO Show item on BIOS Setup settings. Motherboard Model BIOS Version EP43T-S3L E1a . . . . : BIOS Setup : XpressRecovery2 : Boot Menu : Qflash 10/15/2009-P43-ICH10-7A69PG0TC-00 Function Keys Function Keys Function Keys: :...
Manual
Page 61
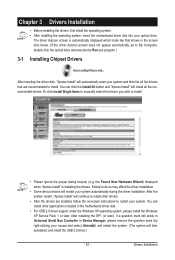
... are installed, follow the on-screen instructions to My Computer, double-click the optical drive and execute the Run.exe program.) 3-1 Installing Chipset Drivers After inserting the driver disk, "Xpress Install" will restart your system. the Found New Hardware Wizard) displayed when "Xpress Install" is automatically displayed which looks like that shown...
... are installed, follow the on-screen instructions to My Computer, double-click the optical drive and execute the Run.exe program.) 3-1 Installing Chipset Drivers After inserting the driver disk, "Xpress Install" will restart your system. the Found New Hardware Wizard) displayed when "Xpress Install" is automatically displayed which looks like that shown...
Manual
Page 62
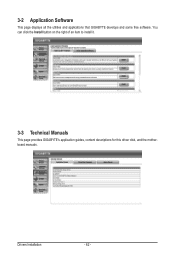
3-2 Application Software This page displays all the utilities and applications that GIGABYTE develops and some free software. Drivers Installation - 62 - You can click the Install button on the right of an item to install it. 3-3 Technical Manuals This page provides GIGABYTE's application guides, content descriptions for this driver disk, and the motherboard manuals.
3-2 Application Software This page displays all the utilities and applications that GIGABYTE develops and some free software. Drivers Installation - 62 - You can click the Install button on the right of an item to install it. 3-3 Technical Manuals This page provides GIGABYTE's application guides, content descriptions for this driver disk, and the motherboard manuals.
Manual
Page 63
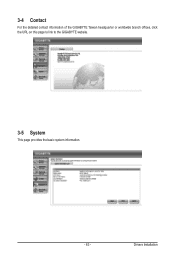
Drivers Installation 3-4 Contact For the detailed contact information of the GIGABYTE Taiwan headquarter or worldwide branch offices, click the URL on this page to link to the GIGABYTE website. 3-5 System This page provides the basic system information. - 63 -
Drivers Installation 3-4 Contact For the detailed contact information of the GIGABYTE Taiwan headquarter or worldwide branch offices, click the URL on this page to link to the GIGABYTE website. 3-5 System This page provides the basic system information. - 63 -
Manual
Page 64
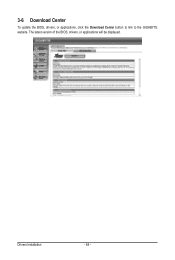
The latest version of the BIOS, drivers, or applications will be displayed. Drivers Installation - 64 - 3-6 Download Center To update the BIOS, drivers, or applications, click the Download Center button to link to the GIGABYTE website.
The latest version of the BIOS, drivers, or applications will be displayed. Drivers Installation - 64 - 3-6 Download Center To update the BIOS, drivers, or applications, click the Download Center button to link to the GIGABYTE website.
Manual
Page 65
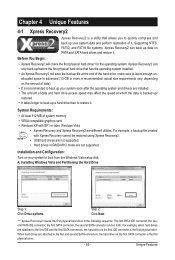
... recommended; System Requirements: • At least 512 MB of the hard drive, make sure to back up your system soon after the operating system and drivers are installed. • The amount of it. For example, when hard drives are attached to the first IDE and the first SATA connectors, the hard...
... recommended; System Requirements: • At least 512 MB of the hard drive, make sure to back up your system soon after the operating system and drivers are installed. • The amount of it. For example, when hard drives are attached to the first IDE and the first SATA connectors, the hard...
Manual
Page 66
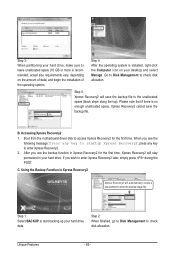
... hard drive data. When you wish to start backing up your desktop and select Manage. Step 3: When partitioning your hard drive. Boot from the motherboard driver disk to access Xpress Recovery2 for the first time, Xpress Recovery2 will stay permanent in Xpress Recovery2 for the first time. If you see the...
... hard drive data. When you wish to start backing up your desktop and select Manage. Step 3: When partitioning your hard drive. Boot from the motherboard driver disk to access Xpress Recovery2 for the first time, Xpress Recovery2 will stay permanent in Xpress Recovery2 for the first time. If you see the...
Manual
Page 75
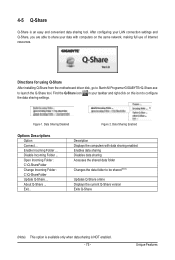
Directions for using Q-Share After installing Q-Share from the motherboard driver disk, go to Start>All Programs>GIGABYTE>Q-Share.exe to be shared (Note) Updates Q-Share online Displays the current Q-Share version Exits Q-Share (Note) This option is available only when data sharing ...
Directions for using Q-Share After installing Q-Share from the motherboard driver disk, go to Start>All Programs>GIGABYTE>Q-Share.exe to be shared (Note) Updates Q-Share online Displays the current Q-Share version Exits Q-Share (Note) This option is available only when data sharing ...
Manual
Page 77
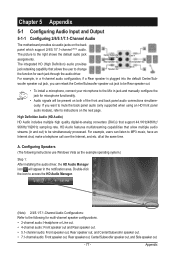
... Speaker Out Rear Speaker Out Side Speaker Out Line In Front Speaker Out Mic In the function for each jack through the audio driver. all at the same time. Double-click the icon to access the HD Audio Manager. (Note) 2/4/5.1/7.1-Channel Audio Configurations: Refer...Appendix For example, in and out) to the following instructions use Windows Vista as the example operating system.) Step 1: After installing the audio driver, the HD Audio Manager icon will appear in jack and manually configure the jack for multi-channel speaker configurations. • 2-channel audio: ...
... Speaker Out Rear Speaker Out Side Speaker Out Line In Front Speaker Out Mic In the function for each jack through the audio driver. all at the same time. Double-click the icon to access the HD Audio Manager. (Note) 2/4/5.1/7.1-Channel Audio Configurations: Refer...Appendix For example, in and out) to the following instructions use Windows Vista as the example operating system.) Step 1: After installing the audio driver, the HD Audio Manager icon will appear in jack and manually configure the jack for multi-channel speaker configurations. • 2-channel audio: ...

Manual
Page 81
... microphone functions on the front panel and back panel cannot be able to record the sound. Appendix 5-1-3 Configuring Microphone Recording Step 1: After installing the audio driver, the HD Audio Manager icon will appear in jack (pink) on Microphone and select Set Default Device. - 81 - Step 3: Go to the Mic in jack...
... microphone functions on the front panel and back panel cannot be able to record the sound. Appendix 5-1-3 Configuring Microphone Recording Step 1: After installing the audio driver, the HD Audio Manager icon will appear in jack (pink) on Microphone and select Set Default Device. - 81 - Step 3: Go to the Mic in jack...
Manual
Page 84
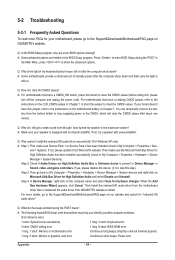
...values after about one minute. A: For motherboards that have this step.) Step 3: Then go back to the Support&Downloads\Motherboards\FAQ page on GIGABYTE's website. Q: Why do I clear the CMOS values? If not, try a speaker with an internal amplifier. 5-2 Troubleshooting 5-2-1 Frequently Asked .... Then install the onboard HD audio driver from the motherboard driver disk or download the audio driver from Microsoft's website. Q: What do the beeps emitted during the POST. Press to install. If not, please update it from GIGABYTE's website to enter BIOS Setup during the...
...values after about one minute. A: For motherboards that have this step.) Step 3: Then go back to the Support&Downloads\Motherboards\FAQ page on GIGABYTE's website. Q: Why do I clear the CMOS values? If not, try a speaker with an internal amplifier. 5-2 Troubleshooting 5-2-1 Frequently Asked .... Then install the onboard HD audio driver from the motherboard driver disk or download the audio driver from Microsoft's website. Q: What do the beeps emitted during the POST. Press to install. If not, please update it from GIGABYTE's website to enter BIOS Setup during the...


