Manual
Page 4
Table of Contents Box Contents ...6 OptionalItems...6 GA-EP43C-DS3 Motherboard Layout 7 Block Diagram...8 Chapter 1 Hardware Installation 9 1-1 Installation Precautions 9 1-2 Product Specifications 10 1-3 Installing the CPU and CPU Cooler 13 1-3-1 Installing the CPU 13 1-3-2 Installing the ...
Table of Contents Box Contents ...6 OptionalItems...6 GA-EP43C-DS3 Motherboard Layout 7 Block Diagram...8 Chapter 1 Hardware Installation 9 1-1 Installation Precautions 9 1-2 Product Specifications 10 1-3 Installing the CPU and CPU Cooler 13 1-3-1 Installing the CPU 13 1-3-2 Installing the ...
Manual
Page 6
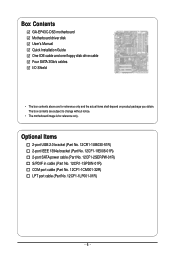
...No. 12CR1-1SPDIN-01R) COM port cable (Part No. 12CF1-1CM001-32R) LPT port cable (Part No. 12CF1-1LP001-01R) - 6 - Box Contents GA-EP43C-DS3 motherboard Motherboard driver disk User's Manual Quick Installation Guide One IDE cable and one floppy disk drive cable Four SATA 3Gb/s cables I/O Shield •... The box contents above are subject to change without notice. • The motherboard image is for reference only and ...
...No. 12CR1-1SPDIN-01R) COM port cable (Part No. 12CF1-1CM001-32R) LPT port cable (Part No. 12CF1-1LP001-01R) - 6 - Box Contents GA-EP43C-DS3 motherboard Motherboard driver disk User's Manual Quick Installation Guide One IDE cable and one floppy disk drive cable Four SATA 3Gb/s cables I/O Shield •... The box contents above are subject to change without notice. • The motherboard image is for reference only and ...

Manual
Page 15
... installed CPU. 1-3-2 Installing the CPU Cooler Follow the steps below to correctly install the CPU cooler on the motherboard. (The following procedure uses Intel® boxed cooler as the picture above, the installation is to install.) Step 3: Place the cooler atop the CPU, aligning the four push pins through the pin...
... installed CPU. 1-3-2 Installing the CPU Cooler Follow the steps below to correctly install the CPU cooler on the motherboard. (The following procedure uses Intel® boxed cooler as the picture above, the installation is to install.) Step 3: Place the cooler atop the CPU, aligning the four push pins through the pin...
Manual
Page 61
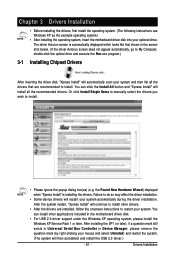
... Service Pack 1 or later. Drivers Installation You can install other drivers. • After the drivers are recommended to install. • Please ignore the popup dialog box(es) (e.g.
... Service Pack 1 or later. Drivers Installation You can install other drivers. • After the drivers are recommended to install. • Please ignore the popup dialog box(es) (e.g.
Manual
Page 80
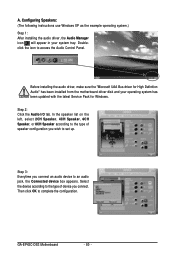
... Audio Control Panel. Step 3: Everytime you wish to the type of speaker configuration you connect an audio device to an audio jack, the Connected device box appears. Select the device according to set up. A. Before installing the audio driver, make sure the "Microsoft UAA Bus driver for Windows. GA-EP43C-DS3 Motherboard - 80 -
... Audio Control Panel. Step 3: Everytime you wish to the type of speaker configuration you connect an audio device to an audio jack, the Connected device box appears. Select the device according to set up. A. Before installing the audio driver, make sure the "Microsoft UAA Bus driver for Windows. GA-EP43C-DS3 Motherboard - 80 -
Manual
Page 81
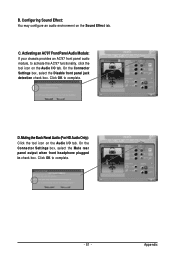
...Audio (For HD Audio Only): Click the tool icon on the Audio I /O tab. On the Connector Settings box, select the Mute rear panel output when front headphone plugged in check box. Click OK to activate the AC'97 functionality, click the tool icon on the Sound Effect tab. On the... Connector Settings box, select the Disable front panel jack detection check box. Configuring Sound Effect: You may configure an audio environment on the Audio I /O tab. D. Appendix C. Activating an AC'97 Front ...
...Audio (For HD Audio Only): Click the tool icon on the Audio I /O tab. On the Connector Settings box, select the Mute rear panel output when front headphone plugged in check box. Click OK to activate the AC'97 functionality, click the tool icon on the Sound Effect tab. On the... Connector Settings box, select the Disable front panel jack detection check box. Configuring Sound Effect: You may configure an audio environment on the Audio I /O tab. D. Appendix C. Activating an AC'97 Front ...
Manual
Page 83
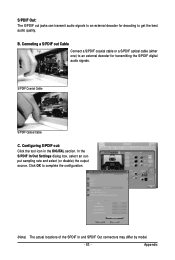
Appendix In the S/PDIF In/Out Settings dialog box, select an output sampling rate and select (or disable) the output source. S/PDIF Coaxial Cable S/PDIF Optical Cable C. Click OK to complete the configuration. (Note) ...
Appendix In the S/PDIF In/Out Settings dialog box, select an output sampling rate and select (or disable) the output source. S/PDIF Coaxial Cable S/PDIF Optical Cable C. Click OK to complete the configuration. (Note) ...
Manual
Page 85
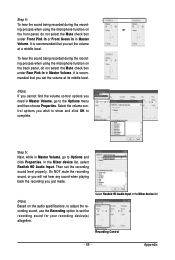
..., select Realtek HD Audio Input. It is recommended that you just made. (Note) Based on or the front panel, do not select the Mute check box under Front Pink In or Front Green In in Master Volume. It is recommended that you wish to show and click OK to the Options... menu and then choose Properties. ing process when using the microphone function on the back panel, do not select the Mute check box under Rear Pink In in Master Volume, go to complete. Select the volume control options you set the recording sound level properly. Step 5: Next, while...
..., select Realtek HD Audio Input. It is recommended that you just made. (Note) Based on or the front panel, do not select the Mute check box under Front Pink In or Front Green In in Master Volume. It is recommended that you wish to show and click OK to the Options... menu and then choose Properties. ing process when using the microphone function on the back panel, do not select the Mute check box under Rear Pink In in Master Volume, go to complete. Select the volume control options you set the recording sound level properly. Step 5: Next, while...

Manual
Page 86
To record a sound file, click the Recording but- ton . 4. In the Open dialog box, select the sound (.wav) file you have connected the audio input device (e.g. Front Green In, Front Pink In). To stop playing, click the Stop button . 5. ... Advanced button under a volume control option (e.g. Make sure you wish to save the recording upon completion. Playing the Sound: 1. GA-EP43C-DS3 Motherboard - 86 - In the Other Controls field, select the 1 Microphone Boost check box. You may use the Fast Forward button to move to the beginning of a file or the Fast Backward button...
To record a sound file, click the Recording but- ton . 4. In the Open dialog box, select the sound (.wav) file you have connected the audio input device (e.g. Front Green In, Front Pink In). To stop playing, click the Stop button . 5. ... Advanced button under a volume control option (e.g. Make sure you wish to save the recording upon completion. Playing the Sound: 1. GA-EP43C-DS3 Motherboard - 86 - In the Other Controls field, select the 1 Microphone Boost check box. You may use the Fast Forward button to move to the beginning of a file or the Fast Backward button...
