Manual
Page 3
... or download the information on/from the Support&Downloads\Motherboard\Technology Guide page on your motherboard revision before updating motherboard BIOS, drivers, or when looking for technical information. Changes to use of the product, read the User's Manual. Documentation Classifications In order...like this manual may be made by copyright laws and is 1.0. Copyright © 2009 GIGA-BYTE TECHNOLOGY CO., LTD. No part of GIGABYTE. For example, "REV: 1.0" means the revision of the motherboard is the property of this manual may be reproduced, copied, translated, ...
... or download the information on/from the Support&Downloads\Motherboard\Technology Guide page on your motherboard revision before updating motherboard BIOS, drivers, or when looking for technical information. Changes to use of the product, read the User's Manual. Documentation Classifications In order...like this manual may be made by copyright laws and is 1.0. Copyright © 2009 GIGA-BYTE TECHNOLOGY CO., LTD. No part of GIGABYTE. For example, "REV: 1.0" means the revision of the motherboard is the property of this manual may be reproduced, copied, translated, ...

Manual
Page 5
... 57 3-1 Installing Chipset Drivers 57 3-2 Application Software 58 3-3 Technical Manuals 58 3-4 Contact...59 3-5 System...59 3-6 Download Center 60 Chapter 4 Unique Features 61 4-1 Xpress Recovery2 61 4-2 BIOS Update Utilities 64 4-2-1 ...
... 57 3-1 Installing Chipset Drivers 57 3-2 Application Software 58 3-3 Technical Manuals 58 3-4 Contact...59 3-5 System...59 3-6 Download Center 60 Chapter 4 Unique Features 61 4-1 Xpress Recovery2 61 4-2 BIOS Update Utilities 64 4-2-1 ...
Manual
Page 6
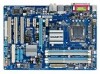
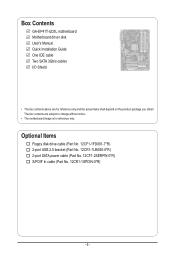
Box Contents GA-EP41T-UD3L motherboard Motherboard driver disk User's Manual Quick Installation Guide One IDE cable Two SATA 3Gb/s cables I/O Shield • The box contents above are subject to change without notice. &#...
Box Contents GA-EP41T-UD3L motherboard Motherboard driver disk User's Manual Quick Installation Guide One IDE cable Two SATA 3Gb/s cables I/O Shield • The box contents above are subject to change without notice. &#...

Manual
Page 18
... the PCI Express slot. Example: Installing and Removing a PCI Express x16 Graphics Card: • Installing a Graphics Card: Gently push down on your card. Install the driver provided with a screw. 5. PCI Express x1 Slot PCI Express x16 Slot PCI Slot Follow the steps below to the chassis back panel with the expansion...
... the PCI Express slot. Example: Installing and Removing a PCI Express x16 Graphics Card: • Installing a Graphics Card: Gently push down on your card. Install the driver provided with a screw. 5. PCI Express x1 Slot PCI Express x16 Slot PCI Slot Follow the steps below to the chassis back panel with the expansion...
Manual
Page 32
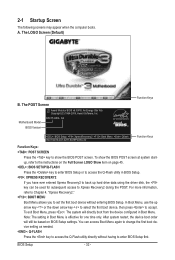
... will directly boot from the device configured in Boot Menu. A. You can be used for one time only. BIOS Setup - 32 - Motherboard Model BIOS Version EP41T-UD3L E4 . . . . : BIOS Setup : XpressRecovery2 : Boot Menu : Qflash 09/21/2009-G41-ICH7-6A79PG05C-00 Function Keys Function Keys Function Keys: : POST SCREEN... BIOS POST screen at system startup, refer to Xpress Recovery2 during the POST. In Boot Menu, use the up hard drive data using the driver disk, the key can access Boot Menu again to change the first boot device setting as needed. : Q-FLASH Press the key to access ...
... will directly boot from the device configured in Boot Menu. A. You can be used for one time only. BIOS Setup - 32 - Motherboard Model BIOS Version EP41T-UD3L E4 . . . . : BIOS Setup : XpressRecovery2 : Boot Menu : Qflash 09/21/2009-G41-ICH7-6A79PG05C-00 Function Keys Function Keys Function Keys: : POST SCREEN... BIOS POST screen at system startup, refer to Xpress Recovery2 during the POST. In Boot Menu, use the up hard drive data using the driver disk, the key can access Boot Menu again to change the first boot device setting as needed. : Q-FLASH Press the key to access ...
Manual
Page 57
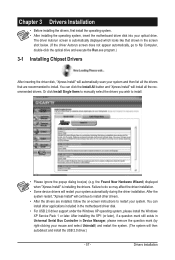
...After installing the SP1 (or later), if a question mark still exists in Universal Serial Bus Controller in the screen shot below. (If the driver Autorun screen does not appear automatically, go to install. • Please ignore the popup dialog box(es) (e.g. Or click Install Single Items ... question mark (by right-clicking your mouse and select Uninstall) and restart the system. (The system will then autodetect and install the USB 2.0 driver.) - 57 - the Found New Hardware Wizard) displayed when "Xpress Install" is automatically displayed which looks like that are installed, follow the on...
...After installing the SP1 (or later), if a question mark still exists in Universal Serial Bus Controller in the screen shot below. (If the driver Autorun screen does not appear automatically, go to install. • Please ignore the popup dialog box(es) (e.g. Or click Install Single Items ... question mark (by right-clicking your mouse and select Uninstall) and restart the system. (The system will then autodetect and install the USB 2.0 driver.) - 57 - the Found New Hardware Wizard) displayed when "Xpress Install" is automatically displayed which looks like that are installed, follow the on...

Manual
Page 58
3-2 Application Software This page displays all the utilities and applications that GIGABYTE develops and some free software. You can click the Install button on the right of an item to install it. 3-3 Technical Manuals This page provides GIGABYTE's application guides, content descriptions for this driver disk, and the motherboard manuals. Drivers Installation - 58 -
3-2 Application Software This page displays all the utilities and applications that GIGABYTE develops and some free software. You can click the Install button on the right of an item to install it. 3-3 Technical Manuals This page provides GIGABYTE's application guides, content descriptions for this driver disk, and the motherboard manuals. Drivers Installation - 58 -

Manual
Page 59
3-4 Contact For the detailed contact information of the GIGABYTE Taiwan headquarter or worldwide branch offices, click the URL on this page to link to the GIGABYTE website. 3-5 System This page provides the basic system information. - 59 - Drivers Installation
3-4 Contact For the detailed contact information of the GIGABYTE Taiwan headquarter or worldwide branch offices, click the URL on this page to link to the GIGABYTE website. 3-5 System This page provides the basic system information. - 59 - Drivers Installation

Manual
Page 60
3-6 Download Center To update the BIOS, drivers, or applications, click the Download Center button to link to the GIGABYTE website. The latest version of the BIOS, drivers, or applications will be displayed. Drivers Installation - 60 -
3-6 Download Center To update the BIOS, drivers, or applications, click the Download Center button to link to the GIGABYTE website. The latest version of the BIOS, drivers, or applications will be displayed. Drivers Installation - 60 -

Manual
Page 61
... requirements vary, depending on PATA and SATA hard drives and restore it . Installation and Configuration: Turn on your system soon after the operating system and drivers are attached to boot from the Windows Vista setup disk. For example, a backup file created with SP1 or later, Windows Vista • Xpress Recovery and...
... requirements vary, depending on PATA and SATA hard drives and restore it . Installation and Configuration: Turn on your system soon after the operating system and drivers are attached to boot from the Windows Vista setup disk. For example, a backup file created with SP1 or later, Windows Vista • Xpress Recovery and...

Manual
Page 62
Boot from the motherboard driver disk to access Xpress Recovery2 for the first time, Xpress Recovery2 will stay permanent in your hard drive data. Step 2: When finished, go to Disk ...
Boot from the motherboard driver disk to access Xpress Recovery2 for the first time, Xpress Recovery2 will stay permanent in your hard drive data. Step 2: When finished, go to Disk ...
Manual
Page 71
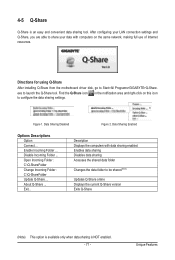
Find the Q-Share icon to Start>All Programs>GIGABYTE>Q-Share. in the notification area and right-click on the same network, making full use of Internet resources. About Q-Share ... ...data folder to launch the Q-Share tool. 4-5 Q-Share Q-Share is NOT enabled. - 71 - Directions for using Q-Share After installing Q-Share from the motherboard driver disk, go to configure the data sharing settings. Open Incoming Folder : C:\Q-ShareFolder Change Incoming Folder : C:\Q-ShareFolder Update Q-Share ... Data Sharing Disabled Figure 2. Disable...
Find the Q-Share icon to Start>All Programs>GIGABYTE>Q-Share. in the notification area and right-click on the same network, making full use of Internet resources. About Q-Share ... ...data folder to launch the Q-Share tool. 4-5 Q-Share Q-Share is NOT enabled. - 71 - Directions for using Q-Share After installing Q-Share from the motherboard driver disk, go to configure the data sharing settings. Open Incoming Folder : C:\Q-ShareFolder Change Incoming Folder : C:\Q-ShareFolder Update Q-Share ... Data Sharing Disabled Figure 2. Disable...
Manual
Page 73
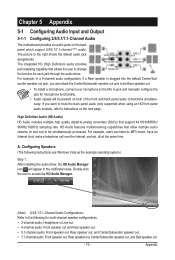
... Speaker Out Rear Speaker Out Side Speaker Out Line In Front Speaker Out Mic In the function for each jack through the audio driver. all at the same time. Double-click the icon to access the HD Audio Manager. (Note) 2/4/5.1/7.1-Channel Audio Configurations: Refer...- 73 - If you can listen to the following instructions use Windows Vista as the example operating system.) Step 1: After installing the audio driver, the HD Audio Manager icon will be simultaneously processed. Configuring Speakers (The following for microphone functionality. • Audio signals will appear in...
... Speaker Out Rear Speaker Out Side Speaker Out Line In Front Speaker Out Mic In the function for each jack through the audio driver. all at the same time. Double-click the icon to access the HD Audio Manager. (Note) 2/4/5.1/7.1-Channel Audio Configurations: Refer...- 73 - If you can listen to the following instructions use Windows Vista as the example operating system.) Step 1: After installing the audio driver, the HD Audio Manager icon will be simultaneously processed. Configuring Speakers (The following for microphone functionality. • Audio signals will appear in...
Manual
Page 77
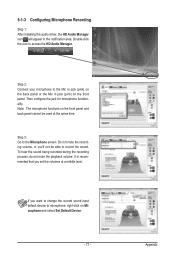
... and back panel cannot be able to record the sound. Then configure the jack for microphone functionality. 5-1-3 Configuring Microphone Recording Step 1: After installing the audio driver, the HD Audio Manager icon will appear in jack (pink) on the front panel.
... and back panel cannot be able to record the sound. Then configure the jack for microphone functionality. 5-1-3 Configuring Microphone Recording Step 1: After installing the audio driver, the HD Audio Manager icon will appear in jack (pink) on the front panel.

Manual
Page 80
...during the POST mean? If not, try a speaker with an internal amplifier. Then install the onboard HD audio driver from the motherboard driver disk or download the audio driver from Microsoft's website. A: The following Award BIOS beep code descriptions may help you identify possible computer problems. ...that have this , please turn off the computer and unplug the power cord). If not, please update it from GIGABYTE's website to the Support&Downloads\Motherboards\FAQ page on GIGABYTE's website. Q: What do I still get a weak sound even though I have a CMOS_SW button, press this ...
...during the POST mean? If not, try a speaker with an internal amplifier. Then install the onboard HD audio driver from the motherboard driver disk or download the audio driver from Microsoft's website. A: The following Award BIOS beep code descriptions may help you identify possible computer problems. ...that have this , please turn off the computer and unplug the power cord). If not, please update it from GIGABYTE's website to the Support&Downloads\Motherboards\FAQ page on GIGABYTE's website. Q: What do I still get a weak sound even though I have a CMOS_SW button, press this ...


