Manual
Page 3
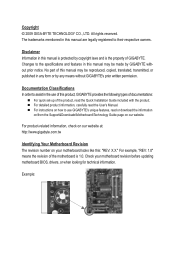
...this manual is protected by any form or by copyright laws and is the property of the motherboard is 1.0. For example, "REV: 1.0" means the revision of GIGABYTE. No part of the product, read the User's Manual. For detailed product information, carefully ...read the Quick Installation Guide included with the product. For instructions on your motherboard revision before updating motherboard BIOS, drivers, or when looking for technical information...
...this manual is protected by any form or by copyright laws and is the property of the motherboard is 1.0. For example, "REV: 1.0" means the revision of GIGABYTE. No part of the product, read the User's Manual. For detailed product information, carefully ...read the Quick Installation Guide included with the product. For instructions on your motherboard revision before updating motherboard BIOS, drivers, or when looking for technical information...
Manual
Page 6
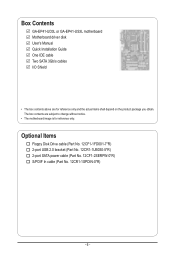
The box contents are for reference only. Box Contents GA-EP41-UD3L or GA-EP41-US3L motherboard Motherboard driver disk User's Manual Quick Installation Guide One IDE cable Two SATA 3Gb/s cables I/O Shield • The box contents above are subject to change without notice. • The motherboard image is for reference only and the actual items shall depend on the...
The box contents are for reference only. Box Contents GA-EP41-UD3L or GA-EP41-US3L motherboard Motherboard driver disk User's Manual Quick Installation Guide One IDE cable Two SATA 3Gb/s cables I/O Shield • The box contents above are subject to change without notice. • The motherboard image is for reference only and the actual items shall depend on the...
Manual
Page 18
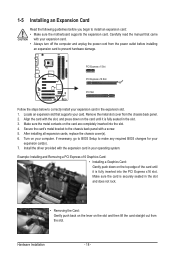
... - 18 - Locate an expansion slot that came with your card. Secure the card's metal bracket to install an expansion card: • Make sure the motherboard supports the expansion card. Remove the metal slot cover from the slot. PCI Express x1 Slot PCI Express x16 Slot PCI Slot Follow the steps...3. If necessary, go to BIOS Setup to correctly install your operating system. Make sure the card is fully seated in the expansion slot. 1. Install the driver provided with the expansion card in the slot and does not rock. • Removing the Card: Gently push back on the lever on the card...
... - 18 - Locate an expansion slot that came with your card. Secure the card's metal bracket to install an expansion card: • Make sure the motherboard supports the expansion card. Remove the metal slot cover from the slot. PCI Express x1 Slot PCI Express x16 Slot PCI Slot Follow the steps...3. If necessary, go to BIOS Setup to correctly install your operating system. Make sure the card is fully seated in the expansion slot. 1. Install the driver provided with the expansion card in the slot and does not rock. • Removing the Card: Gently push back on the lever on the card...

Manual
Page 32
... v6.00PG, An Energy Star Ally Copyright (C) 1984-2009, Award Software, Inc. In Boot Menu, use the up hard drive data using the driver disk, the key can access Boot Menu again to change the first boot device setting as needed. : Q-FLASH Press the key to the instructions ... ever entered Xpress Recovery2 to back up arrow key or the down arrow key to select the first boot device, then press to accept. Motherboard Model BIOS Version EP41-UD3L F2e . . . . : BIOS Setup : XpressRecovery2 : Boot Menu : Qflash 03/11/2009-G41-ICH7-7A69PG0OC-00 Function Keys Function Keys Function Keys: : ...
... v6.00PG, An Energy Star Ally Copyright (C) 1984-2009, Award Software, Inc. In Boot Menu, use the up hard drive data using the driver disk, the key can access Boot Menu again to change the first boot device setting as needed. : Q-FLASH Press the key to the instructions ... ever entered Xpress Recovery2 to back up arrow key or the down arrow key to select the first boot device, then press to accept. Motherboard Model BIOS Version EP41-UD3L F2e . . . . : BIOS Setup : XpressRecovery2 : Boot Menu : Qflash 03/11/2009-G41-ICH7-7A69PG0OC-00 Function Keys Function Keys Function Keys: : ...
Manual
Page 57
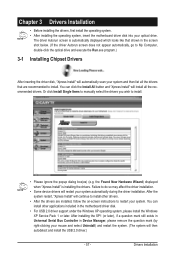
.... You can install other drivers. • After the drivers are recommended to do so may affect the driver installation. • Some device drivers will then autodetect and install the USB 2.0 driver.) - 57 - Chapter 3 Drivers Installation • Before installing the drivers, first install the operating system. • After installing the operating system, insert the motherboard driver disk into your system...
.... You can install other drivers. • After the drivers are recommended to do so may affect the driver installation. • Some device drivers will then autodetect and install the USB 2.0 driver.) - 57 - Chapter 3 Drivers Installation • Before installing the drivers, first install the operating system. • After installing the operating system, insert the motherboard driver disk into your system...
Manual
Page 58
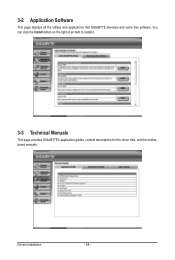
3-2 Application Software This page displays all the utilities and applications that GIGABYTE develops and some free software. Drivers Installation - 58 - You can click the Install button on the right of an item to install it. 3-3 Technical Manuals This page provides GIGABYTE's application guides, content descriptions for this driver disk, and the motherboard manuals.
3-2 Application Software This page displays all the utilities and applications that GIGABYTE develops and some free software. Drivers Installation - 58 - You can click the Install button on the right of an item to install it. 3-3 Technical Manuals This page provides GIGABYTE's application guides, content descriptions for this driver disk, and the motherboard manuals.
Manual
Page 62
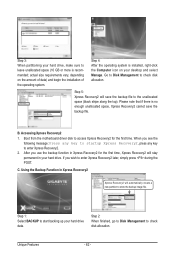
... function in Xpress Recovery2 for the first time. Unique Features - 62 - actual size requirements vary, depending on your desktop and select Manage. Boot from the motherboard driver disk to access Xpress Recovery2 for the first time, Xpress Recovery2 will stay permanent in Xpress Recovery2 Xpress Recovery2 will save the backup file. If...
... function in Xpress Recovery2 for the first time. Unique Features - 62 - actual size requirements vary, depending on your desktop and select Manage. Boot from the motherboard driver disk to access Xpress Recovery2 for the first time, Xpress Recovery2 will stay permanent in Xpress Recovery2 Xpress Recovery2 will save the backup file. If...
Manual
Page 71
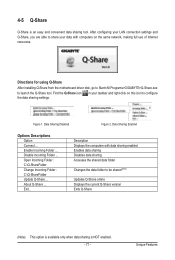
Directions for using Q-Share After installing Q-Share from the motherboard driver disk, go to Start>All Programs>GIGABYTE>Q-Share.exe to configure the data sharing settings. 4-5 Q-Share Q-Share is NOT enabled. - 71 - Data Sharing Enabled Options Descriptions Option Connect ... Open Incoming Folder : C:\Q-ShareFolder ...
Directions for using Q-Share After installing Q-Share from the motherboard driver disk, go to Start>All Programs>GIGABYTE>Q-Share.exe to configure the data sharing settings. 4-5 Q-Share Q-Share is NOT enabled. - 71 - Data Sharing Enabled Options Descriptions Option Connect ... Open Incoming Folder : C:\Q-ShareFolder ...
Manual
Page 73
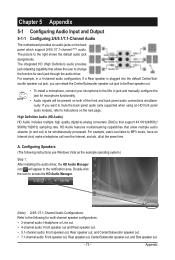
...microphone, connect your microphone to instructions on the next page. Chapter 5 Appendix 5-1 Configuring Audio Input and Output 5-1-1 Configuring 2/4/5.1/7.1-Channel Audio The motherboard provides six audio jacks on both of the front and back panel audio connections simultaneously. woofer speaker out jack, you want to mute the... to the following instructions use Windows Vista as the example operating system.) Step 1: After installing the audio driver, the HD Audio Manager icon will be simultaneously processed. Configuring Speakers (The following for each jack through the audio...
...microphone, connect your microphone to instructions on the next page. Chapter 5 Appendix 5-1 Configuring Audio Input and Output 5-1-1 Configuring 2/4/5.1/7.1-Channel Audio The motherboard provides six audio jacks on both of the front and back panel audio connections simultaneously. woofer speaker out jack, you want to mute the... to the following instructions use Windows Vista as the example operating system.) Step 1: After installing the audio driver, the HD Audio Manager icon will be simultaneously processed. Configuring Speakers (The following for each jack through the audio...


