Manual
Page 7
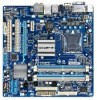
GA-EG41MF-US2H Motherboard Layout KB_MS PHASE LED IT8718 ATX_12V LGA775 FDD VGA LAN DVI HDMI Level Shifter OPTICAL Level Shifter USB_1394 BATTERY USB AUDIO F_AUDIO CPU_FAN PCIE_1 RTL8111C/D PCIE_16 PCI1 SPDIF_O PCI2 CODEC CD_IN SPDIF_I COMA GA-EG41MF-US2H Intel® G41 B_BIOS M_BIOS TSB43AB23 Intel® ICH7 DDR2_1 DDR2_2 DDR2_3 DDR2_4 IDE ATX SYS_FAN SATA2_1 SATA2_3 CI SATA2_0 SATA2_2 CLR_CMOS F1_1394 F_USB1 F_USB2 PWR_LED F_PANEL - 7 -
GA-EG41MF-US2H Motherboard Layout KB_MS PHASE LED IT8718 ATX_12V LGA775 FDD VGA LAN DVI HDMI Level Shifter OPTICAL Level Shifter USB_1394 BATTERY USB AUDIO F_AUDIO CPU_FAN PCIE_1 RTL8111C/D PCIE_16 PCI1 SPDIF_O PCI2 CODEC CD_IN SPDIF_I COMA GA-EG41MF-US2H Intel® G41 B_BIOS M_BIOS TSB43AB23 Intel® ICH7 DDR2_1 DDR2_2 DDR2_3 DDR2_4 IDE ATX SYS_FAN SATA2_1 SATA2_3 CI SATA2_0 SATA2_2 CLR_CMOS F1_1394 F_USB1 F_USB2 PWR_LED F_PANEL - 7 -

Manual
Page 22
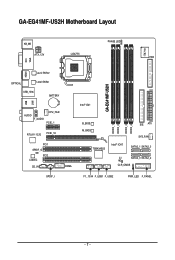
... your computer. GA-EG41MF-US2H Motherboard - 22 - 1-7 Internal Connectors 1 20 5 9 3 2 11 6 4 7 14 12 19 13 17 16 15 18 8 10 1) ATX_12V 2) ATX 3) CPU_FAN 4) SYS_FAN 5) FDD 6) IDE 7) SATA2_0/1/2/3 8) PWR_LED 9) BATTERY 10) F_PANEL 11) F_AUDIO 12) CD_IN 13) SPDIF_I 14) SPDIF_O 15) F_USB1/F_USB2 16) F1_1394 17) COMA 18) CI 19) CLR_CMOS 20) PHASE LED Read the...
... your computer. GA-EG41MF-US2H Motherboard - 22 - 1-7 Internal Connectors 1 20 5 9 3 2 11 6 4 7 14 12 19 13 17 16 15 18 8 10 1) ATX_12V 2) ATX 3) CPU_FAN 4) SYS_FAN 5) FDD 6) IDE 7) SATA2_0/1/2/3 8) PWR_LED 9) BATTERY 10) F_PANEL 11) F_AUDIO 12) CD_IN 13) SPDIF_I 14) SPDIF_O 15) F_USB1/F_USB2 16) F1_1394 17) COMA 18) CI 19) CLR_CMOS 20) PHASE LED Read the...

Manual
Page 32
date information and BIOS configurations) and reset the CMOS values to Chapter 2, "BIOS Setup," for BIOS configurations). 20) PHASE LED The number of lighted LEDs. GA-EG41MF-US2H Motherboard - 32 - Failure to do so may cause damage to the motherboard. • After system restart, go to BIOS Setup ...Always turn off your computer, be sure to clear the CMOS values (e.g. The higher the CPU loading, the more details. To enable the Phase LED display function, please first enable Dynamic Energy Saver Advanced. 19) CLR_CMOS (Clearing CMOS Jumper) Use this jumper to remove the jumper cap ...
date information and BIOS configurations) and reset the CMOS values to Chapter 2, "BIOS Setup," for BIOS configurations). 20) PHASE LED The number of lighted LEDs. GA-EG41MF-US2H Motherboard - 32 - Failure to do so may cause damage to the motherboard. • After system restart, go to BIOS Setup ...Always turn off your computer, be sure to clear the CMOS values (e.g. The higher the CPU loading, the more details. To enable the Phase LED display function, please first enable Dynamic Energy Saver Advanced. 19) CLR_CMOS (Clearing CMOS Jumper) Use this jumper to remove the jumper cap ...

Manual
Page 73
...GIGABYTE Dynamic Energy Saver Advanced shows how much power they have saved in taskbar) 16 INFO/Help 17 Live Utility Update (Check for the latest utility version) • The above data is for reference only. Button Information Table Button Description 1 Dynamic Energy Saver On/Off Switch (Default: Off) 2 Motherboard Phase LED... On/Off Switch (Default: On) 3 Dynamic CPU Frequency Function On/Off Switch (Default: Off) (Note 2) 4 CPU Throttling Display 5 3-Level CPU Voltage Switch (Default:1) (Note 3) 6 CPU Voltage Display 7 Dynamic Power Phase Status ...
...GIGABYTE Dynamic Energy Saver Advanced shows how much power they have saved in taskbar) 16 INFO/Help 17 Live Utility Update (Check for the latest utility version) • The above data is for reference only. Button Information Table Button Description 1 Dynamic Energy Saver On/Off Switch (Default: Off) 2 Motherboard Phase LED... On/Off Switch (Default: On) 3 Dynamic CPU Frequency Function On/Off Switch (Default: Off) (Note 2) 4 CPU Throttling Display 5 3-Level CPU Voltage Switch (Default:1) (Note 3) 6 CPU Voltage Display 7 Dynamic Power Phase Status ...

Manual
Page 74
...total power saving reaches 99999999 Watts. Button Information Table Button Description 1 Dynamic Energy Saver On/Off Switch (Default: Off) 2 Motherboard Phase LED On/Off Switch (Default: On) 3 Dynamic CPU Frequency Function On/Off Switch (Default: Off) 4 CPU Throttling Display 5 3-... (Note 3) 6 CPU Voltage Display 7 Dynamic Power Phase Status 8 Current CPU Power Consumption 9 Time/Date Dynamic Energy Saver Enabled 10 Total Power Savings (Total power saving with the user-defined power saving settings, even after the system is restarted. GA-EG41MF-US2H Motherboard - 74 -
...total power saving reaches 99999999 Watts. Button Information Table Button Description 1 Dynamic Energy Saver On/Off Switch (Default: Off) 2 Motherboard Phase LED On/Off Switch (Default: On) 3 Dynamic CPU Frequency Function On/Off Switch (Default: Off) 4 CPU Throttling Display 5 3-... (Note 3) 6 CPU Voltage Display 7 Dynamic Power Phase Status 8 Current CPU Power Consumption 9 Time/Date Dynamic Energy Saver Enabled 10 Total Power Savings (Total power saving with the user-defined power saving settings, even after the system is restarted. GA-EG41MF-US2H Motherboard - 74 -


