

Manual
Page 4
Table of Contents Box Contents ...6 OptionalItems ...6 GA-EG41MF-S2H Motherboard Layout 7 Block Diagram ...8 Chapter 1 Hardware Installation 9 1-1 Installation Precautions 9 1-2 Product Specifications 10 1-3 Installing the CPU and CPU Cooler 13 1-3-1 Installing the CPU 13 1-3-2 Installing the CPU Cooler 15 1-4 Installing the Memory 16 1-4-1 Dual Channel Memory Configuration 16 1-4-2 Installing a Memory 17 1-5 Installing an Expansion Card 18 1-6 Back Panel Connectors...
Table of Contents Box Contents ...6 OptionalItems ...6 GA-EG41MF-S2H Motherboard Layout 7 Block Diagram ...8 Chapter 1 Hardware Installation 9 1-1 Installation Precautions 9 1-2 Product Specifications 10 1-3 Installing the CPU and CPU Cooler 13 1-3-1 Installing the CPU 13 1-3-2 Installing the CPU Cooler 15 1-4 Installing the Memory 16 1-4-1 Dual Channel Memory Configuration 16 1-4-2 Installing a Memory 17 1-5 Installing an Expansion Card 18 1-6 Back Panel Connectors...

Manual
Page 8
...-D Switch Switch x4 x4 PCI Express x16 Host Interface Intel® G41 D-Sub CPU CLK+/(333/266/200 MHz) DDR2 800/667 MHz Dual Channel Memory GMCH CLK (333/266/200 MHz) 1 PCI Express x1 LAN RJ45 PCIe CLK (100 MHz) x1 RTL8111C x1 PCI Express Bus PCI Bus TSB43AB23 2 IEEE...
...-D Switch Switch x4 x4 PCI Express x16 Host Interface Intel® G41 D-Sub CPU CLK+/(333/266/200 MHz) DDR2 800/667 MHz Dual Channel Memory GMCH CLK (333/266/200 MHz) 1 PCI Express x1 LAN RJ45 PCIe CLK (100 MHz) x1 RTL8111C x1 PCI Express Bus PCI Bus TSB43AB23 2 IEEE...

Manual
Page 9
... place the computer system in a high-temperature environment. • Turning on the computer power during the installation process can become damaged as a motherboard, CPU or memory.
... place the computer system in a high-temperature environment. • Turning on the computer power during the installation process can become damaged as a motherboard, CPU or memory.

Manual
Page 10
...: Intel® ICH7 4 x 1.8V DDR2 DIMM sockets supporting up to 8 GB of system memory (Note 1) Dual channel memory architecture (Note 2) Support for DDR2 800/667 MHz memory modules (Go to GIGABYTE's website for the latest memory support list.) North Bridge: - 1 x D-Sub port - 1 x DVI-D port (Note ... Up to 8 USB 2.0/1.1 ports (4 on the back panel, 1 via the USB brackets connected to the internal IEEE 1394a header) GA-EG41MF-S2H Motherboard - 10 - TSB43AB23 chip Up to 2 IEEE 1394a ports (1 on the back panel, 4 via the IEEE 1394a bracket...
...: Intel® ICH7 4 x 1.8V DDR2 DIMM sockets supporting up to 8 GB of system memory (Note 1) Dual channel memory architecture (Note 2) Support for DDR2 800/667 MHz memory modules (Go to GIGABYTE's website for the latest memory support list.) North Bridge: - 1 x D-Sub port - 1 x DVI-D port (Note ... Up to 8 USB 2.0/1.1 ports (4 on the back panel, 1 via the USB brackets connected to the internal IEEE 1394a header) GA-EG41MF-S2H Motherboard - 10 - TSB43AB23 chip Up to 2 IEEE 1394a ports (1 on the back panel, 4 via the IEEE 1394a bracket...

Manual
Page 12
..., to avoid the system being unable to start or the memory being incorrectly detected, if only one memory module is installed, the actual memory size displayed will depend on the DDR2_1 and DDR2_3 sockets. (Go to GIGABYTE's website for Microsoft® Windows® Vista/XP ...system limitation, when more than 4 GB. (Note 2) Because of physical memory is to be installed, we suggest that you install them on the CPU/ System cooler you install it on the DDR2_1 or DDR2_3 socket; GA-EG41MF-S2H Motherboard - 12 - BIOS Unique Features Bundled Software Operating System Form Factor ...
..., to avoid the system being unable to start or the memory being incorrectly detected, if only one memory module is installed, the actual memory size displayed will depend on the DDR2_1 and DDR2_3 sockets. (Go to GIGABYTE's website for Microsoft® Windows® Vista/XP ...system limitation, when more than 4 GB. (Note 2) Because of physical memory is to be installed, we suggest that you install them on the CPU/ System cooler you install it on the DDR2_1 or DDR2_3 socket; GA-EG41MF-S2H Motherboard - 12 - BIOS Unique Features Bundled Software Operating System Form Factor ...

Manual
Page 13
...CPU. 1-3 Installing the CPU and CPU Cooler Read the following guidelines before installing the CPU to your hardware specifications including the CPU, graphics card, memory, hard drive, etc. 1-3-1 Installing the CPU A. Hardware Installation The CPU cannot be inserted if oriented incorrectly. (Or you may locate the ....) • Always turn on the computer if the CPU cooler is not recom- mended that the motherboard supports the CPU. (Go to GIGABYTE's website for the peripherals. LGA775 CPU Socket Alignment Key LGA 775 CPU Alignment Key Pin One Corner of the CPU may occur. •...
...CPU. 1-3 Installing the CPU and CPU Cooler Read the following guidelines before installing the CPU to your hardware specifications including the CPU, graphics card, memory, hard drive, etc. 1-3-1 Installing the CPU A. Hardware Installation The CPU cannot be inserted if oriented incorrectly. (Or you may locate the ....) • Always turn on the computer if the CPU cooler is not recom- mended that the motherboard supports the CPU. (Go to GIGABYTE's website for the peripherals. LGA775 CPU Socket Alignment Key LGA 775 CPU Alignment Key Pin One Corner of the CPU may occur. •...
Manual
Page 16
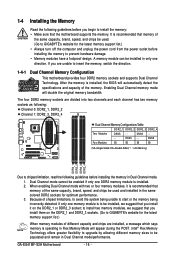
...GIGABYTE's website for the latest memory support list.) • Always turn off the computer and unplug the power cord from the power outlet before installing the memory to prevent hardware damage. • Memory modules have a foolproof design. DS/SS - - GA-EG41MF-S2H Motherboard - 16 - The four DDR2 memory... sockets are divided into two channels and each channel has two memory sockets as following: Channel...
...GIGABYTE's website for the latest memory support list.) • Always turn off the computer and unplug the power cord from the power outlet before installing the memory to prevent hardware damage. • Memory modules have a foolproof design. DS/SS - - GA-EG41MF-S2H Motherboard - 16 - The four DDR2 memory... sockets are divided into two channels and each channel has two memory sockets as following: Channel...

Manual
Page 17
... insert it can only fit in the picture on the left, place your memory modules in the memory sockets. 1-4-2 Installing a Memory Before installing a memory module , make sure to turn off the computer and unplug the power cord from the power outlet to prevent damage to ...correctly install your fingers on the top edge of the memory module. Place the memory module on this motherboard. Notch DDR2 DIMM A DDR2 memory module has a notch, so it vertically into place when the memory module is securely inserted. - 17 - As indicated in one direction. Step 2:...
... insert it can only fit in the picture on the left, place your memory modules in the memory sockets. 1-4-2 Installing a Memory Before installing a memory module , make sure to turn off the computer and unplug the power cord from the power outlet to prevent damage to ...correctly install your fingers on the top edge of the memory module. Place the memory module on this motherboard. Notch DDR2 DIMM A DDR2 memory module has a notch, so it vertically into place when the memory module is securely inserted. - 17 - As indicated in one direction. Step 2:...

Manual
Page 20
... data rate Activity LED: State Description Blinking Data transmission or receiving is occurring Off No data transmission or receiving is occurring GA-EG41MF-S2H Motherboard - 20 - Note that your audio system provides an optical digital audio in operating system environments. In addition, under... refer to the recommended system requirements (or better) below. • CPU: Intel® Dual-Core processor • Memory: Two 1 GB DDR2 800 memory modules with dual channel mode enabled • HDCP compliant monitor(s) Optical S/PDIF Out Connector This connector provides digital audio out...
... data rate Activity LED: State Description Blinking Data transmission or receiving is occurring Off No data transmission or receiving is occurring GA-EG41MF-S2H Motherboard - 20 - Note that your audio system provides an optical digital audio in operating system environments. In addition, under... refer to the recommended system requirements (or better) below. • CPU: Intel® Dual-Core processor • Memory: Two 1 GB DDR2 800 memory modules with dual channel mode enabled • HDCP compliant monitor(s) Optical S/PDIF Out Connector This connector provides digital audio out...

Manual
Page 36
... settings remain in effect. It allows you to restrict access to the system and BIOS Setup. It allows you can also carry out this task.) GA-EG41MF-S2H Motherboard - 36 - First select the profile you wish to load, then press to complete. MB Intelligent Tweaker(M.I.T.) Use this menu to configure... exit BIOS Setup. (Pressing can use the SPACE key) and then press to complete. F12 : Load CMOS from BIOS If your CPU, memory, etc. Standard CMOS Features Use this menu to configure the system time and date, hard drive types, floppy disk drive types, and the ...
... settings remain in effect. It allows you to restrict access to the system and BIOS Setup. It allows you can also carry out this task.) GA-EG41MF-S2H Motherboard - 36 - First select the profile you wish to load, then press to complete. MB Intelligent Tweaker(M.I.T.) Use this menu to configure... exit BIOS Setup. (Pressing can use the SPACE key) and then press to complete. F12 : Load CMOS from BIOS If your CPU, memory, etc. Standard CMOS Features Use this menu to configure the system time and date, hard drive types, floppy disk drive types, and the ...
Manual
Page 37
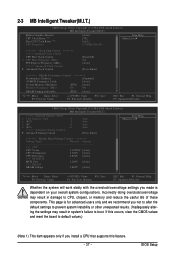
... if you install a CPU that supports this occurs, clear the CMOS values and reset the board to CPU, chipset, or memory and reduce the useful life of these components. BIOS Setup This page is for advanced users only and we recommend you made ... Advanced Clock Control [Disabled] 266 [Auto] [Press Enter] ******** DRAM Performance Control ******** Performance Enhance [Standard] (G)MCH Frequency Latch [Auto] System Memory Multiplier (SPD) [Auto] Memory Frequency (Mhz) 800 800 DRAM Timing Selectable (SPD) [Auto] Move Enter: Select F5: Previous Values +/-/PU/PD: Value F10: Save F6:...
... if you install a CPU that supports this occurs, clear the CMOS values and reset the board to CPU, chipset, or memory and reduce the useful life of these components. BIOS Setup This page is for advanced users only and we recommend you made ... Advanced Clock Control [Disabled] 266 [Auto] [Press Enter] ******** DRAM Performance Control ******** Performance Enhance [Standard] (G)MCH Frequency Latch [Auto] System Memory Multiplier (SPD) [Auto] Memory Frequency (Mhz) 800 800 DRAM Timing Selectable (SPD) [Auto] Move Enter: Select F5: Previous Values +/-/PU/PD: Value F10: Save F6:...

Manual
Page 38
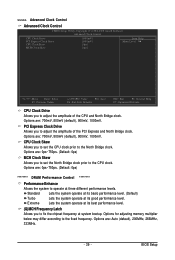
... that supports this item to manually set in accordance with unlocked clock ratio is present only if a CPU with the CPU specifications. GA-EG41MF-S2H Motherboard - 38 - Auto allows the BIOS to automatically set this item to enhance the performance of CPU host clock. This item ...operating CPU frequency. ******** Clock Chip Control Standard Clock Control CPU Host Clock Control Enables or disables the control of the graphics chip and memory. For a 1333 MHz FSB CPU, set the PCIe clock frequency. The adjustable range is enabled. Auto sets the PCIe clock frequency ...
... that supports this item to manually set in accordance with unlocked clock ratio is present only if a CPU with the CPU specifications. GA-EG41MF-S2H Motherboard - 38 - Auto allows the BIOS to automatically set this item to enhance the performance of CPU host clock. This item ...operating CPU frequency. ******** Clock Chip Control Standard Clock Control CPU Host Clock Control Enables or disables the control of the graphics chip and memory. For a 1333 MHz FSB CPU, set the PCIe clock frequency. The adjustable range is enabled. Auto sets the PCIe clock frequency ...
Manual
Page 39
... - Options are : 700mV, 800mV (default), 900mV, 1000mV. CPU Clock Skew Allows you to fix the chipset frequency at three different performance levels. Options for adjusting memory multiplier below may differ according to operate at system bootup. BIOS Setup Options are : 700mV, 800mV (default), 900mV, 1000mV. Extreme Lets the system operate at...
... - Options are : 700mV, 800mV (default), 900mV, 1000mV. CPU Clock Skew Allows you to fix the chipset frequency at three different performance levels. Options for adjusting memory multiplier below may differ according to operate at system bootup. BIOS Setup Options are : 700mV, 800mV (default), 900mV, 1000mV. Extreme Lets the system operate at...

Manual
Page 40
.... Options are : Auto (default), 1~15. DRAM Timing Selectable (SPD) Manual allows all DRAM timing control items below to set the system memory multiplier. tRCD Options are dependent on CPU FSB and the (G)MCH Frequency Latch settings. tRP Options are : Auto (default), 1~63. >>>>>...Enter: Select F5: Previous Values +/-/PU/PD: Value F10: Save F6: Fail-Safe Defaults ESC: Exit F1: General Help F7: Optimized Defaults GA-EG41MF-S2H Motherboard - 40 - tRAS Options are : Auto (default), 1~15. Options are: Auto (default), Manual. >>>>> Standard Timing Control CAS Latency Time Options ...
.... Options are : Auto (default), 1~15. DRAM Timing Selectable (SPD) Manual allows all DRAM timing control items below to set the system memory multiplier. tRCD Options are dependent on CPU FSB and the (G)MCH Frequency Latch settings. tRP Options are : Auto (default), 1~63. >>>>>...Enter: Select F5: Previous Values +/-/PU/PD: Value F10: Save F6: Fail-Safe Defaults ESC: Exit F1: General Help F7: Optimized Defaults GA-EG41MF-S2H Motherboard - 40 - tRAS Options are : Auto (default), 1~15. Options are: Auto (default), Manual. >>>>> Standard Timing Control CAS Latency Time Options ...

Manual
Page 42
...(default), 1~15. DIMM2 Clock Skew Control Options are : Auto (default), +8~-7. Cmd Driving Pull-Up Level Options are : Auto (default), +800ps~-700ps. GA-EG41MF-S2H Motherboard - 42 - Twr2rd(Different Rank) Options are : Auto (default), +8~-7. Enabled Enables this function. Data Driving Pull-Up Level Options are : Auto (... 1066MHz, OC-1200, OC-1333. DDR Write Training Allows you to determine whether to fine-tune memory parameters to enhance memory compatibility. Auto Lets the BIOS decide whether to enable this function. (Default) Disabled Disables this function to enhance...
...(default), 1~15. DIMM2 Clock Skew Control Options are : Auto (default), +8~-7. Cmd Driving Pull-Up Level Options are : Auto (default), +800ps~-700ps. GA-EG41MF-S2H Motherboard - 42 - Twr2rd(Different Rank) Options are : Auto (default), +8~-7. Enabled Enables this function. Data Driving Pull-Up Level Options are : Auto (... 1066MHz, OC-1200, OC-1333. DDR Write Training Allows you to determine whether to fine-tune memory parameters to enhance memory compatibility. Auto Lets the BIOS decide whether to enable this function. (Default) Disabled Disables this function to enhance...

Manual
Page 44
... Channel 3 Master IDE Channel 3 Slave [None] [None] [None] [None] [None] [None] Drive A Floppy 3 Mode Support [1.44M, 3.5"] [Disabled] Halt On [All, But Keyboard] Base Memory Extended Memory Total Memory 640K 510M 512M Move Enter: Select F5: Previous Values +/-/PU/PD: Value F10: Save F6: Fail-Safe Defaults ESC: Exit F1: General Help F7... one of the device during the POST. (Default) • None If no IDE/SATA devices are : Auto (default), Large. Sets the hard drive access mode. GA-EG41MF-S2H Motherboard - 44 -
... Channel 3 Master IDE Channel 3 Slave [None] [None] [None] [None] [None] [None] Drive A Floppy 3 Mode Support [1.44M, 3.5"] [Disabled] Halt On [All, But Keyboard] Base Memory Extended Memory Total Memory 640K 510M 512M Move Enter: Select F5: Previous Values +/-/PU/PD: Value F10: Save F6: Fail-Safe Defaults ESC: Exit F1: General Help F7... one of the device during the POST. (Default) • None If no IDE/SATA devices are : Auto (default), Large. Sets the hard drive access mode. GA-EG41MF-S2H Motherboard - 44 -

Manual
Page 45
... will stop for an error during the POST. All, But Disk/Key The system boot will stop for all other errors. Cylinder Number of sectors. Memory These fields are read-only and are : None, 360K/5.25", 1.2M/5.25", 720K/3.5", 1.44M/3.5", 2.88M/3.5". BIOS Setup If you to None. ...(Default) The system boot will not stop for a floppy disk drive error but it will stop for the MS-DOS operating system. Base Memory Also called conventional memory. Number of cylinders. Drive A Allows you do not install a floppy disk drive, set this item to selects the type of heads. Head...
... will stop for an error during the POST. All, But Disk/Key The system boot will stop for all other errors. Cylinder Number of sectors. Memory These fields are read-only and are : None, 360K/5.25", 1.2M/5.25", 720K/3.5", 1.44M/3.5", 2.88M/3.5". BIOS Setup If you to None. ...(Default) The system boot will not stop for a floppy disk drive error but it will stop for the MS-DOS operating system. Base Memory Also called conventional memory. Number of cylinders. Drive A Allows you do not install a floppy disk drive, set this item to selects the type of heads. Head...

Manual
Page 46
... Specifies the boot order from the installed hard drives. Use the up or down arrow key to select a device and press to 3 (Note) No-Execute Memory Protect (Note) CPU Enhanced Halt (C1E) (Note) C2/C2E State Support (Note) CPU Thermal Monitor 2(TM2) (Note) CPU EIST Function (Note) Virtualization Technology (Note) ... installed. (Default: Enabled) (Note) This item is present only if you enter BIOS Setup. to accept. Capability CPU Multi-Threading (Note) Limit CPUID Max. GA-EG41MF-S2H Motherboard - 46 - Setup A password is only required for entering the BIOS Setup program.
... Specifies the boot order from the installed hard drives. Use the up or down arrow key to select a device and press to 3 (Note) No-Execute Memory Protect (Note) CPU Enhanced Halt (C1E) (Note) C2/C2E State Support (Note) CPU Thermal Monitor 2(TM2) (Note) CPU EIST Function (Note) Virtualization Technology (Note) ... installed. (Default: Enabled) (Note) This item is present only if you enter BIOS Setup. to accept. Capability CPU Multi-Threading (Note) Limit CPUID Max. GA-EG41MF-S2H Motherboard - 46 - Setup A password is only required for entering the BIOS Setup program.

Manual
Page 47
set a delay time for the BIOS to initialize the hard drive as Windows NT4.0. (Default: Disabled) No-Execute Memory Protect (Note) Enables or disables Intel® Execute Disable Bit function. The adjustable range is from 0 to 15 seconds. (Default: 0) (Note) This item is overheated. (...
set a delay time for the BIOS to initialize the hard drive as Windows NT4.0. (Default: Disabled) No-Execute Memory Protect (Note) Enables or disables Intel® Execute Disable Bit function. The adjustable range is from 0 to 15 seconds. (Default: 0) (Note) This item is overheated. (...

Manual
Page 48
...not available to any user application. Blu-ray disc). This memory is installed. Init Display First Specifies the first initiation of system memory during boot. Enable this item to playback HDCP contents. GA-EG41MF-S2H Motherboard - 48 - Disabled Disables this mode. PCI Sets ...the PCI graphics card as the first display. (Default) Onboard Sets the onboard VGA as the first display. PAVP Lite Mode Specifies the buffer memory size for premium content ...
...not available to any user application. Blu-ray disc). This memory is installed. Init Display First Specifies the first initiation of system memory during boot. Enable this item to playback HDCP contents. GA-EG41MF-S2H Motherboard - 48 - Disabled Disables this mode. PCI Sets ...the PCI graphics card as the first display. (Default) Onboard Sets the onboard VGA as the first display. PAVP Lite Mode Specifies the buffer memory size for premium content ...


