

Manual
Page 1
GA-EG41MF-S2H LGA775 socket motherboard for Intel® CoreTM processor family/ Intel® Pentium® processor family/Intel® Celeron® processor family User's Manual Rev. 1002 12ME-EG41MFS2H-1002R
GA-EG41MF-S2H LGA775 socket motherboard for Intel® CoreTM processor family/ Intel® Pentium® processor family/Intel® Celeron® processor family User's Manual Rev. 1002 12ME-EG41MFS2H-1002R

Manual
Page 3
... detailed product information, carefully read the User's Manual. For instructions on how to the specifications and features in this manual may be reproduced, copied, translated, transmitted, or published in this manual is protected by GIGABYTE without GIGABYTE's prior written permission. Changes to use of this product, GIGABYTE provides the following types of the motherboard is...
... detailed product information, carefully read the User's Manual. For instructions on how to the specifications and features in this manual may be reproduced, copied, translated, transmitted, or published in this manual is protected by GIGABYTE without GIGABYTE's prior written permission. Changes to use of this product, GIGABYTE provides the following types of the motherboard is...
Manual
Page 5
Chapter 3 Drivers Installation 61 3-1 Installing Chipset Drivers 61 3-2 Application Software 62 3-3 Technical Manuals 62 3-4 Contact ...63 3-5 System ...63 3-6 Download Center 64 Chapter 4 Unique Features 65 4-1 Xpress Recovery2 65 4-2 BIOS Update Utilities 70 4-2-1 Updating the BIOS with the Q-Flash ...
Chapter 3 Drivers Installation 61 3-1 Installing Chipset Drivers 61 3-2 Application Software 62 3-3 Technical Manuals 62 3-4 Contact ...63 3-5 System ...63 3-6 Download Center 64 Chapter 4 Unique Features 65 4-1 Xpress Recovery2 65 4-2 BIOS Update Utilities 70 4-2-1 Updating the BIOS with the Q-Flash ...

Manual
Page 6
Box Contents GA-EG41MF-S2H motherboard Motherboard driver disk User's Manual One IDE cable and one floppy disk drive cable Two SATA 3Gb/s cables I/O Shield • The box contents above are subject to change without notice. &#...
Box Contents GA-EG41MF-S2H motherboard Motherboard driver disk User's Manual One IDE cable and one floppy disk drive cable Two SATA 3Gb/s cables I/O Shield • The box contents above are subject to change without notice. &#...

Manual
Page 9
... uncertain about any metal leads or connectors. • It is best to the use of electrostatic discharge (ESD). Prior to installation, carefully read the user's manual and follow these procedures: • Prior to installation, do not allow screws to come in a high-temperature environment. • Turning on the motherboard, make sure...
... uncertain about any metal leads or connectors. • It is best to the use of electrostatic discharge (ESD). Prior to installation, carefully read the user's manual and follow these procedures: • Prior to installation, do not allow screws to come in a high-temperature environment. • Turning on the motherboard, make sure...

Manual
Page 15
... the CPU cooler may adhere to the CPU. Check that the Male and Female push pins are joined closely. (Refer to your CPU cooler installation manual for instructions on installing the cooler.) Step 5: After the installation, check the back of arrow is to remove the cooler, on the contrary, is to...
... the CPU cooler may adhere to the CPU. Check that the Male and Female push pins are joined closely. (Refer to your CPU cooler installation manual for instructions on installing the cooler.) Step 5: After the installation, check the back of arrow is to remove the cooler, on the contrary, is to...

Manual
Page 18
... make any required BIOS changes for your expansion card(s). 7. Make sure the card is securely seated in your computer. Install the driver provided with a screw. 5. GA-EG41MF-S2H Motherboard - 18 - Make sure the metal contacts on your operating system. If necessary, go to BIOS Setup to the chassis back panel with the expansion... press down on the card until it is fully inserted into the slot. 4. After installing all expansion cards, replace the chassis cover(s). 6. Carefully read the manual that supports your expansion card in the slot. 3.
... make any required BIOS changes for your expansion card(s). 7. Make sure the card is securely seated in your computer. Install the driver provided with a screw. 5. GA-EG41MF-S2H Motherboard - 18 - Make sure the metal contacts on your operating system. If necessary, go to BIOS Setup to the chassis back panel with the expansion... press down on the card until it is fully inserted into the slot. 4. After installing all expansion cards, replace the chassis cover(s). 6. Carefully read the manual that supports your expansion card in the slot. 3.

Manual
Page 29
... an HDMI display to certain expansion cards like graphics cards and sound cards. For information about connecting the S/PDIF digital audio cable, carefully read the manual for your graphics card if you to use a S/PDIF digital audio cable for digital audio output from your motherboard to the graphics card and have...
... an HDMI display to certain expansion cards like graphics cards and sound cards. For information about connecting the S/PDIF digital audio cable, carefully read the manual for your graphics card if you to use a S/PDIF digital audio cable for digital audio output from your motherboard to the graphics card and have...
Manual
Page 32
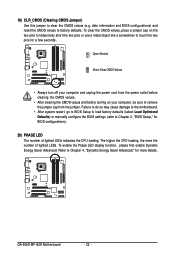
Open: Normal Short: Clear CMOS Values • Always turn off your computer, be sure to touch the two pins for a few seconds. GA-EG41MF-S2H Motherboard - 32 - To clear the CMOS values, place a jumper cap on the two pins to temporarily short the two pins or use a metal ... may cause damage to the motherboard. • After system restart, go to BIOS Setup to load factory defaults (select Load Optimized Defaults) or manually configure the BIOS settings (refer to factory defaults. The higher the CPU loading, the more details. date information and BIOS configurations) and reset the...
Open: Normal Short: Clear CMOS Values • Always turn off your computer, be sure to touch the two pins for a few seconds. GA-EG41MF-S2H Motherboard - 32 - To clear the CMOS values, place a jumper cap on the two pins to temporarily short the two pins or use a metal ... may cause damage to the motherboard. • After system restart, go to BIOS Setup to load factory defaults (select Load Optimized Defaults) or manually configure the BIOS settings (refer to factory defaults. The higher the CPU loading, the more details. date information and BIOS configurations) and reset the...

Manual
Page 38
...the graphics chip and memory. Important It is highly recommended that supports this item to manually set this feature. PCI Express Frequency (Mhz) Allows you install a CPU that the CPU frequency be configurable. GA-EG41MF-S2H Motherboard - 38 - mode based on system configurations. The item is present only ...the CPU Host Frequency item below to automatically set the PCIe clock frequency. For a 1066 MHz FSB CPU, set this item to manually set the R.G.B. Robust Graphics Booster Robust Graphics Booster (R.G.B.) helps to 266 MHz. Auto allows the BIOS to be set this item...
...the graphics chip and memory. Important It is highly recommended that supports this item to manually set this feature. PCI Express Frequency (Mhz) Allows you install a CPU that the CPU frequency be configurable. GA-EG41MF-S2H Motherboard - 38 - mode based on system configurations. The item is present only ...the CPU Host Frequency item below to automatically set the PCIe clock frequency. For a 1066 MHz FSB CPU, set this item to manually set the R.G.B. Robust Graphics Booster Robust Graphics Booster (R.G.B.) helps to 266 MHz. Auto allows the BIOS to be set this item...

Manual
Page 40
...the second is the memory frequency that is the normal operating frequency of the memory being used; DRAM Timing Selectable (SPD) Manual allows all DRAM timing control items below to set the system memory multiplier. tRP Options are : Auto (default), 1~15....F10: Save F6: Fail-Safe Defaults ESC: Exit F1: General Help F7: Optimized Defaults GA-EG41MF-S2H Motherboard - 40 - tRAS Options are dependent on CPU FSB and the (G)MCH Frequency Latch settings. Options are: Auto (default), Manual. >>>>> Standard Timing Control CAS Latency Time Options are: Auto (default), 3~7. System Memory ...
...the second is the memory frequency that is the normal operating frequency of the memory being used; DRAM Timing Selectable (SPD) Manual allows all DRAM timing control items below to set the system memory multiplier. tRP Options are : Auto (default), 1~15....F10: Save F6: Fail-Safe Defaults ESC: Exit F1: General Help F7: Optimized Defaults GA-EG41MF-S2H Motherboard - 40 - tRAS Options are dependent on CPU FSB and the (G)MCH Frequency Latch settings. Options are: Auto (default), Manual. >>>>> Standard Timing Control CAS Latency Time Options are: Auto (default), 3~7. System Memory ...

Manual
Page 44
... startup. Access Mode Sets the hard drive access mode. Select the desired field and use the up arrow or down arrow key to manually enter the specifications of the device during the POST for faster system startup. Time Sets the system time. Allows you to set the ...arrow key to CHS. IDE Channel 0 Master/Slave IDE HDD Auto-Detection Press to autodetect the parameters of the IDE/SATA device on this channel. GA-EG41MF-S2H Motherboard - 44 - IDE Channel 2, 3 Master/Slave IDE Auto-Detection Press to autodetect the parameters of the IDE/SATA device on this channel....
... startup. Access Mode Sets the hard drive access mode. Select the desired field and use the up arrow or down arrow key to manually enter the specifications of the device during the POST for faster system startup. Time Sets the system time. Allows you to set the ...arrow key to CHS. IDE Channel 0 Master/Slave IDE HDD Auto-Detection Press to autodetect the parameters of the IDE/SATA device on this channel. GA-EG41MF-S2H Motherboard - 44 - IDE Channel 2, 3 Master/Slave IDE Auto-Detection Press to autodetect the parameters of the IDE/SATA device on this channel....

Manual
Page 45
... to specify whether the installed floppy disk drive is 3-mode floppy disk drive, a Japanese standard floppy disk drive. If you wish to enter the parameters manually, refer to selects the type of extended memory. Floppy 3 Mode Support Allows you to the information on the system. - 45 - Extended Memory The amount of...
... to specify whether the installed floppy disk drive is 3-mode floppy disk drive, a Japanese standard floppy disk drive. If you wish to enter the parameters manually, refer to selects the type of extended memory. Floppy 3 Mode Support Allows you to the information on the system. - 45 - Extended Memory The amount of...

Manual
Page 50
.../Slave. When PATA IDE Set to is configured to Ch. 1 Master/Slave, this option will be automatically set to Combined or Enhanced mode. GA-EG41MF-S2H Motherboard - 50 - Disabled Disables the integrated SATA controller. When PATA IDE Set to is configured to Ch. 0 Master/Slave, this option will... of 4 ATA devices to Ch. 1 Master/Slave. SATA Port 1/3 Set to This value is automatically configured to Combined mode, you can manually re-configure it to Enhanced mode as needed. (Default) Combined Sets all SATA devices to settings. Non-Combined Sets all SATA devices to settings...
.../Slave. When PATA IDE Set to is configured to Ch. 1 Master/Slave, this option will be automatically set to Combined or Enhanced mode. GA-EG41MF-S2H Motherboard - 50 - Disabled Disables the integrated SATA controller. When PATA IDE Set to is configured to Ch. 0 Master/Slave, this option will... of 4 ATA devices to Ch. 1 Master/Slave. SATA Port 1/3 Set to This value is automatically configured to Combined mode, you can manually re-configure it to Enhanced mode as needed. (Default) Combined Sets all SATA devices to settings. Non-Combined Sets all SATA devices to settings...
Manual
Page 61
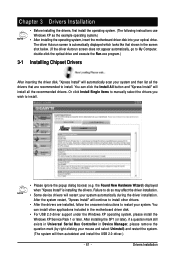
... all the drivers that are installed, follow the onscreen instructions to restart your system automatically during the driver installation. Or click Install Single Items to manually select the drivers you wish to install. The driver Autorun screen is installing the drivers. Drivers Installation the Found New Hardware Wizard) displayed when "Xpress...
... all the drivers that are installed, follow the onscreen instructions to restart your system automatically during the driver installation. Or click Install Single Items to manually select the drivers you wish to install. The driver Autorun screen is installing the drivers. Drivers Installation the Found New Hardware Wizard) displayed when "Xpress...

Manual
Page 62
GA-EG41MF-S2H Motherboard - 62 - You can click the Install button on the right of an item to install it. 3-3 Technical Manuals This page provides GIGABYTE's application guides, content descriptions for this driver disk, and the motherboard manuals. 3-2 Application Software This page displays all the utilities and applications that GIGABYTE develops and some free software.
GA-EG41MF-S2H Motherboard - 62 - You can click the Install button on the right of an item to install it. 3-3 Technical Manuals This page provides GIGABYTE's application guides, content descriptions for this driver disk, and the motherboard manuals. 3-2 Application Software This page displays all the utilities and applications that GIGABYTE develops and some free software.
Manual
Page 63
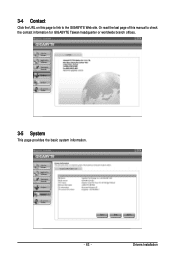
3-4 Contact Click the URL on this manual to the GIGABYTE Web site. Or read the last page of this page to link to check the contact information for GIGABYTE Taiwan headquarter or worldwide branch offices. 3-5 System This page provides the basic system information. - 63 - Drivers Installation
3-4 Contact Click the URL on this manual to the GIGABYTE Web site. Or read the last page of this page to link to check the contact information for GIGABYTE Taiwan headquarter or worldwide branch offices. 3-5 System This page provides the basic system information. - 63 - Drivers Installation
Manual
Page 70
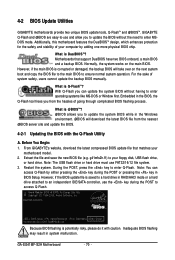
...manually. Inadequate BIOS flashing may result in BIOS Setup. What is DualBIOS ? Extract the file and save the new BIOS file (e.g. g41mfs2h.f1) to enter operating systems like MS-DOS or Window first. TM @BIOS allows you to update the BIOS without having to your motherboard model. 2. GA-EG41MF-S2H... Motherboard - 70 - What is Q-Flash ? TM Motherboards that matches your floppy disk, USB flash drive, or hard drive. 4-2 BIOS Update Utilities GIGABYTE motherboards provide two unique BIOS update tools, Q-...
...manually. Inadequate BIOS flashing may result in BIOS Setup. What is DualBIOS ? Extract the file and save the new BIOS file (e.g. g41mfs2h.f1) to enter operating systems like MS-DOS or Window first. TM @BIOS allows you to update the BIOS without having to your motherboard model. 2. GA-EG41MF-S2H... Motherboard - 70 - What is Q-Flash ? TM Motherboards that matches your floppy disk, USB flash drive, or hard drive. 4-2 BIOS Update Utilities GIGABYTE motherboards provide two unique BIOS update tools, Q-...

Manual
Page 73
...to complete. 3. During the BIOS update process, ensure the Internet connection is not present on -screen instructions to boot. - 73 - GIGABYTE product warranty does not cover any BIOS damage or system failure resulting from the Internet or through other source. Using @BIOS: 1. Update the... BIOS without Using the Internet Update Function" below. 2. Follow the on the @BIOS server site, please manually download the BIOS update file from GIGABYTE's website and follow the instructions in a corrupted BIOS or a system that the BIOS file to start. 3. Updating the BIOS ...
...to complete. 3. During the BIOS update process, ensure the Internet connection is not present on -screen instructions to boot. - 73 - GIGABYTE product warranty does not cover any BIOS damage or system failure resulting from the Internet or through other source. Using @BIOS: 1. Update the... BIOS without Using the Internet Update Function" below. 2. Follow the on the @BIOS server site, please manually download the BIOS update file from GIGABYTE's website and follow the instructions in a corrupted BIOS or a system that the BIOS file to start. 3. Updating the BIOS ...
Manual
Page 79
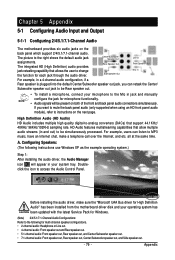
... both of the front and back panel audio connections simultaneously. Configuring Speakers: (The following for microphone functionality. • Audio signals will appear in jack and manually configure the jack for multi-channel speaker configurations. • 2-channel audio: Headphone or Line out. • 4-channel audio: Front speaker out and Rear speaker out...
... both of the front and back panel audio connections simultaneously. Configuring Speakers: (The following for microphone functionality. • Audio signals will appear in jack and manually configure the jack for multi-channel speaker configurations. • 2-channel audio: Headphone or Line out. • 4-channel audio: Front speaker out and Rear speaker out...


