
Manual
Page 2
Motherboard GA-E350N WIN8 Motherboard GA-E350N WIN8 Nov. 30, 2012 Nov. 30, 2012 Copyright © 2012 GIGA-BYTE TECHNOLOGY CO., LTD. Changes to the specifications and features in this manual is protected by copyright laws and is the property of the motherboard is 1.0. Example: Disclaimer ...132; For product-related information, check on our website at: http://www.gigabyte.com Identifying Your Motherboard Revision The revision number on your motherboard revision before updating motherboard BIOS, drivers, or when looking for technical information. No part of this : "REV: ...
Motherboard GA-E350N WIN8 Motherboard GA-E350N WIN8 Nov. 30, 2012 Nov. 30, 2012 Copyright © 2012 GIGA-BYTE TECHNOLOGY CO., LTD. Changes to the specifications and features in this manual is protected by copyright laws and is the property of the motherboard is 1.0. Example: Disclaimer ...132; For product-related information, check on our website at: http://www.gigabyte.com Identifying Your Motherboard Revision The revision number on your motherboard revision before updating motherboard BIOS, drivers, or when looking for technical information. No part of this : "REV: ...

Manual
Page 3
Table of Contents GA-E350N WIN8 Motherboard Layout 4 GA-E350N WIN8 Motherboard Block Diagram 5 Chapter 1 Hardware Installation 6 1-1 Installation Precautions 6 1-2 Product Specifications 7 1-3 Installing the Memory 9 1-4 Installing an Expansion Card 9 1-5 Back Panel Connectors 9 1-6 Internal Connectors 11 Chapter 2 BIOS Setup 16 2-1 Startup Screen 16 2-2 M.I.T...17 2-3 System...20 2-4 BIOS Features 21 2-5 Peripherals...23 2-6 Power Management 24 2-7 Save & Exit...26 Chapter 3 Drivers Installation 27 Regulatory Statements 28 - 3 -
Table of Contents GA-E350N WIN8 Motherboard Layout 4 GA-E350N WIN8 Motherboard Block Diagram 5 Chapter 1 Hardware Installation 6 1-1 Installation Precautions 6 1-2 Product Specifications 7 1-3 Installing the Memory 9 1-4 Installing an Expansion Card 9 1-5 Back Panel Connectors 9 1-6 Internal Connectors 11 Chapter 2 BIOS Setup 16 2-1 Startup Screen 16 2-2 M.I.T...17 2-3 System...20 2-4 BIOS Features 21 2-5 Peripherals...23 2-6 Power Management 24 2-7 Save & Exit...26 Chapter 3 Drivers Installation 27 Regulatory Statements 28 - 3 -

Manual
Page 4
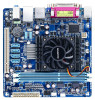
... Realtek GbE LAN F_USB2 F_USB1 SPDIF_O AUDIO BAT F_AUDIO CODEC PCI AMD A45 FCH SATA2 0 1 2 3 DDR3_0 DDR3_1 SYS_FAN ATX PWR_LED CLR_CMOS F_PANEL Box Contents 55 GA-E350N WIN8 motherboard 55 Motherboard driver disk 55 User's Manual 55 Two SATA cables 55 I/O Shield The box contents above are subject to change without notice. - 4 - The box contents are...
... Realtek GbE LAN F_USB2 F_USB1 SPDIF_O AUDIO BAT F_AUDIO CODEC PCI AMD A45 FCH SATA2 0 1 2 3 DDR3_0 DDR3_1 SYS_FAN ATX PWR_LED CLR_CMOS F_PANEL Box Contents 55 GA-E350N WIN8 motherboard 55 Motherboard driver disk 55 User's Manual 55 Two SATA cables 55 I/O Shield The box contents above are subject to change without notice. - 4 - The box contents are...

Manual
Page 10
... of transmitting uncompressed audio/video signals. Microphones must be used . Use this port to connect your device and then remove it from the motherboard. •• When removing the cable, pull it side to side to 192KHz/24bit 8-channel LPCM audio output. HDMI Port HDMI (... 4/5.1/7.1-channel audio configuration. This jack can use an HD front panel audio module and enable the multi-channel audio feature through the audio driver. •• When removing the cable connected to connect front speakers in jack. After installing the HDMI device, make sure to set ...
... of transmitting uncompressed audio/video signals. Microphones must be used . Use this port to connect your device and then remove it from the motherboard. •• When removing the cable, pull it side to side to 192KHz/24bit 8-channel LPCM audio output. HDMI Port HDMI (... 4/5.1/7.1-channel audio configuration. This jack can use an HD front panel audio module and enable the multi-channel audio feature through the audio driver. •• When removing the cable connected to connect front speakers in jack. After installing the HDMI device, make sure to set ...

Manual
Page 27
...Or click Install Single Items to manually select the drivers you wish to install. - 27 - The driver Autorun screen is automatically displayed which looks like that shown in the screen shot below. (If the driver Autorun screen does not appear automatically, go to ... After inserting the driver disk, "Xpress Install" will install all the drivers that are recommended to install. Chapter 3 Drivers Installation •• Before installing the drivers, first install the operating system. •• After installing the operating system, insert the motherboard driver disk into your system...
...Or click Install Single Items to manually select the drivers you wish to install. - 27 - The driver Autorun screen is automatically displayed which looks like that shown in the screen shot below. (If the driver Autorun screen does not appear automatically, go to ... After inserting the driver disk, "Xpress Install" will install all the drivers that are recommended to install. Chapter 3 Drivers Installation •• Before installing the drivers, first install the operating system. •• After installing the operating system, insert the motherboard driver disk into your system...


