Manual
Page 3
...related information, check on our website at: http://www.gigabyte.com Identifying Your Motherboard Revision The revision number on your motherboard revision before updating motherboard BIOS, drivers, or when looking for technical information. Check your motherboard looks like this manual may be reproduced, copied, ...assist in this manual may be made by any form or by GIGABYTE without prior notice. Changes to their respective owners. Disclaimer Information in this manual are legally registered to the specifications and features in the use of this : "REV: X.X." ...
...related information, check on our website at: http://www.gigabyte.com Identifying Your Motherboard Revision The revision number on your motherboard revision before updating motherboard BIOS, drivers, or when looking for technical information. Check your motherboard looks like this manual may be reproduced, copied, ...assist in this manual may be made by any form or by GIGABYTE without prior notice. Changes to their respective owners. Disclaimer Information in this manual are legally registered to the specifications and features in the use of this : "REV: X.X." ...
Manual
Page 4
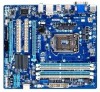
Table of Contents GA-B75M-D3H Motherboard Layout 5 GA-B75M-D3H Motherboard Block Diagram 6 Chapter 1 Hardware Installation 7 1-1 Installation Precautions 7 1-2 Product Specifications 8 1-3 Installing the CPU 10 1-4 Installing the Memory 11 1-5 Installing an Expansion Card 11 1-6 Back Panel Connectors 12 1-7 Internal Connectors 14 Chapter 2 BIOS Setup 23 2-1 Startup Screen 23 2-2 The Main Menu 24 2-3 M.I.T...25 2-4 System...32 2-5 BIOS Features 33 2-6 Peripherals...35 2-7 Power Management 38 2-8 Save & Exit...39 Chapter 3 Drivers Installation 40 Regulatory Statements 41 - 4 -
Table of Contents GA-B75M-D3H Motherboard Layout 5 GA-B75M-D3H Motherboard Block Diagram 6 Chapter 1 Hardware Installation 7 1-1 Installation Precautions 7 1-2 Product Specifications 8 1-3 Installing the CPU 10 1-4 Installing the Memory 11 1-5 Installing an Expansion Card 11 1-6 Back Panel Connectors 12 1-7 Internal Connectors 14 Chapter 2 BIOS Setup 23 2-1 Startup Screen 23 2-2 The Main Menu 24 2-3 M.I.T...25 2-4 System...32 2-5 BIOS Features 33 2-6 Peripherals...35 2-7 Power Management 38 2-8 Save & Exit...39 Chapter 3 Drivers Installation 40 Regulatory Statements 41 - 4 -
Manual
Page 10
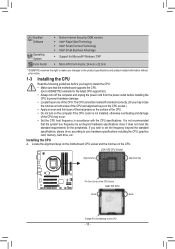
...the frequency beyond hardware specifications since it does not meet the standard requirements for the latest CPU support list.) •• Always turn on the computer if the CPU cooler is not recommended that the motherboard supports the CPU. (Go to GIGABYTE's website for the ...peripherals. Installing the CPU A. If you wish to set beyond the standard specifications, please do so according to your hardware specifications including the CPU, graphics card, memory, hard...
...the frequency beyond hardware specifications since it does not meet the standard requirements for the latest CPU support list.) •• Always turn on the computer if the CPU cooler is not recommended that the motherboard supports the CPU. (Go to GIGABYTE's website for the ...peripherals. Installing the CPU A. If you wish to set beyond the standard specifications, please do so according to your hardware specifications including the CPU, graphics card, memory, hard...
Manual
Page 11
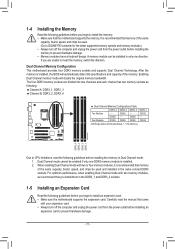
... a foolproof design. If you begin to install an expansion card: •• Make sure the motherboard supports the expansion card. Enabling Dual Channel memory mode will automatically detect the specifications and capacity of the memory. DS/SS - - It is recommended that memory of the same capacity..., brand, speed, and chips be used . (Go to insert the memory, switch the direction. The four DDR3 memory sockets are unable to GIGABYTE's website for...
... a foolproof design. If you begin to install an expansion card: •• Make sure the motherboard supports the expansion card. Enabling Dual Channel memory mode will automatically detect the specifications and capacity of the memory. DS/SS - - It is recommended that memory of the same capacity..., brand, speed, and chips be used . (Go to insert the memory, switch the direction. The four DDR3 memory sockets are unable to GIGABYTE's website for...
Manual
Page 13
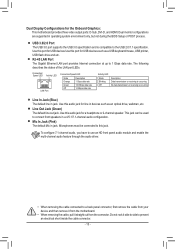
...a back panel connector, first remove the cable from your device and then remove it from the motherboard. •• When removing the cable, pull it side to side to the USB 2.0/1.1 specification. RJ-45 LAN Port The Gigabit Ethernet LAN port provides Internet connection at up to this audio... jack for the Onboard Graphics: This motherboard provides three video output ports: D-Sub, DVI-D, and HDMI. Use this jack...
...a back panel connector, first remove the cable from your device and then remove it from the motherboard. •• When removing the cable, pull it side to side to the USB 2.0/1.1 specification. RJ-45 LAN Port The Gigabit Ethernet LAN port provides Internet connection at up to this audio... jack for the Onboard Graphics: This motherboard provides three video output ports: D-Sub, DVI-D, and HDMI. Use this jack...


