Manual
Page 5
Channel Audio Function Introduction 62 4-2 Troubleshooting 67 - 5 - Chapter 3 Install Drivers 51 3-1 Install Chipset Drivers 51 3-2 SoftwareApplications 52 3-3 Driver CD Information 52 3-4 Hardware Information 53 3-5 Contact Us ...53 Chapter 4 Appendix 55 4-1 Unique Software Utilities 55 4-1-1 EasyTune 5 Introduction 55 4-1-2 Xpress Recovery2 Introduction 56 4-1-3 Flash BIOS Method Introduction 58 4-1-4 2- / 4- / 6- / 8-
Channel Audio Function Introduction 62 4-2 Troubleshooting 67 - 5 - Chapter 3 Install Drivers 51 3-1 Install Chipset Drivers 51 3-2 SoftwareApplications 52 3-3 Driver CD Information 52 3-4 Hardware Information 53 3-5 Contact Us ...53 Chapter 4 Appendix 55 4-1 Unique Software Utilities 55 4-1-1 EasyTune 5 Introduction 55 4-1-2 Xpress Recovery2 Introduction 56 4-1-3 Flash BIOS Method Introduction 58 4-1-4 2- / 4- / 6- / 8-
Manual
Page 16
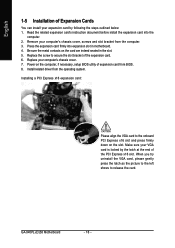
...x16 slot and press firmly down on the card are indeed seated in motherboard. 4. English 1-5 Installation of the PCI Express x16 slot. GA-945PL-(D)S3 Motherboard - 16 - Be sure the metal contacts on the slot. Replace your computer's chassis cover, screws and slot bracket from the ... your computer's chassis cover. 7. Power on the computer, if necessary, setup BIOS utility of the expansion card. 6. Install related driver from the computer. 3. Read the related expansion card's instruction document before install the expansion card into expansion slot in the slot. 5.
...x16 slot and press firmly down on the card are indeed seated in motherboard. 4. English 1-5 Installation of the PCI Express x16 slot. GA-945PL-(D)S3 Motherboard - 16 - Be sure the metal contacts on the slot. Replace your computer's chassis cover, screws and slot bracket from the ... your computer's chassis cover. 7. Power on the computer, if necessary, setup BIOS utility of the expansion card. 6. Install related driver from the computer. 3. Read the related expansion card's instruction document before install the expansion card into expansion slot in the slot. 5.
Manual
Page 17
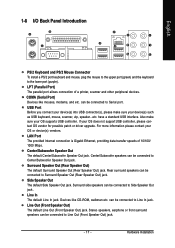
... you connect your device(s) into USB connector(s), please make sure your OS does not support USB controller, please contact OS vendor for possible patch or driver upgrade. Line In The default Line In jack. can be connected to Surround Speaker Out (Rear Speaker Out) jack. have a standard USB interface. Center/Subwoofer...
... you connect your device(s) into USB connector(s), please make sure your OS does not support USB controller, please contact OS vendor for possible patch or driver upgrade. Line In The default Line In jack. can be connected to Surround Speaker Out (Rear Speaker Out) jack. have a standard USB interface. Center/Subwoofer...
Manual
Page 22
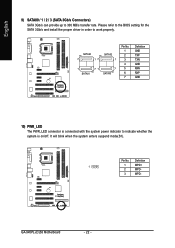
... whether the system is connected with the system power indicator to 300 MB/s transfer rate. It will blink when the system enters suspend mode(S1). GA-945PL-(D)S3 Motherboard - 22 - Please refer to the BIOS setting for the SATA 3Gb/s and install the proper driver in order to work properly. Definition 1 1 MPD+ 2 MPD- 3 MPD-
... whether the system is connected with the system power indicator to 300 MB/s transfer rate. It will blink when the system enters suspend mode(S1). GA-945PL-(D)S3 Motherboard - 22 - Please refer to the BIOS setting for the SATA 3Gb/s and install the proper driver in order to work properly. Definition 1 1 MPD+ 2 MPD- 3 MPD-
Manual
Page 23
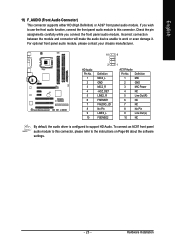
Definition 1 MIC 2 GND 3 MIC Power 4 NC 5 Line Out (R) 6 NC 7 NC 8 No Pin 9 Line Out (L) 10 NC By default, the audio driver is configured to this connector, please refer to work or even damage it. English 11) F_AUDIO (Front Audio Connector) This connector supports either HD (High ...
Definition 1 MIC 2 GND 3 MIC Power 4 NC 5 Line Out (R) 6 NC 7 NC 8 No Pin 9 Line Out (L) 10 NC By default, the audio driver is configured to this connector, please refer to work or even damage it. English 11) F_AUDIO (Front Audio Connector) This connector supports either HD (High ...
Manual
Page 51
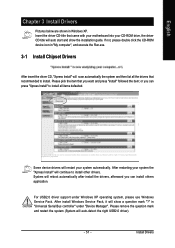
... please use Windows Service Pack. Some device drivers will auto-detect the right USB2.0 driver). - 51 - After restarting your system the "Xpress Install" will continue to install. For USB2.0 driver support under "Device Manager". Install Drivers If not, please double click the CD-... all items defaulted. English Chapter 3 Install Drivers Pictures below are shown in "My computer", and execute the Run.exe. 3-1 Install Chipset Drivers After insert the driver CD, "Xpress Install" will reboot automatically after install the drivers, afterward you want and press "install" followed...
... please use Windows Service Pack. Some device drivers will auto-detect the right USB2.0 driver). - 51 - After restarting your system the "Xpress Install" will continue to install. For USB2.0 driver support under "Device Manager". Install Drivers If not, please double click the CD-... all items defaulted. English Chapter 3 Install Drivers Pictures below are shown in "My computer", and execute the Run.exe. 3-1 Install Chipset Drivers After insert the driver CD, "Xpress Install" will reboot automatically after install the drivers, afterward you want and press "install" followed...
Manual
Page 52
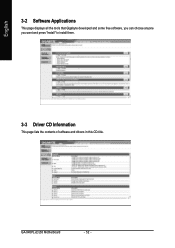
English 3-2 Software Applications This page displays all the tools that Gigabyte developed and some free software, you can choose anyone you want and press "install" to install them. 3-3 Driver CD Information This page lists the contents of software and drivers in this CD-title. GA-945PL-(D)S3 Motherboard - 52 -
English 3-2 Software Applications This page displays all the tools that Gigabyte developed and some free software, you can choose anyone you want and press "install" to install them. 3-3 Driver CD Information This page lists the contents of software and drivers in this CD-title. GA-945PL-(D)S3 Motherboard - 52 -

Manual
Page 53
Install Drivers English 3-4 Hardware Information This page lists all device you have for this motherboard. 3-5 Contact Us Please see the last page for details. - 53 -
Install Drivers English 3-4 Hardware Information This page lists all device you have for this motherboard. 3-5 Contact Us Please see the last page for details. - 53 -
Manual
Page 56
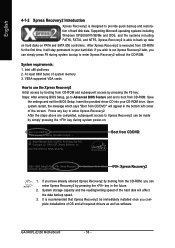
... well as software. At least 64M bytes of the hard disk will affect the data backup speed. 3. Insert the provided driver CD into your hard disk. After the steps above are completed, subsequent access to Xpress Recovery2 can simply press F9 during system ...executed from CD/DVD:" will stay permanent in the bottom left corner of hard disk data. Boot from CD-ROM. GA-945PL-(D)S3 Motherboard - 56 - Upon system restart, the message which says "Boot from CD-ROM for 945PL-DS3 F2e . . . . :BIOS Setup/Q-Flash :Xpress Recovery2 :Boot Menu :Qflash 2/2/2007-I945-6A79TG0DC-00 :...
... well as software. At least 64M bytes of the hard disk will affect the data backup speed. 3. Insert the provided driver CD into your hard disk. After the steps above are completed, subsequent access to Xpress Recovery2 can simply press F9 during system ...executed from CD/DVD:" will stay permanent in the bottom left corner of hard disk data. Boot from CD-ROM. GA-945PL-(D)S3 Motherboard - 56 - Upon system restart, the message which says "Boot from CD-ROM for 945PL-DS3 F2e . . . . :BIOS Setup/Q-Flash :Xpress Recovery2 :Boot Menu :Qflash 2/2/2007-I945-6A79TG0DC-00 :...
Manual
Page 57
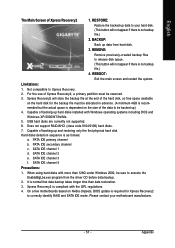
.... 5. On a few motherboards based on the size of backing up hard disks installed with more than data restoration. 3. Appendix BACKUP: Back up data from the driver CD before data backup. 2. USB hard disks are currently not supported. 6. SATA IDE channel 3 f. It is required for the backup file must be allocated in...
.... 5. On a few motherboards based on the size of backing up hard disks installed with more than data restoration. 3. Appendix BACKUP: Back up data from the driver CD before data backup. 2. USB hard disks are currently not supported. 6. SATA IDE channel 3 f. It is required for the backup file must be allocated in...
Manual
Page 62
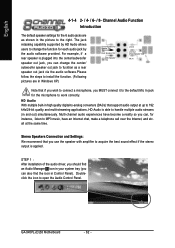
... support audio output at the same time. GA-945PL-(D)S3 Motherboard - 62 - all at up to 192 kHz/24-bit quality and multi-streaming applications, HD Audio is applied. English 4-1-4 2- / 4- / 6- / 8- HD Audio With multiple built-in and out) simultaneously. STEP 1 : After installation of the audio driver, you should find an Audio Manager icon in...
... support audio output at the same time. GA-945PL-(D)S3 Motherboard - 62 - all at up to 192 kHz/24-bit quality and multi-streaming applications, HD Audio is applied. English 4-1-4 2- / 4- / 6- / 8- HD Audio With multiple built-in and out) simultaneously. STEP 1 : After installation of the audio driver, you should find an Audio Manager icon in...

Manual
Page 63
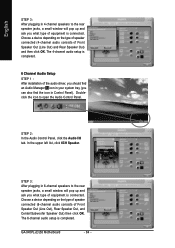
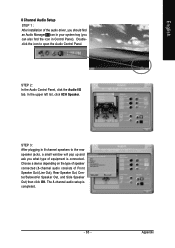
... 1 : After installation of equipment is plugged into the rear Line Out jack, a small window will pop up and ask you what type of the audio driver, you should find an Audio Manager icon in your system tray (you can also find the icon in Control Panel). STEP 2: In the Audio Control...
... 1 : After installation of equipment is plugged into the rear Line Out jack, a small window will pop up and ask you what type of the audio driver, you should find an Audio Manager icon in your system tray (you can also find the icon in Control Panel). STEP 2: In the Audio Control...
Manual
Page 64
... click OK. The 6-channel audio setup is completed. GA-945PL-(D)S3 Motherboard - 64 - STEP 2: In the Audio Control Panel, click the Audio I/O tab. STEP 3: After plugging in Control Panel). The 4-channel audio setup is completed. 6 Channel Audio Setup STEP 1 : After installation of the audio driver, you should find an Audio Manager icon in your...
... click OK. The 6-channel audio setup is completed. GA-945PL-(D)S3 Motherboard - 64 - STEP 2: In the Audio Control Panel, click the Audio I/O tab. STEP 3: After plugging in Control Panel). The 4-channel audio setup is completed. 6 Channel Audio Setup STEP 1 : After installation of the audio driver, you should find an Audio Manager icon in your...
Manual
Page 65
.... STEP 3: After plugging in Control Panel). Appendix English In the upper left list, click 8CH Speaker. 8 Channel Audio Setup STEP 1 : After installation of the audio driver, you should find an Audio Manager icon in your system tray (you can also find the icon in 8-channel speakers to open the Audio Control...
.... STEP 3: After plugging in Control Panel). Appendix English In the upper left list, click 8CH Speaker. 8 Channel Audio Setup STEP 1 : After installation of the audio driver, you should find an Audio Manager icon in your system tray (you can also find the icon in 8-channel speakers to open the Audio Control...


