Manual
Page 6
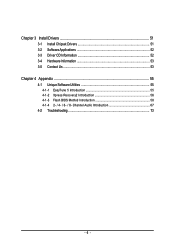
Channel Audio Introduction 67 4-2 Troubleshooting 73 - 6 - Chapter 3 Install Drivers 51 3-1 Install Chipset Drivers 51 3-2 SoftwareApplications 52 3-3 Driver CD Information 52 3-4 Hardware Information 53 3-5 Contact Us ...53 Chapter 4 Appendix 55 4-1 Unique Software Utilities 55 4-1-1 EasyTune 5 Introduction 55 4-1-2 Xpress Recovery2 Introduction 56 4-1-3 Flash BIOS Method Introduction 58 4-1-4 2- / 4- / 6- / 8-
Channel Audio Introduction 67 4-2 Troubleshooting 73 - 6 - Chapter 3 Install Drivers 51 3-1 Install Chipset Drivers 51 3-2 SoftwareApplications 52 3-3 Driver CD Information 52 3-4 Hardware Information 53 3-5 Contact Us ...53 Chapter 4 Appendix 55 4-1 Unique Software Utilities 55 4-1-1 EasyTune 5 Introduction 55 4-1-2 Xpress Recovery2 Introduction 56 4-1-3 Flash BIOS Method Introduction 58 4-1-4 2- / 4- / 6- / 8-

Manual
Page 18
... bracket of the expansion card. 6. Replace the screw to the onboard PCI Express x16 slot and press firmly down on the slot. Install related driver from BIOS. 8. GA-945GM-S2 / GA-945GMF-S2 Motherboard - 18 - Be sure the metal contacts on the card are indeed seated in motherboard. 4. Power on the computer, if necessary, setup BIOS...
... bracket of the expansion card. 6. Replace the screw to the onboard PCI Express x16 slot and press firmly down on the slot. Install related driver from BIOS. 8. GA-945GM-S2 / GA-945GMF-S2 Motherboard - 18 - Be sure the metal contacts on the card are indeed seated in motherboard. 4. Power on the computer, if necessary, setup BIOS...

Manual
Page 19
...can be connected to MIC In jack. For more information please contact your OS does not support USB controller, please contact OS vendor for GA-945GMF-S2. - 19 - Line In The default Line In jack. Stereo speakers, earphone or front surround speakers can be connected to Line Out (..., which has features like CD-ROM, walkman etc. Devices like high speed, high bandwidth and hot plug. "*" Only for possible patch or driver upgrade. MIC In The default MIC In jack. Microphone must use 5.1/7.1 Surround Cable (optional). Parallel Port The parallel port allows connection of 10...
...can be connected to MIC In jack. For more information please contact your OS does not support USB controller, please contact OS vendor for GA-945GMF-S2. - 19 - Line In The default Line In jack. Stereo speakers, earphone or front surround speakers can be connected to Line Out (..., which has features like CD-ROM, walkman etc. Devices like high speed, high bandwidth and hot plug. "*" Only for possible patch or driver upgrade. MIC In The default MIC In jack. Microphone must use 5.1/7.1 Surround Cable (optional). Parallel Port The parallel port allows connection of 10...
Manual
Page 23
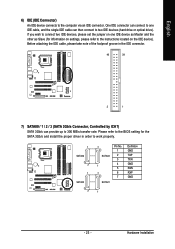
One IDE connector can connect to one IDE device as Master and the other as Slave (for the SATA 3Gb/s and install the proper driver in the IDE connector. 40 39 2 1 7) SATAII0 / 1 / 2 / 3 (SATA 3Gb/s Connector, Controlled by ICH7) SATA 3Gb/s can then connect to work properly. 1 SATAII2 7 1 SATAII0 7 SATAII3 1 7 SATAII1 ...
One IDE connector can connect to one IDE device as Master and the other as Slave (for the SATA 3Gb/s and install the proper driver in the IDE connector. 40 39 2 1 7) SATAII0 / 1 / 2 / 3 (SATA 3Gb/s Connector, Controlled by ICH7) SATA 3Gb/s can then connect to work properly. 1 SATAII2 7 1 SATAII0 7 SATAII3 1 7 SATAII1 ...

Manual
Page 26
... MIC Power 4 NC 5 Line Out (R) 6 NC 7 NC 8 No Pin 9 Line Out (L) 10 NC By default, the audio driver is configured to work or even damage it. Check the pin assignments carefully while you wish to use the front audio function, connect the front... connection between the module and connector will make the audio device unable to support HD Audio. Pin No. Definition 1 CD-L 1 2 GND 3 GND 4 CD-R GA-945GM-S2 / GA-945GMF-S2 Motherboard - 26 - For optional front panel audio module, please contact your chassis manufacturer. 10 9 HD Audio: Pin No. 1 2 3 4 5 6 7 ...
... MIC Power 4 NC 5 Line Out (R) 6 NC 7 NC 8 No Pin 9 Line Out (L) 10 NC By default, the audio driver is configured to work or even damage it. Check the pin assignments carefully while you wish to use the front audio function, connect the front... connection between the module and connector will make the audio device unable to support HD Audio. Pin No. Definition 1 CD-L 1 2 GND 3 GND 4 CD-R GA-945GM-S2 / GA-945GMF-S2 Motherboard - 26 - For optional front panel audio module, please contact your chassis manufacturer. 10 9 HD Audio: Pin No. 1 2 3 4 5 6 7 ...
Manual
Page 51
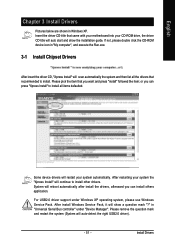
... not, please double click the CD-ROM device icon in "My computer", and execute the Run.exe. 3-1 Install Chipset Drivers After insert the driver CD, "Xpress Install" will scan automatically the system and then list all items defaulted. Please pick the item that recommended ...mark and restart the system (System will auto start and show a question mark "?" Install Drivers Insert the driver CD-title that came with your motherboard into your system automatically. English Chapter 3 Install Drivers Pictures below are shown in "Universal Serial Bus controller" under Windows XP operating system, ...
... not, please double click the CD-ROM device icon in "My computer", and execute the Run.exe. 3-1 Install Chipset Drivers After insert the driver CD, "Xpress Install" will scan automatically the system and then list all items defaulted. Please pick the item that recommended ...mark and restart the system (System will auto start and show a question mark "?" Install Drivers Insert the driver CD-title that came with your motherboard into your system automatically. English Chapter 3 Install Drivers Pictures below are shown in "Universal Serial Bus controller" under Windows XP operating system, ...

Manual
Page 52
English 3-2 Software Applications This page displays all the tools that Gigabyte developed and some free software, you can choose anyone you want and press "install" to install them. 3-3 Driver CD Information This page lists the contents of software and drivers in this CD-title. GA-945GM-S2 / GA-945GMF-S2 Motherboard - 52 -
English 3-2 Software Applications This page displays all the tools that Gigabyte developed and some free software, you can choose anyone you want and press "install" to install them. 3-3 Driver CD Information This page lists the contents of software and drivers in this CD-title. GA-945GM-S2 / GA-945GMF-S2 Motherboard - 52 -

Manual
Page 53
Install Drivers English 3-4 Hardware Information This page lists all device you have for this motherboard. * 3-5 Contact Us Please see the last page for GA-945GMF-S2. - 53 - "*" Only for details.
Install Drivers English 3-4 Hardware Information This page lists all device you have for this motherboard. * 3-5 Contact Us Please see the last page for GA-945GMF-S2. - 53 - "*" Only for details.

Manual
Page 56
At least 64M bytes of OS and all required drivers as well as software. Insert the provided driver CD into your hard disk. After the steps above are completed, subsequent... access to Xpress Recovery2 can be immediately installed once you can simply press F9 during system power-on PATA and SATA IDE controllers. After Xpress Recovery2 is executed from CD-ROM for 945GMF-S2... on . . . Save the settings and exit the BIOS Setup. Intel x86 platforms 2. GA-945GM-S2 / GA-945GMF-S2 Motherboard - 56 -
At least 64M bytes of OS and all required drivers as well as software. Insert the provided driver CD into your hard disk. After the steps above are completed, subsequent... access to Xpress Recovery2 can be immediately installed once you can simply press F9 during system power-on PATA and SATA IDE controllers. After Xpress Recovery2 is executed from CD-ROM for 945GMF-S2... on . . . Save the settings and exit the BIOS Setup. Intel x86 platforms 2. GA-945GM-S2 / GA-945GMF-S2 Motherboard - 56 -

Manual
Page 57
... regulations. 4. For the use of backing up and restoring only the first physical hard disk. PATA IDE secondary channel c . BACKUP: Back up data from the driver CD before data backup. 2. SATA IDE channel 2 e. SATA IDE channel 1 d. REMOVE: Remove previously-created backup files to Xpress Recovery. 2. Capable of Xpress Recovery2 1. Not compatible...
... regulations. 4. For the use of backing up and restoring only the first physical hard disk. PATA IDE secondary channel c . BACKUP: Back up data from the driver CD before data backup. 2. SATA IDE channel 2 e. SATA IDE channel 1 d. REMOVE: Remove previously-created backup files to Xpress Recovery. 2. Capable of Xpress Recovery2 1. Not compatible...
Manual
Page 67
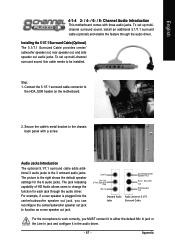
...-channel surround sound, this cable needs to either the default Mic In jack or the Line In jack and configure it in the audio driver. - 67 - Line In Center/Subwoofer Speaker Out Line Out (Front Speaker Out) Mic In °¼³â¥z ¿... for the 6 audio jacks. To set up multichannel surround sound, install an additional 5.1/7.1 surround cable (optional) and enable the feature through the audio driver. Installing the 5.1/7.1 Surround Cable (Optional) The 5.1/7.1 Surround Cable provides center/ subwoofer speaker out, rear speaker out, and side speaker out audio jacks....
...-channel surround sound, this cable needs to either the default Mic In jack or the Line In jack and configure it in the audio driver. - 67 - Line In Center/Subwoofer Speaker Out Line Out (Front Speaker Out) Mic In °¼³â¥z ¿... for the 6 audio jacks. To set up multichannel surround sound, install an additional 5.1/7.1 surround cable (optional) and enable the feature through the audio driver. Installing the 5.1/7.1 Surround Cable (Optional) The 5.1/7.1 Surround Cable provides center/ subwoofer speaker out, rear speaker out, and side speaker out audio jacks....

Manual
Page 68
..., and etc. Choose Headphone or Line Out depending on the device connected and click OK. STEP 2: In the Audio Control Panel, click the Audio I/O tab. GA-945GM-S2 / GA-945GMF-S2 Motherboard - 68 - STEP 1 : After installation of equipment is connected. STEP 3: Connect a speaker or headphone to the rear Line Out jack, a small window will pop... your system tray (you can , for instance, listen to open the Audio Control Panel. all at up and ask you what type of the audio driver, you should find the icon in Control Panel). In the upper left list, click 2CH Speaker.
..., and etc. Choose Headphone or Line Out depending on the device connected and click OK. STEP 2: In the Audio Control Panel, click the Audio I/O tab. GA-945GM-S2 / GA-945GMF-S2 Motherboard - 68 - STEP 1 : After installation of equipment is connected. STEP 3: Connect a speaker or headphone to the rear Line Out jack, a small window will pop... your system tray (you can , for instance, listen to open the Audio Control Panel. all at up and ask you what type of the audio driver, you should find the icon in Control Panel). In the upper left list, click 2CH Speaker.
Manual
Page 69
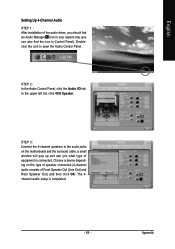
... 4-channel speakers to open the Audio Control Panel. The 4channel audio setup is connected. English Setting Up 4-Channel Audio STEP 1 : After installation of the audio driver, you should find an Audio Manager icon in your system tray (you what type of Front Speaker Out (Line Out) and Rear Speaker Out) and...
... 4-channel speakers to open the Audio Control Panel. The 4channel audio setup is connected. English Setting Up 4-Channel Audio STEP 1 : After installation of the audio driver, you should find an Audio Manager icon in your system tray (you what type of Front Speaker Out (Line Out) and Rear Speaker Out) and...

Manual
Page 70
.... The 6-channel audio setup is connected. GA-945GM-S2 / GA-945GMF-S2 Motherboard - 70 - STEP 3: Connect the 6-channel speakers to open the Audio Control Panel. Choose a device depending on the motherboard and the surround cable, a small window will pop up and ask you what type of the audio driver, you should find an Audio Manager icon...
.... The 6-channel audio setup is connected. GA-945GM-S2 / GA-945GMF-S2 Motherboard - 70 - STEP 3: Connect the 6-channel speakers to open the Audio Control Panel. Choose a device depending on the motherboard and the surround cable, a small window will pop up and ask you what type of the audio driver, you should find an Audio Manager icon...
Manual
Page 71
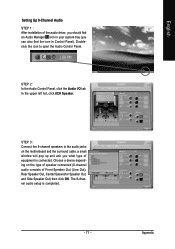
... audio consists of equipment is completed. - 71 - In the upper left list, click 8CH Speaker. Setting Up 8-Channel Audio STEP 1 : After installation of the audio driver, you should find the icon in your system tray (you what type of Front Speaker Out (Line Out), Rear Speaker Out, Center/Subwoofer Speaker Out...
... audio consists of equipment is completed. - 71 - In the upper left list, click 8CH Speaker. Setting Up 8-Channel Audio STEP 1 : After installation of the audio driver, you should find the icon in your system tray (you what type of Front Speaker Out (Line Out), Rear Speaker Out, Center/Subwoofer Speaker Out...


