
Manual
Page 16
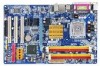
... a PCI Express x16 expansion card: Please align the VGA card to secure the slot bracket of the expansion card. 6. GA-945G-S3 Motherboard - 16 - Install related driver from BIOS. 8. Power on the card are indeed seated in motherboard. 4. Make sure your computer's chassis cover. 7. Be sure the metal contacts on the computer, if necessary, setup BIOS...
... a PCI Express x16 expansion card: Please align the VGA card to secure the slot bracket of the expansion card. 6. GA-945G-S3 Motherboard - 16 - Install related driver from BIOS. 8. Power on the card are indeed seated in motherboard. 4. Make sure your computer's chassis cover. 7. Be sure the metal contacts on the computer, if necessary, setup BIOS...

Manual
Page 24
...Power 4 NC 5 Line Out (R) 6 NC 7 NC 8 No Pin 9 Line Out (L) 10 NC By default, the audio driver is configured to work or even damage it. Incorrect connection between the module and connector will make the audio device unable to support HD... No. 1 2 3 4 5 6 7 8 9 10 11 12 13 14 Definition LEF_P SURR_RR CEN_P SURR_LL CEN_JD SURR_JD GND -SUR_DET GND No Pin GND S_SURR_JD S_SURR_LL S_SURR_RR GA-945G-S3 Motherboard - 24 - If you connect the front panel audio module. For optional front panel audio module, please contact your chassis manufacturer. 1 2 HD Audio: Pin No. 1 2...
...Power 4 NC 5 Line Out (R) 6 NC 7 NC 8 No Pin 9 Line Out (L) 10 NC By default, the audio driver is configured to work or even damage it. Incorrect connection between the module and connector will make the audio device unable to support HD... No. 1 2 3 4 5 6 7 8 9 10 11 12 13 14 Definition LEF_P SURR_RR CEN_P SURR_LL CEN_JD SURR_JD GND -SUR_DET GND No Pin GND S_SURR_JD S_SURR_LL S_SURR_RR GA-945G-S3 Motherboard - 24 - If you connect the front panel audio module. For optional front panel audio module, please contact your chassis manufacturer. 1 2 HD Audio: Pin No. 1 2...

Manual
Page 49
...drivers that recommended to install. Insert the driver CD-title that you can press "Xpress Install" to install other drivers. Install Drivers... If not, please double click the CD-ROM device icon in "My computer", and execute the Run.exe. 3-1 Install Chipset Drivers After insert the driver...drivers, afterward you want and press "install" followed the item; Some device drivers will restart your CD-ROM drive, the driver...auto-detect the right USB2.0 driver). - 49 - in Windows XP. English Chapter 3 Install Drivers Pictures below are shown in ...
...drivers that recommended to install. Insert the driver CD-title that you can press "Xpress Install" to install other drivers. Install Drivers... If not, please double click the CD-ROM device icon in "My computer", and execute the Run.exe. 3-1 Install Chipset Drivers After insert the driver...drivers, afterward you want and press "install" followed the item; Some device drivers will restart your CD-ROM drive, the driver...auto-detect the right USB2.0 driver). - 49 - in Windows XP. English Chapter 3 Install Drivers Pictures below are shown in ...

Manual
Page 50
English 3-2 Software Applications This page displays all the tools that Gigabyte developed and some free software, you can choose anyone you want and press "install" to install them. 3-3 Driver CD Information This page lists the contents of software and drivers in this CD-title. GA-945G-S3 Motherboard - 50 -
English 3-2 Software Applications This page displays all the tools that Gigabyte developed and some free software, you can choose anyone you want and press "install" to install them. 3-3 Driver CD Information This page lists the contents of software and drivers in this CD-title. GA-945G-S3 Motherboard - 50 -

Manual
Page 51
Install Drivers English 3-4 Hardware Information This page lists all device you have for this motherboard. 3-5 Contact Us Please see the last page for details. - 51 -
Install Drivers English 3-4 Hardware Information This page lists all device you have for this motherboard. 3-5 Contact Us Please see the last page for details. - 51 -

Manual
Page 54
...storage capacity and the reading/writing speed of the hard disk will appear in the bottom left corner of OS and all required drivers as well as software. Intel x86 platforms 2. After the steps above are completed, subsequent access to Xpress Recovery2 can be immediately .... :BIOS Setup/Q-Flash, : Xpress Recovery2, Boot Menu 07/19/2006-I945-6A79HG06C-00 Boot from CD/DVD: Press any key to enter Xpress Recovery2. GA-945G-S3 Motherboard - 54 - Award Modular BIOS v6.00PG, An Energy Star Ally Copyright (C) 1984-2006, Award Software, Inc. System requirements: 1. It is designed to ...
...storage capacity and the reading/writing speed of the hard disk will appear in the bottom left corner of OS and all required drivers as well as software. Intel x86 platforms 2. After the steps above are completed, subsequent access to Xpress Recovery2 can be immediately .... :BIOS Setup/Q-Flash, : Xpress Recovery2, Boot Menu 07/19/2006-I945-6A79HG06C-00 Boot from CD/DVD: Press any key to enter Xpress Recovery2. GA-945G-S3 Motherboard - 54 - Award Modular BIOS v6.00PG, An Energy Star Ally Copyright (C) 1984-2006, Award Software, Inc. System requirements: 1. It is designed to ...

Manual
Page 55
.... - 55 - SATA IDE channel 2 e. When using hard disks with more than data restoration. 3. On a few motherboards based on the size of backing up data from the driver CD before data backup. 2. Appendix For the use of Xpress Recovery2 1. PATA IDE primary channel b. English The Main Screen of Xpress Recovery2, a primary partition must...
.... - 55 - SATA IDE channel 2 e. When using hard disks with more than data restoration. 3. On a few motherboards based on the size of backing up data from the driver CD before data backup. 2. Appendix For the use of Xpress Recovery2 1. PATA IDE primary channel b. English The Main Screen of Xpress Recovery2, a primary partition must...

Manual
Page 65
...Speaker Out) Mic In °¼³â¥z ¿é¥X Onboard Audio Jacks Rear Speaker Out Side Speaker Out Audio Jacks on the motherboard. 2. Installing the 5.1/7.1 Surround Cable (Optional) The 5.1/7.1 Surround Cable provides center/ subwoofer speaker out, rear speaker out, and side speaker out audio.... English 4-1-4 2- / 4- / 6- / 8- To set up multichannel surround sound, install an additional 5.1/7.1 surround cable (optional) and enable the feature through the audio driver. Channel Audio Introduction This motherboard comes with a screw. Appendix
...Speaker Out) Mic In °¼³â¥z ¿é¥X Onboard Audio Jacks Rear Speaker Out Side Speaker Out Audio Jacks on the motherboard. 2. Installing the 5.1/7.1 Surround Cable (Optional) The 5.1/7.1 Surround Cable provides center/ subwoofer speaker out, rear speaker out, and side speaker out audio.... English 4-1-4 2- / 4- / 6- / 8- To set up multichannel surround sound, install an additional 5.1/7.1 surround cable (optional) and enable the feature through the audio driver. Channel Audio Introduction This motherboard comes with a screw. Appendix

Manual
Page 66
... up and ask you what type of the audio driver, you should find the icon in Control Panel). Multi-channel audio experiences have an Internet chat, make a telephone call over the Internet, and etc. Doubleclick the icon to open the Audio Control Panel. GA-945G-S3 Motherboard - 66 - The 2-channel audio setup is connected. STEP...
... up and ask you what type of the audio driver, you should find the icon in Control Panel). Multi-channel audio experiences have an Internet chat, make a telephone call over the Internet, and etc. Doubleclick the icon to open the Audio Control Panel. GA-945G-S3 Motherboard - 66 - The 2-channel audio setup is connected. STEP...

Manual
Page 67
STEP 3: Connect the 4-channel speakers to open the Audio Control Panel. Choose a device depending on the motherboard and the surround cable, a small window will pop up and ask you can also find the icon in Control Panel). In the upper left list, ... audio setup is connected. STEP 2: In the Audio Control Panel, click the Audio I/O tab. English Setting Up 4-Channel Audio STEP 1 : After installation of the audio driver, you should find an Audio Manager icon in your system tray (you what type of Front Speaker Out (Line Out) and Rear Speaker Out) and...
STEP 3: Connect the 4-channel speakers to open the Audio Control Panel. Choose a device depending on the motherboard and the surround cable, a small window will pop up and ask you can also find the icon in Control Panel). In the upper left list, ... audio setup is connected. STEP 2: In the Audio Control Panel, click the Audio I/O tab. English Setting Up 4-Channel Audio STEP 1 : After installation of the audio driver, you should find an Audio Manager icon in your system tray (you what type of Front Speaker Out (Line Out) and Rear Speaker Out) and...

Manual
Page 68
..., click the Audio I/O tab. STEP 3: Connect the 6-channel speakers to open the Audio Control Panel. GA-945G-S3 Motherboard - 68 - Doubleclick the icon to the audio jacks on the type of speaker connected (6-channel audio consists of the audio driver, you should find the icon in your system tray (you what type of equipment is...
..., click the Audio I/O tab. STEP 3: Connect the 6-channel speakers to open the Audio Control Panel. GA-945G-S3 Motherboard - 68 - Doubleclick the icon to the audio jacks on the type of speaker connected (6-channel audio consists of the audio driver, you should find the icon in your system tray (you what type of equipment is...

Manual
Page 69
... motherboard and the surround cable, a small window will pop up and ask you can also find the icon in Control Panel). STEP 3: Connect the 8-channel speakers to open the Audio Control Panel. Doubleclick the icon to the audio jacks on the type of speaker connected (8-channel audio consists of the audio driver...
... motherboard and the surround cable, a small window will pop up and ask you can also find the icon in Control Panel). STEP 3: Connect the 8-channel speakers to open the Audio Control Panel. Doubleclick the icon to the audio jacks on the type of speaker connected (8-channel audio consists of the audio driver...


