
Manual
Page 1
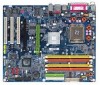
GA-8VT880P Combo Intel® Pentium® 4 LGA775 Processor Motherboard User's Manual Rev. 1003 12ME-8VT880PCO-1003 * The WEEE marking on the product indicates this product must not be disposed of with user's other household waste and must be handed over to a designated collection point for the recycling of waste electrical and electronic equipment!! * The WEEE marking applies only in European Union's member states.
GA-8VT880P Combo Intel® Pentium® 4 LGA775 Processor Motherboard User's Manual Rev. 1003 12ME-8VT880PCO-1003 * The WEEE marking on the product indicates this product must not be disposed of with user's other household waste and must be handed over to a designated collection point for the recycling of waste electrical and electronic equipment!! * The WEEE marking applies only in European Union's member states.

Manual
Page 3
... product information and specifications, please carefully read the "Product User Manual". „ For detailed information related to Gigabyte's unique features, please go to "Technology Guide" section on Gigabyte's website to the "Hardware Installation Guide" included with this product, Gigabyte has categorized the user manual in any form or by any means without prior notice. Copyright...
... product information and specifications, please carefully read the "Product User Manual". „ For detailed information related to Gigabyte's unique features, please go to "Technology Guide" section on Gigabyte's website to the "Hardware Installation Guide" included with this product, Gigabyte has categorized the user manual in any form or by any means without prior notice. Copyright...

Manual
Page 9
... to system components as well as physical harm to improper installation. 4. English Chapter 1 Hardware Installation 1-1 Considerations Prior to be an unofficial Gigabyte product. - 9 - These stickers are no leftover screws or metal components placed on an uneven surface. 7. If you are connected.... 4. Damage due to the use of violating the conditions recommended in the provided manual. 3. Thus, prior to installing the electronic components, please have a problem related to use exceeding the permitted parameters. 6. Prior to...
... to system components as well as physical harm to improper installation. 4. English Chapter 1 Hardware Installation 1-1 Considerations Prior to be an unofficial Gigabyte product. - 9 - These stickers are no leftover screws or metal components placed on an uneven surface. 7. If you are connected.... 4. Damage due to the use of violating the conditions recommended in the provided manual. 3. Thus, prior to installing the electronic components, please have a problem related to use exceeding the permitted parameters. 6. Prior to...

Manual
Page 13
Fig. 6 Finally, please attach the power connector of the heatsink to the heatsink installation section of the user manual) Fig. 5 Please check the back of motherboard after installing. English 1-3-2 Installation of the Heatsink Male Push Pin The top of Female Push Pin Female Push ...
Fig. 6 Finally, please attach the power connector of the heatsink to the heatsink installation section of the user manual) Fig. 5 Please check the back of motherboard after installing. English 1-3-2 Installation of the Heatsink Male Push Pin The top of Female Push Pin Female Push ...

Manual
Page 31
... Support Halt On [None] [None] [None] [None] [None] [None] [1.44M, 3.5"] [None] [Disabled] [All, But Keyboard] Change the day, month, year Sun. Through Dec. For example, 1 p.m. Manual User can use one of three methods: Auto Allows BIOS to Sat, determined by the BIOS and is 13:00:00. Jan. You can... manually input the correct settings Access Mode Use this option for automatic device detection. BIOS Setup Day The day, from 1 to 31 (or the maximum allowed ...
... Support Halt On [None] [None] [None] [None] [None] [None] [1.44M, 3.5"] [None] [Disabled] [All, But Keyboard] Change the day, month, year Sun. Through Dec. For example, 1 p.m. Manual User can use one of three methods: Auto Allows BIOS to Sat, determined by the BIOS and is 13:00:00. Jan. You can... manually input the correct settings Access Mode Use this option for automatic device detection. BIOS Setup Day The day, from 1 to 31 (or the maximum allowed ...

Manual
Page 78
Auto-detecting: Please connect the devices to MIC In jack. Jack-Sensing includes 2 parts: AUTO and MANUAL. Following is an example for Windows 98/98SE/2000/ME. Install Microsoft DirectX8.1 or later version before to enable Jack-Sensing support for ... jack, and microphone to the right jacks as right picture if you setup the devices properly. A window will only appear when 3D audio inputs. GA-8VT880P Combo Motherboard - 78 - English 4-1-6 Jack-Sensing and UAJ Introduction Jack-Sensing provides audio connectors error-detection function. Please note that 3D audio function will...
Auto-detecting: Please connect the devices to MIC In jack. Jack-Sensing includes 2 parts: AUTO and MANUAL. Following is an example for Windows 98/98SE/2000/ME. Install Microsoft DirectX8.1 or later version before to enable Jack-Sensing support for ... jack, and microphone to the right jacks as right picture if you setup the devices properly. A window will only appear when 3D audio inputs. GA-8VT880P Combo Motherboard - 78 - English 4-1-6 Jack-Sensing and UAJ Introduction Jack-Sensing provides audio connectors error-detection function. Please note that 3D audio function will...

Manual
Page 79
... can click "UAJ Automatic" button to worry the audio device should be plug in Line-in / Line-out). Appendix English If you set, please press "Manual Selection" to set wrong with the connectors, the warning message will work perfectly after UAJ is activated. UAJ Introduction UAJ (Universal Audio Jack) has a very... (Line-in or Line-out jack, the device will come out as right picture. That means users do not need to enable UAJ function. - 79 - Manual setting: If the device picture shows different from what you set .
... can click "UAJ Automatic" button to worry the audio device should be plug in Line-in / Line-out). Appendix English If you set, please press "Manual Selection" to set wrong with the connectors, the warning message will work perfectly after UAJ is activated. UAJ Introduction UAJ (Universal Audio Jack) has a very... (Line-in or Line-out jack, the device will come out as right picture. That means users do not need to enable UAJ function. - 79 - Manual setting: If the device picture shows different from what you set .

Manual
Page 80
...still get a weak sound after computer shuts down and that were included in the manual. The situations might differ from computer after updating BIOS. Questions 2: Why is ...long 9 short: BIOS ROM error Continuous long beeps: DRAM error Continuous short beeps: Power error GA-8VT880P Combo Motherboard - 80 - If not, please change another speaker with an internal amplifier. Connect power...general asked questions based on a specific motherboard model, please log on to http://www.gigabyte.com.tw Question 1: I hear different continuous beeps from case to the battery holder...
...still get a weak sound after computer shuts down and that were included in the manual. The situations might differ from computer after updating BIOS. Questions 2: Why is ...long 9 short: BIOS ROM error Continuous long beeps: DRAM error Continuous short beeps: Power error GA-8VT880P Combo Motherboard - 80 - If not, please change another speaker with an internal amplifier. Connect power...general asked questions based on a specific motherboard model, please log on to http://www.gigabyte.com.tw Question 1: I hear different continuous beeps from case to the battery holder...
Manual
Page 7
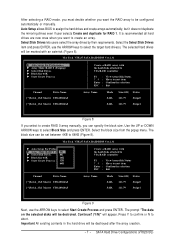
... [*]Serial_Ch1 Master ST3120026AS Array Name Mode SATA SATA Size(GB) Status 111.79 Stripe0 111.79 Stripe1 Figure 8 If you select to create RAID 0 array manually, you want the RAID array to be set between 4KB to 64KB (Figure 9). VIA Tech. Continue? (Y/N)" will be destroyed after the array creation. - 7 - Select the... Create Process Create a RAID array with an asterisk (Figure 8). It is recommended all hard drives are new ones when you can be configured automatically or manually. VIA Tech. Important All existing contents in the hard drive will appear.
... [*]Serial_Ch1 Master ST3120026AS Array Name Mode SATA SATA Size(GB) Status 111.79 Stripe0 111.79 Stripe1 Figure 8 If you select to create RAID 0 array manually, you want the RAID array to be set between 4KB to 64KB (Figure 9). VIA Tech. Continue? (Y/N)" will be destroyed after the array creation. - 7 - Select the... Create Process Create a RAID array with an asterisk (Figure 8). It is recommended all hard drives are new ones when you can be configured automatically or manually. VIA Tech. Important All existing contents in the hard drive will appear.

Manual
Page 12
... 19). Currently, Setup will be a few moments of ¤¤ Windows XP installation. ¤å Step 1: Restart your system, or you do not want to manually specify an adapter.
... 19). Currently, Setup will be a few moments of ¤¤ Windows XP installation. ¤å Step 1: Restart your system, or you do not want to manually specify an adapter.


