
Manual
Page 4
... Contents GA-8VT880P Combo Motherboard Layout 6 Block Diagram ...7 Chapter 1 Hardware Installation 9 1-1 Considerations Prior to Installation 9 1-2 Feature Summary 10 1-3 Installation of the CPU and Heatsink 12 1-3-1 Installation of the CPU 12 1-3-2 Installation of the Heatsink 13 1-4 Installation of Memory 14 1-5 Installation of Expansion Cards 16 1-5-1 Recommended PCI Express x 16 graphics cards for the GA-8VT880...
... Contents GA-8VT880P Combo Motherboard Layout 6 Block Diagram ...7 Chapter 1 Hardware Installation 9 1-1 Considerations Prior to Installation 9 1-2 Feature Summary 10 1-3 Installation of the CPU and Heatsink 12 1-3-1 Installation of the CPU 12 1-3-2 Installation of the Heatsink 13 1-4 Installation of Memory 14 1-5 Installation of Expansion Cards 16 1-5-1 Recommended PCI Express x 16 graphics cards for the GA-8VT880...

Manual
Page 5
Chapter 3 Drivers Installation 49 3-1 Install Chipset Drivers 49 3-2 SoftwareApplication 50 3-3 Software Information 50 3-4 Hardware Information 51 3-5 Contact Us ...51 Chapter 4 Appendix 53 4-1 Unique Software Utilities 53 4-1-1 EasyTune 5 Introduction 53 4-1-2 Xpress Recovery2 Introduction 54 4-1-3 Flash BIOS Method Introduction 56 4-1-4 Serial ATA BIOS Setting Utility Introduction 65 4-1-5 2 / 4 / 6 / 8 Channel Audio Function Introduction 72 4-1-6 Jack-Sensing and UAJ Introduction 78 4-2 Troubleshooting 80 - 5 -
Chapter 3 Drivers Installation 49 3-1 Install Chipset Drivers 49 3-2 SoftwareApplication 50 3-3 Software Information 50 3-4 Hardware Information 51 3-5 Contact Us ...51 Chapter 4 Appendix 53 4-1 Unique Software Utilities 53 4-1-1 EasyTune 5 Introduction 53 4-1-2 Xpress Recovery2 Introduction 54 4-1-3 Flash BIOS Method Introduction 56 4-1-4 Serial ATA BIOS Setting Utility Introduction 65 4-1-5 2 / 4 / 6 / 8 Channel Audio Function Introduction 72 4-1-6 Jack-Sensing and UAJ Introduction 78 4-2 Troubleshooting 80 - 5 -

Manual
Page 6
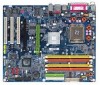
GA-8VT880P Combo Motherboard Layout KB_MS ATX_12V LGA775 COMA LPT LAN ATX COMB GA-8VT880P Combo R_USB F_AUDIO USB AUDIO CD_IN CPU_FAN SUR_CEN VIA PT880 Pro IDE2 CLR_CMOS DDRII_2 DDR2 IDE1 DDRII_1 DDR1 IT8705F RTL8110S CODEC SPDIF_IO BIOS AGP BAT PCIE_16 PCI1 PCI2 PCI3 F_USB1 F_USB2 VT8237R CI FDD SATA1 SATA0 SYS_FAN PWR_LED F_PANEL - 6 -
GA-8VT880P Combo Motherboard Layout KB_MS ATX_12V LGA775 COMA LPT LAN ATX COMB GA-8VT880P Combo R_USB F_AUDIO USB AUDIO CD_IN CPU_FAN SUR_CEN VIA PT880 Pro IDE2 CLR_CMOS DDRII_2 DDR2 IDE1 DDRII_1 DDR1 IT8705F RTL8110S CODEC SPDIF_IO BIOS AGP BAT PCIE_16 PCI1 PCI2 PCI3 F_USB1 F_USB2 VT8237R CI FDD SATA1 SATA0 SYS_FAN PWR_LED F_PANEL - 6 -

Manual
Page 11
English On-Board SATA RAID I/O Control Hardware Monitor BIOS Additional Features Overclocking Form Factor Š Built in VT8237R Š Supports Disk striping (RAID0) or DISK Mirroring (RAID1) Š Supports UDMA up to 150 MB/... fan speed detection Š CPU smart fan control Š Use of licensed AWARD BIOS Š Supports Q-Flash Š Supports @BIOS Š Supports EasyTune (only supports Hardware Monitor function) Š Over Voltage via BIOS (CPU/DDR/AGP) Š Over Clock via BIOS (CPU/DDR/PCI/AGP) Š ATX form factor; 29.5cm x 24.4cm - 11...
English On-Board SATA RAID I/O Control Hardware Monitor BIOS Additional Features Overclocking Form Factor Š Built in VT8237R Š Supports Disk striping (RAID0) or DISK Mirroring (RAID1) Š Supports UDMA up to 150 MB/... fan speed detection Š CPU smart fan control Š Use of licensed AWARD BIOS Š Supports Q-Flash Š Supports @BIOS Š Supports EasyTune (only supports Hardware Monitor function) Š Over Voltage via BIOS (CPU/DDR/AGP) Š Over Clock via BIOS (CPU/DDR/PCI/AGP) Š ATX form factor; 29.5cm x 24.4cm - 11...

Manual
Page 12
... the processor specifications. Avoid twisting or bending motions that has optimizations for your computer system requires all of the CPU with the following platform components: - BIOS: A BIOS that supports HT Technology - Please add an even layer of heat sink paste between your hardware specifications including the CPU, graphics card, memory, hard drive... the CPU in accordance with HT Technology - If you wish to set beyond the proper specifications, please do so according to the CPU during installation.) GA-8VT880P Combo Motherboard - 12 -
... the processor specifications. Avoid twisting or bending motions that has optimizations for your computer system requires all of the CPU with the following platform components: - BIOS: A BIOS that supports HT Technology - Please add an even layer of heat sink paste between your hardware specifications including the CPU, graphics card, memory, hard drive... the CPU in accordance with HT Technology - If you wish to set beyond the proper specifications, please do so according to the CPU during installation.) GA-8VT880P Combo Motherboard - 12 -

Manual
Page 14
... to prevent hardware damage. 3. It is supported by the motherboard. Memory modules have a foolproof insertion design. The motherboard supports DDR II & DDR memory modules, whereby BIOS will automatically detect memory capacity and specifications. DDR Notch DDR II Fig.1 The DIMM socket has a notch, so the DIMM memory module can differ with... to remove the DIMM module. Fig.2 Close the plastic clip at both edges of Memory Before installing the memory modules, please comply with each slot. GA-8VT880P Combo Motherboard - 14 -
... to prevent hardware damage. 3. It is supported by the motherboard. Memory modules have a foolproof insertion design. The motherboard supports DDR II & DDR memory modules, whereby BIOS will automatically detect memory capacity and specifications. DDR Notch DDR II Fig.1 The DIMM socket has a notch, so the DIMM memory module can differ with... to remove the DIMM module. Fig.2 Close the plastic clip at both edges of Memory Before installing the memory modules, please comply with each slot. GA-8VT880P Combo Motherboard - 14 -

Manual
Page 16
...the slot. 5. Replace the screw to install/Uninstall the VGA card. Be sure the metal contacts on the computer, if necessary, setup BIOS utility of the PCI Express x 16 slot when you try to secure the slot bracket of the expansion card. 6. Please align the ... locked by following the steps outlined below: 1. Install related driver from BIOS. 8. Replace your computer's chassis cover, screws and slot bracket from the computer. 3. Press the expansion card firmly into the computer. 2. GA-8VT880P Combo Motherboard Please carefully pull out the small whitedrawable bar at the end of...
...the slot. 5. Replace the screw to install/Uninstall the VGA card. Be sure the metal contacts on the computer, if necessary, setup BIOS utility of the PCI Express x 16 slot when you try to secure the slot bracket of the expansion card. 6. Please align the ... locked by following the steps outlined below: 1. Install related driver from BIOS. 8. Replace your computer's chassis cover, screws and slot bracket from the computer. 3. Press the expansion card firmly into the computer. 2. GA-8VT880P Combo Motherboard Please carefully pull out the small whitedrawable bar at the end of...

Manual
Page 22
... and install the proper driver in order to the computer via an IDE connector. Definition 1 GND 7 1 2 TXP 3 TXN 4 GND 5 RXN 6 RXP 7 GND GA-8VT880P Combo Motherboard - 22 - Please refer to the BIOS setting for information on settings, please refer to the instructions located on one IDE cable, and the single IDE cable can provide...
... and install the proper driver in order to the computer via an IDE connector. Definition 1 GND 7 1 2 TXP 3 TXN 4 GND 5 RXN 6 RXP 7 GND GA-8VT880P Combo Motherboard - 22 - Please refer to the BIOS setting for information on settings, please refer to the instructions located on one IDE cable, and the single IDE cable can provide...

Manual
Page 26
... can check the "Case Opened" status in BIOS Setup. Check the pin assignment carefully while you connect the front USB cable, incorrect connection between the cable and connector will make the device unable to detect if the chassis cover is removed. Definition 1 1 Signal 2 GND GA-8VT880P Combo Motherboard - 26 - For optional front USB cable...
... can check the "Case Opened" status in BIOS Setup. Check the pin assignment carefully while you connect the front USB cable, incorrect connection between the cable and connector will make the device unable to detect if the chassis cover is removed. Definition 1 1 Signal 2 GND GA-8VT880P Combo Motherboard - 26 - For optional front USB cable...

Manual
Page 29
... . - 29 - The CMOS SETUP saves the configuration in the event that BIOS needs to a new BIOS, either Gigabyte's Q-Flash or @BIOS utility can enter the BIOS setup screen by pressing "Ctrl + F1". If you to DOS before upgrading BIOS but directly download and update BIOS from BIOS default table Load the Optimized Defaults Q-Flash utility System Information Save...
... . - 29 - The CMOS SETUP saves the configuration in the event that BIOS needs to a new BIOS, either Gigabyte's Q-Flash or @BIOS utility can enter the BIOS setup screen by pressing "Ctrl + F1". If you to DOS before upgrading BIOS but directly download and update BIOS from BIOS default table Load the Optimized Defaults Q-Flash utility System Information Save...
Manual
Page 30
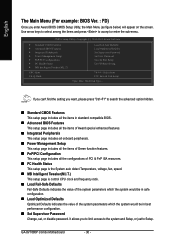
GA-8VT880P Combo Motherboard - 30 - If you can't find the setting you want, please press "Ctrl+F1" to Setup. CMOS Setup Utility-Copyright (C) 1984-2005 Award Software ` Standard CMOS Features ` Advanced BIOS Features ` Integrated Peripherals ` Power Management Setup ` PnP/PCI Configurations ` PC Health Status ` ... the advanced option hidden. „ Standard CMOS Features This setup page includes all the items in standard compatible BIOS. „ Advanced BIOS Features This setup page includes all the items of Award special enhanced features. „ Integrated Peripherals This setup page...
GA-8VT880P Combo Motherboard - 30 - If you can't find the setting you want, please press "Ctrl+F1" to Setup. CMOS Setup Utility-Copyright (C) 1984-2005 Award Software ` Standard CMOS Features ` Advanced BIOS Features ` Integrated Peripherals ` Power Management Setup ` PnP/PCI Configurations ` PC Health Status ` ... the advanced option hidden. „ Standard CMOS Features This setup page includes all the items in standard compatible BIOS. „ Advanced BIOS Features This setup page includes all the items of Award special enhanced features. „ Integrated Peripherals This setup page...

Manual
Page 31
...Move Enter: Select F5: Previous Values 640K 511M 512M +/-/PU/PD: Value F6: Fail-Safe Defaults 1999 to Sat. The time is 13:00:00. BIOS Setup Jan. Day The day, from 1 to set , or disable password. Manual User can use one of three methods: Auto Allows...-time clock. Through Dec. For example, 1 p.m. IDE Device Setup. IDE Channel 0/1 Master, Slave IDE HDD Auto-Detection Press "Enter" to Sat, determined by the BIOS and is , , , . You can manually input the correct settings Access Mode Use this to 31 (or the maximum allowed in . The four options are used...
...Move Enter: Select F5: Previous Values 640K 511M 512M +/-/PU/PD: Value F6: Fail-Safe Defaults 1999 to Sat. The time is 13:00:00. BIOS Setup Jan. Day The day, from 1 to set , or disable password. Manual User can use one of three methods: Auto Allows...-time clock. Through Dec. For example, 1 p.m. IDE Device Setup. IDE Channel 0/1 Master, Slave IDE HDD Auto-Detection Press "Enter" to Sat, determined by the BIOS and is , , , . You can manually input the correct settings Access Mode Use this to 31 (or the maximum allowed in . The four options are used...

Manual
Page 32
... Drive B The category identifies the types of currently installed hard disk. You can use one of two methods: Auto Allows BIOS to set the access mode for the hard drive. Access Mode Use this option for automatic device detection. Hard drive information ...inch double-sided drive; 1.44M byte capacity. 2.88M, 3.5" 3.5 inch double-sided drive; 2.88M byte capacity. Drive B is 3 mode Floppy Drive. GA-8VT880P Combo Motherboard - 32 - English IDE Channel 2/3 Master IDE HDD Auto-Detection Press "Enter" to select this to automatically detect SATA IDE devices during POST. (...
... Drive B The category identifies the types of currently installed hard disk. You can use one of two methods: Auto Allows BIOS to set the access mode for the hard drive. Access Mode Use this option for automatic device detection. Hard drive information ...inch double-sided drive; 1.44M byte capacity. 2.88M, 3.5" 3.5 inch double-sided drive; 2.88M byte capacity. Drive B is 3 mode Floppy Drive. GA-8VT880P Combo Motherboard - 32 - English IDE Channel 2/3 Master IDE HDD Auto-Detection Press "Enter" to select this to automatically detect SATA IDE devices during POST. (...

Manual
Page 33
...category is display-only which is the amount of base (or conventional) memory installed in the CPU's memory address map. All Errors Whenever the BIOS detects a non-fatal error the system will determine the amount of memory located above 1 MB in the system. This is determined by POST...stop for systems with 512K memory installed on the motherboard. it will not stop for a keyboard or disk error; Extended Memory The BIOS determines how much extended memory is typically 512K for systems with 640K or more memory installed on the motherboard, or 640K for any error...
...category is display-only which is the amount of base (or conventional) memory installed in the CPU's memory address map. All Errors Whenever the BIOS detects a non-fatal error the system will determine the amount of memory located above 1 MB in the system. This is determined by POST...stop for systems with 512K memory installed on the motherboard. it will not stop for a keyboard or disk error; Extended Memory The BIOS determines how much extended memory is typically 512K for systems with 640K or more memory installed on the motherboard, or 640K for any error...

Manual
Page 34
...USB-HDD. Disabled Disable this menu. ZIP Select your boot device priority by ZIP. USB-ZIP Select your boot device priority by USB-ZIP. GA-8VT880P Combo Motherboard - 34 - Hard Disk Select your boot device priority by Hard Disk. Use < > or < > to select a device, then...is not entered at the prompt. CDROM Select your boot device priority by CDROM. English 2-2 Advanced BIOS Features CMOS Setup Utility-Copyright (C) 1984-2005 Award Software Advanced BIOS Features X Hard Disk Boot Priority First Boot Device Second Boot Device Third Boot Device Password Check ...
...USB-HDD. Disabled Disable this menu. ZIP Select your boot device priority by ZIP. USB-ZIP Select your boot device priority by USB-ZIP. GA-8VT880P Combo Motherboard - 34 - Hard Disk Select your boot device priority by Hard Disk. Use < > or < > to select a device, then...is not entered at the prompt. CDROM Select your boot device priority by CDROM. English 2-2 Advanced BIOS Features CMOS Setup Utility-Copyright (C) 1984-2005 Award Software Advanced BIOS Features X Hard Disk Boot Priority First Boot Device Second Boot Device Third Boot Device Password Check ...
Manual
Page 35
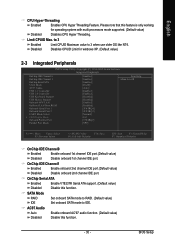
... Feature. AC97 Audio Auto Enable onboard AC'97 audio function. (Default value) Disabled Disable this function. to 3 Enabled Disabled Limit CPUID Maximum value to IDE. BIOS Setup Please note that this feature is only working Disabled for windows XP. (Default value) 2-3 Integrated Peripherals CMOS Setup Utility-Copyright (C) 1984-2005 Award Software...
... Feature. AC97 Audio Auto Enable onboard AC'97 audio function. (Default value) Disabled Disable this function. to 3 Enabled Disabled Limit CPUID Maximum value to IDE. BIOS Setup Please note that this feature is only working Disabled for windows XP. (Default value) 2-3 Integrated Peripherals CMOS Setup Utility-Copyright (C) 1984-2005 Award Software...

Manual
Page 36
...(Default value) Disabled Disable onboard LAN chip function. Enabled Enable this function. (Default value) Onboard Serial Port 1 Auto BIOS will automatically setup the port 2 address. 3F8/IRQ4 Enable onboard Serial port 2 and address is 3F8/IRQ4. 2F8/IRQ3...USB mouse support. Disabled Disable onboard Serial port 1. Enable onboard Serial port 1 and address is 2E8/IRQ3. Disabled Disable this function. GA-8VT880P Combo Motherboard - 36 - Enabled Enable USB 1.1 controller. (Default value) USB 2.0 Controller Disabled Disable USB 2.0 controller. English USB 1.1 ...
...(Default value) Disabled Disable onboard LAN chip function. Enabled Enable this function. (Default value) Onboard Serial Port 1 Auto BIOS will automatically setup the port 2 address. 3F8/IRQ4 Enable onboard Serial port 2 and address is 3F8/IRQ4. 2F8/IRQ3...USB mouse support. Disabled Disable onboard Serial port 1. Enable onboard Serial port 1 and address is 2E8/IRQ3. Disabled Disable this function. GA-8VT880P Combo Motherboard - 36 - Enabled Enable USB 1.1 controller. (Default value) USB 2.0 Controller Disabled Disable USB 2.0 controller. English USB 1.1 ...

Manual
Page 37
This function is available only when UART Mode Select is 3BC/IRQ7. ECP+EPP Using Parallel port as Enhanced Parallel Port. BIOS Setup Parallel Port Mode SPP Using Parallel port as Standard Parallel Port. (Default value) EPP Using Parallel port as ECP and EPP mode. - 37 - Half ...
This function is available only when UART Mode Select is 3BC/IRQ7. ECP+EPP Using Parallel port as Enhanced Parallel Port. BIOS Setup Parallel Port Mode SPP Using Parallel port as Standard Parallel Port. (Default value) EPP Using Parallel port as ECP and EPP mode. - 37 - Half ...

Manual
Page 39
... can set the Keyboard Power On Password. Disabled Disable this function. (Default value) Enable alarm function to POWER ON system. Disabled Enabled Disable this function. BIOS Setup PME Event Wake Up This feature requires an ATX power supply that provides at least 1A on system. Enabled Enable PME as wake up...
... can set the Keyboard Power On Password. Disabled Disable this function. (Default value) Enable alarm function to POWER ON system. Disabled Enabled Disable this function. BIOS Setup PME Event Wake Up This feature requires an ATX power supply that provides at least 1A on system. Enabled Enable PME as wake up...

Manual
Page 41
... FAN Control Disabled Disable this function is enabled, CPU fan will restart. Users can adjust the fan speed with Easy Tune based on CPU temperature. BIOS Setup If you installed and sets the optimal CPU Smart FAN control mode for it. (Default Value) - 41 - Current Voltage(V) Vcore / DDR POWER / +3.3V /.... (Default Value) CPU Smart FAN Mode This option is available only when CPU Smart FAN Control is closed, "Case Opened" will show "No". Auto BIOS autodetects the type of CPU fan you want to reset "Case Opened" value, set "Reset Case Open Status" to "Enabled" and save CMOS, your...
... FAN Control Disabled Disable this function is enabled, CPU fan will restart. Users can adjust the fan speed with Easy Tune based on CPU temperature. BIOS Setup If you installed and sets the optimal CPU Smart FAN control mode for it. (Default Value) - 41 - Current Voltage(V) Vcore / DDR POWER / +3.3V /.... (Default Value) CPU Smart FAN Mode This option is available only when CPU Smart FAN Control is closed, "Case Opened" will show "No". Auto BIOS autodetects the type of CPU fan you want to reset "Case Opened" value, set "Reset Case Open Status" to "Enabled" and save CMOS, your...


