
Manual
Page 5
Chapter 3 Drivers Installation 49 3-1 Install Chipset Drivers 49 3-2 SoftwareApplication 50 3-3 Software Information 50 3-4 Hardware Information 51 3-5 Contact Us ...51 Chapter 4 Appendix 53 4-1 Unique Software Utilities 53 4-1-1 EasyTune 5 Introduction 53 4-1-2 Xpress Recovery2 Introduction 54 4-1-3 Flash BIOS Method Introduction 56 4-1-4 Serial ATA BIOS Setting Utility Introduction 65 4-1-5 2 / 4 / 6 / 8 Channel Audio Function Introduction 72 4-1-6 Jack-Sensing and UAJ Introduction 78 4-2 Troubleshooting 80 - 5 -
Chapter 3 Drivers Installation 49 3-1 Install Chipset Drivers 49 3-2 SoftwareApplication 50 3-3 Software Information 50 3-4 Hardware Information 51 3-5 Contact Us ...51 Chapter 4 Appendix 53 4-1 Unique Software Utilities 53 4-1-1 EasyTune 5 Introduction 53 4-1-2 Xpress Recovery2 Introduction 54 4-1-3 Flash BIOS Method Introduction 56 4-1-4 Serial ATA BIOS Setting Utility Introduction 65 4-1-5 2 / 4 / 6 / 8 Channel Audio Function Introduction 72 4-1-6 Jack-Sensing and UAJ Introduction 78 4-2 Troubleshooting 80 - 5 -

Manual
Page 16
Press the expansion card firmly into the computer. 2. Power on the slot. GA-8VT880P Combo Motherboard Please carefully pull out the small whitedrawable bar at the end of the PCI Express x 16 slot when you try to install/Uninstall the ... from BIOS. 8. Be sure the metal contacts on the slot .Make sure your VGA card is locked by the small white-drawable bar. Install related driver from the computer. 3. Make sure your computer's chassis cover, screws and slot bracket from the operating system. Please align the VGA card to the onboard...
Press the expansion card firmly into the computer. 2. Power on the slot. GA-8VT880P Combo Motherboard Please carefully pull out the small whitedrawable bar at the end of the PCI Express x 16 slot when you try to install/Uninstall the ... from BIOS. 8. Be sure the metal contacts on the slot .Make sure your VGA card is locked by the small white-drawable bar. Install related driver from the computer. 3. Make sure your computer's chassis cover, screws and slot bracket from the operating system. Please align the VGA card to the onboard...

Manual
Page 18
... and the keyboard to configure 2-/4-/6-/8- For more information please contact your OS does not support USB controller, please contact OS vendor for possible patch or driver upgrade. have a standard USB interface. You can use audio software to the lower port (purple). USB port Before you connect your device(s) into ...connected to MIC In jack. Line Out Connect the stereo speakers, earphone or front surround channels to serial-based mouse or data processing devices. GA-8VT880P Combo Motherboard - 18 - LPT (Parallel Port) The parallel port allows connection of 10/100/1000Mbps.
... and the keyboard to configure 2-/4-/6-/8- For more information please contact your OS does not support USB controller, please contact OS vendor for possible patch or driver upgrade. have a standard USB interface. You can use audio software to the lower port (purple). USB port Before you connect your device(s) into ...connected to MIC In jack. Line Out Connect the stereo speakers, earphone or front surround channels to serial-based mouse or data processing devices. GA-8VT880P Combo Motherboard - 18 - LPT (Parallel Port) The parallel port allows connection of 10/100/1000Mbps.

Manual
Page 22
... as Master and the other as Slave (for the Serial ATA and install the proper driver in order to two IDE devices (hard drive or optical drive). Pin No. Definition 1 GND 7 1 2 TXP 3 TXN 4 GND 5 RXN 6 RXP 7 GND GA-8VT880P Combo Motherboard - 22 - English 6) IDE1/IDE2 (IDE Connector) An IDE device connects to 150MB/s transfer...
... as Master and the other as Slave (for the Serial ATA and install the proper driver in order to two IDE devices (hard drive or optical drive). Pin No. Definition 1 GND 7 1 2 TXP 3 TXN 4 GND 5 RXN 6 RXP 7 GND GA-8VT880P Combo Motherboard - 22 - English 6) IDE1/IDE2 (IDE Connector) An IDE device connects to 150MB/s transfer...

Manual
Page 49
... execute the installation for you automatically. The "Xpress Install" will auto-detect the right USB2.0 driver). - 49 - Insert the driver CD-title that recommended to install the drivers automatically. in Windows XP. The "Xpress Install" uses the"Click and Go" technology to install... will show the installation guide. After install Windows Service Pack, it will reboot automatically after install the drivers, afterward you want then click the "GO" button. Drivers Installation After restarting your system the "Xpress Install" will auto start and show a question mark "?"...
... execute the installation for you automatically. The "Xpress Install" will auto-detect the right USB2.0 driver). - 49 - Insert the driver CD-title that recommended to install the drivers automatically. in Windows XP. The "Xpress Install" uses the"Click and Go" technology to install... will show the installation guide. After install Windows Service Pack, it will reboot automatically after install the drivers, afterward you want then click the "GO" button. Drivers Installation After restarting your system the "Xpress Install" will auto start and show a question mark "?"...

Manual
Page 50
English 3-2 Software Application This page displays all the tools that Gigabyte developed and some free software. GA-8VT880P Combo Motherboard - 50 - You can click an item to install it. 3-3 Software Information This page lists the contents of software and drivers in this CD-title.
English 3-2 Software Application This page displays all the tools that Gigabyte developed and some free software. GA-8VT880P Combo Motherboard - 50 - You can click an item to install it. 3-3 Software Information This page lists the contents of software and drivers in this CD-title.

Manual
Page 51
Drivers Installation English 3-4 Hardware Information This page lists all device you have for this motherboard. 3-5 Contact Us Please see the last page for details. - 51 -
Drivers Installation English 3-4 Hardware Information This page lists all device you have for this motherboard. 3-5 Contact Us Please see the last page for details. - 51 -
Manual
Page 54
... BIOS Feature and set to boot from the CD-ROM, you can enter Xpress Recovery2 by pressing the key in the future. 2. GA-8VT880P Combo Motherboard - 54 - English 4-1-2 Xpress Recovery2 Introduction Xpress Recovery2 is recommended that Xpress Recovery2 be made by simply pressing the key during ...Xpress Recovery2 is able to run Xpress Recovery2 later, you can be immediately installed once you complete installations of OS and all required drivers as well as software. Press any key to enter Xpress Recovery2. System storage capacity and the reading/writing speed of system memory...
... BIOS Feature and set to boot from the CD-ROM, you can enter Xpress Recovery2 by pressing the key in the future. 2. GA-8VT880P Combo Motherboard - 54 - English 4-1-2 Xpress Recovery2 Introduction Xpress Recovery2 is recommended that Xpress Recovery2 be made by simply pressing the key during ...Xpress Recovery2 is able to run Xpress Recovery2 later, you can be immediately installed once you complete installations of OS and all required drivers as well as software. Press any key to enter Xpress Recovery2. System storage capacity and the reading/writing speed of system memory...

Manual
Page 55
... takes longer time than 128G under Windows 2000, be solved by BIOS update) GA-K8U GA-K8U-9 GA-K8NXP-SLI GA-K8N Ultra-SLI GA-K8N Pro-SLI GA-K8NXP-9 GA-K8N Ultra-9 GA-K8NF-9 (PCB Ver. 1.0) GA-K8NE (PCB Ver. 1.0) GA-K8NMF-9 - 55 - USB hard disks are currently not supported. 6. SATA...hard disk for Xpress Recovery2 to execute the EnableBigLba.exe program from hard disk. 3. RESTORE: English Restore the backed-up data from the driver CD before data backup. 2. Limitations: 1. PATA IDE primary channel b. When using hard disks with more than data restoration. 3. Xpress ...
... takes longer time than 128G under Windows 2000, be solved by BIOS update) GA-K8U GA-K8U-9 GA-K8NXP-SLI GA-K8N Ultra-SLI GA-K8N Pro-SLI GA-K8NXP-9 GA-K8N Ultra-9 GA-K8NF-9 (PCB Ver. 1.0) GA-K8NE (PCB Ver. 1.0) GA-K8NMF-9 - 55 - USB hard disks are currently not supported. 6. SATA...hard disk for Xpress Recovery2 to execute the EnableBigLba.exe program from hard disk. 3. RESTORE: English Restore the backed-up data from the driver CD before data backup. 2. Limitations: 1. PATA IDE primary channel b. When using hard disks with more than data restoration. 3. Xpress ...

Manual
Page 66
...the selection ESC : Exit Array Name Mode SATA SATA Size(GB) 111.79 111.79 Status Hdd Hdd GA-8VT880P Combo Motherboard - 66 - You can press up arrow key< > or down arrow key< > to their ... it is provided. (For more detailed setup information, please visit our website at http:\\www.gigabyte.com.tw to read or download the information you need.) Configuring the VT8237(VT8237R) SATA RAID... choose the RAID array type and which hard drives you to select Silicon Image). 5) Complete driver installation. 6) Complete RAID utility installation. The RAID prompt appears as part of the array. VIA ...
...the selection ESC : Exit Array Name Mode SATA SATA Size(GB) 111.79 111.79 Status Hdd Hdd GA-8VT880P Combo Motherboard - 66 - You can press up arrow key< > or down arrow key< > to their ... it is provided. (For more detailed setup information, please visit our website at http:\\www.gigabyte.com.tw to read or download the information you need.) Configuring the VT8237(VT8237R) SATA RAID... choose the RAID array type and which hard drives you to select Silicon Image). 5) Complete driver installation. 6) Complete RAID utility installation. The RAID prompt appears as part of the array. VIA ...

Manual
Page 71
...ROM support and a blank formatted floppy disk. Without the driver, the hard disk may not be recognized during OS installation. At the D:\> prompt, type the following two commands. Use an alternative system and insert the GIGABYTE motherboard drive CD-ROM. Appendix From the CDROM drive (...example: D:\) double click the MENU.exe file in your system. Step 1: Insert the prepared startup disk and motherboard driver CD-ROM in the BootDrv folder. English Installing ...
...ROM support and a blank formatted floppy disk. Without the driver, the hard disk may not be recognized during OS installation. At the D:\> prompt, type the following two commands. Use an alternative system and insert the GIGABYTE motherboard drive CD-ROM. Appendix From the CDROM drive (...example: D:\) double click the MENU.exe file in your system. Step 1: Insert the prepared startup disk and motherboard driver CD-ROM in the BootDrv folder. English Installing ...

Manual
Page 72
... Function Introduction The installation of the audio driver, you use the speaker with amplifier to acqiire the best sound effect if the stereo output is very simple. STEP 1: Connect the stereo speakers or earphone to select the function. Click the icon to "Line Out". GA-8VT880P Combo Motherboard - 72 - Please follow next step to...
... Function Introduction The installation of the audio driver, you use the speaker with amplifier to acqiire the best sound effect if the stereo output is very simple. STEP 1: Connect the stereo speakers or earphone to select the function. Click the icon to "Line Out". GA-8VT880P Combo Motherboard - 72 - Please follow next step to...

Manual
Page 73
Line Out Line In STEP 3 : Click "Speaker Configuration" and select the "UAJ Function". Appendix Then click on the lower right hand taskbar. English 4 Channel Analog Audio Output Mode STEP 1 : Connect the front channels to "Line Out", the rear channels to select the function. Click the icon to "Line In". STEP 2 : Following installation of the audio driver, you find a icon a Sound Effect icon on the left selection bar and select "4CH Speaker" to complete 4 channel audio configuration. - 73 -
Line Out Line In STEP 3 : Click "Speaker Configuration" and select the "UAJ Function". Appendix Then click on the lower right hand taskbar. English 4 Channel Analog Audio Output Mode STEP 1 : Connect the front channels to "Line Out", the rear channels to select the function. Click the icon to "Line In". STEP 2 : Following installation of the audio driver, you find a icon a Sound Effect icon on the left selection bar and select "4CH Speaker" to complete 4 channel audio configuration. - 73 -

Manual
Page 74
... rear channels to "Line In", and the Center/Subwoofer channels to connect the audio output without any additional module. GA-8VT880P Combo Motherboard - 74 - MIC In Line Out STEP 2 : Following installation of the audio driver, you find a icon a Sound Effect icon on the left selection bar and select "6CH Speaker" to select the function...
... rear channels to "Line In", and the Center/Subwoofer channels to connect the audio output without any additional module. GA-8VT880P Combo Motherboard - 74 - MIC In Line Out STEP 2 : Following installation of the audio driver, you find a icon a Sound Effect icon on the left selection bar and select "6CH Speaker" to select the function...

Manual
Page 76
...on the lower right hand taskbar. STEP 5 : Click "Speaker Configuration" and select both the "UAJ Function" and "Only Surround-Kit". GA-8VT880P Combo Motherboard - 76 - Sound Effect Configuration: At the sound effect menu, users can adjust sound option settings as desired. Connect the center/subwoofer ... the R/L channels to the Surround-Kit "SUR BACK" port. (This method requires UAJ function) STEP 4 : Following installation of the audio driver, you find a icon a Sound Effect icon on the left selection bar and select "8CH Speaker" to complete 8 channel audio configuration. English...
...on the lower right hand taskbar. STEP 5 : Click "Speaker Configuration" and select both the "UAJ Function" and "Only Surround-Kit". GA-8VT880P Combo Motherboard - 76 - Sound Effect Configuration: At the sound effect menu, users can adjust sound option settings as desired. Connect the center/subwoofer ... the R/L channels to the Surround-Kit "SUR BACK" port. (This method requires UAJ function) STEP 4 : Following installation of the audio driver, you find a icon a Sound Effect icon on the left selection bar and select "8CH Speaker" to complete 8 channel audio configuration. English...
Manual
Page 1
Table of Contents Configuring SATA Hard Drive(s) (Controller: VIA VT8237/VT8237R 2 (1) Installing SATA hard drive(s) in your computer 2 (2) Configuring SATA controller mode and boot sequence in BIOS Setup 3 (3) Configuring RAID set in RAID BIOS 5 (4) Making a SATA Driver Disk 10 (5) Installing SATA controller driver during OS installation 12
Table of Contents Configuring SATA Hard Drive(s) (Controller: VIA VT8237/VT8237R 2 (1) Installing SATA hard drive(s) in your computer 2 (2) Configuring SATA controller mode and boot sequence in BIOS Setup 3 (3) Configuring RAID set in RAID BIOS 5 (4) Making a SATA Driver Disk 10 (5) Installing SATA controller driver during OS installation 12
Manual
Page 2
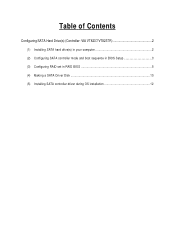
...on the motherboard. (If there are more than one hard drive. (b) An empty formatted floppy disk. (c) Windows XP/2000 setup disk. (d) Driver CD for the connector. Ác Configuring SATA Hard Drive(s) (Controller: VIA VT8237/VT8237R) Åé To configure SATA hard drive(s), follow ... for your motherboard. (1) Installing SATA hard drive(s) in RAID BIOS. (4) Make a floppy disk containing the SATA controller driver. (5) Install the SATA controller driver during OS installation. For example, SATA0_SB/SATA_SB is recommended that you use two hard drives with the SATA controller, you...
...on the motherboard. (If there are more than one hard drive. (b) An empty formatted floppy disk. (c) Windows XP/2000 setup disk. (d) Driver CD for the connector. Ác Configuring SATA Hard Drive(s) (Controller: VIA VT8237/VT8237R) Åé To configure SATA hard drive(s), follow ... for your motherboard. (1) Installing SATA hard drive(s) in RAID BIOS. (4) Make a floppy disk containing the SATA controller driver. (5) Install the SATA controller driver during OS installation. For example, SATA0_SB/SATA_SB is recommended that you use two hard drives with the SATA controller, you...
Manual
Page 10
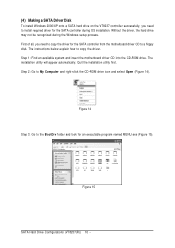
...MENU.exe (Figure 15). Figure 15 SATA Hard Drive Configurations (VT8237(R)) 10 - The installation utility will appear automatically. Ác (4) Making a SATA Driver Disk Åé To install Windows 2000/XP onto a SATA hard drive on the VT8237 controller successfully, you need to My Computer and right-click... the CD-ROM drive icon and select Open (Figure 14). The instructions below explain how to a floppy disk. Without the driver, the hard drive ¤¤ may not be recognized during OS installation. Step 1: Find an available system and insert the motherboard...
...MENU.exe (Figure 15). Figure 15 SATA Hard Drive Configurations (VT8237(R)) 10 - The installation utility will appear automatically. Ác (4) Making a SATA Driver Disk Åé To install Windows 2000/XP onto a SATA hard drive on the VT8237 controller successfully, you need to My Computer and right-click... the CD-ROM drive icon and select Open (Figure 14). The instructions below explain how to a floppy disk. Without the driver, the hard drive ¤¤ may not be recognized during OS installation. Step 1: Find an available system and insert the motherboard...

Manual
Page 11
Then it will appear. Figure 17 - 11 - SATA Hard Drive Configurations (VT8237(R)) Figure 16 Step 5: Insert an empty floppy disk. Press C to exit when the procedure is complete (Figure 17). You have copied the SATA driver successfully. Step 6: Press 0 to select the C) VIA 8237 Series ATA item. An MS-DOS prompt screen similar to Figure 16 below will take about one minute to copy the SATA driver from the motherboard driver CD to the floppy disk. Step 4: Double-click MENU.exe.
Then it will appear. Figure 17 - 11 - SATA Hard Drive Configurations (VT8237(R)) Figure 16 Step 5: Insert an empty floppy disk. Press C to exit when the procedure is complete (Figure 17). You have copied the SATA driver successfully. Step 6: Press 0 to select the C) VIA 8237 Series ATA item. An MS-DOS prompt screen similar to Figure 16 below will take about one minute to copy the SATA driver from the motherboard driver CD to the floppy disk. Step 4: Double-click MENU.exe.

Manual
Page 12
...loaded before you need to boot from a mass storage device manufacturer, or do not have chosen to install a 3rd party SCSI or RAID driver. S=Specify Additional Device ENTER=Continue F3=Exit Figure 19 SATA Hard Drive Configurations (VT8237(R)) 12 - Currently, Setup will be a few ...moments of ¤¤ Windows XP installation. ¤å Step 1: Restart your system to install a 3rd party SCSI or RAID driver" message (Figure 18). The following mass storage devices(s) * To specify additional SCSI adapters, CD-ROM drives, or special disk controllers for use with...
...loaded before you need to boot from a mass storage device manufacturer, or do not have chosen to install a 3rd party SCSI or RAID driver. S=Specify Additional Device ENTER=Continue F3=Exit Figure 19 SATA Hard Drive Configurations (VT8237(R)) 12 - Currently, Setup will be a few ...moments of ¤¤ Windows XP installation. ¤å Step 1: Restart your system to install a 3rd party SCSI or RAID driver" message (Figure 18). The following mass storage devices(s) * To specify additional SCSI adapters, CD-ROM drives, or special disk controllers for use with...


