
Manual
Page 12
... the proper specifications, please do so according to your hardware specifications including the CPU, graphics card, memory, hard drive, etc. Fig. 2 Remove the plastic covering on the CPU socket to the CPU during installation.) GA-8VT880P Combo Motherboard - 12 - Fig. 4 Once the CPU is installed on the edge of the CPU socket. It is...
... the proper specifications, please do so according to your hardware specifications including the CPU, graphics card, memory, hard drive, etc. Fig. 2 Remove the plastic covering on the CPU socket to the CPU during installation.) GA-8VT880P Combo Motherboard - 12 - Fig. 4 Once the CPU is installed on the edge of the CPU socket. It is...

Manual
Page 21
...) The FDD connector is the ground wire (GND). The black connector wire is used to connect the FDD cable while the other end of FDD drives supported are designed with color-coded power connector wires. Most coolers are : 360KB, 720KB, 1.2MB, 1.44MB and 2.88MB. A red power connector wire indicates a positive connection.... 1 2 3 4 Definition GND +12V Sense Speed Control (Only for CPU_FAN) power connector and possesses a foolproof connection design. The types of the cable connects to the FDD drive. Hardware Installation
...) The FDD connector is the ground wire (GND). The black connector wire is used to connect the FDD cable while the other end of FDD drives supported are designed with color-coded power connector wires. Most coolers are : 360KB, 720KB, 1.2MB, 1.44MB and 2.88MB. A red power connector wire indicates a positive connection.... 1 2 3 4 Definition GND +12V Sense Speed Control (Only for CPU_FAN) power connector and possesses a foolproof connection design. The types of the cable connects to the FDD drive. Hardware Installation

Manual
Page 22
... IDE cable, and the single IDE cable can provide up to work properly. Definition 1 GND 7 1 2 TXP 3 TXN 4 GND 5 RXN 6 RXP 7 GND GA-8VT880P Combo Motherboard - 22 - If you wish to connect two IDE devices, please set the jumper on the IDE device). 40 39 2 1 7) SATA0/SATA1 (Serial ATA Connector...computer via an IDE connector. Pin No. English 6) IDE1/IDE2 (IDE Connector) An IDE device connects to two IDE devices (hard drive or optical drive). One IDE connector can connect to one IDE device as Master and the other as Slave (for the Serial ATA and install the ...
... IDE cable, and the single IDE cable can provide up to work properly. Definition 1 GND 7 1 2 TXP 3 TXN 4 GND 5 RXN 6 RXP 7 GND GA-8VT880P Combo Motherboard - 22 - If you wish to connect two IDE devices, please set the jumper on the IDE device). 40 39 2 1 7) SATA0/SATA1 (Serial ATA Connector...computer via an IDE connector. Pin No. English 6) IDE1/IDE2 (IDE Connector) An IDE device connects to two IDE devices (hard drive or optical drive). One IDE connector can connect to one IDE device as Master and the other as Slave (for the Serial ATA and install the ...

Manual
Page 31
... Item Help Menu Level` ` IDE Channel 0 Master ` IDE Channel 0 Slave ` IDE Channel 1 Master ` IDE Channel 1 Slave ` IDE Channel 2 Master ` IDE Channel 3 Master Drive A Drive B Floppy 3 Mode Support Halt On [None] [None] [None] [None] [None] [None] [1.44M, 3.5"] [None] [Disabled] [All, But Keyboard] Change the day, month...methods: Auto Allows BIOS to automatically detect IDE devices during POST(default) None Select this to select this option for the hard drive. The four options are used and the system will skip the automatic detection step and allow for faster system start up. ...
... Item Help Menu Level` ` IDE Channel 0 Master ` IDE Channel 0 Slave ` IDE Channel 1 Master ` IDE Channel 1 Slave ` IDE Channel 2 Master ` IDE Channel 3 Master Drive A Drive B Floppy 3 Mode Support Halt On [None] [None] [None] [None] [None] [None] [1.44M, 3.5"] [None] [Disabled] [All, But Keyboard] Change the day, month...methods: Auto Allows BIOS to automatically detect IDE devices during POST(default) None Select this to select this option for the hard drive. The four options are used and the system will skip the automatic detection step and allow for faster system start up. ...

Manual
Page 32
...: Auto Allows BIOS to set the access mode for Japan Area) Disabled Normal Floppy Drive. (Default value) Drive A Drive B Drive A is 3 mode Floppy Drive. Both Drive A & B are used and the system will skip the automatic detection step and allow for automatic device detection. GA-8VT880P Combo Motherboard - 32 - Access Mode Use this option for faster system start up. English...
...: Auto Allows BIOS to set the access mode for Japan Area) Disabled Normal Floppy Drive. (Default value) Drive A Drive B Drive A is 3 mode Floppy Drive. Both Drive A & B are used and the system will skip the automatic detection step and allow for automatic device detection. GA-8VT880P Combo Motherboard - 32 - Access Mode Use this option for faster system start up. English...

Manual
Page 49
... the driver CD, "Xpress Install" will scan automatically the system and then list all the drivers that came with your motherboard into your CD-ROM drive, the driver CD-title will restart your system the "Xpress Install" will continue to install the drivers automatically. Drivers Installation English Chapter 3 Drivers Installation Pictures...
... the driver CD, "Xpress Install" will scan automatically the system and then list all the drivers that came with your motherboard into your CD-ROM drive, the driver CD-title will restart your system the "Xpress Install" will continue to install the drivers automatically. Drivers Installation English Chapter 3 Drivers Installation Pictures...
Manual
Page 54
...IDE controllers. System storage capacity and the reading/writing speed of system memory 3. After the steps above are completed, subsequent access to startup XpressRecovery2..... GA-8VT880P Combo Motherboard - 54 - After Xpress Recovery2 is executed from CD-ROM for 8I945GME E7 . . . . :BIOS Setup/Q-Flash, : Xpress Recovery2 ...says "Boot from CD-ROM. It is recommended that Xpress Recovery2 be made by pressing the key in your CD-ROM drive. Press any key to Xpress Recovery2 can be immediately installed once you can enter Xpress Recovery2 by simply pressing the key ...
...IDE controllers. System storage capacity and the reading/writing speed of system memory 3. After the steps above are completed, subsequent access to startup XpressRecovery2..... GA-8VT880P Combo Motherboard - 54 - After Xpress Recovery2 is executed from CD-ROM for 8I945GME E7 . . . . :BIOS Setup/Q-Flash, : Xpress Recovery2 ...says "Boot from CD-ROM. It is recommended that Xpress Recovery2 be made by pressing the key in your CD-ROM drive. Press any key to Xpress Recovery2 can be immediately installed once you can enter Xpress Recovery2 by simply pressing the key ...

Manual
Page 65
...performance or data fault tolerance. When any disk member fails, it is full, then proceeds to redundancy, the drive capacity of the array is the capacity of the smallest drive. The advantage of an Array is to the operating system. All disk members in an array are called ... Introduction RAID Levels RAID (Redundant Array of Independent Disks) is a method of combining two hard disk drives into one of the mirrored drives suffers a mechanical failure or does not respond, the remaining drive will continue to function. If one logical unit. Fault tolerance is not really a RAID and does...
...performance or data fault tolerance. When any disk member fails, it is full, then proceeds to redundancy, the drive capacity of the array is the capacity of the smallest drive. The advantage of an Array is to the operating system. All disk members in an array are called ... Introduction RAID Levels RAID (Redundant Array of Independent Disks) is a method of combining two hard disk drives into one of the mirrored drives suffers a mechanical failure or does not respond, the remaining drive will continue to function. If one logical unit. Fault tolerance is not really a RAID and does...

Manual
Page 66
...; Note: To achieve best performance, it is provided. (For more detailed setup information, please visit our website at http:\\www.gigabyte.com.tw to read or download the information you need.) Configuring the VT8237(VT8237R) SATA RAID BIOS The RAID BIOS setup utility... Hdd Hdd GA-8VT880P Combo Motherboard - 66 - Serial_Ch0 Master : ST3120026AS Serial_Ch1 Master : ST3120026AS Press Tab to construct a complete RAID array: 1) Have ready your computer, wait until you see the RAID software prompting you want to make and storage capacity. 2) Please attach the hard drive connectors to ...
...; Note: To achieve best performance, it is provided. (For more detailed setup information, please visit our website at http:\\www.gigabyte.com.tw to read or download the information you need.) Configuring the VT8237(VT8237R) SATA RAID BIOS The RAID BIOS setup utility... Hdd Hdd GA-8VT880P Combo Motherboard - 66 - Serial_Ch0 Master : ST3120026AS Serial_Ch1 Master : ST3120026AS Press Tab to construct a complete RAID array: 1) Have ready your computer, wait until you see the RAID software prompting you want to make and storage capacity. 2) Please attach the hard drive connectors to ...

Manual
Page 67
...Mode and press Enter, use the arrow key to next item Enter : Confirm the selection ESC : Exit Channel Drive Name Serial_Ch0 Master ST3120026AS Serial_Ch1 Master ST3120026AS Array Name Mode SATA SATA Size(GB) 111.79 111.79 Status Hdd...VT8237 SATA RAID BIOS Ver 2.41 Auto Setup For Data Security ArRraAyIDM0odfoerRpAerIfDor0m(Santrcieping) SeRleActIDDis1kfDorridvaetsa protection BloRcAkISDizSeP6A4NKfor capacity Start Create Process Channel Drive Name Serial_Ch0 Master ST3120026AS Serial_Ch1 Master ST3120026AS Create a RAID array with the hard disks attached to VIA RAID controller F1 ...
...Mode and press Enter, use the arrow key to next item Enter : Confirm the selection ESC : Exit Channel Drive Name Serial_Ch0 Master ST3120026AS Serial_Ch1 Master ST3120026AS Array Name Mode SATA SATA Size(GB) 111.79 111.79 Status Hdd...VT8237 SATA RAID BIOS Ver 2.41 Auto Setup For Data Security ArRraAyIDM0odfoerRpAerIfDor0m(Santrcieping) SeRleActIDDis1kfDorridvaetsa protection BloRcAkISDizSeP6A4NKfor capacity Start Create Process Channel Drive Name Serial_Ch0 Master ST3120026AS Serial_Ch1 Master ST3120026AS Create a RAID array with the hard disks attached to VIA RAID controller F1 ...

Manual
Page 68
... to 64KB. Important note: All existing contents in the hard drive will be destroied. GA-8VT880P Combo Motherboard - 68 - One method is Auto Setup and the other one is Select Disk Drives. Continue? (Y/N)], press Y to finish the creation, or press N to select the disk drives and create arrays automatically, but it does not duplicate the mirroring...
... to 64KB. Important note: All existing contents in the hard drive will be destroied. GA-8VT880P Combo Motherboard - 68 - One method is Auto Setup and the other one is Select Disk Drives. Continue? (Y/N)], press Y to finish the creation, or press N to select the disk drives and create arrays automatically, but it does not duplicate the mirroring...

Manual
Page 69
... attached to VIA RAID controller F1 : View Array/disk Status , : Move to next item Enter : Confirm the selection ESC : Exit Channel Drive Name [*]Serial_Ch0 Master ST3120026AS [*]Serial_Ch1 Master ST3120026AS Array Name ARRAY 0 ARRAY 0 Mode SATA SATA Size(GB) 111.79 111.79 Status Stripe0 Stripe1... highlight the target disk array and press Enter. Press Esc to go back to next item Enter : Confirm the selection ESC : Exit Channel Drive Name [*]Serial_Ch0 Master ST3120026AS [*]Serial_Ch1 Master ST3120026AS Array Name ARRAY 0 ARRAY 0 Mode SATA SATA Size(GB) 111.79 111.79 Status Boot ...
... attached to VIA RAID controller F1 : View Array/disk Status , : Move to next item Enter : Confirm the selection ESC : Exit Channel Drive Name [*]Serial_Ch0 Master ST3120026AS [*]Serial_Ch1 Master ST3120026AS Array Name ARRAY 0 ARRAY 0 Mode SATA SATA Size(GB) 111.79 111.79 Status Stripe0 Stripe1... highlight the target disk array and press Enter. Press Esc to go back to next item Enter : Confirm the selection ESC : Exit Channel Drive Name [*]Serial_Ch0 Master ST3120026AS [*]Serial_Ch1 Master ST3120026AS Array Name ARRAY 0 ARRAY 0 Mode SATA SATA Size(GB) 111.79 111.79 Status Boot ...

Manual
Page 70
...disks attached to VIA RAID controller F1 : View Array/disk Status , : Move to next item Enter : Confirm the selection ESC : Exit Channel Drive Name Serial_Ch0 Master ST3120026AS Serial_Ch1 Master ST3120026AS Serial Number: 3JT354CP Array Name ARRAY 0 ARRAY 0 Mode SATA SATA Size(GB) 111.79 111.79 ...Block Size(GB) 64K Size(GB) 223.58 GA-8VT880P Combo Motherboard - 70 - If there are no disk arrays then nothing will be viewed in the last column. VIA Tech. View Array Status: Press the F1 key to select a drive, the selected drive's serial number can be displayed on the lower screen...
...disks attached to VIA RAID controller F1 : View Array/disk Status , : Move to next item Enter : Confirm the selection ESC : Exit Channel Drive Name Serial_Ch0 Master ST3120026AS Serial_Ch1 Master ST3120026AS Serial Number: 3JT354CP Array Name ARRAY 0 ARRAY 0 Mode SATA SATA Size(GB) 111.79 111.79 ...Block Size(GB) 64K Size(GB) 223.58 GA-8VT880P Combo Motherboard - 70 - If there are no disk arrays then nothing will be viewed in the last column. VIA Tech. View Array Status: Press the F1 key to select a drive, the selected drive's serial number can be displayed on the lower screen...

Manual
Page 71
...Fig.1 Fig. 2 Step 3: After completing the steps, boot from the Windows installation disk to the CD-ROM drive (example: D:\>). Use an alternative system and insert the GIGABYTE motherboard drive CD-ROM. Without the driver, the hard disk may not be installed.) (Note 1): For users without a startup... disk. Follow the on-screen instructions to complete the installation. (Each time you add a new hard drive to a RAID array, the...
...Fig.1 Fig. 2 Step 3: After completing the steps, boot from the Windows installation disk to the CD-ROM drive (example: D:\>). Use an alternative system and insert the GIGABYTE motherboard drive CD-ROM. Without the driver, the hard disk may not be installed.) (Note 1): For users without a startup... disk. Follow the on-screen instructions to complete the installation. (Each time you add a new hard drive to a RAID array, the...
Manual
Page 1
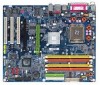
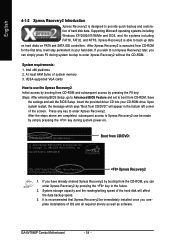
Table of Contents Configuring SATA Hard Drive(s) (Controller: VIA VT8237/VT8237R 2 (1) Installing SATA hard drive(s) in your computer 2 (2) Configuring SATA controller mode and boot sequence in BIOS Setup 3 (3) Configuring RAID set in RAID BIOS 5 (4) Making a SATA Driver Disk 10 (5) Installing SATA controller driver during OS installation 12
Table of Contents Configuring SATA Hard Drive(s) (Controller: VIA VT8237/VT8237R 2 (1) Installing SATA hard drive(s) in your computer 2 (2) Configuring SATA controller mode and boot sequence in BIOS Setup 3 (3) Configuring RAID set in RAID BIOS 5 (4) Making a SATA Driver Disk 10 (5) Installing SATA controller driver during OS installation 12
Manual
Page 2
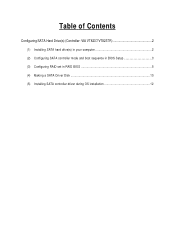
...by the SATA controller on South-Bridge.) Then connect the power connector from your power supply to the hard drive. For example, SATA0_SB/SATA_SB is recommended that you may prepare only one hard drive. (b) An empty formatted floppy disk. (c) Windows XP/2000 setup disk. (d) Driver CD for your motherboard... containing the SATA controller driver. (5) Install the SATA controller driver during OS installation. Before you may check the name of the SATA hard drive and the other end to available SATA port(s) on the motherboard. (If there are more than one SATA controller on the SATA controller....
...by the SATA controller on South-Bridge.) Then connect the power connector from your power supply to the hard drive. For example, SATA0_SB/SATA_SB is recommended that you may prepare only one hard drive. (b) An empty formatted floppy disk. (c) Windows XP/2000 setup disk. (d) Driver CD for your motherboard... containing the SATA controller driver. (5) Install the SATA controller driver during OS installation. Before you may check the name of the SATA hard drive and the other end to available SATA port(s) on the motherboard. (If there are more than one SATA controller on the SATA controller....
Manual
Page 3
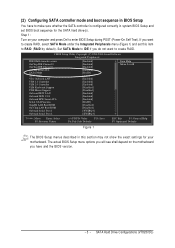
... Setup during POST (Power-On Self Test). (2) Configuring SATA controller mode and boot sequence in BIOS Setup You have and the BIOS version. - 3 - SATA Hard Drive Configurations (VT8237(R)) CMOS Setup Utility-Copyright (C) 1984-2004 Award Software Integrated Peripherals IDE DMA transfer access OnChip IDE Channel 0 OnChip IDE Channel 1 OnChip Serial ATA... Defaults Figure 1 The BIOS Setup menus described in system BIOS Setup and set this section may not show the exact settings for the SATA hard drive(s). If you will see shall depend on your motherboard.
... Setup during POST (Power-On Self Test). (2) Configuring SATA controller mode and boot sequence in BIOS Setup You have and the BIOS version. - 3 - SATA Hard Drive Configurations (VT8237(R)) CMOS Setup Utility-Copyright (C) 1984-2004 Award Software Integrated Peripherals IDE DMA transfer access OnChip IDE Channel 0 OnChip IDE Channel 1 OnChip Serial ATA... Defaults Figure 1 The BIOS Setup menus described in system BIOS Setup and set this section may not show the exact settings for the SATA hard drive(s). If you will see shall depend on your motherboard.

Manual
Page 4
... Setup Utility-Copyright (C) 1984-2004 Award Software Hard Disk Boot Priority 1. In the Hard Disk Boot Priority submenu, select the model of the SATA hard drive onto which you intent to move it down the list. Press to exit this menu. SCSI-0 : ST3120026AS 2. CMOS Setup Utility-Copyright (C) 1984-2004 Award Software... 4: Save and exit BIOS Setup. +/-/PU/PD: Value F10: Save F6: Fail-Safe Defaults Figure 3 ESC: Exit F1: General Help F7: Optimized Defaults SATA Hard Drive Configurations (VT8237(R)) 4 -
... Setup Utility-Copyright (C) 1984-2004 Award Software Hard Disk Boot Priority 1. In the Hard Disk Boot Priority submenu, select the model of the SATA hard drive onto which you intent to move it down the list. Press to exit this menu. SCSI-0 : ST3120026AS 2. CMOS Setup Utility-Copyright (C) 1984-2004 Award Software... 4: Save and exit BIOS Setup. +/-/PU/PD: Value F10: Save F6: Fail-Safe Defaults Figure 3 ESC: Exit F1: General Help F7: Optimized Defaults SATA Hard Drive Configurations (VT8237(R)) 4 -

Manual
Page 5
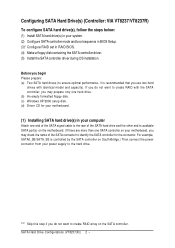
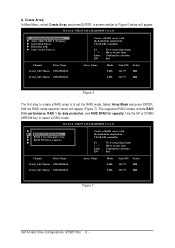
... step and proceed to Section 4 if you can use the UP or DOWN ARROW key to next item Confirm the selection Exit Channel Drive Name Serial_Ch0 Master ST3120026AS Serial_Ch1 Master ST3120026AS Array Name Mode SATA SATA Size(GB) Status 111.79 Hdd 111.79 Hdd Figure 5 -... 5 - All Right reserved. SATA Hard Drive Configurations (VT8237(R)) (3) Configuring RAID set in RAID BIOS Enter the RAID BIOS setup utility to create RAID. Serial_Ch0 Master : ST3120026AS Serial_Ch1 Master :...
... step and proceed to Section 4 if you can use the UP or DOWN ARROW key to next item Confirm the selection Exit Channel Drive Name Serial_Ch0 Master ST3120026AS Serial_Ch1 Master ST3120026AS Array Name Mode SATA SATA Size(GB) Status 111.79 Hdd 111.79 Hdd Figure 5 -... 5 - All Right reserved. SATA Hard Drive Configurations (VT8237(R)) (3) Configuring RAID set in RAID BIOS Enter the RAID BIOS setup utility to create RAID. Serial_Ch0 Master : ST3120026AS Serial_Ch1 Master :...
Manual
Page 6
...6 below will appear (Figure 7). Ác A. VT8237 SATA RAID BIOS Ver 2.31 u Auto Setup For Performance u Array Mode RAID 0 (Striping) u Select Disk Drives u Block Size 64K u Start Create Process Create a RAID array with the hard disks attached to VIA RAID controller F1 : h, i : Enter : ESC : View...VIA RAID controller F1 : h, i : Enter : ESC : View Array/disk Status Move to next item Confirm the selection Exit Channel Drive Name Serial_Ch0 Master ST3120026AS Serial_Ch1 Master ST3120026AS Array Name Mode SATA SATA Size(GB) Status 111.79 Hdd 111.79 Hdd Figure 6 The ...
...6 below will appear (Figure 7). Ác A. VT8237 SATA RAID BIOS Ver 2.31 u Auto Setup For Performance u Array Mode RAID 0 (Striping) u Select Disk Drives u Block Size 64K u Start Create Process Create a RAID array with the hard disks attached to VIA RAID controller F1 : h, i : Enter : ESC : View...VIA RAID controller F1 : h, i : Enter : ESC : View Array/disk Status Move to next item Confirm the selection Exit Channel Drive Name Serial_Ch0 Master ST3120026AS Serial_Ch1 Master ST3120026AS Array Name Mode SATA SATA Size(GB) Status 111.79 Hdd 111.79 Hdd Figure 6 The ...


