
Manual
Page 12
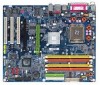
...1-3-1 Installation of the CPU Metal Lever Fig. 1 Gently lift the metal lever located on the CPU prior to the CPU during installation.) GA-8VT880P Combo Motherboard - 12 - Chipset: An VIA Chipset that might cause damage to system use, otherwise overheating and permanent damage of the CPU may...operation system that the motherboard supports the CPU. 2. If you wish to your hardware specifications including the CPU, graphics card, memory, hard drive, etc. Please add an even layer of heat sink paste between your computer system requires all of the following conditions: 1. It is ...
...1-3-1 Installation of the CPU Metal Lever Fig. 1 Gently lift the metal lever located on the CPU prior to the CPU during installation.) GA-8VT880P Combo Motherboard - 12 - Chipset: An VIA Chipset that might cause damage to system use, otherwise overheating and permanent damage of the CPU may...operation system that the motherboard supports the CPU. 2. If you wish to your hardware specifications including the CPU, graphics card, memory, hard drive, etc. Please add an even layer of heat sink paste between your computer system requires all of the following conditions: 1. It is ...

Manual
Page 21
Most coolers are : 360KB, 720KB, 1.2MB, 1.44MB and 2.88MB. Please remember to connect the power to the cooler to the FDD drive. Please remember to connect the power to the CPU fan to prevent CPU overheating and failure. 1 CPU_FAN 1 SYS_FAN Pin No. 1 2 3 4 Definition GND +...positive connection and requires a +12V power voltage. The black connector wire is used to connect the FDD cable while the other end of FDD drives supported are designed with color-coded power connector wires. The types of the cable connects to prevent system overheating and failure. Please connect the ...
Most coolers are : 360KB, 720KB, 1.2MB, 1.44MB and 2.88MB. Please remember to connect the power to the cooler to the FDD drive. Please remember to connect the power to the CPU fan to prevent CPU overheating and failure. 1 CPU_FAN 1 SYS_FAN Pin No. 1 2 3 4 Definition GND +...positive connection and requires a +12V power voltage. The black connector wire is used to connect the FDD cable while the other end of FDD drives supported are designed with color-coded power connector wires. The types of the cable connects to prevent system overheating and failure. Please connect the ...

Manual
Page 22
... 7 1 2 TXP 3 TXN 4 GND 5 RXN 6 RXP 7 GND GA-8VT880P Combo Motherboard - 22 - Please refer to the BIOS setting for information on settings, please refer to the instructions located on one IDE cable, and the single IDE cable can provide up to two IDE devices (hard drive or optical drive). If you wish to connect two IDE...
... 7 1 2 TXP 3 TXN 4 GND 5 RXN 6 RXP 7 GND GA-8VT880P Combo Motherboard - 22 - Please refer to the BIOS setting for information on settings, please refer to the instructions located on one IDE cable, and the single IDE cable can provide up to two IDE devices (hard drive or optical drive). If you wish to connect two IDE...

Manual
Page 31
...BIOS to set , or disable password. IDE Device Setup. English „ Set User Password Change, set the access mode for the hard drive. to CMOS and exit setup. „ Exit Without Saving Abandon all CMOS value changes and exit setup. 2-1 Standard CMOS Features Date ...Item Help Menu Level` ` IDE Channel 0 Master ` IDE Channel 0 Slave ` IDE Channel 1 Master ` IDE Channel 1 Slave ` IDE Channel 2 Master ` IDE Channel 3 Master Drive A Drive B Floppy 3 Mode Support Halt On [None] [None] [None] [None] [None] [None] [1.44M, 3.5"] [None] [Disabled] [All, But Keyboard] Change the day, month...
...BIOS to set , or disable password. IDE Device Setup. English „ Set User Password Change, set the access mode for the hard drive. to CMOS and exit setup. „ Exit Without Saving Abandon all CMOS value changes and exit setup. 2-1 Standard CMOS Features Date ...Item Help Menu Level` ` IDE Channel 0 Master ` IDE Channel 0 Slave ` IDE Channel 1 Master ` IDE Channel 1 Slave ` IDE Channel 2 Master ` IDE Channel 3 Master Drive A Drive B Floppy 3 Mode Support Halt On [None] [None] [None] [None] [None] [None] [1.44M, 3.5"] [None] [Disabled] [All, But Keyboard] Change the day, month...

Manual
Page 32
... byte capacity 720K, 3.5" (3.5 inch when 3 Mode is Enabled). 3.5 inch double-sided drive; 720K byte capacity 1.44M, 3.5" 3.5 inch double-sided drive; 1.44M byte capacity. 2.88M, 3.5" 3.5 inch double-sided drive; 2.88M byte capacity. Enter the appropriate option based on the outside drive casing. GA-8VT880P Combo Motherboard - 32 - Extended IDE Drive SATA devices setup. The two options are 3 mode Floppy...
... byte capacity 720K, 3.5" (3.5 inch when 3 Mode is Enabled). 3.5 inch double-sided drive; 720K byte capacity 1.44M, 3.5" 3.5 inch double-sided drive; 1.44M byte capacity. 2.88M, 3.5" 3.5 inch double-sided drive; 2.88M byte capacity. Enter the appropriate option based on the outside drive casing. GA-8VT880P Combo Motherboard - 32 - Extended IDE Drive SATA devices setup. The two options are 3 mode Floppy...

Manual
Page 49
... you automatically. The "Xpress Install" will scan automatically the system and then list all the drivers that came with your motherboard into your CD-ROM drive, the driver CD-title will reboot automatically after install the drivers, afterward you want then click the "GO" button. After install Windows Service Pack, it...
... you automatically. The "Xpress Install" will scan automatically the system and then list all the drivers that came with your motherboard into your CD-ROM drive, the driver CD-title will reboot automatically after install the drivers, afterward you want then click the "GO" button. After install Windows Service Pack, it...
Manual
Page 54
... all required drivers as well as software. Intel 945 BIOS for the first time, it will stay permanent in your CD-ROM drive. It is executed from CD/DVD: Press any key to enter Xpress Recovery2. Press any key to startup XpressRecovery2..... At least ...completed, subsequent access to Xpress Recovery2 can be immediately installed once you can simply press F9 during system power-on PATA and SATA IDE controllers. GA-8VT880P Combo Motherboard - 54 - Award Modular BIOS v6.00PG, An Energy Star Ally Copyright (C) 1984-2004, Award Software, Inc. System requirements: 1. ...
... all required drivers as well as software. Intel 945 BIOS for the first time, it will stay permanent in your CD-ROM drive. It is executed from CD/DVD: Press any key to enter Xpress Recovery2. Press any key to startup XpressRecovery2..... At least ...completed, subsequent access to Xpress Recovery2 can be immediately installed once you can simply press F9 during system power-on PATA and SATA IDE controllers. GA-8VT880P Combo Motherboard - 54 - Award Modular BIOS v6.00PG, An Energy Star Ally Copyright (C) 1984-2004, Award Software, Inc. System requirements: 1. ...

Manual
Page 65
...mirrored copy of the data can be activated to 64KB. JBOD (Spanning) A spanning disk array is equal to the sum of the all drives when the drives used are RAID 0, RAID 1,and JBOD. JBOD is equal to as there are recognized as a member. English 4-1-4 Serial ATA BIOS Setting...represent different performance levels, security levels and implementation costs. Due to the operating system. The different methods are referred to the number of drive members times the capacity of each member is achieved through a few different methods. If any disk member fails, the failure affects the ...
...mirrored copy of the data can be activated to 64KB. JBOD (Spanning) A spanning disk array is equal to the sum of the all drives when the drives used are RAID 0, RAID 1,and JBOD. JBOD is equal to as there are recognized as a member. English 4-1-4 Serial ATA BIOS Setting...represent different performance levels, security levels and implementation costs. Due to the operating system. The different methods are referred to the number of drive members times the capacity of each member is achieved through a few different methods. If any disk member fails, the failure affects the ...

Manual
Page 66
...hard drive connectors to their appropriate location on Integrated Peripherals). 4) Enter RAID setup in the BIOS and select the RAID type (For instance, enter Tab to next item Enter : Confirm the selection ESC : Exit Array Name Mode SATA SATA Size(GB) 111.79 111.79 Status Hdd Hdd GA-8VT880P Combo ... VIA Tech. Note: To achieve best performance, it is provided. (For more detailed setup information, please visit our website at http:\\www.gigabyte.com.tw to read or download the information you need.) Configuring the VT8237(VT8237R) SATA RAID BIOS The RAID BIOS setup utility lets you ...
...hard drive connectors to their appropriate location on Integrated Peripherals). 4) Enter RAID setup in the BIOS and select the RAID type (For instance, enter Tab to next item Enter : Confirm the selection ESC : Exit Array Name Mode SATA SATA Size(GB) 111.79 111.79 Status Hdd Hdd GA-8VT880P Combo ... VIA Tech. Note: To achieve best performance, it is provided. (For more detailed setup information, please visit our website at http:\\www.gigabyte.com.tw to read or download the information you need.) Configuring the VT8237(VT8237R) SATA RAID BIOS The RAID BIOS setup utility lets you ...

Manual
Page 67
...VT8237 SATA RAID BIOS Ver 2.41 Auto Setup For Data Security ArRraAyIDM0odfoerRpAerIfDor0m(Santrcieping) SeRleActIDDis1kfDorridvaetsa protection BloRcAkISDizSeP6A4NKfor capacity Start Create Process Channel Drive Name Serial_Ch0 Master ST3120026AS Serial_Ch1 Master ST3120026AS Create a RAID array with the hard disks attached to VIA RAID controller F1 :... View Array/disk Status , : Move to next item Enter : Confirm the selection ESC : Exit Channel Drive Name Serial_Ch0 Master ST3120026AS Serial_Ch1 Master ST3120026AS Array Name Mode SATA SATA Size(GB) 111.79 111.79 Status Hdd ...
...VT8237 SATA RAID BIOS Ver 2.41 Auto Setup For Data Security ArRraAyIDM0odfoerRpAerIfDor0m(Santrcieping) SeRleActIDDis1kfDorridvaetsa protection BloRcAkISDizSeP6A4NKfor capacity Start Create Process Channel Drive Name Serial_Ch0 Master ST3120026AS Serial_Ch1 Master ST3120026AS Create a RAID array with the hard disks attached to VIA RAID controller F1 :... View Array/disk Status , : Move to next item Enter : Confirm the selection ESC : Exit Channel Drive Name Serial_Ch0 Master ST3120026AS Serial_Ch1 Master ST3120026AS Array Name Mode SATA SATA Size(GB) 111.79 111.79 Status Hdd ...

Manual
Page 68
... if the user selected Create and duplicate for RAID 1. Important note: All existing contents in the hard drive will be marked a star(*) signal. GA-8VT880P Combo Motherboard - 68 - Select Disk Drives lets the user select the array drives by their requirements. VIA Tech. VIA Tech. Continue? (Y/N)], press Y to finish the creation, or press N to 64KB. The...
... if the user selected Create and duplicate for RAID 1. Important note: All existing contents in the hard drive will be marked a star(*) signal. GA-8VT880P Combo Motherboard - 68 - Select Disk Drives lets the user select the array drives by their requirements. VIA Tech. VIA Tech. Continue? (Y/N)], press Y to finish the creation, or press N to 64KB. The...

Manual
Page 69
... : Move to boot operating system from the disk array. If you want to next item Enter : Confirm the selection ESC : Exit Channel Drive Name [*]Serial_Ch0 Master ST3120026AS [*]Serial_Ch1 Master ST3120026AS Array Name ARRAY 0 ARRAY 0 Mode SATA SATA Size(GB) 111.79 111.79 Status Stripe0 Stripe1... system does not boot from an array. C. Press Esc to go back to next item Enter : Confirm the selection ESC : Exit Channel Drive Name [*]Serial_Ch0 Master ST3120026AS [*]Serial_Ch1 Master ST3120026AS Array Name ARRAY 0 ARRAY 0 Mode SATA SATA Size(GB) 111.79 111.79 Status Boot ...
... : Move to boot operating system from the disk array. If you want to next item Enter : Confirm the selection ESC : Exit Channel Drive Name [*]Serial_Ch0 Master ST3120026AS [*]Serial_Ch1 Master ST3120026AS Array Name ARRAY 0 ARRAY 0 Mode SATA SATA Size(GB) 111.79 111.79 Status Stripe0 Stripe1... system does not boot from an array. C. Press Esc to go back to next item Enter : Confirm the selection ESC : Exit Channel Drive Name [*]Serial_Ch0 Master ST3120026AS [*]Serial_Ch1 Master ST3120026AS Array Name ARRAY 0 ARRAY 0 Mode SATA SATA Size(GB) 111.79 111.79 Status Boot ...

Manual
Page 70
... and press Enter. Use arrow key to next item Enter : Confirm the selection ESC : Exit Block Size(GB) 64K Size(GB) 223.58 GA-8VT880P Combo Motherboard - 70 - VT8237 SATA RAID BIOS Ver 2.41 Create Array Delete Array Create/Delete Spare Select Boot Array Serial Number View Array Name ARRAY ... Stripe Create a RAID array with the hard disks attached to VIA RAID controller F1 : View Array/disk Status , : Move to select a drive, the selected drive's serial number can be displayed on the lower screen. VIA Tech. VT8237 SATA RAID BIOS Ver 2.41 Create Array Delete Array Create/Delete Spare...
... and press Enter. Use arrow key to next item Enter : Confirm the selection ESC : Exit Block Size(GB) 64K Size(GB) 223.58 GA-8VT880P Combo Motherboard - 70 - VT8237 SATA RAID BIOS Ver 2.41 Create Array Delete Array Create/Delete Spare Select Boot Array Serial Number View Array Name ARRAY ... Stripe Create a RAID array with the hard disks attached to VIA RAID controller F1 : View Array/disk Status , : Move to select a drive, the selected drive's serial number can be displayed on the lower screen. VIA Tech. VT8237 SATA RAID BIOS Ver 2.41 Create Array Delete Array Create/Delete Spare...

Manual
Page 71
...startup disk and motherboard driver CD-ROM in the BootDrv folder. At the D:\> prompt, type the following two commands. Prepare a startup disk that hard drive. Without the driver, the hard disk may not be recognized during OS installation. Boot from the menu. Your system will have to install a third ..." message, then supply serial ATA controller driver by pressing the corresponding letter from the startup disk. Use an alternative system and insert the GIGABYTE motherboard drive CD-ROM. From the CDROM drive (example: D:\) double click the MENU.exe file in your system.
...startup disk and motherboard driver CD-ROM in the BootDrv folder. At the D:\> prompt, type the following two commands. Prepare a startup disk that hard drive. Without the driver, the hard disk may not be recognized during OS installation. Boot from the menu. Your system will have to install a third ..." message, then supply serial ATA controller driver by pressing the corresponding letter from the startup disk. Use an alternative system and insert the GIGABYTE motherboard drive CD-ROM. From the CDROM drive (example: D:\) double click the MENU.exe file in your system.
Manual
Page 1
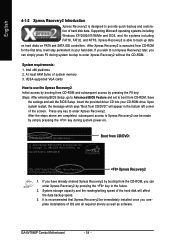
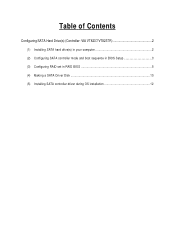
Table of Contents Configuring SATA Hard Drive(s) (Controller: VIA VT8237/VT8237R 2 (1) Installing SATA hard drive(s) in your computer 2 (2) Configuring SATA controller mode and boot sequence in BIOS Setup 3 (3) Configuring RAID set in RAID BIOS 5 (4) Making a SATA Driver Disk 10 (5) Installing SATA controller driver during OS installation 12
Table of Contents Configuring SATA Hard Drive(s) (Controller: VIA VT8237/VT8237R 2 (1) Installing SATA hard drive(s) in your computer 2 (2) Configuring SATA controller mode and boot sequence in BIOS Setup 3 (3) Configuring RAID set in RAID BIOS 5 (4) Making a SATA Driver Disk 10 (5) Installing SATA controller driver during OS installation 12
Manual
Page 2
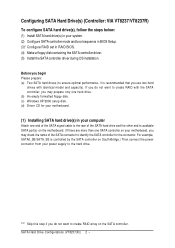
....) Then connect the power connector from your power supply to the hard drive. Ác Configuring SATA Hard Drive(s) (Controller: VIA VT8237/VT8237R) Åé To configure SATA hard drive(s), follow the steps below: ¤¤ (1) Install SATA hard drive(s) in your motherboard, you do not want to create RAID with identical... empty formatted floppy disk. (c) Windows XP/2000 setup disk. (d) Driver CD for your motherboard. (1) Installing SATA hard drive(s) in your computer Attach one end of the SATA signal cable to the rear of the SATA connector to ensure optimal performance, ...
....) Then connect the power connector from your power supply to the hard drive. Ác Configuring SATA Hard Drive(s) (Controller: VIA VT8237/VT8237R) Åé To configure SATA hard drive(s), follow the steps below: ¤¤ (1) Install SATA hard drive(s) in your motherboard, you do not want to create RAID with identical... empty formatted floppy disk. (c) Windows XP/2000 setup disk. (d) Driver CD for your motherboard. (1) Installing SATA hard drive(s) in your computer Attach one end of the SATA signal cable to the rear of the SATA connector to ensure optimal performance, ...
Manual
Page 3
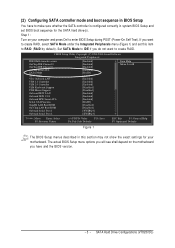
SATA Hard Drive Configurations (VT8237(R)) CMOS Setup Utility-Copyright (C) 1984-2004 Award Software Integrated Peripherals IDE DMA transfer access OnChip IDE Channel 0 OnChip IDE Channel 1 OnChip Serial ATA ... whether the SATA controller is configured correctly in system BIOS Setup and set this section may not show the exact settings for the SATA hard drive(s). Step 1: Turn on the motherboard you do not want to create RAID.
SATA Hard Drive Configurations (VT8237(R)) CMOS Setup Utility-Copyright (C) 1984-2004 Award Software Integrated Peripherals IDE DMA transfer access OnChip IDE Channel 0 OnChip IDE Channel 1 OnChip Serial ATA ... whether the SATA controller is configured correctly in system BIOS Setup and set this section may not show the exact settings for the SATA hard drive(s). Step 1: Turn on the motherboard you do not want to create RAID.

Manual
Page 4
... 4: Save and exit BIOS Setup. +/-/PU/PD: Value F10: Save F6: Fail-Safe Defaults Figure 3 ESC: Exit F1: General Help F7: Optimized Defaults SATA Hard Drive Configurations (VT8237(R)) 4 - CMOS Setup Utility-Copyright (C) 1984-2004 Award Software Hard Disk Boot Priority 1. Bootable Add-in Cards Item Help Menu Level }} Use or to... list. Press to install Microsoft Windows 2000/XP (Figure 2). SCSI-1 : ST3120026AS 3. In the Hard Disk Boot Priority submenu, select the model of the SATA hard drive onto which you intent to exit this menu.
... 4: Save and exit BIOS Setup. +/-/PU/PD: Value F10: Save F6: Fail-Safe Defaults Figure 3 ESC: Exit F1: General Help F7: Optimized Defaults SATA Hard Drive Configurations (VT8237(R)) 4 - CMOS Setup Utility-Copyright (C) 1984-2004 Award Software Hard Disk Boot Priority 1. Bootable Add-in Cards Item Help Menu Level }} Use or to... list. Press to install Microsoft Windows 2000/XP (Figure 2). SCSI-1 : ST3120026AS 3. In the Hard Disk Boot Priority submenu, select the model of the SATA hard drive onto which you intent to exit this menu.

Manual
Page 5
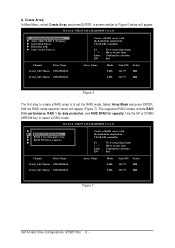
...Copyright (C) VIA Technologies, Inc. Highlight an item that you can use the UP or DOWN ARROW key to execute and press ENTER. SATA Hard Drive Configurations (VT8237(R)) Skip this step and proceed to Section 4 if you do not want to highlight through choices. Press the TAB key to ...next item Confirm the selection Exit Channel Drive Name Serial_Ch0 Master ST3120026AS Serial_Ch1 Master ST3120026AS Array Name Mode SATA SATA Size(GB) Status 111.79 Hdd 111.79 Hdd Figure 5 - 5 - Scan...
...Copyright (C) VIA Technologies, Inc. Highlight an item that you can use the UP or DOWN ARROW key to execute and press ENTER. SATA Hard Drive Configurations (VT8237(R)) Skip this step and proceed to Section 4 if you do not want to highlight through choices. Press the TAB key to ...next item Confirm the selection Exit Channel Drive Name Serial_Ch0 Master ST3120026AS Serial_Ch1 Master ST3120026AS Array Name Mode SATA SATA Size(GB) Status 111.79 Hdd 111.79 Hdd Figure 5 - 5 - Scan...
Manual
Page 6
... attached to VIA RAID controller F1 : h, i : Enter : ESC : View Array/disk Status Move to next item Confirm the selection Exit Channel Drive Name Serial_Ch0 Master ST3120026AS Serial_Ch1 Master ST3120026AS Array Name Mode SATA SATA Size(GB) Status 111.79 Hdd 111.79 Hdd Figure 6 The first step... to create a RAID array is to next item Confirm the selection Exit Channel Drive Name Serial_Ch0 Master ST3120026AS Serial_Ch1 Master ST3120026AS Array Name Mode SATA SATA Size(GB) Status 111.79 Hdd 111.79 Hdd Figure 7 SATA Hard...
... attached to VIA RAID controller F1 : h, i : Enter : ESC : View Array/disk Status Move to next item Confirm the selection Exit Channel Drive Name Serial_Ch0 Master ST3120026AS Serial_Ch1 Master ST3120026AS Array Name Mode SATA SATA Size(GB) Status 111.79 Hdd 111.79 Hdd Figure 6 The first step... to create a RAID array is to next item Confirm the selection Exit Channel Drive Name Serial_Ch0 Master ST3120026AS Serial_Ch1 Master ST3120026AS Array Name Mode SATA SATA Size(GB) Status 111.79 Hdd 111.79 Hdd Figure 7 SATA Hard...


