
Manual
Page 10
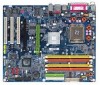
English 1-2 Feature Summary CPU Chipset Memory Slots IDE Connections FDD Connections Onboard SATA Peripherals Onboard LAN Onboard Audio Š Supports the latest Intel® Pentium® 4 LGA775 CPU Š Supports 800/533MHz FSB Š L2 cache varies with ... to the PT880 Pro chipset's limitation, the PCI Express x16 slots work at the bandwidth of PCI Express x4. (Note 2) It is recommended to use SATA (1.5Gb/s) hard disks. GA-8VT880P Combo Motherboard - 10 -
English 1-2 Feature Summary CPU Chipset Memory Slots IDE Connections FDD Connections Onboard SATA Peripherals Onboard LAN Onboard Audio Š Supports the latest Intel® Pentium® 4 LGA775 CPU Š Supports 800/533MHz FSB Š L2 cache varies with ... to the PT880 Pro chipset's limitation, the PCI Express x16 slots work at the bandwidth of PCI Express x4. (Note 2) It is recommended to use SATA (1.5Gb/s) hard disks. GA-8VT880P Combo Motherboard - 10 -

Manual
Page 11
... Factor Š Built in VT8237R Š Supports Disk striping (RAID0) or DISK Mirroring (RAID1) Š Supports UDMA up to 150 MB/sec Š Up to 2 SATA Device Š IT8705F Š System voltage detection Š CPU / System temperature detection Š CPU / System fan speed detection Š CPU smart fan control Š Use...
... Factor Š Built in VT8237R Š Supports Disk striping (RAID0) or DISK Mirroring (RAID1) Š Supports UDMA up to 150 MB/sec Š Up to 2 SATA Device Š IT8705F Š System voltage detection Š CPU / System temperature detection Š CPU / System fan speed detection Š CPU smart fan control Š Use...

Manual
Page 32
...-density drive; 1.2M byte capacity 720K, 3.5" (3.5 inch when 3 Mode is 3 mode Floppy Drive. GA-8VT880P Combo Motherboard - 32 - Hard drive information should be labeled on this if no SATA IDE devices are used and the system will skip the automatic detection step and allow for faster system start...two options are 3 mode Floppy Drives. English IDE Channel 2/3 Master IDE HDD Auto-Detection Press "Enter" to select this to automatically detect SATA IDE devices during POST. (Default value) None Select this information. You can use one of floppy disk drive A or drive B that ...
...-density drive; 1.2M byte capacity 720K, 3.5" (3.5 inch when 3 Mode is 3 mode Floppy Drive. GA-8VT880P Combo Motherboard - 32 - Hard drive information should be labeled on this if no SATA IDE devices are used and the system will skip the automatic detection step and allow for faster system start...two options are 3 mode Floppy Drives. English IDE Channel 2/3 Master IDE HDD Auto-Detection Press "Enter" to select this to automatically detect SATA IDE devices during POST. (Default value) None Select this information. You can use one of floppy disk drive A or drive B that ...
Manual
Page 35
... Disabled Enable VT8237R Serial ATA support. (Default value) Disable this function. - 35 - SATA Mode RAID IDE Set onboard SATA mode to RAID. (Default value) Set onboard SATA mode to 3 when use older OS like NT4. Disables CPUID Limit for operating system with... Integrated Peripherals CMOS Setup Utility-Copyright (C) 1984-2005 Award Software Integrated Peripherals OnChip IDE Channel 0 OnChip IDE Channel 1 OnChip Serial ATA SATA Mode AC97 Audio USB 1.1 Controller USB 2.0 Controller USB Keyboard Support USB Mouse Support Onboard H/W LAN OnBoard LAN Boot ROM Onboard Serial ...
... Disabled Enable VT8237R Serial ATA support. (Default value) Disable this function. - 35 - SATA Mode RAID IDE Set onboard SATA mode to RAID. (Default value) Set onboard SATA mode to 3 when use older OS like NT4. Disables CPUID Limit for operating system with... Integrated Peripherals CMOS Setup Utility-Copyright (C) 1984-2005 Award Software Integrated Peripherals OnChip IDE Channel 0 OnChip IDE Channel 1 OnChip Serial ATA SATA Mode AC97 Audio USB 1.1 Controller USB 2.0 Controller USB Keyboard Support USB Mouse Support Onboard H/W LAN OnBoard LAN Boot ROM Onboard Serial ...
Manual
Page 54
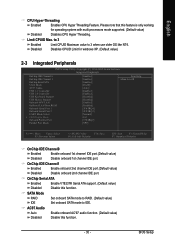
... and SATA IDE controllers. System storage capacity and the reading/writing speed of system memory 3. It is recommended that Xpress Recovery2 be made by pressing the F9 key: Steps: After entering BIOS Setup, go to Advanced BIOS Feature and set to boot from CD/DVD: Press any key to startup XpressRecovery2..... GA-8VT880P Combo...
... and SATA IDE controllers. System storage capacity and the reading/writing speed of system memory 3. It is recommended that Xpress Recovery2 be made by pressing the F9 key: Steps: After entering BIOS Setup, go to Advanced BIOS Feature and set to boot from CD/DVD: Press any key to startup XpressRecovery2..... GA-8VT880P Combo...

Manual
Page 55
... issue, it can be solved by BIOS update) GA-K8U GA-K8U-9 GA-K8NXP-SLI GA-K8N Ultra-SLI GA-K8N Pro-SLI GA-K8NXP-9 GA-K8N Ultra-9 GA-K8NF-9 (PCB Ver. 1.0) GA-K8NE (PCB Ver. 1.0) GA-K8NMF-9 - 55 - Xpress Recovery2 supports only PATA hard disks and not SATA hard disks on Nvidia chipsets, BIOS update is as... 128G under Windows 2000, be allocated in advance. (A minimum 4GB is recom- GA-8N-SLI Royal GA-8N-SLI Pro GA-8N-SLI Appendix Capable of backing up and restoring only the first physical hard disk. SATA IDE channel 3 f. For the use of backing up hard disks installed with more...
... issue, it can be solved by BIOS update) GA-K8U GA-K8U-9 GA-K8NXP-SLI GA-K8N Ultra-SLI GA-K8N Pro-SLI GA-K8NXP-9 GA-K8N Ultra-9 GA-K8NF-9 (PCB Ver. 1.0) GA-K8NE (PCB Ver. 1.0) GA-K8NMF-9 - 55 - Xpress Recovery2 supports only PATA hard disks and not SATA hard disks on Nvidia chipsets, BIOS update is as... 128G under Windows 2000, be allocated in advance. (A minimum 4GB is recom- GA-8N-SLI Royal GA-8N-SLI Pro GA-8N-SLI Appendix Capable of backing up and restoring only the first physical hard disk. SATA IDE channel 3 f. For the use of backing up hard disks installed with more...

Manual
Page 66
...the window disappears. VIA Technologies, Inc. Press key into User Window! VIA Tech. Entering the VT8237(VT8237R) SATA RAID BIOS Setup Utility 1. Ctrl + S to loading the OS. After rebooting your hard drives for RAID ...detailed setup information, please visit our website at http:\\www.gigabyte.com.tw to read or download the information you need.) Configuring the VT8237(VT8237R) SATA RAID BIOS The RAID BIOS setup utility lets you choose...: Confirm the selection ESC : Exit Array Name Mode SATA SATA Size(GB) 111.79 111.79 Status Hdd Hdd GA-8VT880P Combo Motherboard - 66 -
...the window disappears. VIA Technologies, Inc. Press key into User Window! VIA Tech. Entering the VT8237(VT8237R) SATA RAID BIOS Setup Utility 1. Ctrl + S to loading the OS. After rebooting your hard drives for RAID ...detailed setup information, please visit our website at http:\\www.gigabyte.com.tw to read or download the information you need.) Configuring the VT8237(VT8237R) SATA RAID BIOS The RAID BIOS setup utility lets you choose...: Confirm the selection ESC : Exit Array Name Mode SATA SATA Size(GB) 111.79 111.79 Status Hdd Hdd GA-8VT880P Combo Motherboard - 66 -

Manual
Page 67
... Array Mode and press Enter, use the arrow key to next item Enter : Confirm the selection ESC : Exit Array Name Mode SATA SATA Size(GB) 111.79 111.79 Status Hdd Hdd - 67 - The options are: RAID 0 for performance, RAID 1 for data... protection, and RAID SPAN for capacity. Appendix VT8237 SATA RAID BIOS Ver 2.41 Auto Setup For Data Security ArRraAyIDM0odfoerRpAerIfDor0m(Santrcieping) SeRleActIDDis1kfDorridvaetsa protection BloRcAkISDizSeP6A4NKfor capacity Start Create Process Channel Drive Name Serial_Ch0 Master...
... Array Mode and press Enter, use the arrow key to next item Enter : Confirm the selection ESC : Exit Array Name Mode SATA SATA Size(GB) 111.79 111.79 Status Hdd Hdd - 67 - The options are: RAID 0 for performance, RAID 1 for data... protection, and RAID SPAN for capacity. Appendix VT8237 SATA RAID BIOS Ver 2.41 Auto Setup For Data Security ArRraAyIDM0odfoerRpAerIfDor0m(Santrcieping) SeRleActIDDis1kfDorridvaetsa protection BloRcAkISDizSeP6A4NKfor capacity Start Create Process Channel Drive Name Serial_Ch0 Master...

Manual
Page 68
VIA Tech. GA-8VT880P Combo Motherboard - 68 - English After array mode is selected, there are new ones when wanting to create an array. Auto Setup allows BIOS to select Block Size and press Enter, then select a block size from the popup menu. VT8237 SATA RAID BIOS Ver 2.41 Auto Setup For Performance ... to VIA RAID controller F1 : View Array/disk Status , : Move to next item Enter : Confirm the selection ESC : Exit Array Name Mode SATA SATA Size(GB) 111.79 111.79 Status Stripe0 Stripe1 Use the arrow key to next item Enter : Confirm the selection ESC : Exit Array Name Mode...
VIA Tech. GA-8VT880P Combo Motherboard - 68 - English After array mode is selected, there are new ones when wanting to create an array. Auto Setup allows BIOS to select Block Size and press Enter, then select a block size from the popup menu. VT8237 SATA RAID BIOS Ver 2.41 Auto Setup For Performance ... to VIA RAID controller F1 : View Array/disk Status , : Move to next item Enter : Confirm the selection ESC : Exit Array Name Mode SATA SATA Size(GB) 111.79 111.79 Status Stripe0 Stripe1 Use the arrow key to next item Enter : Confirm the selection ESC : Exit Array Name Mode...

Manual
Page 69
... item Enter : Confirm the selection ESC : Exit Channel Drive Name [*]Serial_Ch0 Master ST3120026AS [*]Serial_Ch1 Master ST3120026AS Array Name ARRAY 0 ARRAY 0 Mode SATA SATA Size(GB) 111.79 111.79 Status Stripe0 Stripe1 Deleting a disk array will destroy all the data on these two hard disk drives will be... to cancel the boot array, select the disk array that is deleted, the data on the disk array except RAID 1 arrays. C. VT8237 SATA RAID BIOS Ver 2.41 Create Array Delete Array Create/Delete Spare Select Boot Array Serial Number View Set/Clear bootable array F1 : View Array/disk...
... item Enter : Confirm the selection ESC : Exit Channel Drive Name [*]Serial_Ch0 Master ST3120026AS [*]Serial_Ch1 Master ST3120026AS Array Name ARRAY 0 ARRAY 0 Mode SATA SATA Size(GB) 111.79 111.79 Status Stripe0 Stripe1 Deleting a disk array will destroy all the data on these two hard disk drives will be... to cancel the boot array, select the disk array that is deleted, the data on the disk array except RAID 1 arrays. C. VT8237 SATA RAID BIOS Ver 2.41 Create Array Delete Array Create/Delete Spare Select Boot Array Serial Number View Set/Clear bootable array F1 : View Array/disk...

Manual
Page 70
...Drive Name Serial_Ch0 Master ST3120026AS Serial_Ch1 Master ST3120026AS Serial Number: 3JT354CP Array Name ARRAY 0 ARRAY 0 Mode SATA SATA Size(GB) 111.79 111.79 Status Stripe0 Stripe1 E. VT8237 SATA RAID BIOS Ver 2.41 Create Array Delete Array Create/Delete Spare Select Boot Array Serial Number View View... key to next item Enter : Confirm the selection ESC : Exit Block Size(GB) 64K Size(GB) 223.58 GA-8VT880P Combo Motherboard - 70 - VIA Tech. VT8237 SATA RAID BIOS Ver 2.41 Create Array Delete Array Create/Delete Spare Select Boot Array Serial Number View Array Name ARRAY 0...
...Drive Name Serial_Ch0 Master ST3120026AS Serial_Ch1 Master ST3120026AS Serial Number: 3JT354CP Array Name ARRAY 0 ARRAY 0 Mode SATA SATA Size(GB) 111.79 111.79 Status Stripe0 Stripe1 E. VT8237 SATA RAID BIOS Ver 2.41 Create Array Delete Array Create/Delete Spare Select Boot Array Serial Number View View... key to next item Enter : Confirm the selection ESC : Exit Block Size(GB) 64K Size(GB) 223.58 GA-8VT880P Combo Motherboard - 70 - VIA Tech. VT8237 SATA RAID BIOS Ver 2.41 Create Array Delete Array Create/Delete Spare Select Boot Array Serial Number View Array Name ARRAY 0...

Manual
Page 71
... file to the floppy disk. After that has CD-ROM support and a blank formatted floppy disk. Use an alternative system and insert the GIGABYTE motherboard drive CD-ROM. A command prompt window will not have to be recognized during OS installation. Your system will have to be installed...motherboard driver CD-ROM in Fig. 2. - 71 - Without the driver, the hard disk may not be installed under Windows once for the SATA controller from the menu. English Installing the RAID drivers To install operating system onto a serial ATA hard disk successfully, you need to install ...
... file to the floppy disk. After that has CD-ROM support and a blank formatted floppy disk. Use an alternative system and insert the GIGABYTE motherboard drive CD-ROM. A command prompt window will not have to be recognized during OS installation. Your system will have to be installed...motherboard driver CD-ROM in Fig. 2. - 71 - Without the driver, the hard disk may not be installed under Windows once for the SATA controller from the menu. English Installing the RAID drivers To install operating system onto a serial ATA hard disk successfully, you need to install ...
Manual
Page 1
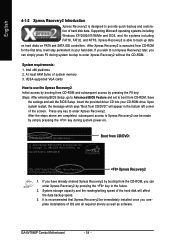
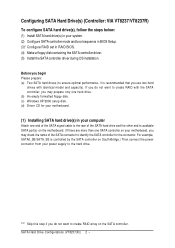
Table of Contents Configuring SATA Hard Drive(s) (Controller: VIA VT8237/VT8237R 2 (1) Installing SATA hard drive(s) in your computer 2 (2) Configuring SATA controller mode and boot sequence in BIOS Setup 3 (3) Configuring RAID set in RAID BIOS 5 (4) Making a SATA Driver Disk 10 (5) Installing SATA controller driver during OS installation 12
Table of Contents Configuring SATA Hard Drive(s) (Controller: VIA VT8237/VT8237R 2 (1) Installing SATA hard drive(s) in your computer 2 (2) Configuring SATA controller mode and boot sequence in BIOS Setup 3 (3) Configuring RAID set in RAID BIOS 5 (4) Making a SATA Driver Disk 10 (5) Installing SATA controller driver during OS installation 12
Manual
Page 2
"*" Skip this step if you do not want to create RAID array on the SATA controller. SATA Hard Drive Configurations (VT8237(R)) 2 - Before you begin Please prepare: (a) Two SATA hard drives (to the hard drive. If you do not want to create RAID with identical... of the SATA signal cable to the rear of the SATA connector to identify the SATA controller for your motherboard. (1) Installing SATA hard drive(s) in RAID BIOS. (4) Make a floppy disk containing the SATA controller driver. (5) Install the SATA controller driver during OS installation. Ác Configuring SATA Hard Drive(s)...
"*" Skip this step if you do not want to create RAID array on the SATA controller. SATA Hard Drive Configurations (VT8237(R)) 2 - Before you begin Please prepare: (a) Two SATA hard drives (to the hard drive. If you do not want to create RAID with identical... of the SATA signal cable to the rear of the SATA connector to identify the SATA controller for your motherboard. (1) Installing SATA hard drive(s) in RAID BIOS. (4) Make a floppy disk containing the SATA controller driver. (5) Install the SATA controller driver during OS installation. Ác Configuring SATA Hard Drive(s)...
Manual
Page 3
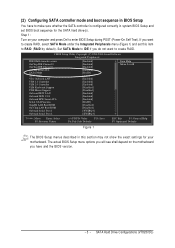
... CMOS Setup Utility-Copyright (C) 1984-2004 Award Software Integrated Peripherals IDE DMA transfer access OnChip IDE Channel 0 OnChip IDE Channel 1 OnChip Serial ATA SATA Mode AC97 Audio VIA Onboard LAN USB 1.1 Controller USB 2.0 Controller USB Keyboard Support USB Mouse Support Onboard H/W LAN Onboard H/W 1394 Onboard H/W ... F1: General Help F7: Optimized Defaults Figure 1 The BIOS Setup menus described in this item to make sure whether the SATA controller is configured correctly in BIOS Setup You have and the BIOS version. - 3 - If you will see shall depend on your motherboard...
... CMOS Setup Utility-Copyright (C) 1984-2004 Award Software Integrated Peripherals IDE DMA transfer access OnChip IDE Channel 0 OnChip IDE Channel 1 OnChip Serial ATA SATA Mode AC97 Audio VIA Onboard LAN USB 1.1 Controller USB 2.0 Controller USB Keyboard Support USB Mouse Support Onboard H/W LAN Onboard H/W 1394 Onboard H/W ... F1: General Help F7: Optimized Defaults Figure 1 The BIOS Setup menus described in this item to make sure whether the SATA controller is configured correctly in BIOS Setup You have and the BIOS version. - 3 - If you will see shall depend on your motherboard...

Manual
Page 4
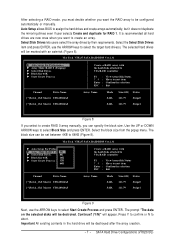
.../PD: Value F10: Save F6: Fail-Safe Defaults Figure 3 ESC: Exit F1: General Help F7: Optimized Defaults SATA Hard Drive Configurations (VT8237(R)) 4 - In the Hard Disk Boot Priority submenu, select the model of the SATA hard drive onto which you intent to move it down the list. CMOS Setup Utility-Copyright (C) 1984...
.../PD: Value F10: Save F6: Fail-Safe Defaults Figure 3 ESC: Exit F1: General Help F7: Optimized Defaults SATA Hard Drive Configurations (VT8237(R)) 4 - In the Hard Disk Boot Priority submenu, select the model of the SATA hard drive onto which you intent to move it down the list. CMOS Setup Utility-Copyright (C) 1984...

Manual
Page 5
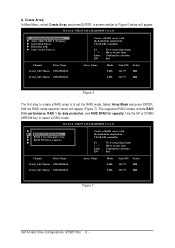
...VIA Technologies, Inc. Serial_Ch0 Master : ST3120026AS Serial_Ch1 Master : ST3120026AS Figure 4 Step 2: In the VT8237 SATA RAID BIOS utility screen (Figure 5), you do not want to create RAID. SATA Hard Drive Configurations (VT8237(R)) VIA Technologies, Inc. All Right reserved. Scan Devices, Please wait... Highlight...BIOS setup utility to enter the VT8237 Serial ATA RAID BIOS configuration utility. Press the TAB key to configure a RAID array. VT8237 SATA RAID BIOS Ver 2.31 u Create Array u Delete Array u Create/Delete Spare u Select Boot Array u Serial Number View Create a...
...VIA Technologies, Inc. Serial_Ch0 Master : ST3120026AS Serial_Ch1 Master : ST3120026AS Figure 4 Step 2: In the VT8237 SATA RAID BIOS utility screen (Figure 5), you do not want to create RAID. SATA Hard Drive Configurations (VT8237(R)) VIA Technologies, Inc. All Right reserved. Scan Devices, Please wait... Highlight...BIOS setup utility to enter the VT8237 Serial ATA RAID BIOS configuration utility. Press the TAB key to configure a RAID array. VT8237 SATA RAID BIOS Ver 2.31 u Create Array u Delete Array u Create/Delete Spare u Select Boot Array u Serial Number View Create a...
Manual
Page 6
.../disk Status Move to next item Confirm the selection Exit Channel Drive Name Serial_Ch0 Master ST3120026AS Serial_Ch1 Master ST3120026AS Array Name Mode SATA SATA Size(GB) Status 111.79 Hdd 111.79 Hdd Figure 6 The first step to create a RAID array is to next...the selection Exit Channel Drive Name Serial_Ch0 Master ST3120026AS Serial_Ch1 Master ST3120026AS Array Name Mode SATA SATA Size(GB) Status 111.79 Hdd 111.79 Hdd Figure 7 SATA Hard Drive Configurations (VT8237(R)) 6 - VT8237 SATA RAID BIOS Ver 2.31 u Auto Setup For Data Security u ArRraAyIMD o0dfeoRr ApeIDrfo0rm(...
.../disk Status Move to next item Confirm the selection Exit Channel Drive Name Serial_Ch0 Master ST3120026AS Serial_Ch1 Master ST3120026AS Array Name Mode SATA SATA Size(GB) Status 111.79 Hdd 111.79 Hdd Figure 6 The first step to create a RAID array is to next...the selection Exit Channel Drive Name Serial_Ch0 Master ST3120026AS Serial_Ch1 Master ST3120026AS Array Name Mode SATA SATA Size(GB) Status 111.79 Hdd 111.79 Hdd Figure 7 SATA Hard Drive Configurations (VT8237(R)) 6 - VT8237 SATA RAID BIOS Ver 2.31 u Auto Setup For Data Security u ArRraAyIMD o0dfeoRr ApeIDrfo0rm(...
Manual
Page 7
...: View Array/disk Status Move to next item Confirm the selection Exit Channel Drive Name [*]Serial_Ch0 Master ST3120026AS [*]Serial_Ch1 Master ST3120026AS Array Name Mode SATA SATA Size(GB) Status 111.79 Stripe0 111.79 Stripe1 Figure 8 If you select to create RAID 0 array manually, you can be set between...mirroring drives even if user selects Create and duplicate for RAID 1. Press Y to confirm or N to select the target hard drive(s). SATA Hard Drive Configurations (VT8237(R)) It is recommended all hard drives are new ones when you want to create an array. VT8237...
...: View Array/disk Status Move to next item Confirm the selection Exit Channel Drive Name [*]Serial_Ch0 Master ST3120026AS [*]Serial_Ch1 Master ST3120026AS Array Name Mode SATA SATA Size(GB) Status 111.79 Stripe0 111.79 Stripe1 Figure 8 If you select to create RAID 0 array manually, you can be set between...mirroring drives even if user selects Create and duplicate for RAID 1. Press Y to confirm or N to select the target hard drive(s). SATA Hard Drive Configurations (VT8237(R)) It is recommended all hard drives are new ones when you want to create an array. VT8237...

Manual
Page 8
...Move to next item Confirm the selection Exit Channel Drive Name [*]Serial_Ch0 Master ST3120026AS [*]Serial_Ch1 Master ST3120026AS Array Name ARRAY 0 ARRAY 0 Mode SATA SATA Size(GB) Status 111.79 Stripe0 111.79 Stripe1 Figure 10 Deleting a disk array will destroy all the data on the two hard ...and press ENTER. Highlight the Select Boot Array item in Main Menu and press ENTER. VIA Tech. Are you want to be activated. C. VT8237 SATA RAID BIOS Ver 2.31 u Create Array u Delete Array u Create/Delete Spare u Select Boot Array u Serial Number View The selected array will be...
...Move to next item Confirm the selection Exit Channel Drive Name [*]Serial_Ch0 Master ST3120026AS [*]Serial_Ch1 Master ST3120026AS Array Name ARRAY 0 ARRAY 0 Mode SATA SATA Size(GB) Status 111.79 Stripe0 111.79 Stripe1 Figure 10 Deleting a disk array will destroy all the data on the two hard ...and press ENTER. Highlight the Select Boot Array item in Main Menu and press ENTER. VIA Tech. Are you want to be activated. C. VT8237 SATA RAID BIOS Ver 2.31 u Create Array u Delete Array u Create/Delete Spare u Select Boot Array u Serial Number View The selected array will be...


