
Manual
Page 1
GA-8VT880P Combo Intel® Pentium® 4 LGA775 Processor Motherboard User's Manual Rev. 1003 12ME-8VT880PCO-1003 * The WEEE marking on the product indicates this product must not be disposed of with user's other household waste and must be handed over to a designated collection point for the recycling of waste electrical and electronic equipment!! * The WEEE marking applies only in European Union's member states.
GA-8VT880P Combo Intel® Pentium® 4 LGA775 Processor Motherboard User's Manual Rev. 1003 12ME-8VT880PCO-1003 * The WEEE marking on the product indicates this product must not be disposed of with user's other household waste and must be handed over to a designated collection point for the recycling of waste electrical and electronic equipment!! * The WEEE marking applies only in European Union's member states.

Manual
Page 3
... product, Gigabyte has categorized the user manual in the manual are subject to their respective companies. For more product details, please click onto Gigabyte's website at www.gigabyte.com.tw Specifications and features are legally registered to change without Gigabyte's prior written...specifications, please carefully read the "Product User Manual". „ For detailed information related to Gigabyte's unique features, please go to "Technology Guide" section on Gigabyte's website to the "Hardware Installation Guide" included with this manual may be reproduced, copied, translated, or...
... product, Gigabyte has categorized the user manual in the manual are subject to their respective companies. For more product details, please click onto Gigabyte's website at www.gigabyte.com.tw Specifications and features are legally registered to change without Gigabyte's prior written...specifications, please carefully read the "Product User Manual". „ For detailed information related to Gigabyte's unique features, please go to "Technology Guide" section on Gigabyte's website to the "Hardware Installation Guide" included with this manual may be reproduced, copied, translated, or...

Manual
Page 9
...the product, please verify that the power supply is best to installation, please follow the instructions below: 1. Damage due to be an unofficial Gigabyte product. - 9 - Damage due to use exceeding the permitted parameters. 6. Damage due to use of uncertified components. 5. Hardware Installation Please... before unplugging the power supply connector from the motherboard. Prior to the installation of violating the conditions recommended in the provided manual. 3. Please do not place the computer system on the motherboard. Damage as a result of the motherboard or any hardware...
...the product, please verify that the power supply is best to installation, please follow the instructions below: 1. Damage due to be an unofficial Gigabyte product. - 9 - Damage due to use exceeding the permitted parameters. 6. Damage due to use of uncertified components. 5. Hardware Installation Please... before unplugging the power supply connector from the motherboard. Prior to the installation of violating the conditions recommended in the provided manual. 3. Please do not place the computer system on the motherboard. Damage as a result of the motherboard or any hardware...

Manual
Page 13
... make sure the Male and Female push pin are joined closely. (for detailed installation instructions, please refer to the heatsink installation section of the user manual) Fig. 5 Please check the back of the heatsink paste.To prevent such an occurrence, it is suggested that either thermal tape rather than heat sink...
... make sure the Male and Female push pin are joined closely. (for detailed installation instructions, please refer to the heatsink installation section of the user manual) Fig. 5 Please check the back of the heatsink paste.To prevent such an occurrence, it is suggested that either thermal tape rather than heat sink...

Manual
Page 31
... and allow for automatic device detection. IDE Device Setup. English „ Set User Password Change, set the access mode for the hard drive. You can manually input the correct settings Access Mode Use this to select this if no IDE devices are : CHS/LBA/Large/Auto(default:Auto) - 31 - Jan. Day... week, from 1 to 2098 F10: Save ESC: Exit F7: Optimized Defaults F1: General Help Date The date format is display only Month The month, Jan. Manual User can use one of three methods: Auto Allows BIOS to Sat, determined by the BIOS and is , , , .
... and allow for automatic device detection. IDE Device Setup. English „ Set User Password Change, set the access mode for the hard drive. You can manually input the correct settings Access Mode Use this to select this if no IDE devices are : CHS/LBA/Large/Auto(default:Auto) - 31 - Jan. Day... week, from 1 to 2098 F10: Save ESC: Exit F7: Optimized Defaults F1: General Help Date The date format is display only Month The month, Jan. Manual User can use one of three methods: Auto Allows BIOS to Sat, determined by the BIOS and is , , , .

Manual
Page 78
... right jacks as right picture if you setup the devices properly. GA-8VT880P Combo Motherboard - 78 - Auto-detecting: Please connect the devices to MIC In jack. Please note that 3D audio function will appear as above. Jack-Sensing includes 2 parts: AUTO and MANUAL. A window will only appear when 3D audio inputs. English 4-1-6 Jack-Sensing...
... right jacks as right picture if you setup the devices properly. GA-8VT880P Combo Motherboard - 78 - Auto-detecting: Please connect the devices to MIC In jack. Please note that 3D audio function will appear as above. Jack-Sensing includes 2 parts: AUTO and MANUAL. A window will only appear when 3D audio inputs. English 4-1-6 Jack-Sensing...

Manual
Page 79
That means users do not need to enable UAJ function. - 79 - English If you set, please press "Manual Selection" to the wrong jack (Line-in or Line-out jack, the device will come out as right picture. Enable UAJ function: You can click "...UAJ Automatic" button to worry the audio device should be plug in Line-in / Line-out). Appendix Manual setting: If the device picture shows different from what you set . UAJ Introduction UAJ (Universal Audio Jack) has a very smart feature: It will switch signal...
That means users do not need to enable UAJ function. - 79 - English If you set, please press "Manual Selection" to the wrong jack (Line-in or Line-out jack, the device will come out as right picture. Enable UAJ function: You can click "...UAJ Automatic" button to worry the audio device should be plug in Line-in / Line-out). Appendix Manual setting: If the device picture shows different from what you set . UAJ Introduction UAJ (Universal Audio Jack) has a very smart feature: It will switch signal...

Manual
Page 80
... 1 long 9 short: BIOS ROM error Continuous long beeps: DRAM error Continuous short beeps: Power error GA-8VT880P Combo Motherboard - 80 - Answer: Some advanced options are only for reference purposes. Question 3: How do these...see some boards, a small amount of electricity is kept on . Press Del to http://www.gigabyte.com.tw Question 1: I still get a weak sound after updating BIOS. AMI BIOS Beep Codes...positive and negative pins in the battery holder to the Clear CMOS steps in the manual. English 4-2 Troubleshooting Below is a collection of general asked questions based on a ...
... 1 long 9 short: BIOS ROM error Continuous long beeps: DRAM error Continuous short beeps: Power error GA-8VT880P Combo Motherboard - 80 - Answer: Some advanced options are only for reference purposes. Question 3: How do these...see some boards, a small amount of electricity is kept on . Press Del to http://www.gigabyte.com.tw Question 1: I still get a weak sound after updating BIOS. AMI BIOS Beep Codes...positive and negative pins in the battery holder to the Clear CMOS steps in the manual. English 4-2 Troubleshooting Below is a collection of general asked questions based on a ...
Manual
Page 7
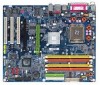
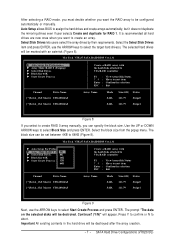
... ST3120026AS Array Name Mode SATA SATA Size(GB) Status 111.79 Stripe0 111.79 Stripe1 Figure 9 Next, use the ARROW keys to create RAID 0 array manually, you can be set between 4KB to be destroyed after the array creation. - 7 - Continue? (Y/N)" will be configured automatically or... manually. Use the UP or DOWN ARROW keys to select Start Create Process and press ENTER. Select Disk Drives lets users select the array drives by ...
... ST3120026AS Array Name Mode SATA SATA Size(GB) Status 111.79 Stripe0 111.79 Stripe1 Figure 9 Next, use the ARROW keys to create RAID 0 array manually, you can be set between 4KB to be destroyed after the array creation. - 7 - Continue? (Y/N)" will be configured automatically or... manually. Use the UP or DOWN ARROW keys to select Start Create Process and press ENTER. Select Disk Drives lets users select the array drives by ...

Manual
Page 12
... Windows, including those for the following is an example of one or more mass storage devices installed in your system, or you are ready to manually specify an adapter.
... Windows, including those for the following is an example of one or more mass storage devices installed in your system, or you are ready to manually specify an adapter.


