
Manual
Page 4
Table of Contents GA-8VT880P Combo Motherboard Layout 6 Block Diagram ...7 Chapter 1 Hardware Installation 9 1-1 Considerations Prior to Installation 9 1-2 Feature Summary 10 1-3 Installation of the CPU and Heatsink 12 1-3-1 Installation of the CPU 12 1-3-2 Installation of the Heatsink 13 1-4 Installation of Memory 14 1-5 Installation of Expansion Cards 16 1-5-1 Recommended PCI Express x 16 graphics cards for the GA-8VT880 Combo17...
Table of Contents GA-8VT880P Combo Motherboard Layout 6 Block Diagram ...7 Chapter 1 Hardware Installation 9 1-1 Considerations Prior to Installation 9 1-2 Feature Summary 10 1-3 Installation of the CPU and Heatsink 12 1-3-1 Installation of the CPU 12 1-3-2 Installation of the Heatsink 13 1-4 Installation of Memory 14 1-5 Installation of Expansion Cards 16 1-5-1 Recommended PCI Express x 16 graphics cards for the GA-8VT880 Combo17...

Manual
Page 9
... determined to installation, please follow the instructions below: 1. Prior to wear an electrostatic discharge (ESD) cuff when handling electronic components (CPU, RAM). 4. Before using the product, please verify that the power supply is best to the installation of uncertified components. 5. When...Installation These stickers are connected. 4. Damage as physical harm to come in the user manual. 3. Thus, prior to be an unofficial Gigabyte product. - 9 - It is switched off the computer and unplug its components. 5. Prior to the use exceeding the permitted parameters. ...
... determined to installation, please follow the instructions below: 1. Prior to wear an electrostatic discharge (ESD) cuff when handling electronic components (CPU, RAM). 4. Before using the product, please verify that the power supply is best to the installation of uncertified components. 5. When...Installation These stickers are connected. 4. Damage as physical harm to come in the user manual. 3. Thus, prior to be an unofficial Gigabyte product. - 9 - It is switched off the computer and unplug its components. 5. Prior to the use exceeding the permitted parameters. ...

Manual
Page 10
... IDE Connections FDD Connections Onboard SATA Peripherals Onboard LAN Onboard Audio Š Supports the latest Intel® Pentium® 4 LGA775 CPU Š Supports 800/533MHz FSB Š L2 cache varies with CPU Š Northbridge: VIA PT880 Pro Chipset Š Southbridge: VIA 8237R Š 2 DDR DIMM memory slots (supports up to 2GB memory... chipset's limitation, the PCI Express x16 slots work at the bandwidth of PCI Express x4. (Note 2) It is recommended to use SATA (1.5Gb/s) hard disks. GA-8VT880P Combo Motherboard - 10 -
... IDE Connections FDD Connections Onboard SATA Peripherals Onboard LAN Onboard Audio Š Supports the latest Intel® Pentium® 4 LGA775 CPU Š Supports 800/533MHz FSB Š L2 cache varies with CPU Š Northbridge: VIA PT880 Pro Chipset Š Southbridge: VIA 8237R Š 2 DDR DIMM memory slots (supports up to 2GB memory... chipset's limitation, the PCI Express x16 slots work at the bandwidth of PCI Express x4. (Note 2) It is recommended to use SATA (1.5Gb/s) hard disks. GA-8VT880P Combo Motherboard - 10 -

Manual
Page 11
...) Š Supports UDMA up to 150 MB/sec Š Up to 2 SATA Device Š IT8705F Š System voltage detection Š CPU / System temperature detection Š CPU / System fan speed detection Š CPU smart fan control Š Use of licensed AWARD BIOS Š Supports Q-Flash Š Supports @BIOS Š Supports EasyTune (only supports Hardware...
...) Š Supports UDMA up to 150 MB/sec Š Up to 2 SATA Device Š IT8705F Š System voltage detection Š CPU / System temperature detection Š CPU / System fan speed detection Š CPU smart fan control Š Use of licensed AWARD BIOS Š Supports Q-Flash Š Supports @BIOS Š Supports EasyTune (only supports Hardware...

Manual
Page 12
... functionality requirement content : Enabling the functionality of Hyper-Threading Technology for HT Technology 1-3-1 Installation of the CPU Metal Lever Fig. 1 Gently lift the metal lever located on the CPU prior to the CPU during installation.) GA-8VT880P Combo Motherboard - 12 - CPU: An Intel® Pentium 4 Processor with HT Technology - Fig. 3 Notice the small gold colored triangle located...
... functionality requirement content : Enabling the functionality of Hyper-Threading Technology for HT Technology 1-3-1 Installation of the CPU Metal Lever Fig. 1 Gently lift the metal lever located on the CPU prior to the CPU during installation.) GA-8VT880P Combo Motherboard - 12 - CPU: An Intel® Pentium 4 Processor with HT Technology - Fig. 3 Notice the small gold colored triangle located...

Manual
Page 13
... inserted as a result of hardening of the heatsink to install.) Please note the direction of the installed CPU. Fig. 2 (Turning the push pin along the direction of arrow is to remove the heatsink, on the contrary, is to the CPU fan header located on the motherboard. The heatsink may adhere to the... the picture, the installation is only for Intel boxed fan) Fig. 3 Place the heatsink atop the CPU and make sure the Male and Female push pin are joined closely. (for heat dissipation or using extreme care when removing the heatsink. - 13 - Fig. 4 ...
... inserted as a result of hardening of the heatsink to install.) Please note the direction of the installed CPU. Fig. 2 (Turning the push pin along the direction of arrow is to remove the heatsink, on the contrary, is to the CPU fan header located on the motherboard. The heatsink may adhere to the... the picture, the installation is only for Intel boxed fan) Fig. 3 Place the heatsink atop the CPU and make sure the Male and Female push pin are joined closely. (for heat dissipation or using extreme care when removing the heatsink. - 13 - Fig. 4 ...

Manual
Page 20
... do not remove it. Before connecting the power connector, please make sure that is able to the CPU. It is recommended that a power supply that is unable to start . Definition 1 GND 3 4 2 GND 1 2 3 +12V 4 +12V GA-8VT880P Combo Motherboard 12 1 - 20 - Caution! Please use a 24-pin ATX power supply, please remove the small cover on...
... do not remove it. Before connecting the power connector, please make sure that is able to the CPU. It is recommended that a power supply that is unable to start . Definition 1 GND 3 4 2 GND 1 2 3 +12V 4 +12V GA-8VT880P Combo Motherboard 12 1 - 20 - Caution! Please use a 24-pin ATX power supply, please remove the small cover on...

Manual
Page 21
... FDD connector is the ground wire (GND). Most coolers are : 360KB, 720KB, 1.2MB, 1.44MB and 2.88MB. Please remember to connect the power to the CPU fan to prevent CPU overheating and failure. 1 CPU_FAN 1 SYS_FAN Pin No. 1 2 3 4 Definition GND +12V Sense Speed Control (Only for CPU_FAN) power connector and possesses a foolproof connection design...
... FDD connector is the ground wire (GND). Most coolers are : 360KB, 720KB, 1.2MB, 1.44MB and 2.88MB. Please remember to connect the power to the CPU fan to prevent CPU overheating and failure. 1 CPU_FAN 1 SYS_FAN Pin No. 1 2 3 4 Definition GND +12V Sense Speed Control (Only for CPU_FAN) power connector and possesses a foolproof connection design...
Manual
Page 30
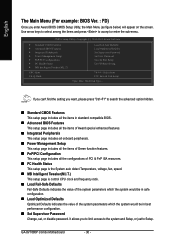
...132; PnP/PCI Configuration This setup page includes all the configurations of PCI & PnP ISA resources. „ PC Health Status This setup page is control CPU clock and frequency ratio. „ Load Fail-Safe Defaults Fail-Safe Defaults indicates the value of the system parameters which the system would be in... password. If you can't find the setting you to limit access to the system and Setup, or just to accept or enter the sub-menu. GA-8VT880P Combo Motherboard - 30 - English The Main Menu (For example: BIOS Ver. : FD) Once you enter Award BIOS CMOS Setup Utility, the Main Menu (as ...
...132; PnP/PCI Configuration This setup page includes all the configurations of PCI & PnP ISA resources. „ PC Health Status This setup page is control CPU clock and frequency ratio. „ Load Fail-Safe Defaults Fail-Safe Defaults indicates the value of the system parameters which the system would be in... password. If you can't find the setting you to limit access to the system and Setup, or just to accept or enter the sub-menu. GA-8VT880P Combo Motherboard - 30 - English The Main Menu (For example: BIOS Ver. : FD) Once you enter Award BIOS CMOS Setup Utility, the Main Menu (as ...

Manual
Page 33
Base Memory The POST of the BIOS will determine the amount of base (or conventional) memory installed in the CPU's memory address map. Total Memory This item displays the memory size that may be detected and you will not stop for a keyboard or disk error; ...
Base Memory The POST of the BIOS will determine the amount of base (or conventional) memory installed in the CPU's memory address map. Total Memory This item displays the memory size that may be detected and you will not stop for a keyboard or disk error; ...

Manual
Page 34
... Select your boot device priority by CDROM. ZIP Select your boot device priority by ZIP. USB-HDD Select your boot device priority by USB-HDD. GA-8VT880P Combo Motherboard - 34 - Use < > or < > to select a device, then press to move it up when you want to cancel the setting ... (C) 1984-2005 Award Software Advanced BIOS Features X Hard Disk Boot Priority First Boot Device Second Boot Device Third Boot Device Password Check # CPU Hyper-Threading Limit CPUID Max. USB-ZIP Select your boot device priority by USB-ZIP. Legacy LAN Select your boot device priority by Legacy...
... Select your boot device priority by CDROM. ZIP Select your boot device priority by ZIP. USB-HDD Select your boot device priority by USB-HDD. GA-8VT880P Combo Motherboard - 34 - Use < > or < > to select a device, then press to move it up when you want to cancel the setting ... (C) 1984-2005 Award Software Advanced BIOS Features X Hard Disk Boot Priority First Boot Device Second Boot Device Third Boot Device Password Check # CPU Hyper-Threading Limit CPUID Max. USB-ZIP Select your boot device priority by USB-ZIP. Legacy LAN Select your boot device priority by Legacy...
Manual
Page 35
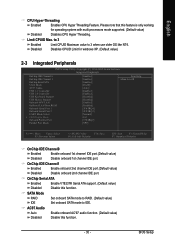
...Enable VT8237R Serial ATA support. (Default value) Disable this function. - 35 - Disables CPUID Limit for operating system with multi processors mode supported. (Default value) Disables CPU Hyper Threading. OnChip IDE Channel1 Enabled Enable onboard 2nd channel IDE port.(Default value) Disabled Disable onboard 2nd channel IDE port. AC97 Audio Auto Enable... onboard 1st channel IDE port.(Default value) Disabled Disable onboard 1st channel IDE port. to 3 Enabled Disabled Limit CPUID Maximum value to IDE. English CPU Hyper-Threading Enabled Enables CPU Hyper Threading Feature.
...Enable VT8237R Serial ATA support. (Default value) Disable this function. - 35 - Disables CPUID Limit for operating system with multi processors mode supported. (Default value) Disables CPU Hyper Threading. OnChip IDE Channel1 Enabled Enable onboard 2nd channel IDE port.(Default value) Disabled Disable onboard 2nd channel IDE port. AC97 Audio Auto Enable... onboard 1st channel IDE port.(Default value) Disabled Disable onboard 1st channel IDE port. to 3 Enabled Disabled Limit CPUID Maximum value to IDE. English CPU Hyper-Threading Enabled Enables CPU Hyper Threading Feature.

Manual
Page 41
...2005 Award Software PC Health Status Reset Case Open Status Case Opened Vcore DDR POWER +3.3V +12V Current CPU Temperature Current CPU FAN Speed Current SYSTEM FAN Speed CPU Smart FAN Control CPU Smart FAN Mode [Disabled] No OK OK OK OK 44oC 4687 RPM 0 RPM [Enabled] [Auto]... Clear case open status at different speed depending on their requirements. (Default Value) CPU Smart FAN Mode This option is available only when CPU Smart FAN Control is enabled. Current CPU/SYSTEM FAN Speed (RPM) Detect CPU/SYSTEM Fan speed status automatically. Current Voltage(V) Vcore / DDR POWER / +3.3V ...
...2005 Award Software PC Health Status Reset Case Open Status Case Opened Vcore DDR POWER +3.3V +12V Current CPU Temperature Current CPU FAN Speed Current SYSTEM FAN Speed CPU Smart FAN Control CPU Smart FAN Mode [Disabled] No OK OK OK OK 44oC 4687 RPM 0 RPM [Enabled] [Auto]... Clear case open status at different speed depending on their requirements. (Default Value) CPU Smart FAN Mode This option is available only when CPU Smart FAN Control is enabled. Current CPU/SYSTEM FAN Speed (RPM) Detect CPU/SYSTEM Fan speed status automatically. Current Voltage(V) Vcore / DDR POWER / +3.3V ...

Manual
Page 42
... restart, please wait 20secs. C.I .A. Incorrectly using these features may damage your system broken. for CPU fans with a 4-pin fan power cable. GA-8VT880P Combo Motherboard - 42 - Frequency (Mhz) x Fixed AGP/PCI Frequency AGP/PCI Frequency DRAM Clock CPU Voltage Control Normal CPU Vcore AGP Voltage Control DDR Voltage Control [16X] [Disabled] 200MHz [Disabled] Cruise Disabled 66...
... restart, please wait 20secs. C.I .A. Incorrectly using these features may damage your system broken. for CPU fans with a 4-pin fan power cable. GA-8VT880P Combo Motherboard - 42 - Frequency (Mhz) x Fixed AGP/PCI Frequency AGP/PCI Frequency DRAM Clock CPU Voltage Control Normal CPU Vcore AGP Voltage Control DDR Voltage Control [16X] [Disabled] 200MHz [Disabled] Cruise Disabled 66...

Manual
Page 43
... AGP/PCI Frequency (Mhz) The values depend on system components. BIOS Setup to Turbo. (Automatically increase CPU frequency(10%) by CPU loading. to Sports. (Automatically increase CPU frequency(5%) by CPU loading. DRAM Clock (MHz) Please set "DRAM Clock(MHz)" to "200-DDR400". If you use.... If you use only! Incorrect using it may be available when "CPU Host Clock Control" is over-voltage. CPU Voltage Control Supports adjustable CPU Vcore from 0.8375V to Enabled. Normal CPU Vcore Display your system broken. AGP Voltage Control Normal Set AGP Voltage Control...
... AGP/PCI Frequency (Mhz) The values depend on system components. BIOS Setup to Turbo. (Automatically increase CPU frequency(10%) by CPU loading. to Sports. (Automatically increase CPU frequency(5%) by CPU loading. DRAM Clock (MHz) Please set "DRAM Clock(MHz)" to "200-DDR400". If you use.... If you use only! Incorrect using it may be available when "CPU Host Clock Control" is over-voltage. CPU Voltage Control Supports adjustable CPU Vcore from 0.8375V to Enabled. Normal CPU Vcore Display your system broken. AGP Voltage Control Normal Set AGP Voltage Control...

Manual
Page 53
... page Enters the PC Health setting page Confirmation and Execution button Toggles between Easy and Advance Mode Display panel of both CPU cooling fan and North-Bridge Chipset cooling fan, 4) PC health for monitoring system status.(Note) User Interface Overview Button ...Introduction EasyTune 5 presents the most convenient Windows based system performance enhancement and manageability utility. Featuring several powerful yet easy to GIGABYTE website Display EasyTuneTM 5 Help file Quit or Minimize EasyTuneTM 5 software (Note) EasyTune 5 functions may vary depending on different motherboards. - 53 ...
... page Enters the PC Health setting page Confirmation and Execution button Toggles between Easy and Advance Mode Display panel of both CPU cooling fan and North-Bridge Chipset cooling fan, 4) PC health for monitoring system status.(Note) User Interface Overview Button ...Introduction EasyTune 5 presents the most convenient Windows based system performance enhancement and manageability utility. Featuring several powerful yet easy to GIGABYTE website Display EasyTuneTM 5 Help file Quit or Minimize EasyTuneTM 5 software (Note) EasyTune 5 functions may vary depending on different motherboards. - 53 ...


