Manual
Page 28
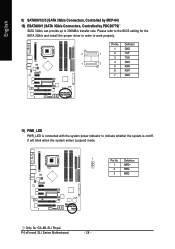
Please refer to work properly. It will blink when the system enters suspend mode. 1 Pin No. Only for the SATA 3Gb/s and install the proper driver in order to the BIOS setting for GA-8N-SLI Royal. Definition 1 GND 7 1 2 TXP 3 TXN 1 7 4 GND 5 RXN 6 RXP 7 GND 11) PWR_LED PWR_LED is connected with the system power indicator to...
Please refer to work properly. It will blink when the system enters suspend mode. 1 Pin No. Only for the SATA 3Gb/s and install the proper driver in order to the BIOS setting for GA-8N-SLI Royal. Definition 1 GND 7 1 2 TXP 3 TXN 1 7 4 GND 5 RXN 6 RXP 7 GND 11) PWR_LED PWR_LED is connected with the system power indicator to...
Manual
Page 63
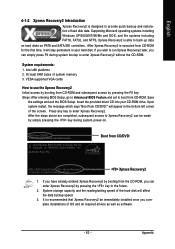
... BIOS Setup, go to Advanced BIOS Feature and set to Xpress Recovery2 can simply press F9 during system power-on PATA and SATA IDE controllers. After Xpress Recovery2 is designed to use the Xpress Recovery2 Initial access by booting from CD-ROM and subsequent access ...backup and restoration of OS and all required drivers as well as software. - 63 - English 4-1-2 Xpress Recovery2 Introduction Xpress Recovery2 is executed from CD-ROM. Save the settings and exit the BIOS Setup. Press any key to back up data on hard disks on . . . GA-8N-SLI Royal F5a . . . . :BIOS...
... BIOS Setup, go to Advanced BIOS Feature and set to Xpress Recovery2 can simply press F9 during system power-on PATA and SATA IDE controllers. After Xpress Recovery2 is designed to use the Xpress Recovery2 Initial access by booting from CD-ROM and subsequent access ...backup and restoration of OS and all required drivers as well as software. - 63 - English 4-1-2 Xpress Recovery2 Introduction Xpress Recovery2 is executed from CD-ROM. Save the settings and exit the BIOS Setup. Press any key to back up data on hard disks on . . . GA-8N-SLI Royal F5a . . . . :BIOS...
Manual
Page 64
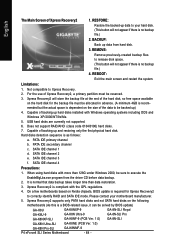
...under Windows 2000, be reserved. 3. Xpress Recovery2 supports only PATA hard disks and not SATA hard disks on the size of backing up data from the driver CD before data backup. 2. REBOOT: Exit the main screen and restart the system....identify RAID and SATA IDE mode. The Main Screen of Xpress Recovery2, a primary partition must be solved by BIOS update) GA-K8U GA-K8NXP-9 GA-8N-SLI Royal GA-K8U-9 GA-K8N Ultra-9 GA-8N-SLI Pro GA-K8NXP-SLI GA-K8NF-9 (PCB Ver. 1.0) GA-8N-SLI GA-K8N Ultra-SLI GA-K8NE (PCB Ver. 1.0) GA-K8N Pro-SLI GA-K8NMF-9 P4 nForce4 SLI Series Motherboard ...
...under Windows 2000, be reserved. 3. Xpress Recovery2 supports only PATA hard disks and not SATA hard disks on the size of backing up data from the driver CD before data backup. 2. REBOOT: Exit the main screen and restart the system....identify RAID and SATA IDE mode. The Main Screen of Xpress Recovery2, a primary partition must be solved by BIOS update) GA-K8U GA-K8NXP-9 GA-8N-SLI Royal GA-K8U-9 GA-K8N Ultra-9 GA-8N-SLI Pro GA-K8NXP-SLI GA-K8NF-9 (PCB Ver. 1.0) GA-8N-SLI GA-K8N Ultra-SLI GA-K8NE (PCB Ver. 1.0) GA-K8N Pro-SLI GA-K8NMF-9 P4 nForce4 SLI Series Motherboard ...

Manual
Page 77
...please visit "Support\ Motherboard\ Technology Guide section" on our website at http:\\www.gigabyte.com.tw to read or download the information you need.) Configuring the Nvidia RAID BIOS...choose the RAID array type and which hard drives you to select Silicon Image). 5) Complete driver installation. 6) Complete RAID utility installation. Entering the RAID BIOS Setup 1. You have a few...Define a New Array - After rebooting your hard drives for RAID construction. IDE, SCSI, or SATA. 3) Enter the motherboard BIOS and locate RAID setup (Please refer to the section on Integrated ...
...please visit "Support\ Motherboard\ Technology Guide section" on our website at http:\\www.gigabyte.com.tw to read or download the information you need.) Configuring the Nvidia RAID BIOS...choose the RAID array type and which hard drives you to select Silicon Image). 5) Complete driver installation. 6) Complete RAID utility installation. Entering the RAID BIOS Setup 1. You have a few...Define a New Array - After rebooting your hard drives for RAID construction. IDE, SCSI, or SATA. 3) Enter the motherboard BIOS and locate RAID setup (Please refer to the section on Integrated ...

Manual
Page 86
... steps, boot from the menu. Use an alternative system and insert the GIGABYTE motherboard driver CD-ROM. Without the driver, the hard disk may not be installed under Windows once for the SATA controller from the startup disk. See the instructions below about how to copy...driver for that in the BootDrv folder. Boot from the motherboard driver CD-ROM to be recognized during OS installation. Once at the A:\> prompt, change to exit when finished. Your system will not have to a floppy disk. After that has CD-ROM support and a blank formatted floppy disk. P4 nForce4 SLI...
... steps, boot from the menu. Use an alternative system and insert the GIGABYTE motherboard driver CD-ROM. Without the driver, the hard disk may not be installed under Windows once for the SATA controller from the startup disk. See the instructions below about how to copy...driver for that in the BootDrv folder. Boot from the motherboard driver CD-ROM to be recognized during OS installation. Once at the A:\> prompt, change to exit when finished. Your system will not have to a floppy disk. After that has CD-ROM support and a blank formatted floppy disk. P4 nForce4 SLI...
Manual
Page 1
Table of Contents Configuring SATA Hard Drive(s) (Controller: nVIDIA nForce4 SLI 2 (1) Installing SATA hard drive(s) in your computer 2 (2) Configuring SATA controller mode and boot sequence in BIOS Setup 2 (3) Configuring RAID set in RAID BIOS 6 (4) Making a SATA controller driver disk 9 (5) Installing SATA controller driver during OS installation 11 (6) Configuring a bootable RAID array with Microsoft Windows 2000 14
Table of Contents Configuring SATA Hard Drive(s) (Controller: nVIDIA nForce4 SLI 2 (1) Installing SATA hard drive(s) in your computer 2 (2) Configuring SATA controller mode and boot sequence in BIOS Setup 2 (3) Configuring RAID set in RAID BIOS 6 (4) Making a SATA controller driver disk 9 (5) Installing SATA controller driver during OS installation 11 (6) Configuring a bootable RAID array with Microsoft Windows 2000 14

Manual
Page 2
...the example in your computer Attach one hard drive. (b) An empty formatted floppy disk. (c) Windows XP/2000 setup disk. (d) Driver CD for the SATA hard drive(s)/RAID array. If you wish to create RAID array, press ENTER on your computer and press Del to ensure optimal...Peripherals menu is enabled (Serial-ATAII1 controls the SATAII0/1 connectors and Serial-ATAII2 controls the SATAII2/3 connectors). SATA Configurations (P4 nForce4 SLI series) - 2 - If there are more than one SATA controller on your motherboard, you use two hard drives with identical model and capacity). "*" Skip this ...
...the example in your computer Attach one hard drive. (b) An empty formatted floppy disk. (c) Windows XP/2000 setup disk. (d) Driver CD for the SATA hard drive(s)/RAID array. If you wish to create RAID array, press ENTER on your computer and press Del to ensure optimal...Peripherals menu is enabled (Serial-ATAII1 controls the SATAII0/1 connectors and Serial-ATAII2 controls the SATAII2/3 connectors). SATA Configurations (P4 nForce4 SLI series) - 2 - If there are more than one SATA controller on your motherboard, you use two hard drives with identical model and capacity). "*" Skip this ...
Manual
Page 8
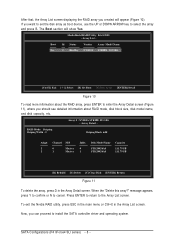
... [D] Delete [C] Clear Disk [ENTER] Return Figure 11 To delete the array, press D in the Array List screen. Press ENTER to return to install the SATA controller driver and operating system. RAID Mode: Striping Striping Width : 2 Array 2 : NVIDIA STRIPE 223.58G - message appears, press Y to confirm or N to enter... where you want to set the disk array as boot device, use the UP or DOWN ARROW key to select the array and press B. SATA Configurations (P4 nForce4 SLI series) - 8 - When the "Delete this array?" Array List - ¤å Boot Id Status Vendor Array Model Name No 2 ...
... [D] Delete [C] Clear Disk [ENTER] Return Figure 11 To delete the array, press D in the Array List screen. Press ENTER to return to install the SATA controller driver and operating system. RAID Mode: Striping Striping Width : 2 Array 2 : NVIDIA STRIPE 223.58G - message appears, press Y to confirm or N to enter... where you want to set the disk array as boot device, use the UP or DOWN ARROW key to select the array and press B. SATA Configurations (P4 nForce4 SLI series) - 8 - When the "Delete this array?" Array List - ¤å Boot Id Status Vendor Array Model Name No 2 ...

Manual
Page 9
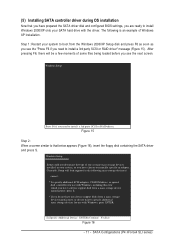
... program named MENU.exe (Figure 13). Step 1: Find an available system and insert the motherboard driver CD into the CD-ROM drive. The installation utility will appear automatically. Figure 13 - 9 - SATA Configurations (P4 nForce4 SLI series) Without the driver, the hard drive/RAID array may not be recognized during OS installation. The instructions below...
... program named MENU.exe (Figure 13). Step 1: Find an available system and insert the motherboard driver CD into the CD-ROM drive. The installation utility will appear automatically. Figure 13 - 9 - SATA Configurations (P4 nForce4 SLI series) Without the driver, the hard drive/RAID array may not be recognized during OS installation. The instructions below...
Manual
Page 10
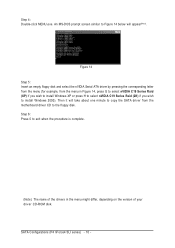
...will take about one minute to copy the SATA driver from the menu in Figure 14, press ...is complete. (Note): The name of the drivers in the menu might differ, depending on the version of your driver CD-ROM disk. Step 6: Press 0 ...to install Windows 2000). Then it will appear(Note). ¤¤ ¤å Figure 14 Step 5: Insert an empty floppy disk and select the nVIDIA Serial ATA driver... by pressing the corresponding letter from the menu (for example, from the motherboard driver CD to the floppy disk. Á...
...will take about one minute to copy the SATA driver from the menu in Figure 14, press ...is complete. (Note): The name of the drivers in the menu might differ, depending on the version of your driver CD-ROM disk. Step 6: Press 0 ...to install Windows 2000). Then it will appear(Note). ¤¤ ¤å Figure 14 Step 5: Insert an empty floppy disk and select the nVIDIA Serial ATA driver... by pressing the corresponding letter from the menu (for example, from the motherboard driver CD to the floppy disk. Á...
Manual
Page 11
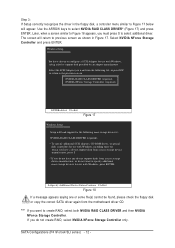
... F6 if you need to that you have prepared the SATA driver disk and configured BIOS settings, you are ready to install a 3rd party SCSI or RAID driver" message (Figure 15). S=Specify Additional Device ENTER=Continue ...driver. After pressing F6, there will load support for the following is an example of Windows XP installation. SATA Configurations (P4 nForce4 SLI series) Step 1: Restart your SATA hard drive with Windows, press ENTER. (5) Installing SATA controller driver during OS installation Now that below appears (Figure 16), insert the floppy disk containing the SATA driver...
... F6 if you need to that you have prepared the SATA driver disk and configured BIOS settings, you are ready to install a 3rd party SCSI or RAID driver" message (Figure 15). S=Specify Additional Device ENTER=Continue ...driver. After pressing F6, there will load support for the following is an example of Windows XP installation. SATA Configurations (P4 nForce4 SLI series) Step 1: Restart your SATA hard drive with Windows, press ENTER. (5) Installing SATA controller driver during OS installation Now that below appears (Figure 16), insert the floppy disk containing the SATA driver...
Manual
Page 12
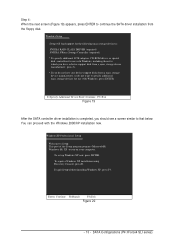
...Setup Setup will load support for the following list, or press ESC to return to select NVIDIA RAID CLASS DRIVER* (Figure 17) and press ¤¤ ENTER. SATA Configurations (P4 nForce4 SLI series) - 12 - Select NVIDIA NForce Storage ¤å Controller and press ENTER. Ác Step 3:... Åé If Setup correctly recognizes the driver in Figure 17. Use the ARROW keys to the previous screen. ...
...Setup Setup will load support for the following list, or press ESC to return to select NVIDIA RAID CLASS DRIVER* (Figure 17) and press ¤¤ ENTER. SATA Configurations (P4 nForce4 SLI series) - 12 - Select NVIDIA NForce Storage ¤å Controller and press ENTER. Ác Step 3:... Åé If Setup correctly recognizes the driver in Figure 17. Use the ARROW keys to the previous screen. ...
Manual
Page 13
... quit Setup without installing Windows XP, press F3. WindowsXP Professional Setup Welcome to continue the SATA driver installation from a mass storage device manufacturer, press S. * If you should see a screen similar to run on your computer. SATA Configurations (P4 nForce4 SLI series) Step 4: When the next screen (Figure 19) appears, press ENTER to Setup. Windows...
... quit Setup without installing Windows XP, press F3. WindowsXP Professional Setup Welcome to continue the SATA driver installation from a mass storage device manufacturer, press S. * If you should see a screen similar to run on your computer. SATA Configurations (P4 nForce4 SLI series) Step 4: When the next screen (Figure 19) appears, press ENTER to Setup. Windows...
Manual
Page 14
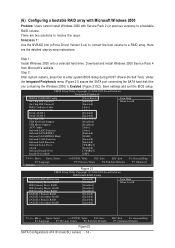
...a RAID array. Under the Integrated Peripherals menu (Figure 21) assure the SATA port connecting the SATA hard disk (the one containing the Windows 2000) is Enabled (Figure 21/22). Solutions 1: Use the NVRAID tool (nForce Driver Version 5.xx) to convert the boot volume to enter system BIOS Setup during...Item Help Menu Level} higf: Move Enter: Select +/-/PU/PD: Value F10: Save F3: Language F5: Previous Values F6: Fail-Safe Defaults Figure22 SATA Configurations (P4 nForce4 SLI series) - 14 - Save settings and exit the BIOS setup. Here are two solutions to a bootable RAID volume.
...a RAID array. Under the Integrated Peripherals menu (Figure 21) assure the SATA port connecting the SATA hard disk (the one containing the Windows 2000) is Enabled (Figure 21/22). Solutions 1: Use the NVRAID tool (nForce Driver Version 5.xx) to convert the boot volume to enter system BIOS Setup during...Item Help Menu Level} higf: Move Enter: Select +/-/PU/PD: Value F10: Save F3: Language F5: Previous Values F6: Fail-Safe Defaults Figure22 SATA Configurations (P4 nForce4 SLI series) - 14 - Save settings and exit the BIOS setup. Here are two solutions to a bootable RAID volume.
Manual
Page 16
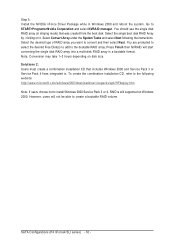
Ác Step 5: Åé Install the NVIDIA nForce Driver Package while in . Note: Conversion may take 1~2 hours depending on it. SATA Configurations (P4 nForce4 SLI series) - 16 - Go to install Windows 2000 Service Pack 3 or 4, RAID is still supported on Windows 2000. To create the combination installation CD, refer to ...
Ác Step 5: Åé Install the NVIDIA nForce Driver Package while in . Note: Conversion may take 1~2 hours depending on it. SATA Configurations (P4 nForce4 SLI series) - 16 - Go to install Windows 2000 Service Pack 3 or 4, RAID is still supported on Windows 2000. To create the combination installation CD, refer to ...


