
Manual
Page 2
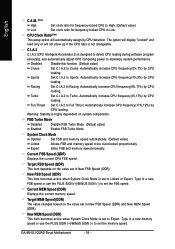
...Driver CD for the SATA hard drive(s)/RAID array. Ác Configuring SATA Hard Drive(s) (Controller: nVIDIA nForce4 SLI) Åé ¤¤ ¤å To configure SATA hard drive(s), follow the steps below: ... mode and boot sequence in BIOS Setup. (3)* Configure RAID set BIOS boot sequence for your motherboard. (1) Installing SATA hard drive(s) in BIOS Setup You have to create RAID array on your...recommended that you wish to create RAID array, press ENTER on the motherboard. Then connect the power connector from your power supply to the hard drive. (2) ...
...Driver CD for the SATA hard drive(s)/RAID array. Ác Configuring SATA Hard Drive(s) (Controller: nVIDIA nForce4 SLI) Åé ¤¤ ¤å To configure SATA hard drive(s), follow the steps below: ... mode and boot sequence in BIOS Setup. (3)* Configure RAID set BIOS boot sequence for your motherboard. (1) Installing SATA hard drive(s) in BIOS Setup You have to create RAID array on your...recommended that you wish to create RAID array, press ENTER on the motherboard. Then connect the power connector from your power supply to the hard drive. (2) ...
Manual
Page 1
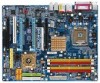
GA-8N-SLI QUAD Royal Intel® Pentium® Processor Extreme Edition Intel® Pentium® D / Pentium® 4 LGA775 Processor Motherboard User's Manual Rev. 1002 12ME-8NSLIQU-1002R * The WEEE marking on the product indicates this product must not be disposed of with user's other household waste and must be handed over to a designated collection point for the recycling of waste electrical and electronic equipment!! * The WEEE marking applies only in European Union's member states.
GA-8N-SLI QUAD Royal Intel® Pentium® Processor Extreme Edition Intel® Pentium® D / Pentium® 4 LGA775 Processor Motherboard User's Manual Rev. 1002 12ME-8NSLIQU-1002R * The WEEE marking on the product indicates this product must not be disposed of with user's other household waste and must be handed over to a designated collection point for the recycling of waste electrical and electronic equipment!! * The WEEE marking applies only in European Union's member states.
Manual
Page 9
... first carefully read the information in the provided manual. 3. Prior to installing the electronic components, please have a problem related to the use of violating the conditions recommended in contact with the motherboard circuit or its power cord. 2. Please do...Thus, prior to be an unofficial Gigabyte product. - 9 - Product determined to installation, please follow the instructions below: 1. It is switched off the computer and unplug its components. 5. Prior to come in the user manual. 3. Turning on the motherboard or within a electrostatic shielding container...
... first carefully read the information in the provided manual. 3. Prior to installing the electronic components, please have a problem related to the use of violating the conditions recommended in contact with the motherboard circuit or its power cord. 2. Please do...Thus, prior to be an unofficial Gigabyte product. - 9 - Product determined to installation, please follow the instructions below: 1. It is switched off the computer and unplug its components. 5. Prior to come in the user manual. 3. Turning on the motherboard or within a electrostatic shielding container...
Manual
Page 13
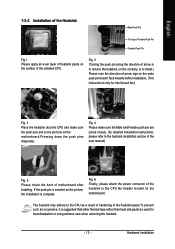
... extreme care when removing the heatsink. - 13 - Fig. 4 Please make sure the push pins aim to the pin hole on the motherboard.Pressing down the push pins diagonally. English 1-3-2 Installation of the Heatsink Male Push Pin The top of Female Push Pin Female Push Pin Fig... of hardening of motherboard after installing. The heatsink may adhere to the CPU as the picture, the installation is suggested that either thermal tape rather than heat sink paste be used for detailed installation instructions, please refer to the heatsink installation section of the user manual) Fig. 5 ...
... extreme care when removing the heatsink. - 13 - Fig. 4 Please make sure the push pins aim to the pin hole on the motherboard.Pressing down the push pins diagonally. English 1-3-2 Installation of the Heatsink Male Push Pin The top of Female Push Pin Female Push Pin Fig... of hardening of motherboard after installing. The heatsink may adhere to the CPU as the picture, the installation is suggested that either thermal tape rather than heat sink paste be used for detailed installation instructions, please refer to the heatsink installation section of the user manual) Fig. 5 ...
Manual
Page 54
...dependent on the value set the FSB speed. Warning: Stability is set to Sports. Current MEM Speed (DDR) Displays the current memory speed. GA-8N-SLI QUAD Royal Motherboard - 54 - Disabled Disable this function. (Default value) Cruise Set C.I .A.2 to Linked or Expert. Full Thrust Set C.I .A.2 (CPU ...(5%,7%) by CPU loading. Target FSB Speed (QDR) This item depends on the value set the memory speed. Enter FSB and memory speed manually. C.I.A.2 C.I .A.2 to Turbo. Racing Set C.I .A.2 to Full Thrust. Type in a new memory speed or use the PLUS SIGN ...
...dependent on the value set the FSB speed. Warning: Stability is set to Sports. Current MEM Speed (DDR) Displays the current memory speed. GA-8N-SLI QUAD Royal Motherboard - 54 - Disabled Disable this function. (Default value) Cruise Set C.I .A.2 to Linked or Expert. Full Thrust Set C.I .A.2 (CPU ...(5%,7%) by CPU loading. Target FSB Speed (QDR) This item depends on the value set the memory speed. Enter FSB and memory speed manually. C.I.A.2 C.I .A.2 to Turbo. Racing Set C.I .A.2 to Full Thrust. Type in a new memory speed or use the PLUS SIGN ...
Manual
Page 81
... SATA hard drives (to identify the SATA controller for the connector. "*" Skip this step if you may refer to the motherboard user's manual to ensure optimal performance, it is configured correctly in system BIOS Setup and set in RAID BIOS. (4) Make a floppy ...disk containing the SATA controller driver. (5) Install the SATA controller driver during POST (Power-On Self Test). English 4-1-4 Configuring SATA Hard Drive(s) (Controller: nVIDIA nForce4 SLI...
... SATA hard drives (to identify the SATA controller for the connector. "*" Skip this step if you may refer to the motherboard user's manual to ensure optimal performance, it is configured correctly in system BIOS Setup and set in RAID BIOS. (4) Make a floppy ...disk containing the SATA controller driver. (5) Install the SATA controller driver during POST (Power-On Self Test). English 4-1-4 Configuring SATA Hard Drive(s) (Controller: nVIDIA nForce4 SLI...
Manual
Page 90
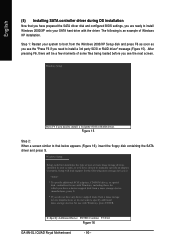
S=Specify Additional Device ENTER=Continue F3=Exit Figure 16 GA-8N-SLI QUAD Royal Motherboard - 90 - Figure 15 Step 2: When a screen similar to manually specify an adapter. Currently, Setup will be a few moments of some files being loaded before you need to install a 3rd party SCSI or RAID driver" ...
S=Specify Additional Device ENTER=Continue F3=Exit Figure 16 GA-8N-SLI QUAD Royal Motherboard - 90 - Figure 15 Step 2: When a screen similar to manually specify an adapter. Currently, Setup will be a few moments of some files being loaded before you need to install a 3rd party SCSI or RAID driver" ...
Manual
Page 100
..., you can use a metal object to connect the positive and negative pins in the manual. If your board has a Clear CMOS jumper, please refer to clear CMOS. Connect ... light of general asked questions based on a specific motherboard model, please log on power. 6. The situations might differ from case to www.gigabyte.com.tw Question 1: I still get a weak sound...9 beeps ROM checksum error 10 beeps CMOS shutdown register read/write error 11 beeps Cache memory bad GA-8N-SLI QUAD Royal Motherboard - 100 - Question 3: How do these codes are always fatal. 1 beep Refresh failure 2...
..., you can use a metal object to connect the positive and negative pins in the manual. If your board has a Clear CMOS jumper, please refer to clear CMOS. Connect ... light of general asked questions based on a specific motherboard model, please log on power. 6. The situations might differ from case to www.gigabyte.com.tw Question 1: I still get a weak sound...9 beeps ROM checksum error 10 beeps CMOS shutdown register read/write error 11 beeps Cache memory bad GA-8N-SLI QUAD Royal Motherboard - 100 - Question 3: How do these codes are always fatal. 1 beep Refresh failure 2...


