Manual
Page 2
...)) Åé ¤¤ To set in RAID BIOS. (4) Make a floppy disk containing the IDE RAID controller driver (5) Install the IDE RAID controller driver during OS installation. Then connect the power connector from your computer. (2) Configure GigaRAID controller mode and boot sequence in BIOS ...drive. (b) An empty formatted floppy disk. (c) Windows XP/2000 setup disk. (d) Driver CD for your motherboard. (1) Installing IDE hard drive(s) in your power supply to create RAID array on the motherboard. (To ensure that you do not want to the hard drive(s). Before you begin...
...)) Åé ¤¤ To set in RAID BIOS. (4) Make a floppy disk containing the IDE RAID controller driver (5) Install the IDE RAID controller driver during OS installation. Then connect the power connector from your computer. (2) Configure GigaRAID controller mode and boot sequence in BIOS ...drive. (b) An empty formatted floppy disk. (c) Windows XP/2000 setup disk. (d) Driver CD for your motherboard. (1) Installing IDE hard drive(s) in your power supply to create RAID array on the motherboard. (To ensure that you do not want to the hard drive(s). Before you begin...
Manual
Page 14
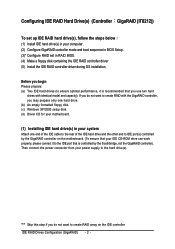
...during OS installation. Figure 16 Step 3: Go to install required driver for the GigaRAID controller on the GigaRAID controller successfully, you need to the BootDrv folder and look for the IDE RAID controller from the motherboard driver CD to My Computer and right-click the CD-ROM drive ...process. ¤å First of all, you need to copy the driver for an executable program named MENU.exe (Figure 17). Quit the installation utility first. Step 1: Find an available system and insert the motherboard driver CD into the CD-ROM drive. The instructions below explain how to copy...
...during OS installation. Figure 16 Step 3: Go to install required driver for the GigaRAID controller on the GigaRAID controller successfully, you need to the BootDrv folder and look for the IDE RAID controller from the motherboard driver CD to My Computer and right-click the CD-ROM drive ...process. ¤å First of all, you need to copy the driver for an executable program named MENU.exe (Figure 17). Quit the installation utility first. Step 1: Find an available system and insert the motherboard driver CD into the CD-ROM drive. The instructions below explain how to copy...
Manual
Page 15
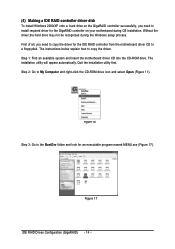
Step 3: Double-click MENU.exe. Press 2 to exit when the procedure is complete (Figure 19). Step 5: Press 0 to select the 2)GIGARAID item. Figure 18 Step 4: Insert an empty floppy disk. You have copied the IDE RAID driver sucessfully. IDE RAID Drives Configuration (GigaRAID) Then it will appear. Figure 19 - 15 - An MS-DOS prompt screen similar to Figure 18 below will take about one minute to copy the GigaRAID driver from the motherboard driver CD to the floppy disk.
Step 3: Double-click MENU.exe. Press 2 to exit when the procedure is complete (Figure 19). Step 5: Press 0 to select the 2)GIGARAID item. Figure 18 Step 4: Insert an empty floppy disk. You have copied the IDE RAID driver sucessfully. IDE RAID Drives Configuration (GigaRAID) Then it will appear. Figure 19 - 15 - An MS-DOS prompt screen similar to Figure 18 below will take about one minute to copy the GigaRAID driver from the motherboard driver CD to the floppy disk.
Manual
Page 17
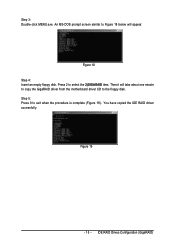
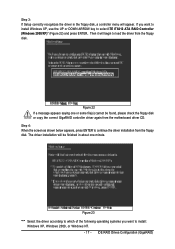
... ATA RAID Controller (Windows 2000/XP)* (Figure 22) and press ENTER. The driver installation will be found, please check the floppy disk or copy the correct GigaRAID controller driver again from the motherboard driver CD. IDE RAID Drives Configuration (GigaRAID) Step 4: When the screen as shown ...below appears, press ENTER to load the driver from the floppy disk. Figure 22 If a message appears saying...
... ATA RAID Controller (Windows 2000/XP)* (Figure 22) and press ENTER. The driver installation will be found, please check the floppy disk or copy the correct GigaRAID controller driver again from the motherboard driver CD. IDE RAID Drives Configuration (GigaRAID) Step 4: When the screen as shown ...below appears, press ENTER to load the driver from the floppy disk. Figure 22 If a message appears saying...

Manual
Page 72
If not, please double click the CD-ROM device icon in Windows XP (CD ver. 2.2) Insert the driver CD-title that came with your motherboard into your CD-ROM drive, the driver CD-title will auto start and show the installation guide. Click "GigaRAID Utility. 72 GigaRAID (IT8212) ATA RAID Controller USER'S MANUAL Application Installation Pictures below are shown in "My computer", and execute the setup.exe. 1.
If not, please double click the CD-ROM device icon in Windows XP (CD ver. 2.2) Insert the driver CD-title that came with your motherboard into your CD-ROM drive, the driver CD-title will auto start and show the installation guide. Click "GigaRAID Utility. 72 GigaRAID (IT8212) ATA RAID Controller USER'S MANUAL Application Installation Pictures below are shown in "My computer", and execute the setup.exe. 1.
Manual
Page 16
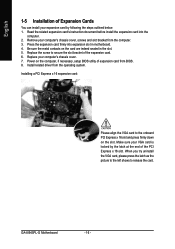
...'s chassis cover, screws and slot bracket from the computer. 3. Replace the screw to release the card. Power on the card are indeed seated in motherboard. 4. GA-8I945PL-G Motherboard - 16 - Install related driver from BIOS. 8. Read the related expansion card's instruction document before install the expansion card into expansion slot in the slot. 5. Replace your expansion...
...'s chassis cover, screws and slot bracket from the computer. 3. Replace the screw to release the card. Power on the card are indeed seated in motherboard. 4. GA-8I945PL-G Motherboard - 16 - Install related driver from BIOS. 8. Read the related expansion card's instruction document before install the expansion card into expansion slot in the slot. 5. Replace your expansion...
Manual
Page 22
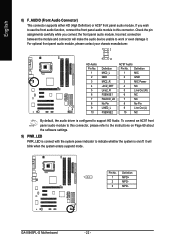
... Power 4 NC 5 Line Out (R) 6 NC 7 NC 8 No Pin 9 Line Out (L) 10 NC By default, the audio driver is configured to indicate whether the system is connect with the system power indicator to support HD Audio. GA-8I945PL-G Motherboard - 22 - To connect an AC97 front panel audio module to work or even damage it. Definition...
... Power 4 NC 5 Line Out (R) 6 NC 7 NC 8 No Pin 9 Line Out (L) 10 NC By default, the audio driver is configured to indicate whether the system is connect with the system power indicator to support HD Audio. GA-8I945PL-G Motherboard - 22 - To connect an AC97 front panel audio module to work or even damage it. Definition...
Manual
Page 51
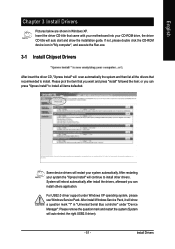
... your motherboard into your CD-ROM drive, the driver CD-title will auto start and show a question mark "?" For USB2.0 driver support under "Device Manager". Insert the driver CD-title that you want and press "install" followed the item; Install Drivers Some device drivers will auto...system automatically. System will show the installation guide. or you can press "Xpress Install" to install all the drivers that recommended to install other drivers. in "Universal Serial Bus controller" under Windows XP operating system, please use Windows Service Pack. If not, ...
... your motherboard into your CD-ROM drive, the driver CD-title will auto start and show a question mark "?" For USB2.0 driver support under "Device Manager". Insert the driver CD-title that you want and press "install" followed the item; Install Drivers Some device drivers will auto...system automatically. System will show the installation guide. or you can press "Xpress Install" to install all the drivers that recommended to install other drivers. in "Universal Serial Bus controller" under Windows XP operating system, please use Windows Service Pack. If not, ...

Manual
Page 52
English 3-2 Software Applications This page displays all the tools that Gigabyte developed and some free software, you can choose anyone you want and press "install" to install them. 3-3 Driver CD Information This page lists the contents of software and drivers in this CD-title. GA-8I945PL-G Motherboard - 52 -
English 3-2 Software Applications This page displays all the tools that Gigabyte developed and some free software, you can choose anyone you want and press "install" to install them. 3-3 Driver CD Information This page lists the contents of software and drivers in this CD-title. GA-8I945PL-G Motherboard - 52 -

Manual
Page 53
Install Drivers English 3-4 Hardware Information This page lists all device you have for this motherboard. 8I945PL-G E1 3-5 Contact Us Please see the last page for details. - 53 -
Install Drivers English 3-4 Hardware Information This page lists all device you have for this motherboard. 8I945PL-G E1 3-5 Contact Us Please see the last page for details. - 53 -
Manual
Page 55
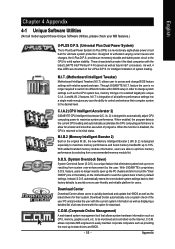
... and smoother execution of system loading. M.I.T. (Motherboard Intelligent Tweaker) Motherboard Intelligent Tweaker (M.I.T.) allows user to access and change system settings such as the CPU system bus, memory timings or to enabled Gigabyte's unique C.I.A. 2 and M.I .B. 2) is returned to withstand varying current levels and changes, the U-Plus D.P.S. to -date drivers and BIOS. - 55 - English Chapter 4 Appendix...
... and smoother execution of system loading. M.I.T. (Motherboard Intelligent Tweaker) Motherboard Intelligent Tweaker (M.I.T.) allows user to access and change system settings such as the CPU system bus, memory timings or to enabled Gigabyte's unique C.I.A. 2 and M.I .B. 2) is returned to withstand varying current levels and changes, the U-Plus D.P.S. to -date drivers and BIOS. - 55 - English Chapter 4 Appendix...
Manual
Page 58
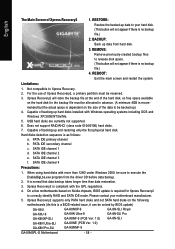
...-related issue, it can be solved by BIOS update) GA-K8U GA-K8U-9 GA-K8NXP-SLI GA-K8N Ultra-SLI GA-K8N Pro-SLI GA-K8NXP-9 GA-K8N Ultra-9 GA-K8NF-9 (PCB Ver. 1.0) GA-K8NE (PCB Ver. 1.0) GA-K8NMF-9 GA-8N-SLI Royal GA-8N-SLI Pro GA-8N-SLI GA-8I945PL-G Motherboard - 58 - SATA IDE channel 2 e. SATA IDE...end of backing up hard disks installed with more than data restoration. 3. RESTORE: English Restore the backed-up data from the driver CD before data backup. 2. Limitations: 1. Xpress Recovery2 will not appear if there is recom- Capable of Xpress Recovery2 1. ...
...-related issue, it can be solved by BIOS update) GA-K8U GA-K8U-9 GA-K8NXP-SLI GA-K8N Ultra-SLI GA-K8N Pro-SLI GA-K8NXP-9 GA-K8N Ultra-9 GA-K8NF-9 (PCB Ver. 1.0) GA-K8NE (PCB Ver. 1.0) GA-K8NMF-9 GA-8N-SLI Royal GA-8N-SLI Pro GA-8N-SLI GA-8I945PL-G Motherboard - 58 - SATA IDE channel 2 e. SATA IDE...end of backing up hard disks installed with more than data restoration. 3. RESTORE: English Restore the backed-up data from the driver CD before data backup. 2. Limitations: 1. Xpress Recovery2 will not appear if there is recom- Capable of Xpress Recovery2 1. ...

Manual
Page 68
...in the picture to MP3 music, have become a reality so you can also find an Audio Manager icon in and out) simultaneously. GA-8I945PL-G Motherboard - 68 - Line In Line Out (Front Speaker Out) Mic In Rear Speaker Out Center/Subwoofer Speaker Out Side Speaker Out Please follow...steps to install the function. (Following pictures are able to work correctly. Channel Audio Function Introduction This motherboard provide 6 audio connector. STEP 1 : After installation of the audio driver, you should find the icon in Windows XP) Note that you can change the center/subwoofer speaker ...
...in the picture to MP3 music, have become a reality so you can also find an Audio Manager icon in and out) simultaneously. GA-8I945PL-G Motherboard - 68 - Line In Line Out (Front Speaker Out) Mic In Rear Speaker Out Center/Subwoofer Speaker Out Side Speaker Out Please follow...steps to install the function. (Following pictures are able to work correctly. Channel Audio Function Introduction This motherboard provide 6 audio connector. STEP 1 : After installation of the audio driver, you should find the icon in Windows XP) Note that you can change the center/subwoofer speaker ...
Manual
Page 70
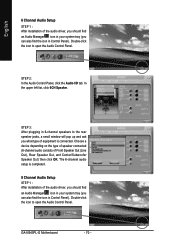
... icon to open the Audio Control Panel. The 6-channel audio setup is completed. 8 Channel Audio Setup STEP 1 : After installation of the audio driver, you should find the icon in Control Panel). STEP 3: After plugging in Control Panel). In the upper left list, click 6CH Speaker. Choose ... Front Speaker Out (Line Out), Rear Speaker Out, and Center/Subwoofer Speaker Out) then click OK. GA-8I945PL-G Motherboard - 70 - English 6 Channel Audio Setup STEP 1 : After installation of the audio driver, you should find an Audio Manager icon in your system tray (you can also find the icon in...
... icon to open the Audio Control Panel. The 6-channel audio setup is completed. 8 Channel Audio Setup STEP 1 : After installation of the audio driver, you should find the icon in Control Panel). STEP 3: After plugging in Control Panel). In the upper left list, click 6CH Speaker. Choose ... Front Speaker Out (Line Out), Rear Speaker Out, and Center/Subwoofer Speaker Out) then click OK. GA-8I945PL-G Motherboard - 70 - English 6 Channel Audio Setup STEP 1 : After installation of the audio driver, you should find an Audio Manager icon in your system tray (you can also find the icon in...


