Manual
Page 5
Chapter 3 Install Drivers 51 3-1 Install Chipset Drivers 51 3-2 SoftwareApplications 52 3-3 Driver CD Information 52 3-4 Hardware Information 53 3-5 Contact Us ...53 Chapter 4 Appendix 55 4-1 Unique Software Utilities 55 4-1-1 EasyTune 5 Introduction 56 4-1-2 Xpress Recovery2 Introduction 57 4-1-3 Flash BIOS Method Introduction 59 4-1-4 Serial ATA BIOS Setting Utility Introduction 70 4-1-5 2- / 4- / 6- / 8- Channel Audio Function Introduction 77 4-2 Troubleshooting 81 Only for GA-8I945G Pro. - 5 -
Chapter 3 Install Drivers 51 3-1 Install Chipset Drivers 51 3-2 SoftwareApplications 52 3-3 Driver CD Information 52 3-4 Hardware Information 53 3-5 Contact Us ...53 Chapter 4 Appendix 55 4-1 Unique Software Utilities 55 4-1-1 EasyTune 5 Introduction 56 4-1-2 Xpress Recovery2 Introduction 57 4-1-3 Flash BIOS Method Introduction 59 4-1-4 Serial ATA BIOS Setting Utility Introduction 70 4-1-5 2- / 4- / 6- / 8- Channel Audio Function Introduction 77 4-2 Troubleshooting 81 Only for GA-8I945G Pro. - 5 -

Manual
Page 16
... slot bracket of expansion card from BIOS. 8. Replace your expansion card by the latch at the end of the PCI Express x 16 slot. GA-8I945G Pro/GA-8I945G Motherboard - 16 - Install related driver from the computer. 3. Installing a PCI Express x 16 expansion card: Please align the VGA card to release the card. Remove your VGA card is...
... slot bracket of expansion card from BIOS. 8. Replace your expansion card by the latch at the end of the PCI Express x 16 slot. GA-8I945G Pro/GA-8I945G Motherboard - 16 - Install related driver from the computer. 3. Installing a PCI Express x 16 expansion card: Please align the VGA card to release the card. Remove your VGA card is...

Manual
Page 22
GA-8I945G Pro/GA-8I945G Motherboard - 22 - Incorrect connection between the module and connector will make the audio device unable to the ... FSENSE1 FAUDIO_JD No Pin LINE2_L FSENSE2 AC'97 Audio: Pin No. Please refer to the BIOS setting for the Serial ATA and install the proper driver in order to this connector, please refer to work properly. 1 7 7 1 Pin No. 1 2 3 4 5 6 7 Definition GND TXP TXN GND ... 2 GND 3 MIC Power 4 NC 5 Line Out (R) 6 NC 7 NC 8 No Pin 9 Line Out (L) 10 NC By default, the audio driver is configured to 300MB/s transfer rate.
GA-8I945G Pro/GA-8I945G Motherboard - 22 - Incorrect connection between the module and connector will make the audio device unable to the ... FSENSE1 FAUDIO_JD No Pin LINE2_L FSENSE2 AC'97 Audio: Pin No. Please refer to the BIOS setting for the Serial ATA and install the proper driver in order to this connector, please refer to work properly. 1 7 7 1 Pin No. 1 2 3 4 5 6 7 Definition GND TXP TXN GND ... 2 GND 3 MIC Power 4 NC 5 Line Out (R) 6 NC 7 NC 8 No Pin 9 Line Out (L) 10 NC By default, the audio driver is configured to 300MB/s transfer rate.
Manual
Page 37
...auto detect. (Default value) Combined Enhanced Set On-Chip SATA mode to 4 HDDs on the motherboard; 2 for SATA and the other for GA-8I945G Pro. - 37 - Disabled Disable USB Mouse Support. (Default value) Azalia Codec Auto Auto detect Azalia audio function. (Default value) Disabled Disable Azalia... audio function. BIOS Setup Advanced Host Controller Interface (AHCI) is an interface specification that allows the storage driver to AHCI mode. Set On-Chip SATA mode to Enhanced, the motherboard allows up to Combined, you are not using onboard USB ...
...auto detect. (Default value) Combined Enhanced Set On-Chip SATA mode to 4 HDDs on the motherboard; 2 for SATA and the other for GA-8I945G Pro. - 37 - Disabled Disable USB Mouse Support. (Default value) Azalia Codec Auto Auto detect Azalia audio function. (Default value) Disabled Disable Azalia... audio function. BIOS Setup Advanced Host Controller Interface (AHCI) is an interface specification that allows the storage driver to AHCI mode. Set On-Chip SATA mode to Enhanced, the motherboard allows up to Combined, you are not using onboard USB ...

Manual
Page 52
English 3-2 Software Applications This page displays all the tools that Gigabyte developed and some free software, you can choose anyone you want and press "install" to install them. 3-3 Driver CD Information This page lists the contents of software and drivers in this CD-title. GA-8I945G Pro/GA-8I945G Motherboard - 52 -
English 3-2 Software Applications This page displays all the tools that Gigabyte developed and some free software, you can choose anyone you want and press "install" to install them. 3-3 Driver CD Information This page lists the contents of software and drivers in this CD-title. GA-8I945G Pro/GA-8I945G Motherboard - 52 -
Manual
Page 57
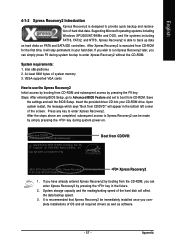
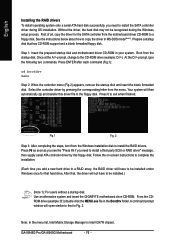
...by booting from CD-ROM. System requirements: 1. At least 64M bytes of OS and all required drivers as well as software. - 57 - Upon system restart, the message which says "Boot from CD-ROM for 8I945G Pro F9a . . . . :BIOS Setup/Q-Flash, : Xpress Recovery2, For Boot Menu 11/07/...2005-I945-6A79HG0GC-00 Xpress Recovery2 1. Appendix Insert the provided driver CD into your hard disk. After the steps above are completed, subsequent access...
...by booting from CD-ROM. System requirements: 1. At least 64M bytes of OS and all required drivers as well as software. - 57 - Upon system restart, the message which says "Boot from CD-ROM for 8I945G Pro F9a . . . . :BIOS Setup/Q-Flash, : Xpress Recovery2, For Boot Menu 11/07/...2005-I945-6A79HG0GC-00 Xpress Recovery2 1. Appendix Insert the provided driver CD into your hard disk. After the steps above are completed, subsequent access...
Manual
Page 58
... for the backup file must be solved by BIOS update) GA-K8U GA-K8NXP-9 GA-K8U-9 GA-K8N Ultra-9 GA-K8NXP-SLI GA-K8NF-9 (PCB Ver. 1.0) GA-K8N Ultra-SLI GA-K8NE (PCB Ver. 1.0) GA-K8N Pro-SLI GA-K8NMF-9 GA-8I945G Pro/GA-8I945G Motherboard - 58 - Not compatible to release disk space. ...GA-8N-SLI Pro GA-8N-SLI Hard disks detection sequence is no backup file.) 2. PATA IDE primary channel b. SATA IDE channel 1 d. REBOOT: Exit the main screen and restart the system. USB hard disks are currently not supported. 6. The Main Screen of backing up data from the driver...
... for the backup file must be solved by BIOS update) GA-K8U GA-K8NXP-9 GA-K8U-9 GA-K8N Ultra-9 GA-K8NXP-SLI GA-K8NF-9 (PCB Ver. 1.0) GA-K8N Ultra-SLI GA-K8NE (PCB Ver. 1.0) GA-K8N Pro-SLI GA-K8NMF-9 GA-8I945G Pro/GA-8I945G Motherboard - 58 - Not compatible to release disk space. ...GA-8N-SLI Pro GA-8N-SLI Hard disks detection sequence is no backup file.) 2. PATA IDE primary channel b. SATA IDE channel 1 d. REBOOT: Exit the main screen and restart the system. USB hard disks are currently not supported. 6. The Main Screen of backing up data from the driver...
Manual
Page 76
...you add a new hard drive to a RAID array, the RAID driver will then automatically zip and transfer this floppy disk. Use an alternative system and insert the GIGABYTE motherboard drive CD-ROM. Once at the A:\> prompt, change to...driver by pressing the corresponding letter from the startup disk. Without the driver, the hard disk may not be installed under Windows once for the SATA controller from the Windows installation disk to the CD-ROM drive (example: D:\>). Step 1: Insert the prepared startup disk and motherboard driver CD-ROM in Fig. 2. GA-8I945G Pro/GA-8I945G...
...you add a new hard drive to a RAID array, the RAID driver will then automatically zip and transfer this floppy disk. Use an alternative system and insert the GIGABYTE motherboard drive CD-ROM. Once at the A:\> prompt, change to...driver by pressing the corresponding letter from the startup disk. Without the driver, the hard disk may not be installed under Windows once for the SATA controller from the Windows installation disk to the CD-ROM drive (example: D:\>). Step 1: Insert the prepared startup disk and motherboard driver CD-ROM in Fig. 2. GA-8I945G Pro/GA-8I945G...

Manual
Page 78
STEP 2: In the Audio Control Panel, click the Audio I/O tab. The 4-channel audio setup is connected. GA-8I945G Pro/GA-8I945G Motherboard - 78 - English STEP 3: After a speaker or headphone is plugged into the rear Line Out jack, a small window will pop up and ask you can ... Rear Speaker Out and then click OK. Choose Headphone or Line Out depending on the type of speaker connected (4-channel audio consists of the audio driver, you should find the icon in 4-channel speakers to open the Audio Control Panel. In the upper left list, click 4CH Speaker. STEP 3: After plugging...
STEP 2: In the Audio Control Panel, click the Audio I/O tab. The 4-channel audio setup is connected. GA-8I945G Pro/GA-8I945G Motherboard - 78 - English STEP 3: After a speaker or headphone is plugged into the rear Line Out jack, a small window will pop up and ask you can ... Rear Speaker Out and then click OK. Choose Headphone or Line Out depending on the type of speaker connected (4-channel audio consists of the audio driver, you should find the icon in 4-channel speakers to open the Audio Control Panel. In the upper left list, click 4CH Speaker. STEP 3: After plugging...


