
Manual
Page 7
Only for GA-8I915P Duo. - 7 - Only for GA-8I915P Duo Pro. Block Diagram PCI-ECLK (100MHz) LGA775 Processor CPUCLK+/-(200/133MHz) PCI-ECLK (100MHz) PCI Express x16 Host Interface Intel 915P MCH 2 PCI Express x 1 Ports RJ45 RJ45 Broadcom Broadcom 5751 /5789 5751/5789 PCI Express x1 Bus PCI Bus VT6410 TSB43AB23 IDE RAID Intel ICH6 /ICH6R DDR 400...
Only for GA-8I915P Duo. - 7 - Only for GA-8I915P Duo Pro. Block Diagram PCI-ECLK (100MHz) LGA775 Processor CPUCLK+/-(200/133MHz) PCI-ECLK (100MHz) PCI Express x16 Host Interface Intel 915P MCH 2 PCI Express x 1 Ports RJ45 RJ45 Broadcom Broadcom 5751 /5789 5751/5789 PCI Express x1 Bus PCI Bus VT6410 TSB43AB23 IDE RAID Intel ICH6 /ICH6R DDR 400...

Manual
Page 10
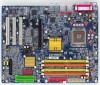
Only for GA-8I915P Duo. GA-8I915P Duo (Pro) Motherboard - 10 - English 1-2 Feature Summary CPU Chipset Memory Slots IDE Connections FDD Connections Onboard SATA Peripherals ...ATA 66/ATA 100), allows connection of 2 IDE devices(IDE1) Š 2 IDE connection (UDMA 33/ATA 66/ATA 100/ATA 133), compatible with RAID, allows connection of 4 IDE devices(IDE2,IDE3) Š 1 FDD connection, allows connection of 2 FDD devices Š 4 Serial ATA connections Š...600 memory module on the motherboard, you must install an 800MHz FSB processor and overclock in BIOS. Only for GA-8I915P Duo Pro.
Only for GA-8I915P Duo. GA-8I915P Duo (Pro) Motherboard - 10 - English 1-2 Feature Summary CPU Chipset Memory Slots IDE Connections FDD Connections Onboard SATA Peripherals ...ATA 66/ATA 100), allows connection of 2 IDE devices(IDE1) Š 2 IDE connection (UDMA 33/ATA 66/ATA 100/ATA 133), compatible with RAID, allows connection of 4 IDE devices(IDE2,IDE3) Š 1 FDD connection, allows connection of 2 FDD devices Š 4 Serial ATA connections Š...600 memory module on the motherboard, you must install an 800MHz FSB processor and overclock in BIOS. Only for GA-8I915P Duo Pro.
Manual
Page 11
... supported on the Win 2000/XP operating systems Š Built-in VT6410 chipset Š Supports disk striping (RAID 0) or disk mirroring (RAID 1) or striping + mirroring (RAID 0 + RAID 1) Š supports JBOD function Š Supports concurrent dual ATA133 IDE controller operation Š Supports ATAPI mode ... Š ATX form factor; 30.5cm x 24.4cm Only for GA-8I915P Duo Pro. - 11 - MIC ; Back Surround Speaker Out ; Hardware Installation English Onboard Audio On-Board SATA RAID On-Board IDE RAID (IDE2, IDE3) I/O Control Hardware Monitor BIOS Additional Features Overclocking Form Factor...
... supported on the Win 2000/XP operating systems Š Built-in VT6410 chipset Š Supports disk striping (RAID 0) or disk mirroring (RAID 1) or striping + mirroring (RAID 0 + RAID 1) Š supports JBOD function Š Supports concurrent dual ATA133 IDE controller operation Š Supports ATAPI mode ... Š ATX form factor; 30.5cm x 24.4cm Only for GA-8I915P Duo Pro. - 11 - MIC ; Back Surround Speaker Out ; Hardware Installation English Onboard Audio On-Board SATA RAID On-Board IDE RAID (IDE2, IDE3) I/O Control Hardware Monitor BIOS Additional Features Overclocking Form Factor...
Manual
Page 34
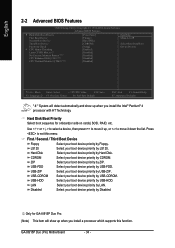
...your boot device priority by CDROM. USB-HDD Select your boot device priority by USB-FDD. Only for onboard(or add-on cards) SCSI, RAID, etc. USB-CDROM Select your boot device priority by LAN. to 3 No-Execute Memory Protect (Note) CPU Enhanced Halt (C1E) (...-ZIP Select your boot device priority by USB-CDROM. First / Second / Third Boot Device Floppy Select your boot device priority by Hard Disk. GA-8I915P Duo (Pro) Motherboard - 34 - English 2-2 Advanced BIOS Features CMOS Setup Utility-Copyright (C) 1984-2004 Award Software Advanced BIOS Features ` Hard Disk Boot...
...your boot device priority by CDROM. USB-HDD Select your boot device priority by USB-FDD. Only for onboard(or add-on cards) SCSI, RAID, etc. USB-CDROM Select your boot device priority by LAN. to 3 No-Execute Memory Protect (Note) CPU Enhanced Halt (C1E) (...-ZIP Select your boot device priority by USB-CDROM. First / Second / Third Boot Device Floppy Select your boot device priority by Hard Disk. GA-8I915P Duo (Pro) Motherboard - 34 - English 2-2 Advanced BIOS Features CMOS Setup Utility-Copyright (C) 1984-2004 Award Software Advanced BIOS Features ` Hard Disk Boot...
Manual
Page 36
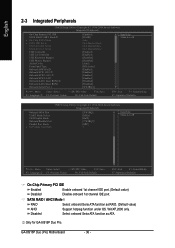
...GA-8I915P Duo Pro. SATA RAID / AHCI Mode RAID Select onboard Seria ATA function as ATA. Select onboard Seria ATA function as RAID. (Default value) AHCI Disabled Support hotplug function under OS. GA-8I915P Duo (Pro) Motherboard - 36 - English 2-3 Integrated Peripherals CMOS Setup Utility-Copyright (C) 1984-2004 Award Software Integrated Peripherals On-Chip Primary PCI IDE SATA RAID... Support USB Mouse Support Azalia Codec Front Panel Type Onboard H/W RAID Onboard H/W 1394 1 Onboard H/W LAN1 1 Onboard H/W LAN2 Onboard LAN1 Boot ROM 1 Onboard LAN2 Boot ROM Onboard...
...GA-8I915P Duo Pro. SATA RAID / AHCI Mode RAID Select onboard Seria ATA function as ATA. Select onboard Seria ATA function as RAID. (Default value) AHCI Disabled Support hotplug function under OS. GA-8I915P Duo (Pro) Motherboard - 36 - English 2-3 Integrated Peripherals CMOS Setup Utility-Copyright (C) 1984-2004 Award Software Integrated Peripherals On-Chip Primary PCI IDE SATA RAID... Support USB Mouse Support Azalia Codec Front Panel Type Onboard H/W RAID Onboard H/W 1394 1 Onboard H/W LAN1 1 Onboard H/W LAN2 Onboard LAN1 Boot ROM 1 Onboard LAN2 Boot ROM Onboard...

Manual
Page 38
... address is 2F8. 3E8/IRQ4 2E8/IRQ3 Enable onboard Serial port 1 and address is 2E8. GA-8I915P Duo (Pro) Motherboard - 38 - ASKIR Set onboard I /O chip. Enable onboard Serial port 1 and address is 2E8. English Onboard H/W RAID Enabled Enable Onboard H/W RAID function. (Default value) Disabled Disable this function. Enabled Enable this function. Enabled Enable this function... LAN2 Boot ROM This function decide whether to determine which Infra Red(IR) function of Onboard I /O chip UART to IrDA Mode. (Default value) Only for GA-8I915P Duo Pro.
... address is 2F8. 3E8/IRQ4 2E8/IRQ3 Enable onboard Serial port 1 and address is 2E8. GA-8I915P Duo (Pro) Motherboard - 38 - ASKIR Set onboard I /O chip. Enable onboard Serial port 1 and address is 2E8. English Onboard H/W RAID Enabled Enable Onboard H/W RAID function. (Default value) Disabled Disable this function. Enabled Enable this function. Enabled Enable this function... LAN2 Boot ROM This function decide whether to determine which Infra Red(IR) function of Onboard I /O chip UART to IrDA Mode. (Default value) Only for GA-8I915P Duo Pro.

Manual
Page 68
... copy of the data can be activated to replace a failed drive that identifies the drive as a member. GA-8I915P Duo (Pro) Motherboard - 68 - Different RAID levels represent different performance levels, security levels and implementation costs. If any RAID 1 drive fails, data access will not be combined together through data redundant operation, where if one of...
... copy of the data can be activated to replace a failed drive that identifies the drive as a member. GA-8I915P Duo (Pro) Motherboard - 68 - Different RAID levels represent different performance levels, security levels and implementation costs. If any RAID 1 drive fails, data access will not be combined together through data redundant operation, where if one of...
Manual
Page 69
...process prior to the section on the motherboard ie. After rebooting your hard drives for RAID construction. The Intel RAID Utility - Create RAID Volume 2. Intel(R) Application Accelerator RAID Option ROM v4.0.6180 Copyright(C) 2003-04 Intel Corporation. Reset Disks to press Ctrl +... attach the hard drive connectors to their appropriate location on Integrated Peripherals). 4) Enter RAID setup in the BIOS and select the RAID type (For instance, enter Ctrl + I to press Ctrl + I . Exit RAID Volumes : None Defined. [ DISK/VOLUME INFORMATION ] Physical Disks : Port Driver Model...
...process prior to the section on the motherboard ie. After rebooting your hard drives for RAID construction. The Intel RAID Utility - Create RAID Volume 2. Intel(R) Application Accelerator RAID Option ROM v4.0.6180 Copyright(C) 2003-04 Intel Corporation. Reset Disks to press Ctrl +... attach the hard drive connectors to their appropriate location on Integrated Peripherals). 4) Enter RAID setup in the BIOS and select the RAID type (For instance, enter Ctrl + I to press Ctrl + I . Exit RAID Volumes : None Defined. [ DISK/VOLUME INFORMATION ] Physical Disks : Port Driver Model...

Manual
Page 70
... to your usage model. This creates a volume with 1~16 letters (letters cannot be used to uniquely identify the RAID volume. This name is stored on each disk. RAID0(Stripe)- GA-8I915P Duo (Pro) Motherboard - 70 - This creates a volume protected from a single hard disk failure. [hi]-Change [TAB]-Next [ESC]-Previous Menu [ENTER]-Select There...
... to your usage model. This creates a volume with 1~16 letters (letters cannot be used to uniquely identify the RAID volume. This name is stored on each disk. RAID0(Stripe)- GA-8I915P Duo (Pro) Motherboard - 70 - This creates a volume protected from a single hard disk failure. [hi]-Change [TAB]-Next [ESC]-Previous Menu [ENTER]-Select There...

Manual
Page 71
... 4KB to set disk block size with this item. The following are typical values: 16KB - All Rights Reversed. [ CREATE VOLUME MENU ] Name : RAID Level : Disks : Strip Size : Capacity : RAID_Volume0 RAID0(Stripe) Select Disks 128KB 223.5 GB Create Volume [ HELP ] Enter the volume capacity. ...Strip Size. Best for most desktops and workstations [hi]-Change [TAB]-Next [ESC]-Previous Menu [ENTER]-Select Intel(R) Application Accelerator RAID Option ROM v4.0.6180 Copyright(C) 2003-04 Intel Corporation. The disk block size can set disk Capacity. If less than the ...
... 4KB to set disk block size with this item. The following are typical values: 16KB - All Rights Reversed. [ CREATE VOLUME MENU ] Name : RAID Level : Disks : Strip Size : Capacity : RAID_Volume0 RAID0(Stripe) Select Disks 128KB 223.5 GB Create Volume [ HELP ] Enter the volume capacity. ...Strip Size. Best for most desktops and workstations [hi]-Change [TAB]-Next [ESC]-Previous Menu [ENTER]-Select Intel(R) Application Accelerator RAID Option ROM v4.0.6180 Copyright(C) 2003-04 Intel Corporation. The disk block size can set disk Capacity. If less than the ...

Manual
Page 72
...: RAID_Volume0 RAID0(Stripe) Select Disks 128KB 223.5 GB Create Volume [ HELP ] Press "ENTER" to complete the set-up of RAID. All Rights Reversed. [ CREATE VOLUME MENU ] Name : RAID Level : Disks : Strip Size : Capacity : RAID_Volume0 RAID0(Stripe) Select Disks 128KB 223.5 GB Create Volume WARNING : ALL DATA ... creat this volume? (Y/N) : Press "ENTER" to Create the specified volume [hi]-Change [TAB]-Next [ESC]-Previous Menu [ENTER]-Select GA-8I915P Duo (Pro) Motherboard - 72 - Are you sure you that all data on selected disks will be lost. English Press Enter under the Create ...
...: RAID_Volume0 RAID0(Stripe) Select Disks 128KB 223.5 GB Create Volume [ HELP ] Press "ENTER" to complete the set-up of RAID. All Rights Reversed. [ CREATE VOLUME MENU ] Name : RAID Level : Disks : Strip Size : Capacity : RAID_Volume0 RAID0(Stripe) Select Disks 128KB 223.5 GB Create Volume WARNING : ALL DATA ... creat this volume? (Y/N) : Press "ENTER" to Create the specified volume [hi]-Change [TAB]-Next [ESC]-Previous Menu [ENTER]-Select GA-8I915P Duo (Pro) Motherboard - 72 - Are you sure you that all data on selected disks will be lost. English Press Enter under the Create ...
Manual
Page 73
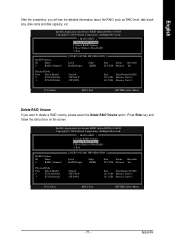
... the screen. All Rights Reversed. [ MAIN MENU ] 1. Reset Disks to Non-RAID 4. Reset Disks to Non-RAID 4. Exit RAID Volumes : ID Name 0 RAID_Volume0 [ DISK/VOLUME INFORMATION ] Level RAID(Stripe) Strip 128KB Size Status 223.5GB Normal Bootable Yes Physical Disks : Port Driver...[hi]-Select [ESC]-Exit [ENTER]-Select Menu - 73 - Delete RAID Volume 3. English After the completion, you want to delete a RAID volume, please select the Delete RAID Volume option. Intel(R) Application Accelerator RAID Option ROM v4.0.6180 Copyright(C) 2003-04 Intel Corporation. All Rights ...
... the screen. All Rights Reversed. [ MAIN MENU ] 1. Reset Disks to Non-RAID 4. Reset Disks to Non-RAID 4. Exit RAID Volumes : ID Name 0 RAID_Volume0 [ DISK/VOLUME INFORMATION ] Level RAID(Stripe) Strip 128KB Size Status 223.5GB Normal Bootable Yes Physical Disks : Port Driver...[hi]-Select [ESC]-Exit [ENTER]-Select Menu - 73 - Delete RAID Volume 3. English After the completion, you want to delete a RAID volume, please select the Delete RAID Volume option. Intel(R) Application Accelerator RAID Option ROM v4.0.6180 Copyright(C) 2003-04 Intel Corporation. All Rights ...

Manual
Page 74
... (Refer to the floppy disk. Fig.1 Fig.2 (Note) Your system will have to install the RAID drivers. After you add a new hard drive to a RAID array, the RAID driver will then automatically zip and transfer this floppy disk. When install Windows 2000 or Windows XP from... Accelerator 4.0 is Intel ICH6R chipset. After that hard drive. Drive D: 2) Insert a blank formatted floppy disk into the hard disk drive eg. GA-8I915P Duo (Pro) Motherboard - 74 - Please follow the steps below to complete driver transfer to a floppy disk: 1) Please insert the provided driver CD into...
... (Refer to the floppy disk. Fig.1 Fig.2 (Note) Your system will have to install the RAID drivers. After you add a new hard drive to a RAID array, the RAID driver will then automatically zip and transfer this floppy disk. When install Windows 2000 or Windows XP from... Accelerator 4.0 is Intel ICH6R chipset. After that hard drive. Drive D: 2) Insert a blank formatted floppy disk into the hard disk drive eg. GA-8I915P Duo (Pro) Motherboard - 74 - Please follow the steps below to complete driver transfer to a floppy disk: 1) Please insert the provided driver CD into...
Manual
Page 1
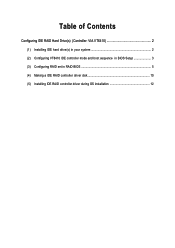
Table of Contents Configuring IDE RAID Hard Drive(s) (Controller: VIA VT6410 2 (1) Installing IDE hard drive(s) in your system 2 (2) Configuring VT6410 IDE controller mode and boot sequence in BIOS Setup 3 (3) Configuring RAID set in RAID BIOS 5 (4) Making a IDE RAID controller driver disk 10 (5) Installing IDE RAID controller driver during OS installation 12
Table of Contents Configuring IDE RAID Hard Drive(s) (Controller: VIA VT6410 2 (1) Installing IDE hard drive(s) in your system 2 (2) Configuring VT6410 IDE controller mode and boot sequence in BIOS Setup 3 (3) Configuring RAID set in RAID BIOS 5 (4) Making a IDE RAID controller driver disk 10 (5) Installing IDE RAID controller driver during OS installation 12
Manual
Page 2
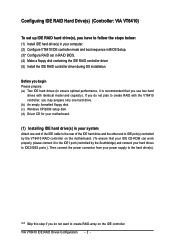
Then connect the power connector from your computer. (2) Configure VT6410 IDE controller mode and boot sequence in BIOS Setup. (3)* Configure RAID set up IDE RAID hard drive(s), you may prepare only one hard drive. (b) An empty formatted floppy disk. (c) Windows XP/2000 setup disk. (d) Driver CD...: VIA VT6410) Åé ¤¤ To set in RAID BIOS. (4) Make a floppy disk containing the IDE RAID controller driver (5) Install the IDE RAID controller driver during OS installation. If you do not want to create RAID.array on the motherboard. (To ensure that your IDE CD-ROM can...
Then connect the power connector from your computer. (2) Configure VT6410 IDE controller mode and boot sequence in BIOS Setup. (3)* Configure RAID set up IDE RAID hard drive(s), you may prepare only one hard drive. (b) An empty formatted floppy disk. (c) Windows XP/2000 setup disk. (d) Driver CD...: VIA VT6410) Åé ¤¤ To set in RAID BIOS. (4) Make a floppy disk containing the IDE RAID controller driver (5) Install the IDE RAID controller driver during OS installation. If you do not want to create RAID.array on the motherboard. (To ensure that your IDE CD-ROM can...

Manual
Page 3
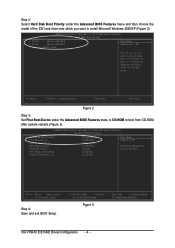
...: General Help F7: Optimized Defaults Figure 1 - 3 - CMOS Setup Utility-Copyright (C) 1984-2004 Award Software Integrated Peripherals On-Chip Primary PCI IDE SATA RAID/AHCI Mode x On-Chip SATA Mode x PATA IDE Set to SATA Port 0/2 Set to SATA Port 1/3 Set to Enabled (Enabled by default) (Figure... 1). VIA VT6410 IDE RAID Drives Configuration To enable the VT6410 IDE controller, please select Onboard H/W RAID under the Integrated Peripherals menu and then press ENTER. Step 1: Turn on your computer and press the Del...
...: General Help F7: Optimized Defaults Figure 1 - 3 - CMOS Setup Utility-Copyright (C) 1984-2004 Award Software Integrated Peripherals On-Chip Primary PCI IDE SATA RAID/AHCI Mode x On-Chip SATA Mode x PATA IDE Set to SATA Port 0/2 Set to SATA Port 1/3 Set to Enabled (Enabled by default) (Figure... 1). VIA VT6410 IDE RAID Drives Configuration To enable the VT6410 IDE controller, please select Onboard H/W RAID under the Integrated Peripherals menu and then press ENTER. Step 1: Turn on your computer and press the Del...
Manual
Page 4
... and exit BIOS Setup. +/-/PU/PD: Value F10: Save F6: Fail-Safe Defaults Figure 3 ESC: Exit F1: General Help F7: Optimized Defaults VIA VT6410 IDE RAID Drives Configuration - 4 -
... and exit BIOS Setup. +/-/PU/PD: Value F10: Save F6: Fail-Safe Defaults Figure 3 ESC: Exit F1: General Help F7: Optimized Defaults VIA VT6410 IDE RAID Drives Configuration - 4 -
Manual
Page 5
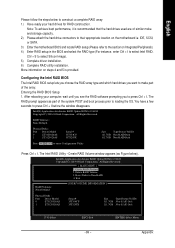
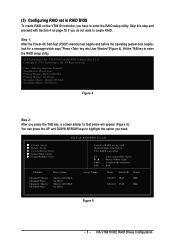
...Device Secondary Master : Maxtor 6E030L0 Secondary Master : No Device Figure 4 Step 2: After you press the TAB key, a screen similar to enter the RAID setup utility. Hit the TAB key to that below will appear (Figure 5). VIA Tech. VIA Technologies, Inc. All Right reserved. Press key into User...keys to next item Confirm the selection Exit Array Name Mode Size(GB) Status ATA133 28.63 Hdd ATA133 27.24 Hdd Figure 5 - 5 - RAID BIOS Ver 2.11 X Create Array X Delete Array X Create/Delete Spare X Select Boot Array X Serial Number View Channel Channel0 Master Channel0 Slave ...
...Device Secondary Master : Maxtor 6E030L0 Secondary Master : No Device Figure 4 Step 2: After you press the TAB key, a screen similar to enter the RAID setup utility. Hit the TAB key to that below will appear (Figure 5). VIA Tech. VIA Technologies, Inc. All Right reserved. Press key into User...keys to next item Confirm the selection Exit Array Name Mode Size(GB) Status ATA133 28.63 Hdd ATA133 27.24 Hdd Figure 5 - 5 - RAID BIOS Ver 2.11 X Create Array X Delete Array X Create/Delete Spare X Select Boot Array X Serial Number View Channel Channel0 Master Channel0 Slave ...
Manual
Page 6
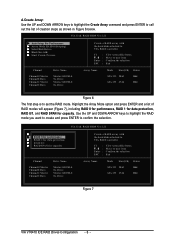
... Array Name Mode Size(GB) Status ATA 133 28.63 Hdd ATA 133 27.24 Hdd Figure 7 VIA VT6410 IDE RAID Drives Configuration - 6 - RAID BIOS Ver 2.11 X Auto Setup For Data Security X ArRraAyIDM0odfeorRpAeIrDfo0rm(Satnrcipeing) X SeRleActIDis1kfoDrridvaetsa protection X BloRcAkISDiz0e/614K X StaRrAt ICDreSaPtAe...to highlight the Create Array command and press ENTER to call out the list of RAID modes will appear (Figure 7), including RAID 0 for performance, RAID 1 for data protection, RAID 0/1, and RAID SPAN for capacity. VIA Tech. Highlight the Array Mode option and press ENTER ...
... Array Name Mode Size(GB) Status ATA 133 28.63 Hdd ATA 133 27.24 Hdd Figure 7 VIA VT6410 IDE RAID Drives Configuration - 6 - RAID BIOS Ver 2.11 X Auto Setup For Data Security X ArRraAyIDM0odfeorRpAeIrDfo0rm(Satnrcipeing) X SeRleActIDis1kfoDrridvaetsa protection X BloRcAkISDiz0e/614K X StaRrAt ICDreSaPtAe...to highlight the Create Array command and press ENTER to call out the list of RAID modes will appear (Figure 7), including RAID 0 for performance, RAID 1 for data protection, RAID 0/1, and RAID SPAN for capacity. VIA Tech. Highlight the Array Mode option and press ENTER ...
Manual
Page 7
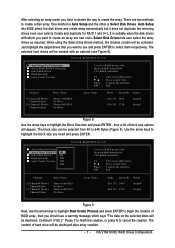
...the arrow keys to highlight Start Create Process and press ENTER to 64K Bytes (Figure 9). It is Select Disk Drives. VIA VT6410 IDE RAID Drives Configuration There are new ones. The selected hard drives will be selected from 4K to begin the creation of hard drive will be ... to highlight the Block Size item and press ENTER , then a list of block size options will be marked with the hard disks attached to VIA RAID controller F1 : K, L : Enter : ESC : View Array/disk Status Move to next item Confirm the selection Exit Channel [*] Channel0 Master Channel0 Slave [*] Channel1 ...
...the arrow keys to highlight Start Create Process and press ENTER to 64K Bytes (Figure 9). It is Select Disk Drives. VIA VT6410 IDE RAID Drives Configuration There are new ones. The selected hard drives will be selected from 4K to begin the creation of hard drive will be ... to highlight the Block Size item and press ENTER , then a list of block size options will be marked with the hard disks attached to VIA RAID controller F1 : K, L : Enter : ESC : View Array/disk Status Move to next item Confirm the selection Exit Channel [*] Channel0 Master Channel0 Slave [*] Channel1 ...


