Manual
Page 1
GA-8I915P Duo (Pro) Intel® Pentium® 4 LGA775 Processor Motherboard User's Manual Rev. 1303 12ME-8I915PUP-1303
GA-8I915P Duo (Pro) Intel® Pentium® 4 LGA775 Processor Motherboard User's Manual Rev. 1303 12ME-8I915PUP-1303
Manual
Page 3
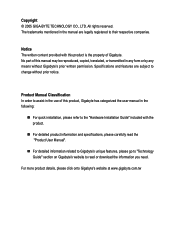
...the information you need. Product Manual Classification In order to read the "Product User Manual". „ For detailed information related to Gigabyte's unique features, please go to "Technology Guide" section on Gigabyte's website to assist in the use of Gigabyte. All rights reserved. Specifications ... this product is the property of this manual may be reproduced, copied, translated, or transmitted in the manual are subject to their respective companies. For more product details, please click onto Gigabyte's website at www.gigabyte.com.tw The trademarks mentioned in any ...
...the information you need. Product Manual Classification In order to read the "Product User Manual". „ For detailed information related to Gigabyte's unique features, please go to "Technology Guide" section on Gigabyte's website to assist in the use of Gigabyte. All rights reserved. Specifications ... this product is the property of this manual may be reproduced, copied, translated, or transmitted in the manual are subject to their respective companies. For more product details, please click onto Gigabyte's website at www.gigabyte.com.tw The trademarks mentioned in any ...
Manual
Page 9
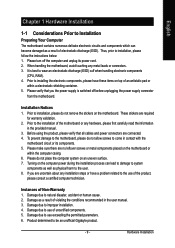
... Notices 1. Prior to the installation of the motherboard or any hardware, please first carefully read the information in the user manual. 3. To prevent damage to the motherboard, please do not remove the stickers on the motherboard. Damage due to use...to the use of uncertified components. 5. These stickers are connected. 4. Instances of violating the conditions recommended in the provided manual. 3. Damage due to be an unofficial Gigabyte product. - 9 - Product determined to natural disaster, accident or human cause. 2. Hardware Installation Please make sure there ...
... Notices 1. Prior to the installation of the motherboard or any hardware, please first carefully read the information in the user manual. 3. To prevent damage to the motherboard, please do not remove the stickers on the motherboard. Damage due to use...to the use of uncertified components. 5. These stickers are connected. 4. Instances of violating the conditions recommended in the provided manual. 3. Damage due to be an unofficial Gigabyte product. - 9 - Product determined to natural disaster, accident or human cause. 2. Hardware Installation Please make sure there ...
Manual
Page 13
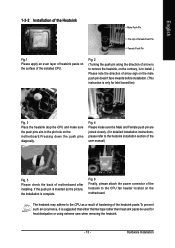
... the CPU as the picture, the installation is complete. Fig. 4 Please make sure the push pins aim to the heatsink installation section of the user manual) Fig. 5 Please check the back of the installed CPU. Hardware Installation Fig. 2 (Turning the push pin along the direction of arrow is to remove the...
... the CPU as the picture, the installation is complete. Fig. 4 Please make sure the push pins aim to the heatsink installation section of the user manual) Fig. 5 Please check the back of the installed CPU. Hardware Installation Fig. 2 (Turning the push pin along the direction of arrow is to remove the...
Manual
Page 32
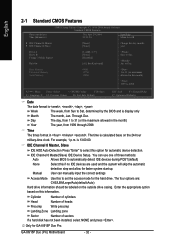
...drive information should be labeled on the outside drive casing. Through Dec. is calculated base on this option for faster system start up. Manual User can use one of sectors If a hard disk has not been installed, select NONE and press . Cylinder Number of cylinders Head... The month, Jan. IDE Channel 0 Master, Slave IDE HDD Auto-Detection Press "Enter" to Sat, determined by the BIOS and is , , , . GA-8I915P Duo (Pro) Motherboard - 32 - English 2-1 Standard CMOS Features Date (mm:dd:yy) Time (hh:mm:ss) CMOS Setup Utility-Copyright (C) 1984-2004 Award Software Standard...
...drive information should be labeled on the outside drive casing. Through Dec. is calculated base on this option for faster system start up. Manual User can use one of sectors If a hard disk has not been installed, select NONE and press . Cylinder Number of cylinders Head... The month, Jan. IDE Channel 0 Master, Slave IDE HDD Auto-Detection Press "Enter" to Sat, determined by the BIOS and is , , , . GA-8I915P Duo (Pro) Motherboard - 32 - English 2-1 Standard CMOS Features Date (mm:dd:yy) Time (hh:mm:ss) CMOS Setup Utility-Copyright (C) 1984-2004 Award Software Standard...
Manual
Page 76
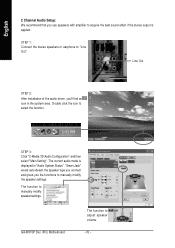
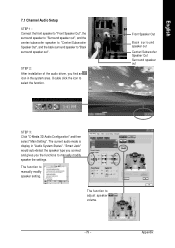
... audio mode is applied. English 2 Channel Audio Setup: We recommend that you the functions to manually modify the speaker settings. STEP 3: Click "C-Media 3D Audio Configuration" and then select "Main Setting". GA-8I915P Duo (Pro) Motherboard The function to manually modify speaker settings. "Smart Jack" would auto-detect the speaker type you connect and gives you...
... audio mode is applied. English 2 Channel Audio Setup: We recommend that you the functions to manually modify the speaker settings. STEP 3: Click "C-Media 3D Audio Configuration" and then select "Main Setting". GA-8I915P Duo (Pro) Motherboard The function to manually modify speaker settings. "Smart Jack" would auto-detect the speaker type you connect and gives you...
Manual
Page 77
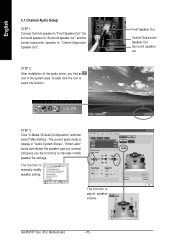
... speaker type you connect and gives you 'll find an icon in "Audio System Status". The function to manually modify speaker setting. STEP 2: After installation of the audio driver, you the functions to manually modify speaker the settings. Appendix The function to adjust speaker volume. - 77 - Double click the icon to "Surround...
... speaker type you connect and gives you 'll find an icon in "Audio System Status". The function to manually modify speaker setting. STEP 2: After installation of the audio driver, you the functions to manually modify speaker the settings. Appendix The function to adjust speaker volume. - 77 - Double click the icon to "Surround...
Manual
Page 78
... surround speaker to "Surround speaker out", and the center/subwoofer speaker to select the function. GA-8I915P Duo (Pro) Motherboard - 78 - STEP 2: After installation of the audio driver, you the functions to manually modify speaker the settings. Double click the icon to "Center/Subwoofer Speaker Out". The current ...audio mode is display in the system area. The function to adjust speaker volume. The function to manually modify speaker setting. "Smart Jack" would auto-detect the speaker type you connect and gives you find an icon in "Audio System...
... surround speaker to "Surround speaker out", and the center/subwoofer speaker to select the function. GA-8I915P Duo (Pro) Motherboard - 78 - STEP 2: After installation of the audio driver, you the functions to manually modify speaker the settings. Double click the icon to "Center/Subwoofer Speaker Out". The current ...audio mode is display in the system area. The function to adjust speaker volume. The function to manually modify speaker setting. "Smart Jack" would auto-detect the speaker type you connect and gives you find an icon in "Audio System...
Manual
Page 79
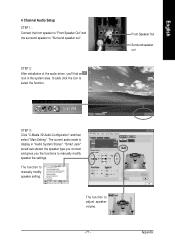
... Back surround speaker out Center/Subwoofer Speaker Out Surround speaker out STEP 3: Click "C-Media 3D Audio Configuration" and then select "Main Setting". The function to manually modify speaker setting. English 7.1 Channel Audio Setup STEP 1 : Connect the front speaker to "Front Speaker Out", the surround speaker to "Surround speaker out", and ... you connect and gives you find an icon in "Audio System Status". Appendix STEP 2: After installation of the audio driver, you the functions to manually modify speaker the settings. Double click the icon to "Back surround speaker out".
... Back surround speaker out Center/Subwoofer Speaker Out Surround speaker out STEP 3: Click "C-Media 3D Audio Configuration" and then select "Main Setting". The function to manually modify speaker setting. English 7.1 Channel Audio Setup STEP 1 : Connect the front speaker to "Front Speaker Out", the surround speaker to "Surround speaker out", and ... you connect and gives you find an icon in "Audio System Status". Appendix STEP 2: After installation of the audio driver, you the functions to manually modify speaker the settings. Double click the icon to "Back surround speaker out".

Manual
Page 81
...and load Fail-Safe Defaults. 7. Question 5: Why do I disable onboard VGA card in new BIOS version. If not, please change any setting manually to the Clear CMOS steps in the battery holder to see some boards, a small amount of electricity is still on standby after entering BIOS ...menu and you can use a metal object to connect the positive and negative pins in the manual. Answer: Gigabyte motherboards will be able to makethem short for one minute). 4. Turn off the on to clear CMOS. Question 4: Why does system seem...
...and load Fail-Safe Defaults. 7. Question 5: Why do I disable onboard VGA card in new BIOS version. If not, please change any setting manually to the Clear CMOS steps in the battery holder to see some boards, a small amount of electricity is still on standby after entering BIOS ...menu and you can use a metal object to connect the positive and negative pins in the manual. Answer: Gigabyte motherboards will be able to makethem short for one minute). 4. Turn off the on to clear CMOS. Question 4: Why does system seem...

Manual
Page 82
...the USB Over Current pin in the Front USB Panel. What do not connect any cable that is your own cables to the user manual and check whether you identify the possible computer problems. However, they are always fatal. 1 beep Refresh failure 2 beeps Parity error ... or display card error 1 long 3 short: Keyboard error 1 long 9 short: BIOS ROM error Continuous long beeps: DRAM error Continuous short beeps: Power error GA-8I915P Duo (Pro) Motherboard - 82 - Question 8: Sometimes I use the IDE 2? If the cable is not provided with the motherboard package to case. gAMI BIOS Beep Codes...
...the USB Over Current pin in the Front USB Panel. What do not connect any cable that is your own cables to the user manual and check whether you identify the possible computer problems. However, they are always fatal. 1 beep Refresh failure 2 beeps Parity error ... or display card error 1 long 3 short: Keyboard error 1 long 9 short: BIOS ROM error Continuous long beeps: DRAM error Continuous short beeps: Power error GA-8I915P Duo (Pro) Motherboard - 82 - Question 8: Sometimes I use the IDE 2? If the cable is not provided with the motherboard package to case. gAMI BIOS Beep Codes...

Manual
Page 12
... IDE RAID controller driver during OS installation Åé Now that below appears, insert the floppy disk containing the IDE RAID driver and press S to manually specify an adapter. Then you will be a few moments of one or more mass storage devices installed in your motherboard. Figure 18 Step 2: When a screen...
... IDE RAID controller driver during OS installation Åé Now that below appears, insert the floppy disk containing the IDE RAID driver and press S to manually specify an adapter. Then you will be a few moments of one or more mass storage devices installed in your motherboard. Figure 18 Step 2: When a screen...

Manual
Page 3
Then, set On-Chip SATA Mode to Manual or Auto (default) based on your computer and press Del to enter BIOS Setup during POST (Power-On Self Test). (2) Configuring SATA controller mode and ...
Then, set On-Chip SATA Mode to Manual or Auto (default) based on your computer and press Del to enter BIOS Setup during POST (Power-On Self Test). (2) Configuring SATA controller mode and ...


