Manual
Page 29
...download and update BIOS from BIOS default table Load the Optimized Defaults Dual BIOS /Q-Flash utility System Information Save all the CMOS changes, only for GA-8I915P Duo Pro. - 29 - Exit current page and return to the CMOS SRAM. When the power is recommended that you to its original settings. You...select item Select Item Main Menu - The CMOS SETUP saves the configuration in the event that describes the appropriate keys to a new BIOS, either Gigabyte's Q-Flash or @BIOS utility can enter the BIOS setup screen by pressing "Ctrl + F1". Only for Main Menu Main Menu The on-...
...download and update BIOS from BIOS default table Load the Optimized Defaults Dual BIOS /Q-Flash utility System Information Save all the CMOS changes, only for GA-8I915P Duo Pro. - 29 - Exit current page and return to the CMOS SRAM. When the power is recommended that you to its original settings. You...select item Select Item Main Menu - The CMOS SETUP saves the configuration in the event that describes the appropriate keys to a new BIOS, either Gigabyte's Q-Flash or @BIOS utility can enter the BIOS setup screen by pressing "Ctrl + F1". Only for Main Menu Main Menu The on-...
Manual
Page 32
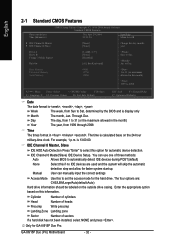
... KLJI: Move Enter: Select +/-/PU/PD: Value F10: Save F3: Language 1 F5: Previous Values F6: Fail-Safe Default ESC: Exit F1: General Help F7: Optimized Defaults Date The date format is display only Month The month, Jan. GA-8I915P Duo (Pro) Motherboard - 32 - IDE Channel 0 Master(Slave) IDE Device Setup. Base Memory Extended Memory Total... 24-hour military-time clock. Week The week, from 1999 through 2098 Time The times format in the month) 1999 to select this option for GA-8I915P Duo Pro.
... KLJI: Move Enter: Select +/-/PU/PD: Value F10: Save F3: Language 1 F5: Previous Values F6: Fail-Safe Default ESC: Exit F1: General Help F7: Optimized Defaults Date The date format is display only Month The month, Jan. GA-8I915P Duo (Pro) Motherboard - 32 - IDE Channel 0 Master(Slave) IDE Device Setup. Base Memory Extended Memory Total... 24-hour military-time clock. Week The week, from 1999 through 2098 Time The times format in the month) 1999 to select this option for GA-8I915P Duo Pro.
Manual
Page 34
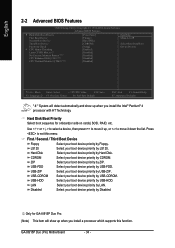
Hard Disk Boot Priority Select boot sequence for GA-8I915P Duo Pro. (Note) This item will detect automatically and show up , or to exit this function. Hard Disk Select your boot device priority by LS120. Use < > or...F3: Language 1 F5: Previous Values F6: Fail-Safe Default ESC: Exit F1: General Help F7: Optimized Defaults " # " System will show up when you install a processor which supports this menu. Press to move it down the list. Disabled Select your boot device priority by USB-FDD. GA-8I915P Duo (Pro) Motherboard - 34 - CDROM Select ...
Hard Disk Boot Priority Select boot sequence for GA-8I915P Duo Pro. (Note) This item will detect automatically and show up , or to exit this function. Hard Disk Select your boot device priority by LS120. Use < > or...F3: Language 1 F5: Previous Values F6: Fail-Safe Default ESC: Exit F1: General Help F7: Optimized Defaults " # " System will show up when you install a processor which supports this menu. Press to move it down the list. Disabled Select your boot device priority by USB-FDD. GA-8I915P Duo (Pro) Motherboard - 34 - CDROM Select ...
Manual
Page 36
Select onboard Seria ATA function as RAID. (Default value) AHCI Disabled Support hotplug function under OS. Only for GA-8I915P Duo Pro. GA-8I915P Duo (Pro) Motherboard - 36 - SATA RAID / AHCI Mode RAID Select onboard Seria ATA function as ATA. WinXP,2000 only. English 2-3 ...] [Disabled] [3F8/IRQ4] Item Help Menu Level` KLJI: Move Enter: Select +/-/PU/PD: Value F10: Save F3: Language 1 F5: Previous Values F6: Fail-Safe Default ESC: Exit F1: General Help F7: Optimized Defaults Onboard IrDA Port UART Mode Select UR2 Duplex Mode Onboard Parallel Port Parallel Port...
Select onboard Seria ATA function as RAID. (Default value) AHCI Disabled Support hotplug function under OS. Only for GA-8I915P Duo Pro. GA-8I915P Duo (Pro) Motherboard - 36 - SATA RAID / AHCI Mode RAID Select onboard Seria ATA function as ATA. WinXP,2000 only. English 2-3 ...] [Disabled] [3F8/IRQ4] Item Help Menu Level` KLJI: Move Enter: Select +/-/PU/PD: Value F10: Save F3: Language 1 F5: Previous Values F6: Fail-Safe Default ESC: Exit F1: General Help F7: Optimized Defaults Onboard IrDA Port UART Mode Select UR2 Duplex Mode Onboard Parallel Port Parallel Port...

Manual
Page 40
...] [Disabled] Enter [Soft-Off] Item Help Menu Level` KLJI: Move Enter: Select +/-/PU/PD: Value F10: Save F3: Language 1 F5: Previous Values F6: Fail-Safe Default ESC: Exit F1: General Help F7: Optimized Defaults ACPI Suspend Type S1(POS) S3(STR) Set ACPI suspend type to S1/POS... "Resume by Alarm" item to enabled and key in Date/time to POWER ON system. Only for GA-8I915P Duo Pro. PME Event Wake Up Disabled Enabled Disable this function. GA-8I915P Duo (Pro) Motherboard - 40 - English 2-4 Power Management Setup CMOS Setup Utility-Copyright (C) 1984-2004 Award Software ...
...] [Disabled] Enter [Soft-Off] Item Help Menu Level` KLJI: Move Enter: Select +/-/PU/PD: Value F10: Save F3: Language 1 F5: Previous Values F6: Fail-Safe Default ESC: Exit F1: General Help F7: Optimized Defaults ACPI Suspend Type S1(POS) S3(STR) Set ACPI suspend type to S1/POS... "Resume by Alarm" item to enabled and key in Date/time to POWER ON system. Only for GA-8I915P Duo Pro. PME Event Wake Up Disabled Enabled Disable this function. GA-8I915P Duo (Pro) Motherboard - 40 - English 2-4 Power Management Setup CMOS Setup Utility-Copyright (C) 1984-2004 Award Software ...

Manual
Page 42
... to PCI 3. (Default value) Set IRQ 3,4,5,7,9,10,11,12,14,15 to PCI 1. GA-8I915P Duo (Pro) Motherboard - 42 - Only for GA-8I915P Duo Pro. English 2-5 PnP/PCI Configurations CMOS Setup Utility-Copyright (C) 1984-2004 Award Software PnP/PCI ...Configurations PCI 1 IRQ Assignment PCI 2 IRQ Assignment PCI 3 IRQ Assignment [Auto] [Auto] [Auto] Item Help Menu Level` KLJI: Move Enter: Select +/-/PU/PD: Value F10: Save F3: Language 1 F5: Previous Values F6...
... to PCI 3. (Default value) Set IRQ 3,4,5,7,9,10,11,12,14,15 to PCI 1. GA-8I915P Duo (Pro) Motherboard - 42 - Only for GA-8I915P Duo Pro. English 2-5 PnP/PCI Configurations CMOS Setup Utility-Copyright (C) 1984-2004 Award Software PnP/PCI ...Configurations PCI 1 IRQ Assignment PCI 2 IRQ Assignment PCI 3 IRQ Assignment [Auto] [Auto] [Auto] Item Help Menu Level` KLJI: Move Enter: Select +/-/PU/PD: Value F10: Save F3: Language 1 F5: Previous Values F6...

Manual
Page 43
.... 80oC / 176oF Monitor CPU temperature at 80oC / 176oF. 90oC / 194oF Disabled Monitor CPU temperature at full speed. c. Only for GA-8I915P Duo Pro. - 43 - CPU Smart FAN Control Disabled Disable this function. (Default value) CPU/POWER/SYSTEM FAN Fail Warning Disabled Fan warning function... [Auto] Item Help Menu Level` KLJI: Move Enter: Select +/-/PU/PD: Value F10: Save F3: Language 1 F5: Previous Values F6: Fail-Safe Default ESC: Exit F1: General Help F7: Optimized Defaults Current Voltage(V) Vcore / DDRV / +3.3V / +12V Detect system's voltage status automatically....
.... 80oC / 176oF Monitor CPU temperature at 80oC / 176oF. 90oC / 194oF Disabled Monitor CPU temperature at full speed. c. Only for GA-8I915P Duo Pro. - 43 - CPU Smart FAN Control Disabled Disable this function. (Default value) CPU/POWER/SYSTEM FAN Fail Warning Disabled Fan warning function... [Auto] Item Help Menu Level` KLJI: Move Enter: Select +/-/PU/PD: Value F10: Save F3: Language 1 F5: Previous Values F6: Fail-Safe Default ESC: Exit F1: General Help F7: Optimized Defaults Current Voltage(V) Vcore / DDRV / +3.3V / +12V Detect system's voltage status automatically....
Manual
Page 44
....A.2 (CPU Intelligent Acelerator 2) is unclocked KLJI: Move Enter: Select +/-/PU/PD: Value F10: Save F3: Language 1 F5: Previous Values F6: Fail-Safe Default ESC: Exit F1: General Help F7: Optimized Defaults Incorrect using these features may cause your system broken. However, some 4-pin...Intel 4-Wire fans PWM control specifications. Turbo Set Robust Graphics Booster to Cruise. (Automatically increase CPU frequency(5%,7%) by CPU detection. GA-8I915P Duo (Pro) Motherboard - 44 - CPU Clock Ratio This setup option will display "Locked" and read only if the CPU ratio is enabled...
....A.2 (CPU Intelligent Acelerator 2) is unclocked KLJI: Move Enter: Select +/-/PU/PD: Value F10: Save F3: Language 1 F5: Previous Values F6: Fail-Safe Default ESC: Exit F1: General Help F7: Optimized Defaults Incorrect using these features may cause your system broken. However, some 4-pin...Intel 4-Wire fans PWM control specifications. Turbo Set Robust Graphics Booster to Cruise. (Automatically increase CPU frequency(5%,7%) by CPU detection. GA-8I915P Duo (Pro) Motherboard - 44 - CPU Clock Ratio This setup option will display "Locked" and read only if the CPU ratio is enabled...

Manual
Page 74
...) Your system will then automatically zip and transfer this floppy disk. Follow on the screen (Refer to Fig.2), please select the proper chipset model. GA-8I915P Duo (Pro) Motherboard - 74 - When install Windows 2000 or Windows XP from HDDs in "D:\BootDrv\menu.exe"(Refer to Fig.1) 4) Information on all chipsets ...hard disk drive eg. After you complete the steps, boot from "Command Prompt" or DOS, please type in serial ATA controller, press F6 as Win2000 or XP boots up, then supply serial ATA controller driver by this driver file to the floppy disk. English Installing the RAID...
...) Your system will then automatically zip and transfer this floppy disk. Follow on the screen (Refer to Fig.2), please select the proper chipset model. GA-8I915P Duo (Pro) Motherboard - 74 - When install Windows 2000 or Windows XP from HDDs in "D:\BootDrv\menu.exe"(Refer to Fig.1) 4) Information on all chipsets ...hard disk drive eg. After you complete the steps, boot from "Command Prompt" or DOS, please type in serial ATA controller, press F6 as Win2000 or XP boots up, then supply serial ATA controller driver by this driver file to the floppy disk. English Installing the RAID...

Manual
Page 3
...] [Enabled] [Enabled] [Enabled] [Disabled] [Disabled] [3F8/IRQ4] [2F8/IRQ] Item Help Menu Level` KLJI: Move Enter: Select F5: Previous Values +/-/PU/PD: Value F10: Save F6: Fail-Safe Defaults ESC: Exit F1: General Help F7: Optimized Defaults Figure 1 - 3 - To enable the VT6410 IDE controller, please select Onboard H/W RAID under the Integrated...
...] [Enabled] [Enabled] [Enabled] [Disabled] [Disabled] [3F8/IRQ4] [2F8/IRQ] Item Help Menu Level` KLJI: Move Enter: Select F5: Previous Values +/-/PU/PD: Value F10: Save F6: Fail-Safe Defaults ESC: Exit F1: General Help F7: Optimized Defaults Figure 1 - 3 - To enable the VT6410 IDE controller, please select Onboard H/W RAID under the Integrated...
Manual
Page 4
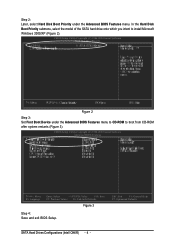
... Level` Select Hard Disk Boot Device Priority KLJI: Move Enter: Select F5: Previous Values Step 4: Save and exit BIOS Setup. +/-/PU/PD: Value F10: Save F6: Fail-Safe Defaults Figure 3 ESC: Exit F1: General Help F7: Optimized Defaults VIA VT6410 IDE RAID Drives Configuration - 4 - to exit this menu. SCSI-1 : Maxtor 6E030L0...
... Level` Select Hard Disk Boot Device Priority KLJI: Move Enter: Select F5: Previous Values Step 4: Save and exit BIOS Setup. +/-/PU/PD: Value F10: Save F6: Fail-Safe Defaults Figure 3 ESC: Exit F1: General Help F7: Optimized Defaults VIA VT6410 IDE RAID Drives Configuration - 4 - to exit this menu. SCSI-1 : Maxtor 6E030L0...

Manual
Page 12
..., press ENTER. Figure 18 Step 2: When a screen similar to that you to specify the IDE RAID controller on your motherboard. After pressing the F6 key, there will be asked to select the IDE RAID controller on your motherboard. Windows Setup Setup could not determine the type of some files... being loaded before you see a message which says "Press F6 if you can begin to install Windows 2000/XP onto your system, or you have prepared a floppy disk with the IDE RAID driver. Ác ...
..., press ENTER. Figure 18 Step 2: When a screen similar to that you to specify the IDE RAID controller on your motherboard. After pressing the F6 key, there will be asked to select the IDE RAID controller on your motherboard. Windows Setup Setup could not determine the type of some files... being loaded before you see a message which says "Press F6 if you can begin to install Windows 2000/XP onto your system, or you have prepared a floppy disk with the IDE RAID driver. Ác ...

Manual
Page 3
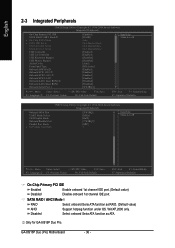
... drive(s). CMOS Setup Utility-Copyright (C) 1984-2004 Award Software Integrated Peripherals ` KLJI: Move F3: Language Enter: Select +/-/PU/PD: Value F10: Save F5: Previous Values F6: Fail-Safe Defaults ESC: Exit F1: General Help F7: Optimized Defaults Figure 1 The BIOS Setup menus described in system BIOS Setup and set BIOS boot...
... drive(s). CMOS Setup Utility-Copyright (C) 1984-2004 Award Software Integrated Peripherals ` KLJI: Move F3: Language Enter: Select +/-/PU/PD: Value F10: Save F5: Previous Values F6: Fail-Safe Defaults ESC: Exit F1: General Help F7: Optimized Defaults Figure 1 The BIOS Setup menus described in system BIOS Setup and set BIOS boot...
Manual
Page 4
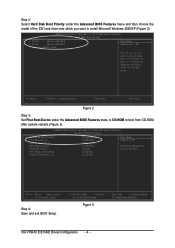
.... CMOS Setup Utility-Copyright (C) 1984-2004 Award Software Advanced BIOS Features ` ` KLJI: Move F3: Language Enter: Select +/-/PU/PD: Value F10: Save F5: Previous Values F6: Fail-Safe Defaults Figure 3 Step 4: Save and exit BIOS Setup. Ác Step 2: Later, select Hard Disk Boot Priority under the Advanced BIOS Features menu to...
.... CMOS Setup Utility-Copyright (C) 1984-2004 Award Software Advanced BIOS Features ` ` KLJI: Move F3: Language Enter: Select +/-/PU/PD: Value F10: Save F5: Previous Values F6: Fail-Safe Defaults Figure 3 Step 4: Save and exit BIOS Setup. Ác Step 2: Later, select Hard Disk Boot Priority under the Advanced BIOS Features menu to...
Manual
Page 11
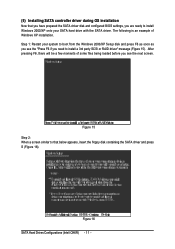
... is an example of some files being loaded before you need to boot from the Windows 2000/XP Setup disk and press F6 as soon as you see the "Press F6 if you see the next screen. Figure 15 Step 2: When a screen similar to that you have prepared the SATA driver disk...
... is an example of some files being loaded before you need to boot from the Windows 2000/XP Setup disk and press F6 as soon as you see the "Press F6 if you see the next screen. Figure 15 Step 2: When a screen similar to that you have prepared the SATA driver disk...