
Manual
Page 5
Chapter 3 Install Drivers 49 3-1 Install Chipset Drivers 49 3-2 Software Applications 50 3-3 Driver CD Information 50 3-4 Hardware Information 51 3-5 Contact Us ...51 Chapter 4 Appendix 53 4-1 Unique Software Utilities 53 4-1-1 Xpress Recovery Introduction 54 4-1-2 Flash BIOS Method Introduction 57 4-1-3 Serial ATA BIOS Setting Utility Introduction 68 4-1-4 2 / 4 / 5.1 / 7.1 Channel Audio Function Introduction 75 4-2 Troubleshooting 81 Only for GA-8I915P Duo Pro. - 5 -
Chapter 3 Install Drivers 49 3-1 Install Chipset Drivers 49 3-2 Software Applications 50 3-3 Driver CD Information 50 3-4 Hardware Information 51 3-5 Contact Us ...51 Chapter 4 Appendix 53 4-1 Unique Software Utilities 53 4-1-1 Xpress Recovery Introduction 54 4-1-2 Flash BIOS Method Introduction 57 4-1-3 Serial ATA BIOS Setting Utility Introduction 68 4-1-4 2 / 4 / 5.1 / 7.1 Channel Audio Function Introduction 75 4-2 Troubleshooting 81 Only for GA-8I915P Duo Pro. - 5 -
Manual
Page 16
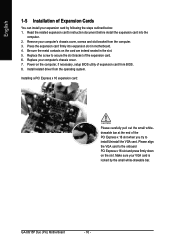
... onboard PCI Express x 16 slot and press firmly down on the slot .Make sure your computer's chassis cover. 7. Install related driver from BIOS. 8. Press the expansion card firmly into the computer. 2. GA-8I915P Duo (Pro) Motherboard - 16 - Be sure the metal contacts on the computer, if necessary, setup BIOS utility of expansion card from the...
... onboard PCI Express x 16 slot and press firmly down on the slot .Make sure your computer's chassis cover. 7. Install related driver from BIOS. 8. Press the expansion card firmly into the computer. 2. GA-8I915P Duo (Pro) Motherboard - 16 - Be sure the metal contacts on the computer, if necessary, setup BIOS utility of expansion card from the...
Manual
Page 17
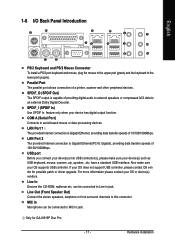
...is Gigabit Ethernet(PCI-E Gigabit), providing data transfer speeds of 10/100/1000Mbps. can be connected to MIC In jack. Only for possible patch or driver upgrade. have a standard USB interface. MIC In Microphone can be connected to Line In jack. Line Out (Front Speaker Out) Connect the stereo ... you connect your device(s) into USB connector(s), please make sure your OS does not support USB controller, please contact OS ven dor for GA-8I915P Duo Pro. - 17 - SPDIF_O (SPDIF Out) The SPDIF output is capable of a printer, scanner and other peripheral devices.
...is Gigabit Ethernet(PCI-E Gigabit), providing data transfer speeds of 10/100/1000Mbps. can be connected to MIC In jack. Only for possible patch or driver upgrade. have a standard USB interface. MIC In Microphone can be connected to Line In jack. Line Out (Front Speaker Out) Connect the stereo ... you connect your device(s) into USB connector(s), please make sure your OS does not support USB controller, please contact OS ven dor for GA-8I915P Duo Pro. - 17 - SPDIF_O (SPDIF Out) The SPDIF output is capable of a printer, scanner and other peripheral devices.
Manual
Page 22
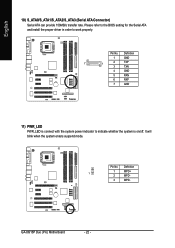
Definition 1 GND 7 1 2 TXP 3 TXN 4 GND 5 RXN 6 RXP 7 GND 11) PWR_LED PWR_LED is connect with the system power indicator to work properly. GA-8I915P Duo (Pro) Motherboard - 22 - Pin No. It will blink when the system enters suspend mode. Definition 1 1 MPD+ 2 MPD- 3 MPD- Please refer to the BIOS setting for the Serial ATA and install the proper driver in order to indicate whether the system is on/off. Pin No. English 10) S_ATA0/S_ATA1/S_ATA2/S_ATA3 (Serial ATA Connector) Serial ATA can provide 150MB/s transfer rate.
Definition 1 GND 7 1 2 TXP 3 TXN 4 GND 5 RXN 6 RXP 7 GND 11) PWR_LED PWR_LED is connect with the system power indicator to work properly. GA-8I915P Duo (Pro) Motherboard - 22 - Pin No. It will blink when the system enters suspend mode. Definition 1 1 MPD+ 2 MPD- 3 MPD- Please refer to the BIOS setting for the Serial ATA and install the proper driver in order to indicate whether the system is on/off. Pin No. English 10) S_ATA0/S_ATA1/S_ATA2/S_ATA3 (Serial ATA Connector) Serial ATA can provide 150MB/s transfer rate.
Manual
Page 49
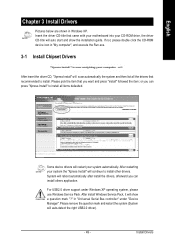
..." under Windows XP operating system, please use Windows Service Pack. Please pick the item that came with your motherboard into your CD-ROM drive, the driver CD-title will scan automatically the system and then list all items defaulted. After restarting your system automatically. After install Windows Service Pack, it will...
..." under Windows XP operating system, please use Windows Service Pack. Please pick the item that came with your motherboard into your CD-ROM drive, the driver CD-title will scan automatically the system and then list all items defaulted. After restarting your system automatically. After install Windows Service Pack, it will...

Manual
Page 50
GA-8I915P Duo (Pro) Motherboard - 50 - English 3-2 Software Applications This page displays all the tools that Gigabyte developed and some free software, you can choose anyone you want and press "install" to install them. 3-3 Driver CD Information This page lists the contents of software and drivers in this CD-title.
GA-8I915P Duo (Pro) Motherboard - 50 - English 3-2 Software Applications This page displays all the tools that Gigabyte developed and some free software, you can choose anyone you want and press "install" to install them. 3-3 Driver CD Information This page lists the contents of software and drivers in this CD-title.
Manual
Page 51
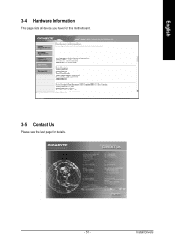
Install Drivers English 3-4 Hardware Information This page lists all device you have for this motherboard. 3-5 Contact Us Please see the last page for details. - 51 -
Install Drivers English 3-4 Hardware Information This page lists all device you have for this motherboard. 3-5 Contact Us Please see the last page for details. - 51 -
Manual
Page 53
...the Internet, C.O.M. C.O.M. (Corporate Online Management) A web-based system management tool that eliminates system boot-up -to the desired level. Through GIGABYTE M.I .T.'s integration of programs. When the function is disabled, the CPU is a unique feature that allows system hardware information such as CPU... the most up errors resulting from a recommended memory module list. English Chapter 4 Appendix 4-1 Unique Software Utilities (Not all new drivers with the latest LGA775 Intel® Pentium® 4 Processor as well as future Intel® processors. for intelligent indication of...
...the Internet, C.O.M. C.O.M. (Corporate Online Management) A web-based system management tool that eliminates system boot-up -to the desired level. Through GIGABYTE M.I .T.'s integration of programs. When the function is disabled, the CPU is a unique feature that allows system hardware information such as CPU... the most up errors resulting from a recommended memory module list. English Chapter 4 Appendix 4-1 Unique Software Utilities (Not all new drivers with the latest LGA775 Intel® Pentium® 4 Processor as well as future Intel® processors. for intelligent indication of...

Manual
Page 54
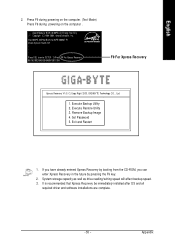
...NTFS formats 2. Must be used to its size. 6. How to NTFS format. GIGABYTE Technology CO. , Ltd. 1. Xpress Recovery is a utility used with an ...user can also function by pressing the F9 key during computer power on. . . Insert the provided driver CD into your CD drive, then save and exit the BIOS menu. Execute Restore Utility 3. Set Password... the phrase "Boot from CD: Xpress Recovery V1.0 (C) Copy Right 2003. Exit and Restart Build 2011 GA-8I915P Duo (Pro) Motherboard - 54 - English 4-1-1 Xpress Recovery Introduction What is backed up and restore an OS partition. ...
...NTFS formats 2. Must be used to its size. 6. How to NTFS format. GIGABYTE Technology CO. , Ltd. 1. Xpress Recovery is a utility used with an ...user can also function by pressing the F9 key during computer power on. . . Insert the provided driver CD into your CD drive, then save and exit the BIOS menu. Execute Restore Utility 3. Set Password... the phrase "Boot from CD: Xpress Recovery V1.0 (C) Copy Right 2003. Exit and Restart Build 2011 GA-8I915P Duo (Pro) Motherboard - 54 - English 4-1-1 Xpress Recovery Introduction What is backed up and restore an OS partition. ...
Manual
Page 55
Intel 865PE AGPSet BIOS for 8IPE1000MT F1 Check System Health OK . . . GIGABYTE Technology CO. , Ltd. 1. Set Password 5. Exit and Restart 1. System storage capacity as well as drive reading/writing speed will affect backup speed. 3. Press DEL ... Xpress Recovery Xpress Recovery V1.0 (C) Copy Right 2003. Remove Backup Image 4. It is recommended that Xpress Recovery be immediately installed after OS and all required driver and software installations are complete. - 55 - Press F9 during powering on the computer. (Text Mode) Press F9 during powering on the computer . Execute Backup ...
Intel 865PE AGPSet BIOS for 8IPE1000MT F1 Check System Health OK . . . GIGABYTE Technology CO. , Ltd. 1. Set Password 5. Exit and Restart 1. System storage capacity as well as drive reading/writing speed will affect backup speed. 3. Press DEL ... Xpress Recovery Xpress Recovery V1.0 (C) Copy Right 2003. Remove Backup Image 4. It is recommended that Xpress Recovery be immediately installed after OS and all required driver and software installations are complete. - 55 - Press F9 during powering on the computer. (Text Mode) Press F9 during powering on the computer . Execute Backup ...
Manual
Page 69
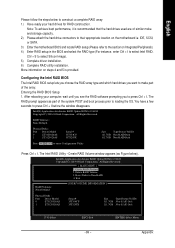
... Configuration Utility Press Ctrl + I before the window disappears. RAID Volumes : None Defined. Reset Disks to select Silicon Image). 5) Complete driver installation. 6) Complete RAID utility installation. Appendix More information on Integrated Peripherals). 4) Enter RAID setup in the BIOS and select the RAID... rebooting your hard drives for RAID construction. Exit RAID Volumes : None Defined. [ DISK/VOLUME INFORMATION ] Physical Disks : Port Driver Model 0 ST3120026AS 1 ST3120026AS Serial # 3JT354CP 3JT329JX Size Type/Status(Vol ID) 111.7GB Non-RAID Disk 111.7GB Non-RAID...
... Configuration Utility Press Ctrl + I before the window disappears. RAID Volumes : None Defined. Reset Disks to select Silicon Image). 5) Complete driver installation. 6) Complete RAID utility installation. Appendix More information on Integrated Peripherals). 4) Enter RAID setup in the BIOS and select the RAID... rebooting your hard drives for RAID construction. Exit RAID Volumes : None Defined. [ DISK/VOLUME INFORMATION ] Physical Disks : Port Driver Model 0 ST3120026AS 1 ST3120026AS Serial # 3JT354CP 3JT329JX Size Type/Status(Vol ID) 111.7GB Non-RAID Disk 111.7GB Non-RAID...
Manual
Page 73
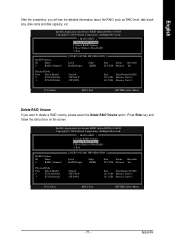
... 0 RAID_Volume0 [ DISK/VOLUME INFORMATION ] Level RAID(Stripe) Strip 128KB Size Status Bootable 223.5GB Normal Yes Physical Disks : Port Driver Model 0 ST3120026AS 1 ST3120026AS Serial # 3JT354CP 3JT329JX Size Type/Status(Vol ID) 111.7GB Member Disk(0) 111.7GB Member Disk(0) ...Name 0 RAID_Volume0 [ DISK/VOLUME INFORMATION ] Level RAID(Stripe) Strip 128KB Size Status 223.5GB Normal Bootable Yes Physical Disks : Port Driver Model 0 ST3120026AS 1 ST3120026AS Serial # 3JT354CP 3JT329JX Size Type/Status(Vol ID) 111.7GB Member Disk(0) 111.7GB Member Disk(0) [hi...
... 0 RAID_Volume0 [ DISK/VOLUME INFORMATION ] Level RAID(Stripe) Strip 128KB Size Status Bootable 223.5GB Normal Yes Physical Disks : Port Driver Model 0 ST3120026AS 1 ST3120026AS Serial # 3JT354CP 3JT329JX Size Type/Status(Vol ID) 111.7GB Member Disk(0) 111.7GB Member Disk(0) ...Name 0 RAID_Volume0 [ DISK/VOLUME INFORMATION ] Level RAID(Stripe) Strip 128KB Size Status 223.5GB Normal Bootable Yes Physical Disks : Port Driver Model 0 ST3120026AS 1 ST3120026AS Serial # 3JT354CP 3JT329JX Size Type/Status(Vol ID) 111.7GB Member Disk(0) 111.7GB Member Disk(0) [hi...

Manual
Page 74
...: In the menu list, Intel Application Accelerator 4.0 is Intel ICH6R chipset. Fig.1 Fig.2 (Note) Your system will then automatically zip and transfer this floppy disk. GA-8I915P Duo (Pro) Motherboard - 74 - English Installing the RAID drivers For the Windows operating system (Win NT, WinXP, Win2000 ), for IDE RAID/SCSI/Serial ATA functioning, the...
...: In the menu list, Intel Application Accelerator 4.0 is Intel ICH6R chipset. Fig.1 Fig.2 (Note) Your system will then automatically zip and transfer this floppy disk. GA-8I915P Duo (Pro) Motherboard - 74 - English Installing the RAID drivers For the Windows operating system (Win NT, WinXP, Win2000 ), for IDE RAID/SCSI/Serial ATA functioning, the...
Manual
Page 75
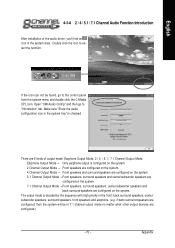
.... 2 Channel Output Mode -- English 4-1-4 2 / 4 / 5.1 / 7.1 Channel Audio Function Introduction After installation of output mode: Earphone Output Mode, 2 / 4 / 5.1 / 7.1 Channel Output Mode. There are 5 kinds of the audio driver, you'll find an icon in 7.1 channel output mode no matter what other output devices are configured.) - 75 - If the icon can not be in...
.... 2 Channel Output Mode -- English 4-1-4 2 / 4 / 5.1 / 7.1 Channel Audio Function Introduction After installation of output mode: Earphone Output Mode, 2 / 4 / 5.1 / 7.1 Channel Output Mode. There are 5 kinds of the audio driver, you'll find an icon in 7.1 channel output mode no matter what other output devices are configured.) - 75 - If the icon can not be in...
Manual
Page 76
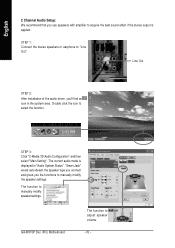
GA-8I915P Duo (Pro) Motherboard The function to select the function. Double click the icon to adjust speaker volume. - 76 - "Smart Jack" would auto-detect the speaker type you ... "C-Media 3D Audio Configuration" and then select "Main Setting". The function to manually modify the speaker settings. Line Out STEP 2: After installation of the audio driver, you'll find an icon in "Audio System Status". English 2 Channel Audio Setup: We recommend that you use speakers with amplifier to acquire the best...
GA-8I915P Duo (Pro) Motherboard The function to select the function. Double click the icon to adjust speaker volume. - 76 - "Smart Jack" would auto-detect the speaker type you ... "C-Media 3D Audio Configuration" and then select "Main Setting". The function to manually modify the speaker settings. Line Out STEP 2: After installation of the audio driver, you'll find an icon in "Audio System Status". English 2 Channel Audio Setup: We recommend that you use speakers with amplifier to acquire the best...
Manual
Page 77
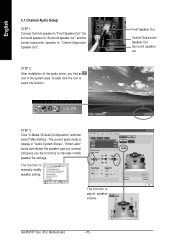
... speaker out STEP 3: Click "C-Media 3D Audio Configuration" and then select "Main Setting". The function to "Surround speaker out". STEP 2: After installation of the audio driver, you the functions to select the function. The current audio mode is display in the system area. Appendix English 4 Channel Audio Setup STEP 1 : Connect the...
... speaker out STEP 3: Click "C-Media 3D Audio Configuration" and then select "Main Setting". The function to "Surround speaker out". STEP 2: After installation of the audio driver, you the functions to select the function. The current audio mode is display in the system area. Appendix English 4 Channel Audio Setup STEP 1 : Connect the...
Manual
Page 78
... an icon in "Audio System Status". The function to adjust speaker volume. GA-8I915P Duo (Pro) Motherboard - 78 - The current audio mode is display in the system area. The function to manually modify speaker setting. STEP 2: After installation of the audio driver, you the functions to manually modify speaker the settings. Double click the icon...
... an icon in "Audio System Status". The function to adjust speaker volume. GA-8I915P Duo (Pro) Motherboard - 78 - The current audio mode is display in the system area. The function to manually modify speaker setting. STEP 2: After installation of the audio driver, you the functions to manually modify speaker the settings. Double click the icon...
Manual
Page 79
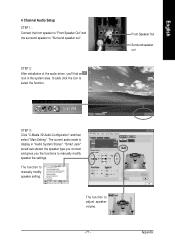
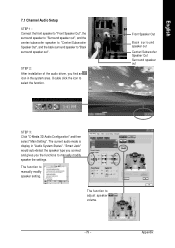
... Speaker Out", and the back surround speaker to adjust speaker volume. - 79 - The function to "Back surround speaker out". STEP 2: After installation of the audio driver, you the functions to manually modify speaker setting. "Smart Jack" would auto-detect the speaker type you connect and gives you find an icon in...
... Speaker Out", and the back surround speaker to adjust speaker volume. - 79 - The function to "Back surround speaker out". STEP 2: After installation of the audio driver, you the functions to manually modify speaker setting. "Smart Jack" would auto-detect the speaker type you connect and gives you find an icon in...
Manual
Page 1
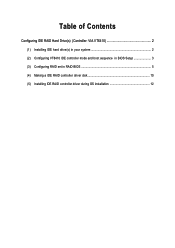
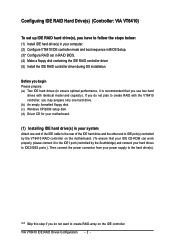
Table of Contents Configuring IDE RAID Hard Drive(s) (Controller: VIA VT6410 2 (1) Installing IDE hard drive(s) in your system 2 (2) Configuring VT6410 IDE controller mode and boot sequence in BIOS Setup 3 (3) Configuring RAID set in RAID BIOS 5 (4) Making a IDE RAID controller driver disk 10 (5) Installing IDE RAID controller driver during OS installation 12
Table of Contents Configuring IDE RAID Hard Drive(s) (Controller: VIA VT6410 2 (1) Installing IDE hard drive(s) in your system 2 (2) Configuring VT6410 IDE controller mode and boot sequence in BIOS Setup 3 (3) Configuring RAID set in RAID BIOS 5 (4) Making a IDE RAID controller driver disk 10 (5) Installing IDE RAID controller driver during OS installation 12
Manual
Page 2
... to the hard drive(s). Before you may prepare only one hard drive. (b) An empty formatted floppy disk. (c) Windows XP/2000 setup disk. (d) Driver CD for your motherboard. (1) Installing IDE hard drive(s) in your system Attach one end of the IDE cable to the rear of the IDE hard... Hard Drive(s) (Controller: VIA VT6410) Åé ¤¤ To set in RAID BIOS. (4) Make a floppy disk containing the IDE RAID controller driver (5) Install the IDE RAID controller driver during OS installation. "*" Skip this step if you do not plan to create RAID with identical model and capacity).
... to the hard drive(s). Before you may prepare only one hard drive. (b) An empty formatted floppy disk. (c) Windows XP/2000 setup disk. (d) Driver CD for your motherboard. (1) Installing IDE hard drive(s) in your system Attach one end of the IDE cable to the rear of the IDE hard... Hard Drive(s) (Controller: VIA VT6410) Åé ¤¤ To set in RAID BIOS. (4) Make a floppy disk containing the IDE RAID controller driver (5) Install the IDE RAID controller driver during OS installation. "*" Skip this step if you do not plan to create RAID with identical model and capacity).


