Manual
Page 2
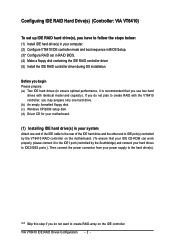
... the VT6410 controller, you may prepare only one hard drive. (b) An empty formatted floppy disk. (c) Windows XP/2000 setup disk. (d) Driver CD for your motherboard. (1) Installing IDE hard drive(s) in your system Attach one end of the IDE cable to the rear of the IDE hard drive and...: VIA VT6410) Åé ¤¤ To set in RAID BIOS. (4) Make a floppy disk containing the IDE RAID controller driver (5) Install the IDE RAID controller driver during OS installation. If you do not want to ensure optimal performance, it to the IDE1 port (controlled by the VT6410 RAID controller...
... the VT6410 controller, you may prepare only one hard drive. (b) An empty formatted floppy disk. (c) Windows XP/2000 setup disk. (d) Driver CD for your motherboard. (1) Installing IDE hard drive(s) in your system Attach one end of the IDE cable to the rear of the IDE hard drive and...: VIA VT6410) Åé ¤¤ To set in RAID BIOS. (4) Make a floppy disk containing the IDE RAID controller driver (5) Install the IDE RAID controller driver during OS installation. If you do not want to ensure optimal performance, it to the IDE1 port (controlled by the VT6410 RAID controller...
Manual
Page 10
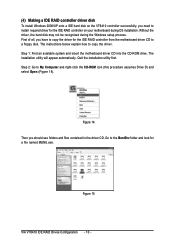
...look for the IDE RAID controller on your motherboard during the Windows setup process. Go to ¤å a floppy disk. Figure 15 VIA VT6410 IDE RAID Drives Configuration - 10 - Step 1: Find an available system and insert the motherboard driver CD into the CD-ROM drive. Without the... ¤¤ driver, the hard disk may not be recognized during OS installation. Step 2: Go to copy the...
...look for the IDE RAID controller on your motherboard during the Windows setup process. Go to ¤å a floppy disk. Figure 15 VIA VT6410 IDE RAID Drives Configuration - 10 - Step 1: Find an available system and insert the motherboard driver CD into the CD-ROM drive. Without the... ¤¤ driver, the hard disk may not be recognized during OS installation. Step 2: Go to copy the...
Manual
Page 11
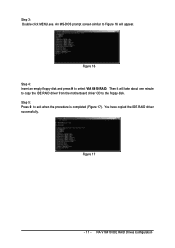
Figure 16 Step 4: Insert an empty floppy disk and press H to exit when the procedure is completed (Figure 17). You have copied the IDE RAID driver successfully. Step 3: Double-click MENU.exe. Figure 17 - 11 - VIA VT6410 IDE RAID Drives Configuration Step 5: Press 0 to select VIA 6410 RAID. Then it will appear. An MS-DOS prompt screen similar to Figure 16 will take about one minute to copy the IDE RAID driver from the motherboard driver CD to the floppy disk.
Figure 16 Step 4: Insert an empty floppy disk and press H to exit when the procedure is completed (Figure 17). You have copied the IDE RAID driver successfully. Step 3: Double-click MENU.exe. Figure 17 - 11 - VIA VT6410 IDE RAID Drives Configuration Step 5: Press 0 to select VIA 6410 RAID. Then it will appear. An MS-DOS prompt screen similar to Figure 16 will take about one minute to copy the IDE RAID driver from the motherboard driver CD to the floppy disk.

Manual
Page 12
... appears, insert the floppy disk containing the IDE RAID driver and press S to install a 3rd party SCSI or RAID driver. Then you to specify the IDE RAID controller on your motherboard. This procedure ¤¤ assumes Windows XP installation. ¤å Step 1: Restart your motherboard. After pressing the F6 key, there will be asked...
... appears, insert the floppy disk containing the IDE RAID driver and press S to install a 3rd party SCSI or RAID driver. Then you to specify the IDE RAID controller on your motherboard. This procedure ¤¤ assumes Windows XP installation. ¤å Step 1: Restart your motherboard. After pressing the F6 key, there will be asked...
Manual
Page 13
...manufacturer, press S. * If you do not want to the previous screen. Step 3: Use the arrow keys to load the IDE RAID driver from the motherboard driver CD. Windows Setup Setup will load support for the following mass storage device(s): VIA RAID Controller(Windows XP) * To specify additional SCSI... have any device support disks from a mass storage device manufacturer, or do not have chosen to proceed with IDE RAID controller driver installation from the following operating systems you want from the floppy disk. VIA RAID Controller(Windows 2003 IA32) VIA RAID Controller(Windows...
...manufacturer, press S. * If you do not want to the previous screen. Step 3: Use the arrow keys to load the IDE RAID driver from the motherboard driver CD. Windows Setup Setup will load support for the following mass storage device(s): VIA RAID Controller(Windows XP) * To specify additional SCSI... have any device support disks from a mass storage device manufacturer, or do not have chosen to proceed with IDE RAID controller driver installation from the following operating systems you want from the floppy disk. VIA RAID Controller(Windows 2003 IA32) VIA RAID Controller(Windows...
Manual
Page 2
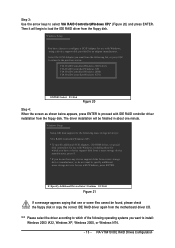
...the name of the SATA hard drive and the other end to available SATA port(s) on the motherboard. (If there are more than one SATA controller on your motherboard, you do not want to create RAID with identical model and capacity). If you may prepare... to create RAID array on South-Bridge.) Then connect the power connector from your motherboard. (1) Installing SATA hard drive(s) in RAID BIOS. (4) Make a floppy disk containing the SATA controller driver. (5) Install the SATA controller driver during OS installation. Ác Configuring SATA Hard Drive(s) (Controller Intel ICH6R) &#...
...the name of the SATA hard drive and the other end to available SATA port(s) on the motherboard. (If there are more than one SATA controller on your motherboard, you do not want to create RAID with identical model and capacity). If you may prepare... to create RAID array on South-Bridge.) Then connect the power connector from your motherboard. (1) Installing SATA hard drive(s) in RAID BIOS. (4) Make a floppy disk containing the SATA controller driver. (5) Install the SATA controller driver during OS installation. Ác Configuring SATA Hard Drive(s) (Controller Intel ICH6R) &#...
Manual
Page 9
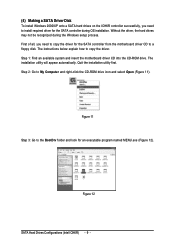
... a SATA hard drives on the ICH6R controller successfully, you need to install required driver for an executable program named MENU.exe (Figure 12). Step 1: Find an available system and insert the motherboard driver CD into the CD-ROM drive. Figure 11 Step 3: Go to a floppy disk.... The installation utility will appear automatically. Quit the installation utility first. Without the driver, the hard drives ¤¤ may not be ...
... a SATA hard drives on the ICH6R controller successfully, you need to install required driver for an executable program named MENU.exe (Figure 12). Step 1: Find an available system and insert the motherboard driver CD into the CD-ROM drive. Figure 11 Step 3: Go to a floppy disk.... The installation utility will appear automatically. Quit the installation utility first. Without the driver, the hard drives ¤¤ may not be ...
Manual
Page 10
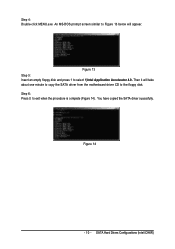
Step 4: Double-click MENU.exe. Figure 13 Step 5: Insert an empty floppy disk and press 1 to exit when the procedure is complete (Figure 14). Then it will appear. Step 6: Press 0 to select 1)Intel Application Accelerator 4.0. You have copied the SATA driver sucessfully. An MS-DOS prompt screen similar to Figure 13 below will take about one minute to copy the SATA driver from the motherboard driver CD to the floppy disk. Figure 14 - 10 - SATA Hard Drives Configurations (Intel ICH6R)
Step 4: Double-click MENU.exe. Figure 13 Step 5: Insert an empty floppy disk and press 1 to exit when the procedure is complete (Figure 14). Then it will appear. Step 6: Press 0 to select 1)Intel Application Accelerator 4.0. You have copied the SATA driver sucessfully. An MS-DOS prompt screen similar to Figure 13 below will take about one minute to copy the SATA driver from the motherboard driver CD to the floppy disk. Figure 14 - 10 - SATA Hard Drives Configurations (Intel ICH6R)

Manual
Page 12
... appear. Figure 18 "*" If your southbridge is ICH6R, select Intel(R) 82801FR (ICH6R). The driver installation will be found, please check the floppy disk or copy the correct SATA driver again from the motherboard driver CD. Step 3: If Setup correctly recognizes the driver in about one or some file(s) cannot be finished in the floppy disk...
... appear. Figure 18 "*" If your southbridge is ICH6R, select Intel(R) 82801FR (ICH6R). The driver installation will be found, please check the floppy disk or copy the correct SATA driver again from the motherboard driver CD. Step 3: If Setup correctly recognizes the driver in about one or some file(s) cannot be finished in the floppy disk...
Manual
Page 16
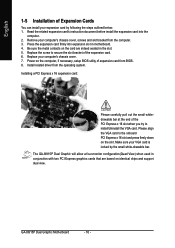
...card's instruction document before install the expansion card into expansion slot in motherboard. 4. Installing a PCI Express x 16 expansion card: Please carefully pull out the small whitedrawable bar at the end of the expansion card. 6. Install related driver from the operating system. English 1-5 Installation of Expansion Cards You ... firmly down on the computer, if necessary, setup BIOS utility of expansion card from the computer. 3. Replace your computer's chassis cover. 7. GA-8I915P Dual Graphic Motherboard - 16 - Press the expansion card firmly into the computer. 2.
...card's instruction document before install the expansion card into expansion slot in motherboard. 4. Installing a PCI Express x 16 expansion card: Please carefully pull out the small whitedrawable bar at the end of the expansion card. 6. Install related driver from the operating system. English 1-5 Installation of Expansion Cards You ... firmly down on the computer, if necessary, setup BIOS utility of expansion card from the computer. 3. Replace your computer's chassis cover. 7. GA-8I915P Dual Graphic Motherboard - 16 - Press the expansion card firmly into the computer. 2.
Manual
Page 18
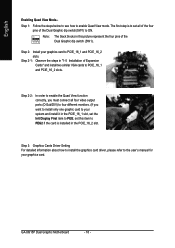
GA-8I915P Dual Graphic Motherboard - 18 - English Enabling Quad View Mode-Step 1: Follow the steps below to see how to your graphics card. Step 2-1: Observe the steps in "1-5 Installation of the Dual Graphic dip switch (SW1). 1 234 Step 2: Install your graphics card to PCIE_16_1 and PCIE_16_2 slots. Step 3: Graphics Cards Driver Setting For detailed information about how to install the graphics card driver, please...
GA-8I915P Dual Graphic Motherboard - 18 - English Enabling Quad View Mode-Step 1: Follow the steps below to see how to your graphics card. Step 2-1: Observe the steps in "1-5 Installation of the Dual Graphic dip switch (SW1). 1 234 Step 2: Install your graphics card to PCIE_16_1 and PCIE_16_2 slots. Step 3: Graphics Cards Driver Setting For detailed information about how to install the graphics card driver, please...
Manual
Page 24
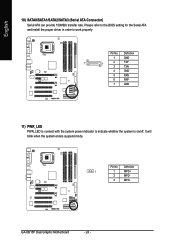
Definition 1 1 MPD+ 2 MPD- 3 MPD- GA-8I915P Dual Graphic Motherboard - 24 - Definition 1 GND 7 1 2 TXP 3 TXN 4 GND 5 RXN 6 RXP 7 GND 11) PWR_LED PWR_LED is on/off. English 10) SATA0/SATA1/SATA2/SATA3 (Serial ATA Connector) Serial ATA can provide 150MB/s transfer rate. It will blink when the system enters suspend mode. Please refer to the BIOS setting for the Serial ATA and install the proper driver in order to indicate whether the system is connect with the system power indicator to work properly. Pin No. Pin No.
Definition 1 1 MPD+ 2 MPD- 3 MPD- GA-8I915P Dual Graphic Motherboard - 24 - Definition 1 GND 7 1 2 TXP 3 TXN 4 GND 5 RXN 6 RXP 7 GND 11) PWR_LED PWR_LED is on/off. English 10) SATA0/SATA1/SATA2/SATA3 (Serial ATA Connector) Serial ATA can provide 150MB/s transfer rate. It will blink when the system enters suspend mode. Please refer to the BIOS setting for the Serial ATA and install the proper driver in order to indicate whether the system is connect with the system power indicator to work properly. Pin No. Pin No.
Manual
Page 51
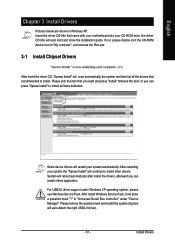
...the Run.exe. 3-1 Install Chipset Drivers After insert the driver CD, "Xpress Install" will auto start and show a question mark "?" After restarting your system automatically. Please pick the item that came with your motherboard into your CD-ROM drive, the driver CD-title will scan automatically the ...system and then list all items defaulted. or you can install others application. Insert the driver CD-title that you can press "Xpress Install...
...the Run.exe. 3-1 Install Chipset Drivers After insert the driver CD, "Xpress Install" will auto start and show a question mark "?" After restarting your system automatically. Please pick the item that came with your motherboard into your CD-ROM drive, the driver CD-title will scan automatically the ...system and then list all items defaulted. or you can install others application. Insert the driver CD-title that you can press "Xpress Install...

Manual
Page 52
GA-8I915P Dual Graphic Motherboard - 52 - English 3-2 Software Applications This page displays all the tools that Gigabyte developed and some free software, you can choose anyone you want and press "install" to install them. 3-3 Driver CD Information This page lists the contents of software and drivers in this CD-title.
GA-8I915P Dual Graphic Motherboard - 52 - English 3-2 Software Applications This page displays all the tools that Gigabyte developed and some free software, you can choose anyone you want and press "install" to install them. 3-3 Driver CD Information This page lists the contents of software and drivers in this CD-title.

Manual
Page 53
Install Drivers English 3-4 Hardware Information This page lists all device you have for this motherboard. 3-5 Contact Us Please see the last page for details. - 53 -
Install Drivers English 3-4 Hardware Information This page lists all device you have for this motherboard. 3-5 Contact Us Please see the last page for details. - 53 -

Manual
Page 55
...these Unique Software Utilities, please check your MB features.) U-PLUS D.P.S. (Universal Plus Dual Power System) The U-Plus Dual Power System (U-Plus DPS) is returned to its initial status. As well, 4 ...circuit the "Clear CMOS" pins or the battery on the motherboard to reset the system back to -date drivers and BIOS. - 55 - Download Center Download Center allows ...® Pentium® 4 Processor as well as CPU, memory, graphics card, etc. Designed to be monitored and controlled via the Internet, C.O.M. Through GIGABYTE M.I .A. 2) is no longer need to open up to maximize ...
...these Unique Software Utilities, please check your MB features.) U-PLUS D.P.S. (Universal Plus Dual Power System) The U-Plus Dual Power System (U-Plus DPS) is returned to its initial status. As well, 4 ...circuit the "Clear CMOS" pins or the battery on the motherboard to reset the system back to -date drivers and BIOS. - 55 - Download Center Download Center allows ...® Pentium® 4 Processor as well as CPU, memory, graphics card, etc. Designed to be monitored and controlled via the Internet, C.O.M. Through GIGABYTE M.I .A. 2) is no longer need to open up to maximize ...

Manual
Page 58
Execute Backup Utility 2. Exit and Restart 1. Remove Backup Image 4. GIGABYTE Technology CO. , Ltd. 1. If you have already entered Xpress Recovery by booting from the CD-ROM, you can enter Xpress Recovery in ...powering on the computer. (Text Mode) Press F9 during powering on the computer . GA-8I915P Dual Graphic Motherboard - 58 - Intel 865PE AGPSet BIOS for 8IPE1000MT F1 Check System Health OK . . . It is recommended that Xpress Recovery be immediately installed after OS and all required driver and software installations are complete. English 2. Execute Restore Utility 3.
Execute Backup Utility 2. Exit and Restart 1. Remove Backup Image 4. GIGABYTE Technology CO. , Ltd. 1. If you have already entered Xpress Recovery by booting from the CD-ROM, you can enter Xpress Recovery in ...powering on the computer. (Text Mode) Press F9 during powering on the computer . GA-8I915P Dual Graphic Motherboard - 58 - Intel 865PE AGPSet BIOS for 8IPE1000MT F1 Check System Health OK . . . It is recommended that Xpress Recovery be immediately installed after OS and all required driver and software installations are complete. English 2. Execute Restore Utility 3.

Manual
Page 72
.../VOLUME INFORMATION ] Physical Disks : Port Driver Model 0 ST3120026AS 1 ST3120026AS Serial # 3JT354CP 3JT329JX Size Type/Status(Vol ID) 111.7GB Non-RAID Disk 111.7GB Non-RAID Disk [ ]-Select [ESC]-Exit [ENTER]-Select Menu GA-8I915P Dual Graphic Motherboard - 72 - The RAID prompt appears... to enter Configuration Utility Press Ctrl + I before the window disappears. Create RAID Volume 2. More information on the motherboard ie. Intel(R) Application Accelerator RAID Option ROM v4.0.6180 Copyright(C) 2003-04 Intel Corporation. RAID Volumes : None Defined. ...
.../VOLUME INFORMATION ] Physical Disks : Port Driver Model 0 ST3120026AS 1 ST3120026AS Serial # 3JT354CP 3JT329JX Size Type/Status(Vol ID) 111.7GB Non-RAID Disk 111.7GB Non-RAID Disk [ ]-Select [ESC]-Exit [ENTER]-Select Menu GA-8I915P Dual Graphic Motherboard - 72 - The RAID prompt appears... to enter Configuration Utility Press Ctrl + I before the window disappears. Create RAID Volume 2. More information on the motherboard ie. Intel(R) Application Accelerator RAID Option ROM v4.0.6180 Copyright(C) 2003-04 Intel Corporation. RAID Volumes : None Defined. ...

Manual
Page 76
... Normal Bootable Yes Physical Disks : Port Driver Model 0 ST3120026AS 1 ST3120026AS Serial # 3JT354CP 3JT329JX Size Type/Status(Vol ID) 111.7GB Member Disk(0) 111.7GB Member Disk(0) [ ]-Select [ESC]-Exit [ENTER]-Select Menu GA-8I915P Dual Graphic Motherboard - 76 - Delete RAID Volume 3.... 0 RAID_Volume0 [ DISK/VOLUME INFORMATION ] Level RAID(Stripe) Strip 128KB Size Status 223.5GB Normal Bootable Yes Physical Disks : Port Driver Model 0 ST3120026AS 1 ST3120026AS Serial # 3JT354CP 3JT329JX Size Type/Status(Vol ID) 111.7GB Member Disk(0) 111.7GB Member Disk(0)...
... Normal Bootable Yes Physical Disks : Port Driver Model 0 ST3120026AS 1 ST3120026AS Serial # 3JT354CP 3JT329JX Size Type/Status(Vol ID) 111.7GB Member Disk(0) 111.7GB Member Disk(0) [ ]-Select [ESC]-Exit [ENTER]-Select Menu GA-8I915P Dual Graphic Motherboard - 76 - Delete RAID Volume 3.... 0 RAID_Volume0 [ DISK/VOLUME INFORMATION ] Level RAID(Stripe) Strip 128KB Size Status 223.5GB Normal Bootable Yes Physical Disks : Port Driver Model 0 ST3120026AS 1 ST3120026AS Serial # 3JT354CP 3JT329JX Size Type/Status(Vol ID) 111.7GB Member Disk(0) 111.7GB Member Disk(0)...
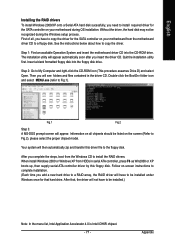
Manual
Page 77
...Fig.1). (Note) Fig.1 Fig.2 Step 3: A MS-DOS prompt screen will have to copy the driver for that hard drive. Step 1: Find an available Operation System and insert the motherboard driver CD into the floppy disk drive. Quit the installation utility first. Double-click the BootDrv folder icon...then supply serial ATA controller driver by this driver file to copy the driver. Step 2: Go to a floppy disk. First of all chipsets should be listed on your motherboard during the Windows setup process. When install Windows 2000 or Windows XP from the motherboard driver CD to My Computer and...
...Fig.1). (Note) Fig.1 Fig.2 Step 3: A MS-DOS prompt screen will have to copy the driver for that hard drive. Step 1: Find an available Operation System and insert the motherboard driver CD into the floppy disk drive. Quit the installation utility first. Double-click the BootDrv folder icon...then supply serial ATA controller driver by this driver file to copy the driver. Step 2: Go to a floppy disk. First of all chipsets should be listed on your motherboard during the Windows setup process. When install Windows 2000 or Windows XP from the motherboard driver CD to My Computer and...


