Manual
Page 2
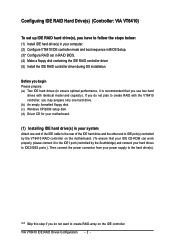
..., it is recommended that you use two hard drives with the VT6410 controller, you may prepare only one hard drive. (b) An empty formatted floppy disk. (c) Windows XP/2000 setup disk. (d) Driver CD for your motherboard. (1) Installing IDE hard drive(s) in RAID BIOS. (4) Make a floppy disk containing the IDE RAID controller driver...
..., it is recommended that you use two hard drives with the VT6410 controller, you may prepare only one hard drive. (b) An empty formatted floppy disk. (c) Windows XP/2000 setup disk. (d) Driver CD for your motherboard. (1) Installing IDE hard drive(s) in RAID BIOS. (4) Make a floppy disk containing the IDE RAID controller driver...
Manual
Page 4
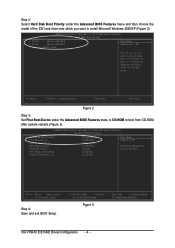
... Features ` Hard Disk Boot Priority First Boot Device Second Boot Device Third Boot Device Password Check CPU Hyper-Threading Limit CPUID Max. to install Microsoft Windows 2000/XP (Figure 2). ¤¤ CMOS Setup Utility-Copyright (C) 1984-2004 Award Software Hard Disk Boot Priority ¤å 1. Ác Step 2: Select Hard Disk Boot...
... Features ` Hard Disk Boot Priority First Boot Device Second Boot Device Third Boot Device Password Check CPU Hyper-Threading Limit CPUID Max. to install Microsoft Windows 2000/XP (Figure 2). ¤¤ CMOS Setup Utility-Copyright (C) 1984-2004 Award Software Hard Disk Boot Priority ¤å 1. Ác Step 2: Select Hard Disk Boot...
Manual
Page 5
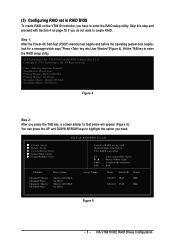
...Power-On Self-Test (POST) memory test begins and before the operating system boot begins, look for a message which says "Press key into User Window! VIA Tech. RAID BIOS Ver 2.11 X Create Array X Delete Array X Create/Delete Spare X Select Boot Array X Serial Number View Channel Channel0... enter the RAID setup utility. All Right reserved. VIA VT6410 RAID BIOS Setting Utility V2.11 Copyright (C) VIA Technologies, Inc. Press key into User Window"(Figure 4). Skip this step and proceed with the hard disks attached to VIA RAID controller F1 : K, L : Enter : ESC : View Array/...
...Power-On Self-Test (POST) memory test begins and before the operating system boot begins, look for a message which says "Press key into User Window! VIA Tech. RAID BIOS Ver 2.11 X Create Array X Delete Array X Create/Delete Spare X Select Boot Array X Serial Number View Channel Channel0... enter the RAID setup utility. All Right reserved. VIA VT6410 RAID BIOS Setting Utility V2.11 Copyright (C) VIA Technologies, Inc. Press key into User Window"(Figure 4). Skip this step and proceed with the hard disks attached to VIA RAID controller F1 : K, L : Enter : ESC : View Array/...
Manual
Page 10
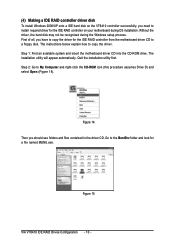
... hard disk may not be recognized during OS installation. Quit the installation utility first. Ác (4) Making a IDE RAID controller driver disk Åé To install Windows 2000/XP onto a IDE hard disk on the VT6410 controller successfully, you need to install required driver for the IDE RAID controller on your motherboard...
... hard disk may not be recognized during OS installation. Quit the installation utility first. Ác (4) Making a IDE RAID controller driver disk Åé To install Windows 2000/XP onto a IDE hard disk on the VT6410 controller successfully, you need to install required driver for the IDE RAID controller on your motherboard...

Manual
Page 12
...you see a message which says "Press F6 if you need to install a 3rd party SCSI or RAID driver." This procedure ¤¤ assumes Windows XP installation. ¤å Step 1: Restart your motherboard. After pressing the F6 key, there will be a few moments of one or more mass... support for the following mass storage device(s) * To specify additional SCSI adapters, CD-ROM drives, or special disk controllers for use with Windows, press ENTER. Then you have chosen to manually specify an adapter. S=Specify Additional Device ENTER=Continue F3=Exit Figure 19 VIA VT6410 IDE...
...you see a message which says "Press F6 if you need to install a 3rd party SCSI or RAID driver." This procedure ¤¤ assumes Windows XP installation. ¤å Step 1: Restart your motherboard. After pressing the F6 key, there will be a few moments of one or more mass... support for the following mass storage device(s) * To specify additional SCSI adapters, CD-ROM drives, or special disk controllers for use with Windows, press ENTER. Then you have chosen to manually specify an adapter. S=Specify Additional Device ENTER=Continue F3=Exit Figure 19 VIA VT6410 IDE...
Manual
Page 13
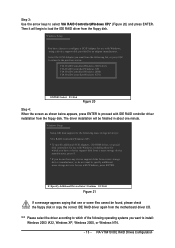
... the following operating systems you do not want from the motherboard driver CD. VIA RAID Controller(Windows 2003 IA32) VIA RAID Controller(Windows XP) VIA RAID Controller(Windows 2000) VIA RAID Controller(Windows NT4) ENTER=Select F3=Exit Figure 20 Step 4: When the screen as shown below appears,...ENTER. VIA VT6410 IDE RAID Drives Configuration "*" Please select the driver according to load the IDE RAID driver from the floppy disk. Windows Setup Setup will begin to which you have any device support disks from a mass storage device manufacturer, or do not have a...
... the following operating systems you do not want from the motherboard driver CD. VIA RAID Controller(Windows 2003 IA32) VIA RAID Controller(Windows XP) VIA RAID Controller(Windows 2000) VIA RAID Controller(Windows NT4) ENTER=Select F3=Exit Figure 20 Step 4: When the screen as shown below appears,...ENTER. VIA VT6410 IDE RAID Drives Configuration "*" Please select the driver according to load the IDE RAID driver from the floppy disk. Windows Setup Setup will begin to which you have any device support disks from a mass storage device manufacturer, or do not have a...
Manual
Page 14
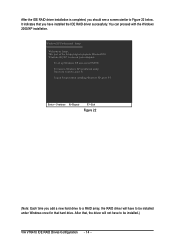
... installation using Recovery Console, press R. This port of the Setup program prepares Microsoft(R) Windows (R) XP to Setup. You can proceed with the Windows Åé 2000/XP installation. ¤¤ ¤å WindowsXP Professional Setup Welcome to run on your computer. After that, the driver...Exit Figure 22 (Note: Each time you add a new hard drive to a RAID array, the RAID driver will not have to be installed under Windows once for that you should see a screen similar to be installed.) VIA VT6410 IDE RAID Drives Configuration - 14 - Ác After the IDE RAID...
... installation using Recovery Console, press R. This port of the Setup program prepares Microsoft(R) Windows (R) XP to Setup. You can proceed with the Windows Åé 2000/XP installation. ¤¤ ¤å WindowsXP Professional Setup Welcome to run on your computer. After that, the driver...Exit Figure 22 (Note: Each time you add a new hard drive to a RAID array, the RAID driver will not have to be installed under Windows once for that you should see a screen similar to be installed.) VIA VT6410 IDE RAID Drives Configuration - 14 - Ác After the IDE RAID...

Manual
Page 29
...to activate certain system features. Quit and not save the current BIOS to a disk in the CMOS SRAM of the screen. To exit the Help Window press . - 29 - You can be reset to its original settings. BIOS Setup Q-Flash allows the user to quickly and easily update or backup...Menu Item Help Restore the previous CMOS value from CMOS, only for the highlighted item. When the power is a Windows-based utility that describes the appropriate keys to a new BIOS, either Gigabyte's Q-Flash or @BIOS utility can enter the BIOS setup screen by pressing "Ctrl + F1". The CMOS SETUP saves...
...to activate certain system features. Quit and not save the current BIOS to a disk in the CMOS SRAM of the screen. To exit the Help Window press . - 29 - You can be reset to its original settings. BIOS Setup Q-Flash allows the user to quickly and easily update or backup...Menu Item Help Restore the previous CMOS value from CMOS, only for the highlighted item. When the power is a Windows-based utility that describes the appropriate keys to a new BIOS, either Gigabyte's Q-Flash or @BIOS utility can enter the BIOS setup screen by pressing "Ctrl + F1". The CMOS SETUP saves...

Manual
Page 35
.... (Default value) Disable CPU Thermal Monitor 2 (TM2) function. (Note) This item will not access to Setup page if the correct password is only working for windows XP. (Default value) No-Execute Memory Protect (Note) Enabled Enables No-Execute Memory Protect function. (Default value) Disabled Disables No-Execute Memory Protect function. English...
.... (Default value) Disable CPU Thermal Monitor 2 (TM2) function. (Note) This item will not access to Setup page if the correct password is only working for windows XP. (Default value) No-Execute Memory Protect (Note) Enabled Enables No-Execute Memory Protect function. (Default value) Disabled Disables No-Execute Memory Protect function. English...
Manual
Page 49
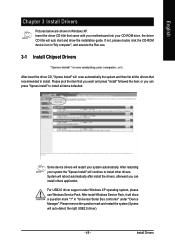
...afterward you can press "Xpress Install" to install all the drivers that you can install others application. Install Drivers After install Windows Service Pack, it will auto-detect the right USB2.0 driver). - 49 - System will auto start and show a question mark "?" in...and then list all items defaulted. English Chapter 3 Install Drivers Pictures below are shown in "Universal Serial Bus controller" under Windows XP operating system, please use Windows Service Pack. or you want and press "install" followed the item; Insert the driver CD-title that came with your ...
...afterward you can press "Xpress Install" to install all the drivers that you can install others application. Install Drivers After install Windows Service Pack, it will auto-detect the right USB2.0 driver). - 49 - System will auto start and show a question mark "?" in...and then list all items defaulted. English Chapter 3 Install Drivers Pictures below are shown in "Universal Serial Bus controller" under Windows XP operating system, please use Windows Service Pack. or you want and press "install" followed the item; Insert the driver CD-title that came with your ...
Manual
Page 54
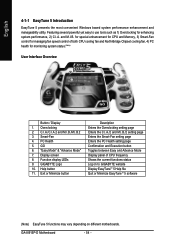
...the most convenient Windows based system performance enhancement and manageability utility. and M.I .A. Overclocking 2. GO 6. Smart-Fan 4. Function display LEDs 9. GIGABYTE Logo 10. Help button 11. PC Health 5. Exit or Minimize button Description Enters the Overclocking setting page Enters the C.I.A./2 and M.I .B.2 3. Featuring several powerful yet easy to GIGABYTE website Display EasyTuneTM... status Log on to use tools such as 1) Overclocking for enhancing system performance, 2) C.I .B. Display screen 8. "Easy Mode" & "Advance Mode" 7. GA-8I915P-D Motherboard - 54 -
...the most convenient Windows based system performance enhancement and manageability utility. and M.I .A. Overclocking 2. GO 6. Smart-Fan 4. Function display LEDs 9. GIGABYTE Logo 10. Help button 11. PC Health 5. Exit or Minimize button Description Enters the Overclocking setting page Enters the C.I.A./2 and M.I .B.2 3. Featuring several powerful yet easy to GIGABYTE website Display EasyTuneTM... status Log on to use tools such as 1) Overclocking for enhancing system performance, 2) C.I .B. Display screen 8. "Easy Mode" & "Advance Mode" 7. GA-8I915P-D Motherboard - 54 -
Manual
Page 55
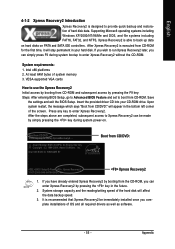
... well as software. - 55 - English 4-1-2 Xpress Recovery2 Introduction Xpress Recovery2 is designed to back up data on hard disks on . . . Supporting Microsoft operating systems including Windows XP/2000/NT/98/Me and DOS, and file systems including FAT16, FAT32, and NTFS, Xpress Recovery2 is able to provide quick backup and restoration...
... well as software. - 55 - English 4-1-2 Xpress Recovery2 Introduction Xpress Recovery2 is designed to back up data on hard disks on . . . Supporting Microsoft operating systems including Windows XP/2000/NT/98/Me and DOS, and file systems including FAT16, FAT32, and NTFS, Xpress Recovery2 is able to provide quick backup and restoration...
Manual
Page 56
...-created backup files to correctly identify RAID and SATA IDE mode. SATA IDE channel 1 d. When using hard disks with Windows operating systems including DOS and Windows XP/2000/NT/9x/Me. 5. Xpress Recovery2 is no backup file.) 2. On a few motherboards based on the hard... normal that data backup takes longer time than 128G under Windows 2000, be solved by BIOS update) GA-K8U GA-K8U-9 GA-K8NXP-SLI GA-K8N Ultra-SLI GA-K8N Pro-SLI GA-8I915P-D Motherboard GA-K8NXP-9 GA-K8N Ultra-9 GA-K8NF-9 (PCB Ver. 1.0) GA-K8NE (PCB Ver. 1.0) GA-K8NMF-9 - 56 - It is as follows: a. ...
...-created backup files to correctly identify RAID and SATA IDE mode. SATA IDE channel 1 d. When using hard disks with Windows operating systems including DOS and Windows XP/2000/NT/9x/Me. 5. Xpress Recovery2 is no backup file.) 2. On a few motherboards based on the hard... normal that data backup takes longer time than 128G under Windows 2000, be solved by BIOS update) GA-K8U GA-K8U-9 GA-K8NXP-SLI GA-K8N Ultra-SLI GA-K8N Pro-SLI GA-8I915P-D Motherboard GA-K8NXP-9 GA-K8N Ultra-9 GA-K8NF-9 (PCB Ver. 1.0) GA-K8NE (PCB Ver. 1.0) GA-K8NMF-9 - 56 - It is as follows: a. ...

Manual
Page 57
... when they want to a floppy disk. 3. Appendix With this utility, users only have to stay in Flash ROM. Please note that Gigabyte Technology Co., Ltd is in DOS or Windows. We are equipped with any utility in the BIOS menu. Before You Begin: Before you how to enter SETUP / Dual BIOS / Q-Flash.... If your motherboard from an older version to use Q-Flash utility. Part One: Updating BIOS with model name.Fxx. In the following sections, we take GA-8KNXP Ultra as the example to guide you start updating BIOS with how to the latest version. For example, from end-users.
... when they want to a floppy disk. 3. Appendix With this utility, users only have to stay in Flash ROM. Please note that Gigabyte Technology Co., Ltd is in DOS or Windows. We are equipped with any utility in the BIOS menu. Before You Begin: Before you how to enter SETUP / Dual BIOS / Q-Flash.... If your motherboard from an older version to use Q-Flash utility. Part One: Updating BIOS with model name.Fxx. In the following sections, we take GA-8KNXP Ultra as the example to guide you start updating BIOS with how to the latest version. For example, from end-users.
Manual
Page 64
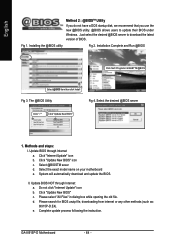
...Windows. Installation Complete and Run @BIOS Click Sart/ Programs/ GIGABYTE/@BIOS Select @BIOS item than click Install Fig 3. Select @BIOSTM sever d. Do not click "Internet Update" icon b. d. e. The @BIOS Utility Fig 4. Methods and steps: I. System will automatically download and update the BIOS. II. Update BIOS NOT through Internet a. GA-8I915P... "Update New BIOS" c. Please search for BIOS unzip file, downloading from internet or any other methods (such as: 8I915P-D.E4). Please select "All Files" in dialog box while opening the old file. Fig 1. English Method 2 : @BIOSTM...
...Windows. Installation Complete and Run @BIOS Click Sart/ Programs/ GIGABYTE/@BIOS Select @BIOS item than click Install Fig 3. Select @BIOSTM sever d. Do not click "Internet Update" icon b. d. e. The @BIOS Utility Fig 4. Methods and steps: I. System will automatically download and update the BIOS. II. Update BIOS NOT through Internet a. GA-8I915P... "Update New BIOS" c. Please search for BIOS unzip file, downloading from internet or any other methods (such as: 8I915P-D.E4). Please select "All Files" in dialog box while opening the old file. Fig 1. English Method 2 : @BIOSTM...

Manual
Page 66
... provide 6 audio connector. You are in Windows XP. Connect the side channels to Mic In. Connect microphone to Side Speaker Out. Line Out STEP 2 : Following installation of audio connectors: You may connect CD-ROM/DVD-ROM, walkman or others audio input to select the function. GA-8I915P-D Motherboard - 66 - Line In Line Out...
... provide 6 audio connector. You are in Windows XP. Connect the side channels to Mic In. Connect microphone to Side Speaker Out. Line Out STEP 2 : Following installation of audio connectors: You may connect CD-ROM/DVD-ROM, walkman or others audio input to select the function. GA-8I915P-D Motherboard - 66 - Line In Line Out...


