Manual
Page 1
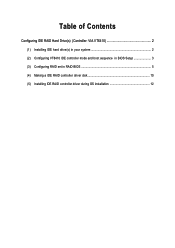
Table of Contents Configuring IDE RAID Hard Drive(s) (Controller: VIA VT6410 2 (1) Installing IDE hard drive(s) in your system 2 (2) Configuring VT6410 IDE controller mode and boot sequence in BIOS Setup 3 (3) Configuring RAID set in RAID BIOS 5 (4) Making a IDE RAID controller driver disk 10 (5) Installing IDE RAID controller driver during OS installation 12
Table of Contents Configuring IDE RAID Hard Drive(s) (Controller: VIA VT6410 2 (1) Installing IDE hard drive(s) in your system 2 (2) Configuring VT6410 IDE controller mode and boot sequence in BIOS Setup 3 (3) Configuring RAID set in RAID BIOS 5 (4) Making a IDE RAID controller driver disk 10 (5) Installing IDE RAID controller driver during OS installation 12
Manual
Page 2
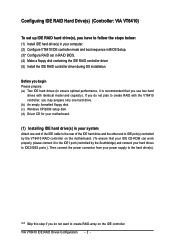
... up IDE RAID hard drive(s), you may prepare only one hard drive. (b) An empty formatted floppy disk. (c) Windows XP/2000 setup disk. (d) Driver CD for your motherboard. (1) Installing IDE hard drive(s) in RAID BIOS. (4) Make a floppy disk containing the IDE RAID controller... driver (5) Install the IDE RAID controller driver during OS installation. "*" Skip this step if you do not plan to create RAID with identical model and capacity). Before you begin ...
... up IDE RAID hard drive(s), you may prepare only one hard drive. (b) An empty formatted floppy disk. (c) Windows XP/2000 setup disk. (d) Driver CD for your motherboard. (1) Installing IDE hard drive(s) in RAID BIOS. (4) Make a floppy disk containing the IDE RAID controller... driver (5) Install the IDE RAID controller driver during OS installation. "*" Skip this step if you do not plan to create RAID with identical model and capacity). Before you begin ...
Manual
Page 10
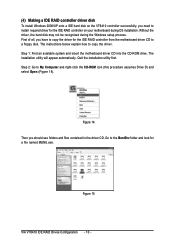
... 1: Find an available system and insert the motherboard driver CD into the CD-ROM drive. Step 2: Go to install required driver for the IDE RAID controller from the motherboard driver CD to ¤å a floppy disk. Ác (4) Making a IDE RAID controller driver disk Åé To install Windows 2000/XP ...motherboard during the Windows setup process. First of all, you should see folders and files contained in the driver CD. Figure 14 Then you have to copy the driver for the IDE RAID controller on the VT6410 controller successfully, you need to My Computer and right-click ...
... 1: Find an available system and insert the motherboard driver CD into the CD-ROM drive. Step 2: Go to install required driver for the IDE RAID controller from the motherboard driver CD to ¤å a floppy disk. Ác (4) Making a IDE RAID controller driver disk Åé To install Windows 2000/XP ...motherboard during the Windows setup process. First of all, you should see folders and files contained in the driver CD. Figure 14 Then you have to copy the driver for the IDE RAID controller on the VT6410 controller successfully, you need to My Computer and right-click ...
Manual
Page 11
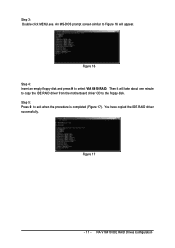
Figure 16 Step 4: Insert an empty floppy disk and press H to exit when the procedure is completed (Figure 17). You have copied the IDE RAID driver successfully. Then it will appear. VIA VT6410 IDE RAID Drives Configuration Figure 17 - 11 - Step 3: Double-click MENU.exe. Step 5: Press 0 to select VIA 6410 RAID. An MS-DOS prompt screen similar to Figure 16 will take about one minute to copy the IDE RAID driver from the motherboard driver CD to the floppy disk.
Figure 16 Step 4: Insert an empty floppy disk and press H to exit when the procedure is completed (Figure 17). You have copied the IDE RAID driver successfully. Then it will appear. VIA VT6410 IDE RAID Drives Configuration Figure 17 - 11 - Step 3: Double-click MENU.exe. Step 5: Press 0 to select VIA 6410 RAID. An MS-DOS prompt screen similar to Figure 16 will take about one minute to copy the IDE RAID driver from the motherboard driver CD to the floppy disk.

Manual
Page 12
... disks from the Windows 2000/XP Setup disk and press F6 as soon as you see the next screen for use with the IDE RAID driver. Windows Setup Setup could not determine the type of some files being loaded before you see a message which says "Press F6 if you to ... IDE RAID controller on your system, or you need to specify additional mass storage devices for you need to install a 3rd party SCSI or RAID driver. This procedure ¤¤ assumes Windows XP installation. ¤å Step 1: Restart your motherboard. Then you will be asked to select the IDE RAID controller...
... disks from the Windows 2000/XP Setup disk and press F6 as soon as you see the next screen for use with the IDE RAID driver. Windows Setup Setup could not determine the type of some files being loaded before you see a message which says "Press F6 if you to ... IDE RAID controller on your system, or you need to specify additional mass storage devices for you need to install a 3rd party SCSI or RAID driver. This procedure ¤¤ assumes Windows XP installation. ¤å Step 1: Restart your motherboard. Then you will be asked to select the IDE RAID controller...
Manual
Page 13
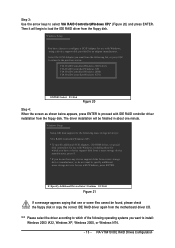
... support disks from a mass storage device manufacturer, or do not have chosen to configure a SCSI Adapter for use with IDE RAID controller driver installation from the motherboard driver CD. The driver installation will be found, please check the floppy disk or copy the correct IDE RAID... support disk from the floppy disk. VIA VT6410 IDE RAID Drives Configuration Select the SCSI Adapter you do not want to load the IDE RAID driver from a mass storage device manufacturer, press S. * If you want to select VIA RAID Controller(Windows XP)* (Figure 20) and press ENTER. S=Specify ...
... support disks from a mass storage device manufacturer, or do not have chosen to configure a SCSI Adapter for use with IDE RAID controller driver installation from the motherboard driver CD. The driver installation will be found, please check the floppy disk or copy the correct IDE RAID... support disk from the floppy disk. VIA VT6410 IDE RAID Drives Configuration Select the SCSI Adapter you do not want to load the IDE RAID driver from a mass storage device manufacturer, press S. * If you want to select VIA RAID Controller(Windows XP)* (Figure 20) and press ENTER. S=Specify ...
Manual
Page 14
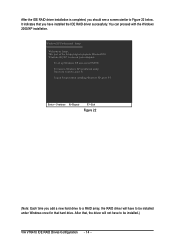
...After that hard drive. To repair a Windows XP installation using Recovery Console, press R. Ác After the IDE RAID driver installation is completed, you have installed the IDE RAID driver successfully. This port of the Setup program prepares Microsoft(R) Windows (R) XP to Setup. To quit Setup without installing Windows ...Exit Figure 22 (Note: Each time you add a new hard drive to a RAID array, the RAID driver will not have to be installed under Windows once for that , the driver will have to Figure 22 below. You can proceed with the Windows Åé 2000/XP installation. ...
...After that hard drive. To repair a Windows XP installation using Recovery Console, press R. Ác After the IDE RAID driver installation is completed, you have installed the IDE RAID driver successfully. This port of the Setup program prepares Microsoft(R) Windows (R) XP to Setup. To quit Setup without installing Windows ...Exit Figure 22 (Note: Each time you add a new hard drive to a RAID array, the RAID driver will not have to be installed under Windows once for that , the driver will have to Figure 22 below. You can proceed with the Windows Åé 2000/XP installation. ...

Manual
Page 5
Chapter 3 Install Drivers 49 3-1 Install Chipset Drivers 49 3-2 SoftwareApplications 50 3-3 Driver CD Information 50 3-4 Hardware Information 51 3-5 Contact Us ...51 Chapter 4 Appendix 53 4-1 Unique Software Utilities 53 4-1-1 EasyTune 5 Introduction 54 4-1-2 Xpress Recovery2 Introduction 55 4-1-3 Flash BIOS Method Introduction 57 4-1-4 2- / 4- / 6- / 8- Channel Audio Function Introduction 66 4-2 Troubleshooting 70 - 5 -
Chapter 3 Install Drivers 49 3-1 Install Chipset Drivers 49 3-2 SoftwareApplications 50 3-3 Driver CD Information 50 3-4 Hardware Information 51 3-5 Contact Us ...51 Chapter 4 Appendix 53 4-1 Unique Software Utilities 53 4-1-1 EasyTune 5 Introduction 54 4-1-2 Xpress Recovery2 Introduction 55 4-1-3 Flash BIOS Method Introduction 57 4-1-4 2- / 4- / 6- / 8- Channel Audio Function Introduction 66 4-2 Troubleshooting 70 - 5 -
Manual
Page 16
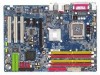
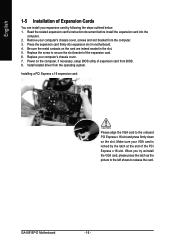
... onboard PCI Express x 16 slot and press firmly down on the slot. GA-8I915P-D Motherboard - 16 - Make sure your computer's chassis cover. 7. Be sure the metal contacts on the computer, if necessary, setup BIOS utility of the expansion card. 6. Install related driver from the computer. 3. Installing a PCI Express x 16 expansion card: Please align...
... onboard PCI Express x 16 slot and press firmly down on the slot. GA-8I915P-D Motherboard - 16 - Make sure your computer's chassis cover. 7. Be sure the metal contacts on the computer, if necessary, setup BIOS utility of the expansion card. 6. Install related driver from the computer. 3. Installing a PCI Express x 16 expansion card: Please align...
Manual
Page 17
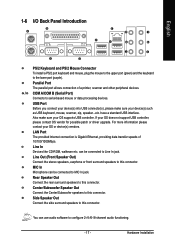
... the keyboard to this connector. For more information please contact your OS does not support USB controller, please contact OS vendor for possible patch or driver upgrade. Line Out (Front Speaker Out) Connect the stereo speakers, earphone or front surround speakers to serial-based mouse or data processing devices. USB Port...
... the keyboard to this connector. For more information please contact your OS does not support USB controller, please contact OS vendor for possible patch or driver upgrade. Line Out (Front Speaker Out) Connect the stereo speakers, earphone or front surround speakers to serial-based mouse or data processing devices. USB Port...

Manual
Page 21
One IDE connector can connect to one IDE device as Master and the other as Slave (for the Serial ATA and install the proper driver in order to work properly, please attach it to the instructions located on settings, please refer to the IDE 1 connector. 40 39 2 1 2 40 1 39 7) SATA0/...
One IDE connector can connect to one IDE device as Master and the other as Slave (for the Serial ATA and install the proper driver in order to work properly, please attach it to the instructions located on settings, please refer to the IDE 1 connector. 40 39 2 1 2 40 1 39 7) SATA0/...
Manual
Page 49
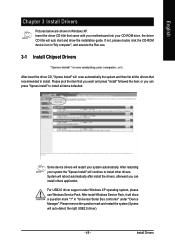
...under Windows XP operating system, please use Windows Service Pack. English Chapter 3 Install Drivers Pictures below are shown in "My computer", and execute the Run.exe. 3-1 Install Chipset Drivers After insert the driver CD, "Xpress Install" will scan automatically the system and then list all items ...CD-ROM device icon in Windows XP. Some device drivers will restart your CD-ROM drive, the driver CD-title will auto-detect the right USB2.0 driver). - 49 - For USB2.0 driver support under "Device Manager". Insert the driver CD-title that came with your motherboard into your system...
...under Windows XP operating system, please use Windows Service Pack. English Chapter 3 Install Drivers Pictures below are shown in "My computer", and execute the Run.exe. 3-1 Install Chipset Drivers After insert the driver CD, "Xpress Install" will scan automatically the system and then list all items ...CD-ROM device icon in Windows XP. Some device drivers will restart your CD-ROM drive, the driver CD-title will auto-detect the right USB2.0 driver). - 49 - For USB2.0 driver support under "Device Manager". Insert the driver CD-title that came with your motherboard into your system...
Manual
Page 50
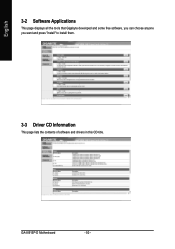
English 3-2 Software Applications This page displays all the tools that Gigabyte developed and some free software, you can choose anyone you want and press "install" to install them. 3-3 Driver CD Information This page lists the contents of software and drivers in this CD-title. GA-8I915P-D Motherboard - 50 -
English 3-2 Software Applications This page displays all the tools that Gigabyte developed and some free software, you can choose anyone you want and press "install" to install them. 3-3 Driver CD Information This page lists the contents of software and drivers in this CD-title. GA-8I915P-D Motherboard - 50 -

Manual
Page 51
English 3-4 Hardware Information This page lists all device you have for this motherboard. 3-5 Contact Us Please see the last page for details. - 51 - Install Drivers
English 3-4 Hardware Information This page lists all device you have for this motherboard. 3-5 Contact Us Please see the last page for details. - 51 - Install Drivers
Manual
Page 53
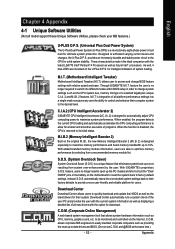
... to be monitored and controlled via the Internet, C.O.M. for download. Through GIGABYTE M.I .B. 2 features. Instead, S.O.S. automatically resets the overclocked system settings back to their factory defaults to -date drivers and BIOS. (Do not use C.O.M. Download Center automatically runs a system ... providing the most up to 10%. C.I.A.2 (CPU Intelligent Accelerator 2) GIGABYTE CPU Intelligent Accelerator 2(C.I .T.) allows user to access and change system settings such as the latest drivers for solid system stability. When enabled, the program detects the current ...
... to be monitored and controlled via the Internet, C.O.M. for download. Through GIGABYTE M.I .B. 2 features. Instead, S.O.S. automatically resets the overclocked system settings back to their factory defaults to -date drivers and BIOS. (Do not use C.O.M. Download Center automatically runs a system ... providing the most up to 10%. C.I.A.2 (CPU Intelligent Accelerator 2) GIGABYTE CPU Intelligent Accelerator 2(C.I .T.) allows user to access and change system settings such as the latest drivers for solid system stability. When enabled, the program detects the current ...
Manual
Page 55
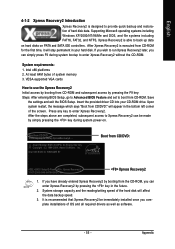
...VESA-supported VGA cards How to boot from CD/DVD: Press any key to back up data on hard disks on . . . Insert the provided driver CD into your hard disk. Boot from CD-ROM. Appendix Intel x86 platforms 2. After the steps above are completed, subsequent access to Xpress Recovery2 can... be immediately installed once you can enter Xpress Recovery2 by pressing the key in the bottom left corner of OS and all required drivers as well as software. - 55 - Save the settings and exit the BIOS Setup. Award Modular BIOS v6.00PG, An Energy Star Ally Copyright ...
...VESA-supported VGA cards How to boot from CD/DVD: Press any key to back up data on hard disks on . . . Insert the provided driver CD into your hard disk. Boot from CD-ROM. Appendix Intel x86 platforms 2. After the steps above are completed, subsequent access to Xpress Recovery2 can... be immediately installed once you can enter Xpress Recovery2 by pressing the key in the bottom left corner of OS and all required drivers as well as software. - 55 - Save the settings and exit the BIOS Setup. Award Modular BIOS v6.00PG, An Energy Star Ally Copyright ...
Manual
Page 56
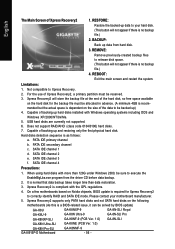
BACKUP: Back up data from the driver CD before data backup. 2. Limitations: 1. Capable of Xpress Recovery2 1. PATA...3. Xpress Recovery2 is a BIOS-related issue, it can be reserved. 3. SATA IDE channel 3 f. GA-8N-SLI Royal GA-8N-SLI Pro GA-8N-SLI REBOOT: Exit the main screen and restart the system. RESTORE: English Restore the backed-up )... for the backup file must be solved by BIOS update) GA-K8U GA-K8U-9 GA-K8NXP-SLI GA-K8N Ultra-SLI GA-K8N Pro-SLI GA-8I915P-D Motherboard GA-K8NXP-9 GA-K8N Ultra-9 GA-K8NF-9 (PCB Ver. 1.0) GA-K8NE (PCB Ver. 1.0) GA-K8NMF-9 - 56 -
BACKUP: Back up data from the driver CD before data backup. 2. Limitations: 1. Capable of Xpress Recovery2 1. PATA...3. Xpress Recovery2 is a BIOS-related issue, it can be reserved. 3. SATA IDE channel 3 f. GA-8N-SLI Royal GA-8N-SLI Pro GA-8N-SLI REBOOT: Exit the main screen and restart the system. RESTORE: English Restore the backed-up )... for the backup file must be solved by BIOS update) GA-K8U GA-K8U-9 GA-K8NXP-SLI GA-K8N Ultra-SLI GA-K8N Pro-SLI GA-8I915P-D Motherboard GA-K8NXP-9 GA-K8N Ultra-9 GA-K8NF-9 (PCB Ver. 1.0) GA-K8NE (PCB Ver. 1.0) GA-K8NMF-9 - 56 -

Manual
Page 66
... Connection and Settings: We recommend that you find a Sound Effect icon on the lower right hand taskbar. Introduction of the audio driver, you use 2-/ 4-/6-/8-channnels audio feature by audio software selection. GA-8I915P-D Motherboard - 66 - STEP 1: Connect the stereo speakers or earphone to Line In. Channel Audio Function Introduction This motherboard provide 6 audio...
... Connection and Settings: We recommend that you find a Sound Effect icon on the lower right hand taskbar. Introduction of the audio driver, you use 2-/ 4-/6-/8-channnels audio feature by audio software selection. GA-8I915P-D Motherboard - 66 - STEP 1: Connect the stereo speakers or earphone to Line In. Channel Audio Function Introduction This motherboard provide 6 audio...

Manual
Page 67
... - Click the icon to "Rear Speaker Out". STEP 3: Click "Speaker Configuration" then click on the lower right hand taskbar. STEP 2 : Following installation of the audio driver, you find a Sound Effect icon on the left selection bar and select "2CH Speaker" to complete 2 channel audio configuration. 4 Channel Audio Setup STEP 1 : Connect the...
... - Click the icon to "Rear Speaker Out". STEP 3: Click "Speaker Configuration" then click on the lower right hand taskbar. STEP 2 : Following installation of the audio driver, you find a Sound Effect icon on the left selection bar and select "2CH Speaker" to complete 2 channel audio configuration. 4 Channel Audio Setup STEP 1 : Connect the...

Manual
Page 68
... the lower right hand taskbar. STEP 2 : Following installation of the audio driver, you find a Sound Effect icon on the left selection bar and select "6CH Speaker" to "Center/Subwoofer Speaker Out". Front Speaker Out Rear Speaker Out Center/Subwoofer Speaker Out GA-8I915P-D Motherboard - 68 - English 6 Channel Audio Setup STEP 1 : Connect the front...
... the lower right hand taskbar. STEP 2 : Following installation of the audio driver, you find a Sound Effect icon on the left selection bar and select "6CH Speaker" to "Center/Subwoofer Speaker Out". Front Speaker Out Rear Speaker Out Center/Subwoofer Speaker Out GA-8I915P-D Motherboard - 68 - English 6 Channel Audio Setup STEP 1 : Connect the front...


